The Grow Awards 2026 🏆 


Likes
Comments
Share
@BasedBuds_89
Follow
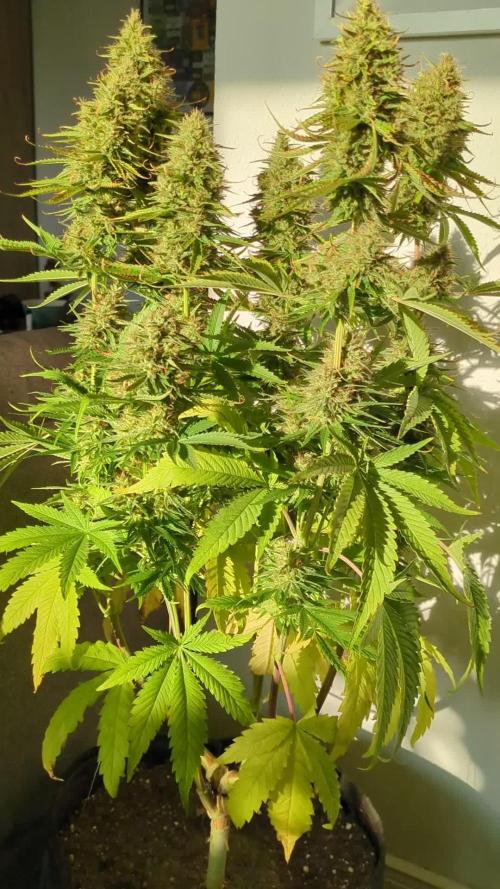
Had a good week overall. I decided to cut back on watering a bit to allow some stress to set in and allow these babies to grow a bit mo. Hopefully loosening up the soil will help a bit with the slow root growth. Wish me luck!
Likes
33
Share
@GrowmieDeLaStreet
Follow
First week of plain water but the fading occurred much sooner than that. The chop is set on the 15th of September so very close! Almost all of the trichomes have turned to milky.
I plucked a couple more seeds to see the stage and they're pretty much all ready. I decided to separate them in different bags depending on what plant they grew on. I believe the ones that only had the hermie's genetic should logically be worst than the others so it's better to keep them seperate.
We'll see each other again on the 15th :)
____________________________________________________________________________
Edit:
I realized that I miscalculated a lot of things and that my diary is not as accurate as I wanted it to be. The correct chop date would be the 12th of September. The trichomes that are still clear still have a bit of time to turn white. I switch to 48hrs of darkness on the 10th.
Likes
17
Share
@CanabisLoverHobbyGrower
Follow
Zkittles defo hit stretch this week and started showing more bud sites, smoothie has been as straight forward as always ,.. everything looks good to me, defoliating zkittles is crazy, the rate the leaves grow back I've never seen anything like it but hopefully now will start putting the effort into the bud sites,... roll on next week 👌

Likes
35
Share
@Hiroots420
Follow
Impecable cosecha de Sweet Cheese, se llenó todo el espacio de secado de buenas cabezas, próximamente actualizaré números finales de cantidades pero hasta el momento se lo ve muy prometedor.

Likes
4
Share
@Nordgrow
Follow
3 der 5 wurden gespült um die Ernte vorzubereiten.
Die Trichome sind größtenteils milchig und wenige bernsteinfarben.
Ende der Woche werden diese 3 geerntet.
Ich denke die Ernte wird massiv ausfallen. Die Blüten sind kompakter als erwartet.
Übrig bleiben der kleine Phänotyp und der ganz große, wobei der große bei weitem noch nicht fertig ist.
Der kleine braucht nicht mehr viel länger, evtl noch eine oder zwei Wochen.
Die nächsten Pflanzen warten schon auf den Einzug 🏻

Processing
Likes
2
Share
@krst97
Follow
I cut the plant after 48 hours of total darkness. To flush the best, I ran a few dozen liters of water through the jar until the one that came out below was transparent. Although the flowers failed to close, I am satisfied with the result and the smell of the buds inspires a good terpene. To dry well, I moved the grow box to the room with an air conditioner. I'm keeping the temperature around 26-27 degrees and the humidity around 50%.
Likes
4
Share
@CK-OrgGrow
Follow
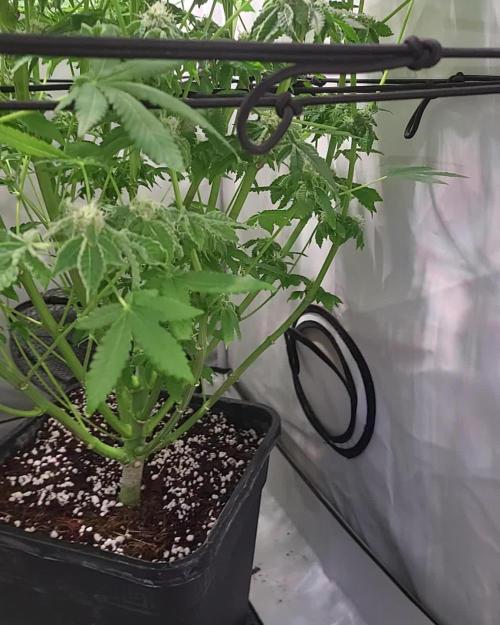
Woche 3
Die Money maker wächst wie die Woche zu vor weiterhin gut,
Die Wurzeln sind zwar nicht ultra weiß aber mir egal die Pflanze sieht gut aus und die Wurzeln auch nix ist Tot oder schleimig. DWC geht auch ohne Wasserstoffperoxid.
Bei Fragen einfach die Frage stellen, genauso bei Verbesserungen und Tipps für mich.
Danke und viel spaß mit euren Pflanzen.

Likes
11
Share
@Bluntblazer66
Follow
Mar 31st
Week 16
Mar 30 Changed nutrients to straight Dense Bud Compactor 1 gram / litre @ 900-1000 ppm for 2 days
I will add the rest of the nutrients to the existing solution on April 1st
April 1st
Fresh nutrients today from the straight Dense Bud Compactor to 8 litres of fresh water with all the nutrients + 6 litres of the existing Dense Bud solution @ 1100 ppm

Likes
7
Share
@Kevs_Best
Follow
DE:
In der sechsten Blütewoche erreichen beide Last Dance-Phänotypen ihren absoluten Höhepunkt – visuell, aromatisch und energetisch. Der erste Phäno zeigt sich in seiner vollen „Black Magic“-Pracht: ultra funky, tief dunkelgrün bis leicht violett schimmernd, mit unglaublich dichten, klebrigen Colas. Das Harzlevel ist enorm – selbst die Fächerblätter glitzern vor Trichomen. Sein Geruch ist intensiv, fast berauschend: eine Mischung aus schwerem Funk, süß-gassigen Noten und einer tiefen, dunklen Würze, die an die Black Magic-Eltern erinnert. Die Struktur ist kräftig und perfekt ausbalanciert, jede Blüte wirkt kompakt und voller Energie.
Der zweite Phänotyp geht klar in die fruchtigere Richtung und zeigt deutliche Einflüsse der Zangria-Eltern. Die Buds sind etwas heller, dafür aber extrem aromatisch – ein süß-tropischer Duft nach Beeren, Trauben und leichter Zitrusfrische steigt bereits beim Vorbeigehen in die Nase. Optisch lässt er sich klar vom ersten Phäno unterscheiden: weniger dunkel, dafür mit leichten pink-lilafarbenen Einschlägen und sehr harmonischer Blütenstruktur. Auch hier ist die Harzproduktion auf Top-Niveau, aber der Gesamteindruck wirkt etwas „leichter“ und verspielter.
Insgesamt ist die sechste Blütewoche ein absolutes Spektakel – der erste Phäno steht für pure Funky-Energie und Tiefe, während der zweite mit fruchtiger, lebendiger Süße glänzt. Beide repräsentieren perfekt die genetische Bandbreite von Last Dance: Power, Charakter und ein unverwechselbarer, komplexer Terpenausdruck.
EN:
In the sixth week of flowering, both Last Dance phenotypes are at their absolute peak – visually, aromatically, and energetically. The first pheno fully embraces its Black Magic heritage: ultra funky, dark green with a slight purple hue, and packed with insanely dense, sticky colas. The resin coverage is off the charts – even the fan leaves sparkle with trichomes. Its aroma is deep and intoxicating: heavy funk, sweet gas, and dark spicy notes that perfectly capture that Black Magic vibe. The structure is strong and balanced, every bud looking compact and full of energy.
The second pheno clearly leans toward the fruitier Zangria side. Its buds are slightly brighter but bursting with aroma – sweet tropical notes of berries, grapes, and a hint of citrus freshness. Visually, it stands apart from the first pheno: less dark, with subtle pinkish-purple tones and a beautifully even flower structure. Resin production is also at its peak, but the overall impression feels lighter, more playful.
Overall, week six is a real show – the first pheno embodies raw funky depth, while the second shines with juicy, fruity sweetness. Together, they capture the full Last Dance spectrum: power, personality, and a truly complex terpene expression.
Likes
57
Share
@Regenwurm
Follow
Nichts besonderes! Die Seeds sind gekeimt wie geplant, wurden dann sofort in Steinwolle gesetzt. Nach 3 Tagen in der Steinwolle waren alle Ladies am Tageslicht. Nach nur 2 Tagen in der Steinwolle direkt in coco töpfe 1 l eingesetzt. Klima ist nicht ganz perfekt, bekomme es aber nicht besser für diese Phase hin. Ventilator läuft 24/7, besonders für die kritische Zeit ohne Wärme der HID Lampe arbeite ich in den Wochen 1-5 mit CO2 Bags, da ich wegen dem Klima (draußen 0 Grad) keine direkte Zuluft nutzen kann.

Likes
5
Share
@Budking420
Follow
Shes doing alright despite my issues of overwatering and using old soil. I added ac infinity self watering bases to the grow. They should help a lot with the issues & improve this grow. I hope that you enjoy it & look forward to the imorivements. Check back next week to see just how fast they grow & remember its 4:20 somewhere!
Likes
21
Share
@TheGanjaFarmer
Follow
Starting to ripen a lot this week and put on more size on the buds, she is getting near the end very happy with how she is going, swapped my light schedule back to 20/4 for last few weeks, Started giving her some PK also.


Likes
5
Share
@Dr_THC_420
Follow
The smell of these 2 girls are amazing , smells like berries / fruit , and really fresh , I have trained them quite a lot so the flowering has delayed but the amount of bud sights are unbelievable and are all really starting to fatten , said it once and I’ll say it again , blackberry 420 fast buds best strain/seeds I have ran to date I have loved watching this plant grow and bloom into what she is now carnt wait for some more colour to come through
Likes
Comments
Share
@eldruida_lamota
Follow
Vamos familia, actualizamos la tercera semana de floración de estas Black Rainbow de Seedstockers, salieron las 3 de 3, 100% ratio éxito.
Aplicamos varios productos de Agrobeta, que son increíbles para aportar una buena alimentación a las plantas.
Temperatura y humedad dentro de los rangos correctos dentro de la etapa de floración.
La tierra utilizada es al mix top crop, por cambiar.
De 3 ejemplares seleccioné los 2 mejores para completar el indoor y trasplanté directamente a macetas de 7 litros, cambien el fotoperiodo a 12/12 y aplique una buena poda de ramas bajas, se ven bien sanas las plantas, tienen un buen color y progresan a muy buen ritmo por el momento, ya empezaron a formarse las flores.
Agrobeta:
https://www.agrobeta.com/agrobetatiendaonline/36-abonos-canamo
Hasta aquí todo, Buenos humos 💨💨💨


