The Grow Awards 2026 🏆 


Likes
6
Share
@IamCy
Follow
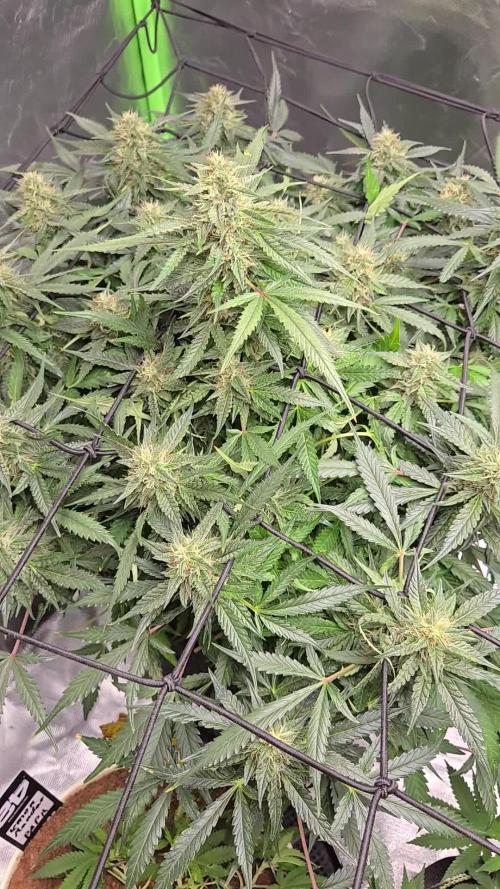
Week 6...........
Getting frosty
Edit: on day 41,I already have amber but it's still packing on weight. I don't know what to do at this point.
Likes
48
Share
@Theia
Follow
I am very happy with the Chiquita Bananas in the end. Clones were total seed factories but I think we may have a go at making some hash with those as the foot long buggers are caked in crystal.. 62g and 63g .
Plant 1 is just a monster for me 365g wet. Long dense buds thick dank smell of tropical sweets. Not as much seed as I thought there would be so glad I was convinced to push her a bit more.
Plant 2 is smaller but has taken a pure turn in the last week.i don't think she was stressed at Al. I did switch to just water for last 10 days but apart from that I dunno. I don't think she has any thing with pure in her genetics but either way she looks beautiful. 169g wet from her.
Everything is drying for the next 10 days when I shall report back.
Happy grows.🌿🌱👊
Stay safe.😷

Likes
126
Share
@WhiteWidow
Follow
Day 1 , week 5.
As i was going trough the tent i said their names so raise the volume.
Remo chemo is absolute beast so far..


Likes
47
Share
@blazin_skywalker
Follow
Day 22 - Rolling into week 4 looking mean and green! 💪
I need to make a decision on what kind of training I want to dish out to this lady. She's growing a bit faster than her tent mates.
Day 23 - Always experimenting - today I begin my first mainline! I've already built the foundation by allowing the plant to grow to 6 nodes, as recommended by the tutorial I followed by the brilliant Miss Nebula Haze @growweedeasy.
My next step is documented here in a video, as I take my lush, happy, healthy plant, and give her the kind of haircut that makes you want to storm out of the salon without leaving a tip. 😂
I even managed to get in my signature branch snap early in the game - being held together now with duct tape. 🤦♀️
In all seriousness though, I'm thrilled to be trying this out, despite the agony of cutting down my plant to nothing but a stump and antennae. I've seen some great growers create some serious masterpieces using this method, and damn it my curiosity is taking control!
Here's to learning something new!
Day 27 - Came home from vacation to find that my plant had hulked through the duct tape that held her snapped branch together... I guess she's doing well. ☺️ Over the course of the past few days her branches have gotten notably thicker! 💪
Day 28 - Now that each new main stem has grown out, I removed all the growth tips from below the 3rd node on each side. I left the fan leaves in tact to give plant access to extra energy as she pushes through this intense training.
I softened the branches with my fingers, very slowly, to tie down my new main stems horizontally across the net basket.
I took a sterilized x-acto knife to then top each of my two main stems at the 3rd node on each side, leaving me with a beautifully symmetrical base to my masterpiece.

Likes
14
Share
@MrGrowDiarie
Follow
Day 56
The plant is looking very healthy and vigorous at this stage of flowering. The canopy is completely filled out under the SCROG net, and the structure is well maintained, allowing all the main colas to receive even light exposure. Bud development has really accelerated over the past week; the flowers are stacking nicely and the buds are noticeably denser than before. There is a visible increase in trichome production, with sugar leaves already showing a heavy coating of resin. The aroma is becoming stronger and more complex, with a noticeable sweet and earthy scent whenever the tent is opened.
The leaves are a deep green color, indicating that nutrient levels are well balanced at the moment. There are no visible signs of major deficiencies or toxicity, although some of the older fan leaves at the bottom are starting to fade slightly, which is normal for this stage of flowering. The plant appears to be focusing its energy on bud production rather than vegetative growth, which is exactly what I want right now. Pistils are still mostly white, but some are beginning to turn orange, which suggests the plant is approaching its final weeks

Processing
Likes
28
Share
@BudsBanditUK
Follow
She has the most amazing smell. Looking very healthy with some chunky looking buds already. Still taking full feeds with no issue. I think this is going to be stunning.


Likes
Comments
Share
@Mnterpteam
Follow
Yeah this pheno is the frostiest plant I’ve seen. Starting to smell like a sweet vanilla GAS. Everything staying healthy, she’s starting to bulk up and show a little bit of purple colors.


Likes
Comments
Share
@stashio
Follow
Really easy grow, I just followed the manufactures instructions on lights and fertilizer. I did give the Finale a miss to see if I didn't get fox tailing, I didnt so i'll give it a miss when its hot and see the results.
I'm trying the short diary format as I was spending more time filling it in some weeks than looking after my plants but I still like the record to look back on.
Likes
5
Share
@84ruk
Follow
The strain is really good. I harvested it when the trichomes were milky and it had a very energizing and uplifting effect. I'll definitely grow it again now with better care and the knowledge I've gained. I harvested around 20 grams dry.


Likes
18
Share
@Grow4Releaf
Follow
Only fed the bigger plant #2 . The first is getting cloudy just waiting for her to go alil further .
Will update more this week but their getting closer.
Likes
7
Share
@Abendkraut
Follow
4th week of bloom
green sensation is now added into the nutrs water mix.
The flowers are nicely growing and smell is clearly changing.
22/03 New video

Likes
6
Share
@Weedman268
Follow
This strain is a really nice strain to grow and if you are a dessert 🍨 person you would love this strain, tho I lost all my main tops to mold nugs was to big and to dense, so lots a ventilation needed for this strain.
Likes
52
Share
@KnightRider
Follow
Well Cannafam weve come to the end(not of us i still love you 💚)
Firstly i would just like to say a massive thanks to Divine Seeds for letting me take part 😊
I gave her the chop yesterday slightly earlier than planned as the nute burn had started getting near the buds and i didnt want to compromise bud quality.
The trichomes on the upper half of the plant are mostly cloudy with a few amber and some beautiful pink ones also, however pics shown are mainly from the lower buds due to slight issues trying to keep buds still while aligning the phone/magnifier 😊
This gal grew like an absolute beast throughout the cycle and i would say is the most rapid ive grown! She was absolutley honking in the end and i can't wait to sample her sweet buds. Overall this grow has been immensly enjoyable and il deffo be growing again at some point.
Ive not done wet weight as yet as i didnt want to chop her monster buds up, but once dry il trim further and give the final weight with smoke report and further photos.
Thank you to everyone who has commented/liked and i hope you've enjoyed this diary 😊
Peace and Love Friends ✌️💚💚💚
********** Update*************
Hey Cannafam,
Well ive tried this gal after curing in my vape and very happy. After drying there was a fair bit of shrinkage but the smoke is lovely. As soon as you take a bit she stops all thoughts in the mind immediately followed by complete muscle release and i would say moderate pain relief.
A medium strength Erb good for the evening and i just chilled out watchin southpark and fell asleep shortly after for a really good nights sleep which is perfect for me, i will definitely grow this gal again 😊✌️

Likes
42
Share
@Only4passion
Follow
First feeding of week 3 juste before taking pictures!!
😁🍀✌️
Day 17 one of the gorilla melon looking not really happy after feeding!! She was doing great I don’t really know yet if it’s a deficiency or over feeding but I’ keep an eye on it 💚✌️
Day 18 I accidentally dropped a full bottle of water on my gorilla melon, which split in two at the base and break the pot😭she wasn’t able to stand alone so I hold her luck she continue to grow 🍀💚✌️
Processing
Likes
4
Share
@MallorcaBreeders
Follow
Los Riegos con abono son alternados, ay semanas que riego 4 días y otras de 3 días, Los riegos con bnzym y prosilicate los realizo a parte del resto de abonos, en esos días que alterno.
The irrigations with fertilizer are alternating, ay weeks that I irrigate 4 days and others of 3 days, the irrigations with bnzym and prosilicate I realize them to part of the rest of installments, in those days that alternate.


Likes
100
Share
@AsNoriu
Follow
Day 30. Girls are perky at the beginning of day, but 20 hours looks like pain for them, I tried 20/4 and was running only 18/6 after, 24/0 even worse for esthetics.
Girls got first feed 400 ppm a week ago, so I went with 800 .... It's was way too much for them. Need now 3 pure water waterings to bring food levels to normal ;)))
Stemps are thick, branches growing, so I am happy and don't worry. Diesels would eat all by the way and they look best ;)
Day 33. Install second wall fan , trimmed bottoms a bit, took few leaves here and there and positioned them for last time .
Next watering feed finally !!! ;)))) I think they recovered and are ready for more !!! ;)))
GC looks worst, NL very unstable with size, AD smallest plant lost one branch by my clumsiness, but still are looking like I love plants to be.
Happy Growing !!!
