


Likes
Comments
Share


@Adkguerrilla44
Follow
I cannot talk up wicked genetics enough man,they are strong and stable plants and honestly since the temps have been continuing to drop these suckers have been LOVING IT!!! I am going to start some boston kreme pie S1s very shortly for my indoor grow. I have so many amazing strains from wicked I can't wait for this winter it's going to be insanity 🤯😵😵💫😎


Likes
11
Share


@GoodTimesOrganics
Follow
Hi liebe Community and Welcome Back! 💚
Wir sehen den ersten Tetraploidgrow meinerseits.
Die Pflanze hat von Beginn an einen guten Start hingelegt und sieht richtig Vital und Munter aus 😉
Nach der vierten Wachstumswoche, geht die Pflanze in einen heftigen Wachstumsboost! Sie hat alle anderen Pflanzen überholt in der Höhe wie auch in der Breite.
Ich habe die Seitentriebe etwas zur Seite gebogen, worauf sie sehr gut reagiert haben. Dadurch bekommen sie etwas mehr Licht ab.
Ihr Aroma ist sehr grün und frisch, so ein wenig wenn frisch der Rasen gemäht würde, allerdings mit einer leichten typischen Cannanote.
Die Bedingungen im Growschrank sind Top!
—————
🌞 Temp: 21
🌚 Temp: 18°C bis 19°C
💨 RH: 58%
VPD: 0,75 kPa
💡ppfd: 330 mpm
—————


Likes
10
Share


@Alvareas
Follow
Die Pflanze ist nicht weiter in die Höhe gewachsen und bleibt bei einer Gesamthöhe von 65 cm.
Ab jetzt liegt der Fokus vollständig auf der Blütenentwicklung.
Genau das war im Verlauf der Woche deutlich zu beobachten.
Die Abstände zwischen den einzelnen Blüten an den Hauptrieben haben sich deutlich verkürzt.
Die Blüten schwellen sichtbar an, und erste Trichome sind klar zu erkennen.
Auch der Geruch wird deutlich intensiver.
Am ehesten erinnert er mich an überreifes Obst, ohne dass ich eine konkrete Obstsorte benennen könnte.
Er wirkt fruchtig-süß mit einer säuerlichen Note und einem leichten, etwas derben Skunk-Unterton.
In dieser Ausprägung ist das Aroma auf jeden Fall interessant.
Die LED habe ich auf 50 % gestellt; das entspricht etwa 750 PPFD und einem DLI von 33.
Eventuell erhöhe ich die Leistung im Laufe der nächsten Woche weiter, um auf 800 bis 1000 PPFD zu kommen.
Die Luft war diese Woche sehr trocken, wodurch der VPD deutlich gestiegen ist.
Den Luftbefeuchter werde ich trotzdem nicht wieder in Betrieb nehmen.
Die Parameter in Woche 10:
Controller Einstellung Tag: Temperatur und Luftfeuchtigkeit 24C°-26C°, 45% - 55%
Controller Einstellung Nacht: Temperatur und Luftfeuchtigkeit 24C°-26C°, 45% - 55%
Durchschnittliche Tagestemperatur: 28,1C°
Durchschnittliche Nachttemperatur: 24,3C°
Durchschnittliche Luftfeuchtigkeit Tag: 43,7%
Durchschnittliche Luftfeuchtigkeit Nacht: 48,3%
Durchschnittlicher VPD Tag: 1,7
Durchschnittlicher VPD Nacht: 1,2
Durchschnittliche Bodenfeuchtigkeit in Mbar: 85
LED Leistung: 50% = 150 Watt
Beleuchtungsdauer: 12 Stunden
Umluft: Stufe 2 oszillierend

Likes
2
Share


@pHilosophy420
Follow
Day 35 Update
Both plants have officially entered the stretch phase this week. I did some additional LST to keep the plants even and opened up the structure a bit more. A light defoliation was done as well to make sure all the stems are getting plenty of light and airflow. Flowering started toward the end of the week, things are looking strong and healthy so far.

Likes
3
Share


@Saskbud7
Follow
Started the new week off with a feeding. The girls are looking healthy.
Week has gone good. Not sure where to continue tying down some branches that are already overhanging the pot... but I shall figure something out. Fed them again on day 6 of the week.
Gonna try and let then get wider in the tent before I flower!


Likes
13
Share

@GreenEldritchGardens
Follow
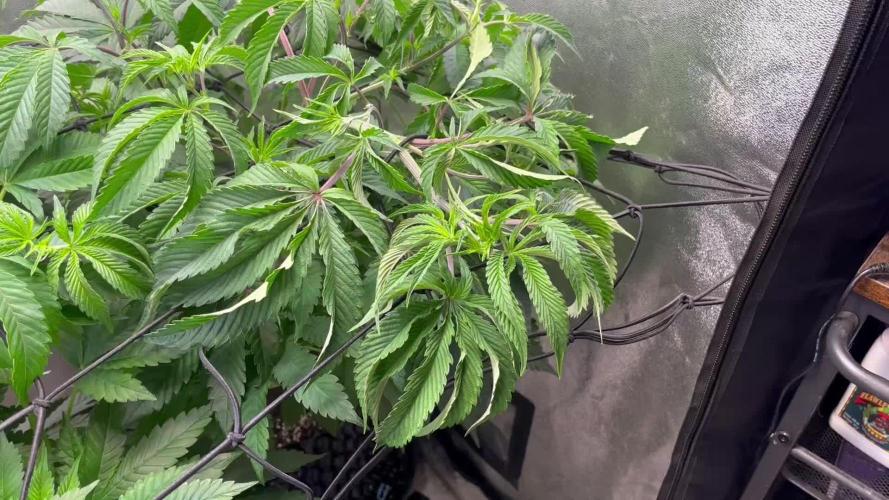
Scrog time! Finally the space on the tent was there and could lower this plant a bit that was getting too high.
So far I really like The Curse, big leaves very sativa like with big fingers, tall and vigorous plant.
Gonna flip her soon to 12/12 later unfortunately not much time lollipop before.

Likes
14
Share


@Terpyboyz
Follow
So this grow came to a finshed but I had a. Few issues that’s held me up from finishing up the diary, but in due time I will reupload it all in order soon. But over all I will also update with a final weigh in of each strain produced so stay tuned 🤙🏻🔥


Processing
Likes
29
Share


@Grey_Wolf
Follow
Ginger Nut cookies & Aussie music video's 5th March 2020
Flowering Begins .......................................
My little creation is officially Flowering folks!!
After stretching upwards about 30cm all tips are developing little Budlets. I started to see minor signs of Nitrogen deficiency from a coupleof bottom leaves that
suddenly began to yellow. This is fairly normal as the plant would have needed as much (nitrogen) as it could get doing all that stretching.
I needed to feed half strength grow nutes ( professors nutrients) @1ml/L three times during the last 7 days.
Now that the stretch seems to have slowed right down I will start to add some Dr Greenthumbs Bud n Bloom mix ( aprox qtr of a cup).
I'll also keep using LST to allow as much light to penetrate as possible. 👍
**** Now for the Weekly Australian Music Videos ***
Last week I posted Links to songs from the Artist Paul Kelly , they were Sleep Australia Sleep and Dumb Things.
I hope you listened to them but that's your preference whether you choose to or not.
Anyhoo This weeks Artist is a real Blast from the Past!! The bands called Daddy Cool
and Ive selected a couple of their quite catchy tunes that were recorded way back in the 1970's
Firstly is a Classic here in australia this is....
Eagle Rock https://www.youtube.com/watch?v=oQfAZVsz6KM
And the other song is Come back again
https://youtu.be/oIG9osPPILM
I am sure these will have you bopping along to their cool and laid back Musical style.
Hope you Enjoy and please leave a like if you do
& I'll be back next week with another grow update and Aussie music Video 💪👌👍
Likes
12
Share


@BeHappyNtoke
Follow
Man I can not wait til she finishes drying and curing she smells amazing I will be trying to reveg her so I can hopefully try my hand at her again this time in a huge pot she definitely deserves it


Likes
61
Share


@eneRgygrow
Follow
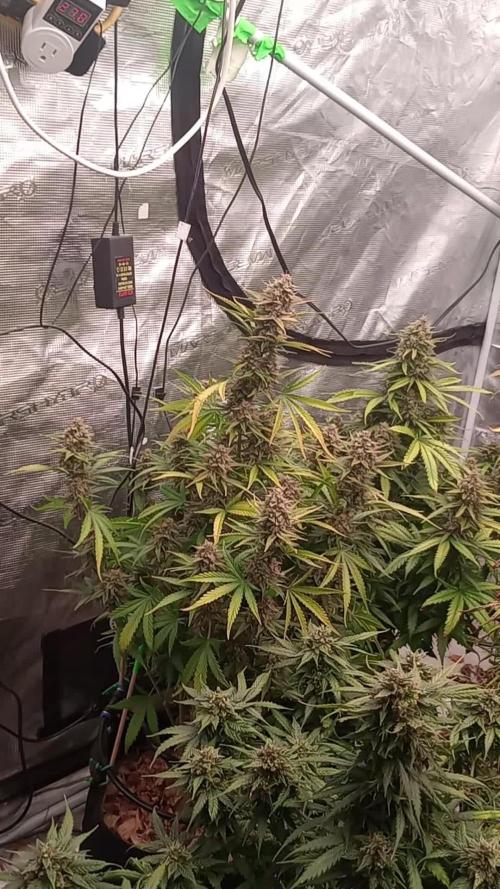
Week 11 has started and the buds are going good! Smell is really strong.
Just watch the Video :)
I hope the buds will fatten up a bit more!
Day 39 - I have found some Thrips in my garden 😟 gonna start fight against them with some predatory mites, buut they will arrive at Day 43
Day 40 - already some milkdy trichomes


Likes
47
Share


@KA_LE
Follow
I decided this week to start adding nutrients at a very low dose at 1/8th of the recommended dose. I'm quite happy with how growth is progressing so far. There is a slight deformation in one of the first leaves but i'm not worried about it at this stage.
Likes
2
Share


@SSKNFbyHAZE
Follow
Hi Growmies~!
What This Post is About
Today, I'll be recording how to cultivate soil microbes at home.
These microbes offer numerous benefits, and they are simple to make.
How I Came Up with This Technique
Since 2014, I’ve tried synthetic growing methods like DWC. While they gave quick results, I often ran into issues with consistency.
Nutrients would expire during breaks, meaning I had to keep buying new bottles.
I strongly felt I needed a change.
A couple of years ago, after taking a break, I started to research and switched to organic growing.
At first, it felt overwhelming with all the steps and prep work, but I saw real potential.
After experimenting with different methods, I came across Korean Natural Farming (KNF) and JADAM, introduced by Mr. Cho.
His simple, ultra low-cost techniques inspired me. They focus on letting nature do the work.
While growing,
I noticed that synthetic nutrient bottles were expensive, especially when trying to complete a full nutrient set.
Organic growing may require more attention and can be costly when investing in organic materials.
Preparing the soil in advance and top dressing with dry nutrients every other week - just these two methods were consuming space, time, and money.
Indoor farming is unnatural, while organic farming is a natural approach.
I had to bring these ideas together, but organic farming often seems geared toward large plots like farms.
Incorporating organic techniques into my indoor garden requires a lot of effort and careful calculations.
So this is one of my techniques for keeping my plants happy:
supporting their daily needs helps them snap out of deficiencies quickly, allowing them to grow consistently.
It took me a while to adapt this technique for indoor use.
I hope this helps, guys!
Supplies Needed
- Potatoes: Provide nutrients and food for the microbes.
- Sea Salt: Stimulates microbial activity and controls harmful organisms.
- Dechlorinated Water: Allows the microbes to grow and multiply.
- Compost, leaf mold, or worm castings: Contains natural microorganisms that are key for this process.
How to Make (1 gallon)
1 cooked potato (about 2 golf ball-sized)
1 pinch of sea salt
2 tablespoons compost or worm castings
1 gallon dechlorinated water
1. Mix Ingredients: In a clean container, fill it with the dechlorinated water, dissolve the sea salt, and add the compost along with the mashed potato.
2. Ferment: Optionally cover the container and let it sit at room temperature for 24-48 hours.
3. Strain (Optional): After fermentation, you can strain the solution if you prefer a clearer liquid.
Note: Watch the timelapse video to see how the microbes activate!
**WARNING**
Wear gloves if possible and/or avoid contact with open wounds
How to Use
IMPORTANT: Always dilute the solution before applying it to plants.
- Use when bubbles form a "pizza shape" on the surface.
- Dilute 5-10 ml per liter of water for bi-weekly feeding. (Test a small batch first to find the best rate for your setup.)
- Once the bubbles disappear, the microbes are likely inactive. You can either mix the rest with water as fertilizer or discard it.
Pros
Promotes Plant Growth
- Usually fixes deficiencies in as little as 6 to 72 hours.
- Improves nutrient absorption, and helps plants thrive.
Boosts Plant Immunity
- Works as IPM: Can be used as foliar sprays (no staining on leaves).
- Lowers the risk of powdery mildew and other diseases.
- Helps the soil ecosystem with beneficial organisms like predatory mites and springtails.
- Naturally reduces pest pressure (Less risk of fungus gnats and other pests).
Improves Soil Health & Supports Composting
- Quickly breaks down organic matter and nutrients.
- Makes growing organically in small containers, like 1-gallon pots, easy.
- Over time, soil becomes softer and richer, even in small pots.
Cost-Effective, Sustainable & Eco-Friendly
- No need for complex equipment like pH pens, air pumps, or other tools.
- Reduces the need for CalMag, N-P-K, or micronutrient supplements (just add a little bit of sea salt to every watering).
- No sugar sources needed in the soil.
- Works for all types of plants—houseplants, exotics, ornamentals, and crops.
Cons
- Limited shelf life; the solution will develop an unpleasant odor after a certain period.
1 Corinthians 10:26
Likes
17
Share


@HowtoBubatz
Follow
We’re in the seventh week of flowering, and the plant is looking absolutely stunning!
It’s starting to show beautiful purple colors in many places, all the way through the buds. The colors are really popping, and it’s giving the plant such a unique look.
On top of that, it’s smelling incredibly sweet—strong and fragrant every time I open the tent! 🍬🌿
Most of the trichomes are now a milky white, which is exactly where I hoped they’d be at this point. I’m sticking to the BioBizz week 7 bloom schedule, knowing it’s almost time for the flush. 🌱💧
Everything is going so well, and I’m beyond excited to see how it turns out in the final stages. Just one more week before the flush, and then we’re almost there! 😁✨
Likes
6
Share


@MmaJunkie420
Follow
Final week papaya was 10/10 frozen biscotti smells even better the zkittlez I picked up was a real old school pheno and we got done heavy colas one of the frozen biscotti is behind a little hoping it tightens up abit before the 12th as they all need chopping together unfortunately but overall been a nice run.



Likes
161
Share


@FrontRowAG_BrianG
Follow
⭐️⭐️🌲WEEK 4 FLOWER🌲⭐️⭐️
Nutrient Line This Week (all nutrients are mixed direct to reservoir in this order)
Front Row AG Part A 3.1g per gallon
Front Row AG Part B 2.1g per gallon
Front Row AG Phoszyme .4g per gallon
Front Row AG Bloom 2.4g per gallon
Front Row AG CleanUp .2g per gallon
I am not sponsored by Front Row AG or any company for that matter. I simply use the products I’ve come to like and use techniques I’ve come to know work well.
Temp 82/ humidity 55-60%/ leaf temp 80
CO2 1500ppm/ PAR 1400/ VPD 1.4
I’ve been using a higher temp higher humidity during flower for a few years now. The plants seem to love it. They are absolutely sucking down CO2 right now. Last week of veg/beginning of flower a 20lb tank lasted 10 days. Now I use 2 in 10 days. You can literally watch them grow by the day at this stage.
Plants are fed with drip tubes for 90 seconds 15 minutes after lights on and for 40 seconds 3 hours before lights off.
So far very few mistakes have been made and the new Front Row AG nutrients are very very good.
If anyone has any questions don’t hesitate to ask. See you next week.
