


Likes
17
Share


@volcanic
Follow
10/12/2023 - Plants are all looking great!
11/12/2023 - Just taking some fan leaves out and keep watching 😋
15/12/2023 - All good, already we can see the 3 different phenos expressing

Likes
13
Share


@masterofsmeagol
Follow
7/20 Went over this morning to plants soaking wet and heavy rain. Went back around 4pm and plants actually look really good. The rain has stopped for a bit and the girls looked great. Apart from some septoria leaves I needed to defoliate on the first plant I treated. I also noticed a few others on other plants so it's spreading albeit slowly. I treated the three in the middle with their second dose of Plant Doctor at 3tsp/1gal. One gallon administered to each plant via root drench. I think I may treat the other plant showing signs with a diy Dr. Zymes using citric acid as the active ingredient. That way I Gould start treatment right away without having to rely fully on plant doctor. Plus it would kill any pests. Ive seen damage but the birds do a number on them. I dont want to spray my plants with a bunch of chemicals if I don't have too. I shouldve replaced the pallets and cleaned the cage better. I think I did a good job sanitizing as I have no wpm. Just this septoria I probably got when the lady mowing the lawn cut all tjis fucking grass and blew it in my pen, throwing bird seed and I'm sure tons of disease into my grow bags. I literally had to harvest a bunch if fucking sunflowers. It looked like my plants had been mulched. Just with small disease carrying shrubs. At some point some of this stuff has to be on purpose. You CAN'T be that stupid. A couple kushes in the back look hungry. I think I may need to up my feed. I've written to much. I'll keep this updated. Thanks if you made it this far.
7/21 I guess it rained last night. Oh well. It was blue skies for hours before dark. It must've rained late/early morning. I'm sure the app of plant doctor will be fine. Like I said I'm considering using citric acid as a foliar spray to help with the septoria and clean up any pests. I don't have enough pests to warrant spraying. I just don't want to put all my eggs in the plant doctor basket. Today is overcast and windy. The wind has really assisted in spreading this virus. I remove anything I see infected immediately and since these plants are reveges they have plenty of leaves. Plants are really stretching. I know I talk about the septoria a lot but realistically if someone looked through my garden they'd have a hard time spotting it. I don't want to exaggerate the problem but I don't like dealing with ANY fungus or molds.
7/22 It was 55° this morning when I went over. I defoliated some septoria leaves and a few that were fading or damaged. I saw almost a whole leaf eaten so it's probably a good idea to move forward with citric acid. I can add that to the plants I've already treated with plant doctor. This is the first year it's been so noticeable. It's the reveg 10th planet that started this off. Oh well. I've dealt with MUCH worse. Plants LOOK good (other than septoria leaves (on bottom of plant). Today is water day for me but it's been raining and it's a lot cooler today. Bags still had weight to them. I want them to have a proper wet dry cycle. Temps top out at 75° so I'll monitor during the day and if something NEEDS WATER I'll give it to it. I'm suprised I have ZERO WPM. The septoria is much more identifiable but pm is usual present in these conditions bur I don't have a spot of it. I may do some defoliation today. I also need to add supports for flowering but one thing at a time.
EDIT: Went over around noon. 70°. Bags seem to be holding weight (it was easier to tell as ONE plant was substantially lighter than the rest) so I decided to hold off on watering. At least until tonight. There are three plants (at least that are going to NEED water). They look phenomenal now though and we've had lots of rain. Plan is to go over later and get the light ones and mix the water for the others so I can administer it in the morning quickly. I have an early doctor's appointment but I don't to overwater or water unnecessarily just because. But when you grow alone sometimes you need to do things when your able. I have people there that would help if I asked. And I have before but its late . I'm very grateful. I defoliated quite a few septoria leaves. They were all from the bottom of the plant. A couole wete bottom interior. I know there are worse things to contend with but still a pain.
EDIT #2 WENT BACK AT FOUR AND PLANTS LOOKED FANTASTIC AND STILL HELD WEIGHT. THE REVEG MK ULTRA IN EARLY FLOWER "MAY" HAVE STARTED TO DROOP AND "SEEMED" LIGHT. THE LARGE SPECIAL KUSH FUETHEST IN FLOWER BY THE DOOR WAS ALSO EXRRENELY LIGHT. I HAVE AN EARLY DOCTORS APPOINTMENT BUT DONT WANT TO OVER WATER MY PLANTS JUST BECAUSE IM IN A HURRY. ITS COOLER THIS WEEK. 70 TODAY AND HIGH OF 80 TOMORROW BUT DAD SAID THATS NOT UNTIL THE AFTERNOON. I MIXED UP ENOUGH WATER TO WATER EVERYTHING IN THE MORNING IF IT NEEDS IT. I HAVE AN IMPORTANT DOCTORS APPOINTMENT EARLY THAT WILL TAKE ME AWAY AND IM FEELING A LITTLE ILL SO I WANTED TO GET DONE WHAT I COULD TODAY. WATERED THE TWO THAT NEEDED IT WITH TWO GALLONS A PIECE (30GAL REVEG MK ULTRA AND THE BIG SPECIAL KUSH IN FRONT I DIDNT TOP THATS FLOWERING THE FASTEST. EVERYTHING ELSE CAN WAIT.
7/24 Surprisingly the plants still held weight this morning! The looked pretty good too! However its going to be highs in the 80's for the next 7 days. Since the plants still had some heft to them I watered everything just a gallon. I gave the 10s a half gallon and skipped the 50gal container plant. I think this is a good happy medium. I'm still seeing random septoria leaves but still no WPM. I defoliate daily sometimes a couple times. I need to get a minute to myself and add a foliar spray. I'll start with a dih Dr. Zymes while I'm looking into other products like bicilus (i have bt but its a different bicilus) or trichodermia. I need to feed sometime this week too.
7/25 Plants looked great this morning. I watered the 10th planet on the end that hadn't been watered in forever. I think I had been overwatering during those 100° days. I didn't water today as everything looks great and they don't seem to need it. I'll check later today. I did water the pink kush beside the 50 as it was much lighter (1/2 gal) to get it on par with the others. I'm starting to see pest damage as well so I think an app of Dr. Zymes would be a good idea. Both for pests and septoria. Plants are REALLY stretching. One special Kush is far ahead of the others.
EDIT:WENT OVER AT NOON AND 4PM. PLANTS LOOKED GREAT APART FROM MIRE SEPTORIA ON THE 10TH PLANET. I NEED TO WATERING DIFFERENT IN THESE TEMPS. IT WAS BREEZY AND 80° BUT THE BAGS DIDNT FEEL TOTALLY LIGHT AND THE PLANTS LOOKED AWESOME! THE HUGE EARLY FLOWERING SPECIAL KUSH IS PRETTY DAMN LUGHT BUT ITS PRAYING AMD LOOKING GREAT. I DECIDED TO WATER AND FEED IN THE MORNING AND HOPFULLY APPLY A DR. ZYMES PRODUCT ON THE ENTIRE GARDEN IN THE EVENING. PLANTS LOOK HUNGRY AND I HAVE RANDOM PESTS. ITS MOSTLY FOR THE FUNGACIDE ASPECT. PLANT SOCTOR SEEMS TO BE WORKING GREAT ON TWO OUT OF THE THREE I USED IT ON. THE THIRD IS A REVEG AND HAS TONS OF FOLIAGE I NEED TO ADDRESS AND CLEAN OUT. IT SEEMS LIKE IT WILL SPIT OFF SOME SEPTORIA LEAVES A DAY OR TWO BEFORE ANOTHER APP IS DUE. I'M LOOKING INTO MY OPTIONS. IF ANY OF YOU HAVE A SURE DIRE WAY TO DEAL WITH LEAF SEPTORIA IN EARLY FLOWER HIT ME UP! IM NOT TOO WORRIED THOUGH. I CAN SUPPRESS IT ENOUGH IF I HAVE TO EVEN IF I GOTTA SPRAY THE LEAVES WITH THAT 9.0PH ALKALINE WATER.


Likes
23
Share

@J4kpvp
Follow
Hey guys:)
Easy week again, I just watered them, took out the leaves that fell of and killed some bugs.
The bottom leaves fall of on their own now, buds start to really fatten up. It looks like the wasabi is done very soon, like a week or 2 max and the sangrias need like 3 more weeks at least..
Looking forward to the next weeks:) Just watching the buds becoming bigger by the day is really satisfying now:)

Likes
30
Share

@All_our_small_plants
Follow
Bewässerung: 2000 ml jeden 2 Tag in der achten Woche
pH-Wert: 6,3
EC-Wert: 1,9 mS/cm
Temperatur: 30ºC
Luftfeuchtigkeit: 55%
Schädlingsbekämpfung: im Moment haben wir keine Anzeichen das es was zu bekämpfen gibt, sobald die ersten Anzeichen da sind werden wir handeln :), aber zur Sicherheit haben wir wieder ein paar Raubmilben an die Pflanzen gehenkt.
PPFD: 600 µmol/m²/s
DLI: 38 mol/m²/Tag
Düngemittel: Sie bekommt CalMag von BioBizz zu Prävention. Ab Tag 44 haben wir angefangen sie mit einem Mineralischen NPK Dünger (NPK 3,5-6-6) zu Gießen, Plagron wurde auch hinzugefügt.
Besonderheiten:
-Tag 44 heute wurde sie gegossen und wir haben den Dünger angepasst
-Tag 46 sie war beim Friseur 😛
-Tag 48 die Blumen werden langsam dicker 😍

Likes
2
Share

@RageTdavis
Follow
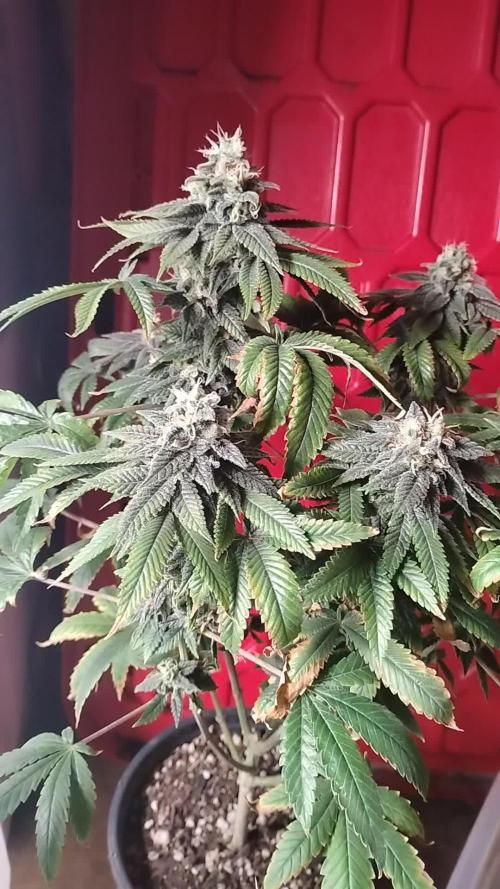
Last and finally feed before I haverst her. Can not wait to see how the dry and cure goes. Peace

Likes
9
Share

@AestheticGenetix
Follow
Throwing pistils out like crazy and definitely thickening up which is nice. They had seemed to stall out for a bit there

Likes
179
Share


@Tropicannibis_Todd
Follow
💩Holy Crap We Are Back At It And Loving It💩
Growmies we are at DAY 28 and she's just killing💀it👌
👉We are in the Preflower stretch 👈
So Shit , I gave them just a tad to much nutes on the last feeding 👈 But I have since fixed it
So I'm starting to pull her over and do some low stress training 🙃 and some defolation 😳
Lights being readjusted and chart updated .........👍rain water to be used entire growth👈
👉I used NutriNPK for nutrients for my grows and welcome anyone to give them a try .👈
👉 www.nutrinpk.com 👈
NutriNPK Cal MAG 14-0-14
NutriNPK Grow 28-14-14
NutriNPK Bloom 8-20-30
NutriNPK Bloom Booster 0-52-34
I GOT MULTIPLE DIARIES ON THE GO 😱 please check them out 😎
👉THANKS FOR TAKING THE TIME TO GO OVER MY DIARIES 👈
Likes
6
Share


@IamCy
Follow
Week 6...........
Getting frosty
Edit: on day 41,I already have amber but it's still packing on weight. I don't know what to do at this point.
Likes
2
Share


@ao_grows1978
Follow
The Afghani x Mac1 auto from DNA recovered well from the training and is in full bloom. Bud sites are looking great. Had an issue with humidity this week and the leaves started looking rough. She got a dose of Recharge this week and drinks about 8-12oz of water throughout each day. All in all she's trucking right along. Very happy with how smooth this solo cup grow is going.
Likes
19
Share


@Mo_Powers
Follow
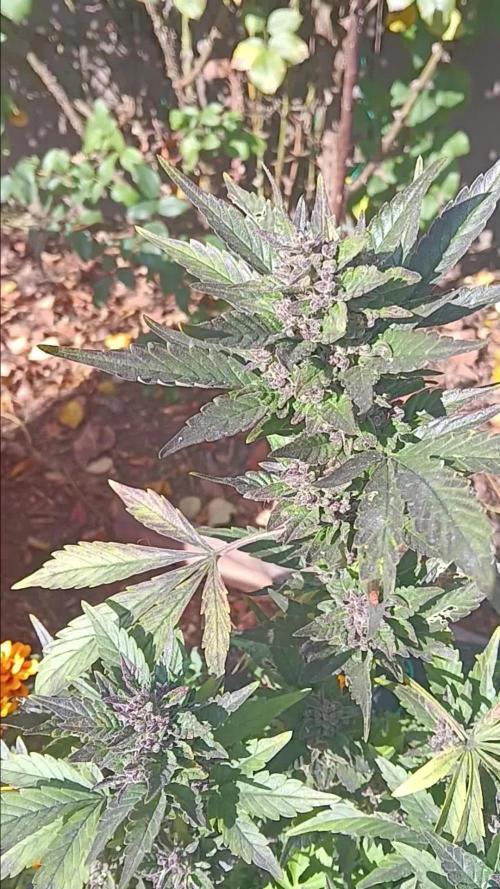
we have the second week of flowering behind us. the plant grows a good 10 cm a week. i have removed the large leaves. unfortunately the german summer is a long time coming. we sometimes only have 8 degrees at night. lots of rain. i hope it's not too much stress for the plant. because of all the rain, it only gets fertiliser every two days at the moment.

Likes
9
Share


@AAAAFarms
Follow
Not too satisfied with the result but let's see how the next few weeks turn out, defoliating end of next week

Likes
10
Share


@biggreens420
Follow
been a great week for cookies shes turning into a nice Bush did some more defoliation and lst removed some lower nodes tried opening her up as much as possible will be dropping silicon and adding buddy next week thanks for reading happy growing guys


Likes
12
Share


@starke
Follow
Week 15 of Ms. Hindu - Day 99 😍
The week started with trimming the dried stem that broke off and had been drying for 6 days now, see photo. The dry vs. wet difference had me shocked a bit, also my buds seem to be very fluffy, I don't mind, I'm beeming 😇 She has cured now for 2 days and the smell is amazing. We also tried a little each day now and she's brilliant and improving daily, so rewarding 😍
Day 100 - The chop
While preparing her for a last photo shoot in the morning light, I found a little spot of dark mould in the middle of her dense main cola 😱After processing the shock with a strong coffee and a little smoke (of her), I chopped her down. Not all of her, but everything except a little young bud, that still wants to grow. Some bugs fell out, a green little guy (see video) and all sorts of nature.
I decided to wash one part of her. Thx to Mrs_Larimar for the inspiration and https://www.docbudsbrix.com/bud-washing for the details. Lots of incredible info on reddit as well. I love science 😍The other half I will wet trim (also a first, the other bud was dry trimmed) and then let dry in the dry box as well.
What a day, pure rollercoaster but smiling and grateful. Thanks to this lovely place as well. 🙏
I will add the proper harvest details later and will update with dry weight in hopefully 7-10 days.

Likes
3
Share


@AustinRon
Follow
Week 8 - Flower Week 4
Lemon Jeffrey by IRIE Genetics (14 Starts for 8 Finishers)
63-70 Days Flower (9 - 10 Weeks)
Seeds Wet: Monday 14 May 2023
Harvest Date Range: [ 2023-08-11, 2024-08-21]
Weeks Observations
- Local weather conditions have been unseasonably HIGH Humidity. First time in 3 years am unable to reduce to standard levels. Dehumidifier being installed today.
- Today is the 21st day since flip - we’ve experienced bolt since week 1, up to 5” in a day
Start of week:
- Dates: [2023-07-10: LJ2Q 57:F:4:1, 2023-07-16: LJ2Q 63:F:4:7 ]
End of Week:
- Plant Height Range: [ 30, 44, in]
- Water/Day/Plant: [ 720, ml]
EnvironmentalCurrent:
- Scotoperiod: [ 12, hrs] # 1900 - 0700 + 24
- LightIntensityPeak: [ 975, µMol/m2/s ]
- DailyLightIntegral: [ 42.1, Mol/m2] # Target: < [ 40, Mol/m2/day]
- LightDistance: [ 12, in] # Despite SuperCropping (Bending & Twisting), we’re wishing 12” of the Light at End of week
- TempAvg: [ 77.5, °F]
- RH: [ 66.9, %]
- VPD: [ 0.85, kPa] # Achieved Ideal ‘Early’ - need to bump to 1.05 to 1.1
- FeedwaterPerPlantPerDay: [ 720, ml]
- FeedwaterPerDayTotal: [ 5760, ml] # 1.5 Gal/Day
- EC: [ 2.0, mS]
Environment NOTES:
- Because room temperature overnight is 68°F, we need to
1. Nightly (2200) CLOSE AC VENT to Grow Room
2. Daily (0700) OPEN Vent to Grow Room
- Goal is to maintain TENT & CABINET TEMPERATURES OVERNIGHT
- RULE
- CLOSE Room Airflow during ‘Daylight’ periods(2030 - 0700) When on Flipped Schedule (Night LIGHT/Day DARK)
- OPEN during ‘Nightime’ Period (0700 - 2200)
Objective
- 8 Plants, Single Colas, Sea of Green
SOP:
- WEAR CLEAN GLOVES FOR ALL SEED OPERATIONS
- CLEAN All Instruments before use
- Light Strengthveg := 100 + (#nodes * 100)
- Light Strengthflower := [ 1000, 600, µMol/m2/s]
- Scotoperiodveg := [ 1300, 1900, 6, hr]
- Scotoperiodflower := [ 0700-1900, 12, hr]
Environment
- Mid Flower (2 Weeks) (Week 8-9) (F4-F5)
- Temp: 78-82°F
- VPD: 1.1 ± 0.1
- Photoperiod: 12/12
- Light Strength: 930 µMol/m2/s
- EC: 2.3
- Late Flower (Week 10-14) (F5-F9)
- Temp: 78-80°F
- VPD: 1.2 ± 0.2
- Photoperiod: 12/123
- Light Strength: [930, 850, µMol/m2/s]
- EC: 2.1 # Week 9-11
- EC: 1.4 # Week 12
- EC: 1.1 # Week 13
- Finish (Week 14) ( F10)
- Temp: 78°F
- VPD: 1.3 ± 0.2
- PPFD: 750 peak
- Resin Bloom ONLY
- EC: 0.8
Rooted Leaf Hydro 1.7 - 1.9 EC (Half RLA,Hydro Chart, EC to Targets):
- Primer A: [ 8, ml, gal]
- Primer B: [ 8, ml, gal]
- Silica Skin: [ 4, ml, gal]
- SLF-100: [ 5, ml, gal]
- PhotosynthesisPlus: [ 6, ml, gal]
____________________
Mon 10 Jul 2023 # Flower 4
LJ2Q 57:F:4:1
- W/ Dehumidifier Installed, our Environment is now …
Tue 11 Jul 2023
LJ2Q 58:F:4:2
Refill Res
- [x] 6.5 - 7 Gal
- [x] Primer A&B: [ 8, ml, gal], [ 80, ml]
- [x] Silica Skin: [ 4, ml, gal], [ 40, ml]
- [x] Photosynthesis+: [ 6, ml, gal], [ 60, ml]
- [x] SLF-100: [ 5, ml, gal], [ 50, ml]
- [x] Dr. Bohners: [ 10, drops]
- [x] ECRange: [ 1.9, 2.0, mS]
- [x] TempReservoir: [ 60, °F]
Wed 12 Jul 2023
LJ2Q 59:F:4:3
Thu 13 Jul 2023
LJ2Q 60:F:4:4
Friday 14 Jul 2023
LJ2Q 61:F:4:5
Sat 15 Jul 2023
LJ2Q 62:F:4:6
- Plants per Feed Line: 4
- Feedwater per Line per feed (FPL): 120
- Feedwater per event (FPE): [ 480, ml]
- Events per day (EPD): 12 # Hourly Fertigation During Lights ON
- Feedwater per day: FPE X EPD: 480 x 12: [ 5760, ml, day]
- Mix 2 Gallons @ 75% Strength (Medium Chart, FW 3)
- Primer A: [ 7.4, ml, gal], [ 15, ml]
- Primer B: [ 7.4, ml, gal], [ 15, ml]
- CalMag Fuel: [ 3, ml, gal], [6, ml]
- SilicaSkin: [ 3, ml, gal], [ 6, ml]
- Lush Green: [ 3, ml, gal], [ 6, ml]
- Root Anchor: [ 3, ml, gal], [ 6, ml]
- Peak Bloom: [ 3, ml, gal], [ 6, ml]
- Resin Bloom: [1.5, ml, gal], [3, ml]
Sun 16 Jul 2023
LJ2Q 63:F:4:7


Likes
20
Share


@420DeepGrow
Follow
Gracias al equipo de Fast Buds, Marshydro y XpertNutrients sin ellos esto no seria posible.
💐🍁🍋🍊 Lemon Mandarin:
Esta variedad es para los amantes de todo lo grande. La Lemon Mandarin es el resultado de nuestro trabajo de cruce de dos deliciosas cepas cítricas: nuestra matriz Lemonade cut y la Tangie (selección de Crockett's Family Farms). Nos aseguramos de que se combinaran los mejores atributos de sus padres, como un efecto eufórico y vigorizante, una producción de tricomas demencial y un perfil de terpenos cítricos agridulces. La Lemon Mandarin es ideal para los amantes de los árboles enormes y los rendimientos XXL: puede alcanzar alturas de hasta 200 cm, mostrando una resistencia extrema y muchas ramas laterales. Su aroma es una mezcla perfecta de la Tangie, cáscara de limón y la dulzura calmante de la mandarina madura, que envuelve los sentidos en una fragancia profundamente picante de mandarina-limón que perdura mucho tiempo después de fumarla. Se comporta perfectamente tanto en interior como en exterior, y su impresionante crecimiento y encanto aromático la hacen ideal para los cultivadores que buscan una cepa realmente excepcional con una compleja fragancia cítrica. Basándonos en nuestra experiencia, aconsejamos realizar el Scrogging o cualquier otro tipo de sujeción, ya que las ramas podrían no ser capaces de soportar el peso de los cogollos. En interior, para conseguir el máximo rendimiento por planta, no coloques más de 2-3 por metro cuadrado, ya que esta variedad se vuelve muy tupida. También podría beneficiarse de una defoliación más frecuente, ya que produce muchas hojas grandes y anchas en abanico, y podría necesitar ayuda con la aireación más adelante en la fase de floración.
🚀 Consigue aqui tus semillas:
https://2fast4buds.com/es/seeds/lemon-mandarin
💡FC6500: Eficiencia líder en el mercado: la lámpara de cultivo LED FC-E6500, que ostenta un estatus líder en el mercado, es una solución rentable con un PPE de 2,8 µmol/J y un rendimiento máximo de 2,5 g/vatio. Ofrece un PPF alto de 2026 umol/S y es adecuada para una cobertura de vegetación de 1,50 m x 1,50 m y una cobertura de flores de 1,20 m x 1,20 m.
Iluminación versátil y uniforme.
https://marshydro.eu/products/mars-hydro-fc-e-6500-730w-commercial-led-grow-light/?gad_source=1&gclid=Cj0KCQjw1qO0BhDwARIsANfnkv9IIrYSbmJqz8PqpJOIyWwJfp5bc3SGJgUV68USLQ4tjmXDYwoBuAsaAue3EALw_wcB
🚥 MarsHydro ADLITE UV/IR/RED:
Para lograr un crecimiento óptimo de las plantas y maximizar los rendimientos es un arte simple que depende en gran medida de las condiciones ambientales adecuadas. Reconociendo las limitaciones de la iluminación natural y las soluciones de iluminación tradicionales para satisfacer estas necesidades únicas, lanzamos ADLITE. Estas luces especiales UV, IR y roja están diseñadas para llenar áreas del espectro, proporcionando las altas longitudes de onda que las plantas necesitan para un crecimiento y desarrollo óptimos.
🚀 Consigue aqui tu Adlite:
https://marshydro.eu/collections/adlite-supplemental-lights/
🏠 : Marshydro 1.50 x 1.50 x 1.80, carpa 100% estanca con ventanas laterales para llegar a todos los lugares durante el grow
https://marshydro.eu/products/diy-150x150x200cm-grow-tent-kit
🌬️💨 Marshydro 6inch + filtro carbon para evitar olores indeseables.
https://marshydro.eu/products/ifresh-smart-6inch-filter-kits/
📆 Semana 12:
Última semana aplicando nutrientes, creo que todavía pueden engordar un poco mas, finalmente estoy contento con los resultados
Likes
80
Share


@Hawkbo
Follow
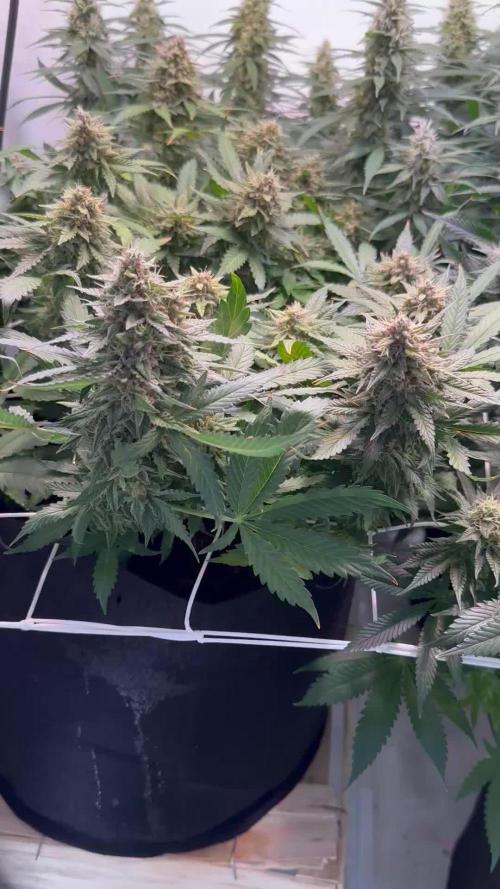
The pics and videos are from day 37 of flower. All 3 of these are starting to beef up a little bit, they have perfect bud structures. I'm picking up a creamy kinda vanilla smell on them each having slight variations but what do I know? I really want to grow all 3 phenos again sincenmy clone runs always seem to be just a little bit better. I said this on my last post but for anyone droppin questions in my DMs just comment on a journal I dont go thru the dms its alot of the same questions over and over. That way anyone can see the questions and responses and I'll try to do a better job at responding to comments as well. I always have so many diaries going at once I rarely stop and read them all until the very end when things slow down. Hope everyone had a happy halloween3👊
Likes
52
Share

@Growingdaddyo
Follow
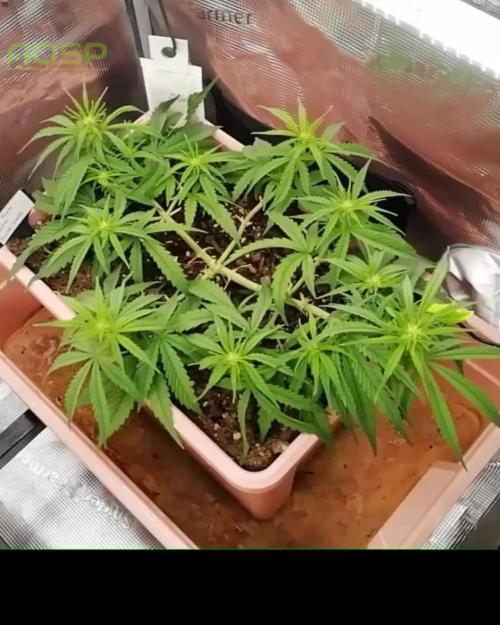
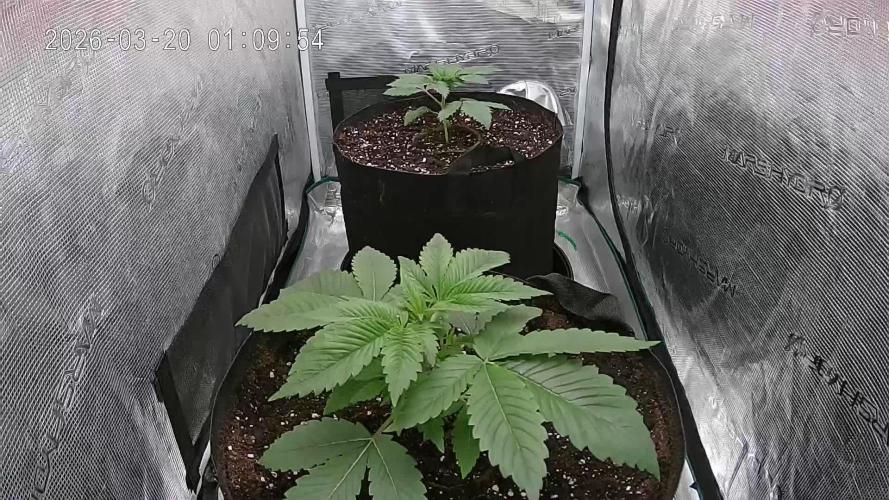
Die dritte Woche ist gestartet. Wächst bisher wie sie soll und das ziemlich flott. Darf gerne so weitergehen..
Habe die Lichtintensität etwas herunter geregelt, die Blätter kräuseln sich etwas.
18.03. Entwickelt sich und wächst sehr schön. Denke am Ende der Woche wird umgetopft.
Und auch hier bleibe ich bei 30 Liter Stofftöpfen. Als Drainageschicht kommen Plagron Pebbles zum Einsatz, ca. 3cm. Darüber ein Mix aus Plagron light mix, Plagron Batmix und zusätzlich etwa 10% Perlite.
Als Dünger nehme ich den Greenhouse biogrow. Davon 3 g pro Liter Substrat, also 90 g. Wird direkt mit der Erdmische gut vermischt.
Das neue zu Hause wartet bereits auf die Damen..
19.03. Umzug ins größere Zelt und Pott. Leider sind mir dabei ein paar Wurzeln abgerissen, hoffe der Schaden hält sich in Grenzen..
Habe zur leichteren Handhabung Drehteller unter die Untersetzer getan😅 isoliert zusätzlich vom kalten Kellerboden.
21.03. Habe mich entschieden an Tag 21 zu toppen und zwar oberhalb der 2. Nodie. Direkt das Training gestartet.
Jetzt darf sie sich erstmal davon erholen..