


Likes
Comments
Share


@Mo_Powers
Follow
it is healthy and the buds are growing vigorously. so far it has withstood wind and weather. it has developed well for only being in a 3 litre pot.



Likes
1
Share


@El_gordito99
Follow
- GERMINAZIONE -
P.S. = Periodo da quando tolgo il seme dall’involucro fino al settimo giorno (una settimana) conterò questa settimana di germinazione a parte e le 5 settimane successive come vegetativa.
Settimane totali dall’innesto del seme: (6 settimane piene prima di girarle in fioritura).
Ciao amici !! Dopo aver tolto i semi di Gorilla Girl f1 fast version di Sweet Seeds dal proprio involucro abbiamo proceduto con l’inserimento di 3 di questi nei soil plug, mentre uno l’abbiamo fatto germinare nella carta/cotone, mantenendo i semi bagnati e umidi per i primi 3/4 giorni, tempo necessario per far “sbocciare” il seme.
Una volta notata l’inizio della plantula abbiamo innestato i soil plug (e il seme singolo) negli appositi vasi, rinvigorendo il terreno con la giusta quantità d’acqua.
(Terreno già concimato una settimana prima)

Likes
8
Share


@LonelyStonerz
Follow
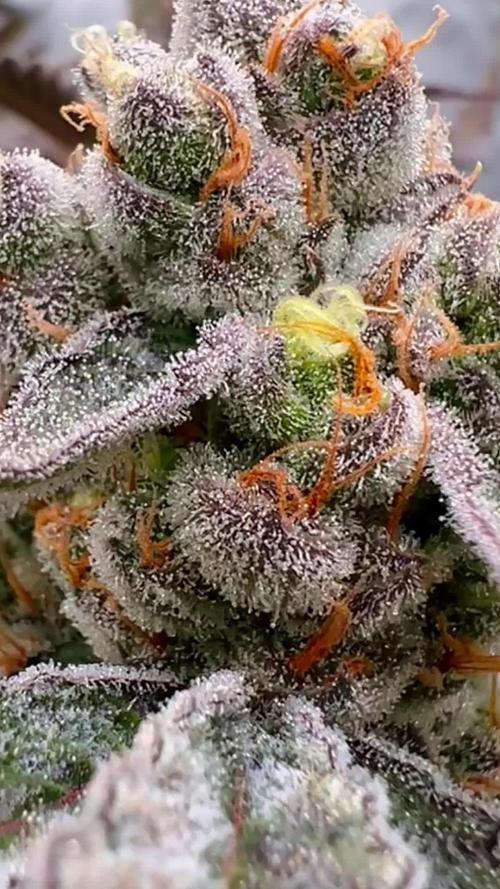
I had to top a few of these because they were hanging so far out, making lots of new space for bud sites I really like to bush/stretch out my plants making as many colas for flowers. Im seeing small pistils popping out here and there.

Likes
11
Share

@MistaOC
Follow
Biotabs Interview
1. Tell us a bit about yourself: who are you, where are you from, and what do you do outside of growing?
I’m 40 years old and based in the western part of Germany, living a grounded life as a family man. My main profession is in sales within the automotive spare parts industry, operating in a large-scale B2B wholesale environment across Germany.
We work with around 7,500 active business clients, and my role is less about day-to-day orders and more about the bigger picture. I’m the first point of contact for business-related matters — handling contracts, partnerships, and acting as the face of our department. It’s a role that requires structure, reliability, and a strong sense for communication.
Outside of that, I’ve always been someone who works with his hands. I take on a wide range of manual projects — from tiling and drywall construction to more specialized work like sealing fire protection openings. I enjoy creating things, improving spaces, and paying attention to the small details that make the difference.
That mindset follows one simple rule: all or nothing. If I do something, I do it properly. This attitude has shaped me for over 40 years — and it naturally carries over into my grows and the way I document them. I put a lot of care into every step, from the grow itself to how I present it in my diaries.
If I had to describe my life in a few pillars, it would be four: my family, my main job, my hands-on side work, and growing. And growing isn’t just a hobby for me — it’s a real passion that ties everything together. 🌱
2. How did you get into growing? Tell us about your very first steps.
My first contact with cannabis goes way back to when I was around 14. Back then, there was no WhatsApp or social media — if you wanted to meet people, you’d call them or maybe send a (pretty expensive) text, and then everyone would just hang out in the same spot. For us, that place was simply “the street.”
I was one of the younger guys in the group, hanging around with a few older ones, maybe 17 or 18. One of them used to disappear into a nearby field every now and then — everyone knew what he was doing, even if it wasn’t really talked about. At that age, I was curious, but also a bit hesitant.
At the same time, I was heavily into football, and most of my circle came from there. One day, during some kind of event at the sports ground, I ended up trying it for the first time with some of the older guys. It wasn’t the smoothest experience, especially mixed with alcohol, but it stayed with me.
After that, things developed naturally. Our small circle grew, especially through school, and we became what you’d probably call a typical smoker group. The real turning point, though, was when one of the guys — who had just moved to our area — showed me his hidden grow in the attic. It was a super basic setup with fluorescent tubes, no real climate control, no deep knowledge — but he was growing his own plants.
That moment stuck with me. It sparked something. Even back then, I knew I wanted to do it myself one day.
That chance came years later. When I was around 22, I moved into my first apartment with my girlfriend — who is now my wife. For the first time, I had my own space, and that’s when I started my first real grow. I converted an IKEA cabinet in a spare room into a small grow space, just big enough for two indica plants. Nothing fancy, but it was mine.
I got my seeds from the Netherlands back then, and I kept growing for about two to three years. My setup evolved over time — back then it was all HPS lamps and fluorescent tubes, long before LED became what it is today. I still have my old Homebox tent from that time, and it’s funny — it still looks almost brand new.
At some point, life changed and we moved into a place where growing just wasn’t possible anymore. So I had to stop, even though the passion never really left.
Then came 2024 and the partial legalization in Germany. For me, that was the moment everything came back. It’s still far from perfect, but for growers like us, it opened the door again to follow this passion a bit more freely — and that’s when I picked it back up.
3. What role does cannabis play in your life – personally and as a grower?
Cannabis has fascinated me from the very first moment — whether it was the smell, the experience, or just the whole vibe around it. For me, it was never really about medicine in the beginning. It was more like a way to unwind, almost like a switch that brings you into a different, more relaxed state.
What always stood out to me was the feeling — that deep physical relaxation and the sense of connection. It was never something negative in my life. In fact, I’ve always preferred it over alcohol, both back then and still today. It just fits me better.
Depending on the situation, it can even sharpen my focus. Of course, it can also do the opposite if you overdo it — but used the right way, it helps me slow down, reset, and find that “end of the day” feeling.
Over time, though, my perspective has evolved. As you get older, your body starts reminding you that you’re not 20 anymore. I recently had a shoulder tendon injury, and that was the first time I really experienced the medical side of cannabis in a noticeable way. It helped reduce the pain and even improved my mobility — something I hadn’t really thought about before.
But as a grower, cannabis means something even deeper to me.
Growing is a true passion. It’s not just about consuming — it’s about the entire process from start to finish. Watching a plant develop, learning from each cycle, improving step by step — that’s what really drives me.
It’s not about being better than anyone else. It’s about becoming better than I was before. That mindset carries over into other areas of my life as well — always refining, always learning.
At the same time, growing teaches discipline. You can’t just let things run and expect great results. Timing, care, consistency — all of that matters. If you don’t put in the effort at the right moments, the outcome won’t be what you’re aiming for.
That’s why I don’t see it as something lazy or passive at all. For me, it’s the opposite. Growing brings structure, focus, and a certain calmness into my life. It grounds me — and that’s what makes it so valuable to me. 🌱
4. What growing method do you prefer and why?
I’ve always preferred indoor growing over outdoor. It comes back to my mindset — all or nothing. In my opinion, especially here in Germany, outdoor simply doesn’t give me the level of quality I’m aiming for. Indoor gives me full control, and that’s exactly what I want.
At the same time, I’m someone who constantly experiments. Even if I know it might cost me yield, quality, or cause stress to the plants — I still do it. That’s how I improve. I need to see things with my own eyes and learn from my own experience to really understand what works best for me.
I’ve always grown in soil. Over time, my setup has evolved a lot. I started with simple plastic pots, switched to fabric pots after legalization, and now I’ve come full circle back to plastic pots — mainly because I moved into an AutoPot system, which fits my current approach better.
My goal today is to keep everything as efficient and stable as possible. I run an automated watering system connected to a 50-liter tank, which is filled through an RO system that I can control via app. The water runs through a calcium filter to help stabilize the pH. I’m not chasing perfect numbers anymore — as long as it’s stable and within a good range, that’s what matters more.
In general, I prefer working with organic nutrients. For me, it’s important to know that the final product is as clean and natural as possible. I’ve gone through all the typical struggles before — adjusting pH, dealing with deficiencies, spending hours mixing water — and over time I’ve simplified my system more and more.
That’s also where Biotabs fits perfectly into my setup. It’s a very natural match — simple, organic, and reliable. It allows me to focus more on the plants themselves instead of constantly adjusting inputs.
My standard setup is pretty consistent: a 1.2 × 1.2 m tent, around 480W LED, AC ventilation with a carbon filter, and usually five plants. I top every plant at minimum, veg for about five weeks, and often run a SCROG net to maximize the canopy.
But even here, I keep testing things. For example, I’m currently experimenting with and without a SCROG to see how it affects yield — because in the end, I’m not only chasing quality, but also efficiency.
That’s really my approach in a nutshell: build a solid system, keep it simple, but never stop refining it. 🌱
5. Which strain is closest to your heart and what fascinates you about it?
That’s a tough one — I don’t think there’s just one single answer.
In general, I’ve always been a fan of fruity, citrus-forward strains. Every now and then I also enjoy something more gassy, but if I had to go with what naturally comes to mind, it’s actually the very first strain I ever grew.
Back in 2012, during my first grow, I ran Super Skunk from Vision Seeds — and to this day, that one stands out. Funny enough, that first grow was probably my best one in terms of how it felt at the time. Everything was new, exciting, and that final product just hit different. Grown under a simple 400W setup, nothing compared to what we have today — but it was, without a doubt, the best weed I had smoked up to that point.
It’s not just about the strain itself — it’s about the moment, the experience, and what it represented.
At the same time, there’s another one I have to mention: Amnesia Haze (Core Cut). That strain is pure nostalgia for me. It was everywhere when I was younger — that classic haze we all knew. Growing it myself today brings back a lot of memories. It’s like a throwback to those early days, but now with the knowledge and control to really do it justice.
So if I had to sum it up: one strain represents where it all started for me, and the other connects me to the roots of the scene I grew up in.
6. What has been your biggest learning moment as a grower – a mistake or a success that helped you grow?
One of the biggest lessons I’ve learned as a grower is that routine can become your biggest enemy.
When you grow consistently over time, you start to build confidence — and that’s a good thing. But at some point, that confidence can turn into complacency. You think you’ve seen it all, you start skipping small steps, and you tell yourself, “it’ll be fine.”
That’s exactly where problems begin.
Looking back at my earlier grows, especially before my longer break, my setup simply wasn’t good enough. I was growing under the roof with temperatures easily hitting 30°C, humidity was all over the place, and the environment just wasn’t dialed in. On top of that, I started letting things slide because I thought I had it under control.
That combination was my wake-up call.
Since getting back into growing after legalization, I’ve taken a completely different approach. I take it seriously now — not just as a hobby, but as something I want to master. And I also recognize that being able to grow under good conditions is a privilege. There are a lot of factors that need to align — your environment, your living situation, responsibility, especially with family — it’s not something you can take for granted.
What really keeps me hooked is that growing never gets boring. I’ve had many hobbies in my life, but this is the only one that never lost its appeal. Even the “dirty work” — cleaning the tent, dialing everything in — it’s all part of the process.
Of course, I’ve made every mistake you can imagine. Overfeeding, underfeeding, overwatering, underwatering — pests like aphids and thrips, and currently my biggest challenge: powdery mildew.
That has been my toughest opponent so far. Even with controlled humidity, it can still show up, and it forces you to really understand your environment and your plants. The difference now is: I know how to deal with it. It’s under control, and that’s what growth is about — not avoiding problems, but learning how to handle them.
Every mistake teaches you something. And over time, you build the confidence that no matter what shows up, you’ll find a way to fix it.
7. What does your typical grow routine look like – how much time do you invest and what do you enjoy most?
My routine is pretty structured — I like to keep things consistent, but still leave room for adjustments when needed.
It all starts with popping seeds. I usually germinate around five to six and then select the strongest five to continue with. They begin in small 0.2L pots under a humidity dome, using Canna Professional soil enriched with Biotabs Startrex according to the feeding schedule.
After about two and a half weeks, I transplant them into 15L AutoPot containers. At that point, I water them in manually — first with about one liter of RO water, followed by another liter mixed with nutrients according to the schedule.
After that, I give them a few days to settle before watering again — usually around five to six days later, again with RO water. This approach has worked well for me to avoid overwatering and to let the roots establish properly in the new medium.
Even though the AutoPot system is already set up, I don’t activate it immediately. During the vegetative phase, I prefer hand-watering to encourage strong root development and avoid overwatering early on. Once I’m close to flowering, I switch the system on — basically just opening a valve, and everything runs automatically from there.
From that point on, the workload drops significantly. I don’t really have to worry about watering anymore. Nutrients are kept simple as well — every couple of weeks I add a small top feed, and that’s basically it. Compared to how complicated things used to be, it almost feels like it runs by itself.
That allows me to focus on what really matters: the plants.
I still check on them regularly, usually every evening when I’m home. Not because I have to, but because I want to. Instead of mixing water or adjusting pH, I can actually observe — the leaves, the structure, the bud development. That’s where the real connection happens.
That’s also when I decide what to do next — defoliation, LST, sometimes HST, or working with a SCROG net. It’s not always a fixed plan, more a combination of experience and feeling in the moment.
Environmental control has also become a key part of my routine. I start with around 70% humidity during germination, then gradually bring it down — around 65% in early veg, and closer to 55% after transplant. Keeping things stable has made a huge difference for me.
After roughly five weeks of veg, I flip to flower. From there, it’s about maintaining the system and letting the plants finish strong. Flowering usually runs around 8–10 weeks, depending on the strain.
And then it all starts over again.
What I enjoy most is exactly that balance — having a system that runs smoothly in the background, while I can fully focus on the plants themselves and the craft of growing. 🌱
8. What advice would you give beginners who are just stepping into the world of growing?
If I had to give one piece of advice, it would be this:
The rule is…there is no rule.
That’s my mindset, and it’s something I truly believe in. Of course, there are guidelines, best practices, and a lot of information out there — but in the end, every grow is different, every environment is different, and every plant reacts in its own way.
So instead of trying to follow everything blindly, sit down, observe, and learn from the plant.
Growing is a process. You won’t get everything right from day one — and that’s completely normal. Mistakes are part of it. In fact, they’re one of the most important ways to learn.
Today, it’s easier than ever to get into growing. There’s endless information online, tutorials, perfect pictures, and step-by-step guides. But that can also be misleading. You see these flawless results and think that’s the standard — but what you don’t see is the experience behind it.
When I started, it was completely different. There were forums, very limited pictures, and you had to figure out a lot on your own. That forced you to really pay attention and understand what was happening in front of you.
And that’s still the most important skill today.
Look closely at your plants. They will tell you what they need — through their leaves, their structure, their growth. Once you start understanding that, everything else becomes much easier.
So don’t chase perfection. Learn, adapt, and enjoy the process.
And most importantly — enjoy the grower’s life. 🌱
9. How did you first hear about Biotabs and what made you want to try it?
I’ve actually known about Biotabs for a long time.
Back when I first started growing, I was running a fully mineral setup — using products like Canna Vega and Flores. At that time, the market wasn’t nearly as saturated as it is today, but brands like Hesi and Biotabs were already around. I remember seeing Biotabs on the shelves back then, but I never really made the switch. I just stuck to what I knew.
My first real contact with Biotabs came much later, when I started diving deeper into soil biology — things like mycorrhiza and trichoderma. I became more interested in how the soil itself works and how to build a healthy microbial environment.
That’s when I came across Bactrex.
Funny enough, looking back now, I was using it completely wrong. I treated it like a different product and just added it straight into the planting hole, thinking that’s how it’s supposed to be used. Whether that was beneficial or not… I guess only the plants know.
But that was my entry point into the Biotabs world.
From there, I started learning more, testing different approaches, and understanding how the system actually works. Over time, I moved further and further away from mineral feeding and more towards a biological approach.
And the more I experimented, the clearer it became to me: the combination of organic growing with a simplified system is exactly what I was looking for.
10. How has Biotabs influenced your grow and what do you appreciate most about the product?
Biotabs has made my grow simpler, more stable, and overall more controlled.
Before, I spent a lot of time adjusting things — mixing nutrients, checking pH, reacting to problems. With Biotabs, that complexity is reduced to a minimum. The system is straightforward: prepare the soil, add the tabs, water it in properly — and from there, it’s mostly just water.
And the surprising part is: it works. Really well.
For me, it fits perfectly into my current setup and mindset. I’ve built a system that is as efficient and automated as possible, and Biotabs complements that in the best way. It allows me to focus on the plants themselves instead of constantly managing inputs.
That’s what I appreciate the most — the balance between simplicity and performance. You don’t have to chase numbers or overcomplicate things to get great results.
At this point, it feels like a natural fit — almost like a symbiosis between my way of growing and the product itself. And once you find something that works reliably on that level, there’s really no reason to change it.
For anyone who wants to grow organically and take their setup to the next level, it’s definitely worth exploring. 🌱.
Likes
2
Share


@Honeymolasses49
Follow
These young ladies are stacking up beautifully. Banana Purple Punch day 28 of flower and Bubblegum day 33 of flower. Lemon Cherry Cookies day 28 of flower and 28 inches tall. Blue Bourbon Smash day 33 of flower (day 53 from seed).

Likes
72
Share


@BodyByVio
Follow
This week I had to Lollipop again (I know is very late and I hope I didn’t stressed the plant to much).
My canopy is so tick and so many overlapping leaves and buds in the center of the plant that don’t receive enough light or any at all , n combination with the RH swings that I got going on (45 and 63 RH), I’m very afraid of mold. I should have did a better job at Lollipoping from day 21. I’m inexperienced grower and I didn’t knew better.
I decided is better to risk to shock the plant a little bit risking a reduction in yield then get mold or pests and lose it all.
My 30 pin dehumidifier works great with the AC but sometimes when the AC( compressor) stops my RH jump at 62% -63%, witch I don’t like . I’m trying to keep the humidity around 50% but in such a small room between the AC and Dehumidifier I got big swings in temp ( 75-82) and RH ( 45%-63%) witch is not ideal but is nothing that I can do. I played with the AC and Dehumidifier setting a lot trying to keep humidity around 50% and temp around 80 degrees and that’s the best I can. My AC is set at 82 degrees and my Dehumidifier is set at 45% RH.
Also during the lights off (day time) is very hard to keep the temperature In control when outside is 110-115 degrees with my portable AC (1400BTU) in the 4x 6 closet. Is crazy but I do my best to keep temp under control.
This is another rocky mistake I made is trying growing weed DWC in the middle of summer where temps are 105-115 degrees constant in a closet without centralized AC port and at second level in the building. LOL
Also I think I underfed her (630 PPM TDS, PH 5.8-5.9) ) and I got a Ca deficiency witch I think is the reason my flowers developed slower then I anticipated.
Hopefully I’m wrong and everything will be good.
P.S. I got a little bit of calcium deficiency caused by salt buildup (to much PK boost) despite my earlier belief that is underfed.
I increased the PPM from week 4 (630-640TDS) to 680 TDS) on week 5 while I kept the PK booster at 3+ml l per gallon. Slightly my PPM’s was rising in my reservoir for few days until I decided that my plant can’t take that much nutrients (PK). 2-3 days after I increased the TDS I’ve noticed more spots on the lower leaves with tip burns on top ( first signs of PK toxicity). One day later found spots and yellowing of the leaves on top of the plant that indicates Ca deficiency caused by salt buildup ( PK toxicity) and reversed osmosis (hope I’m not wrong). Going into week 6 I lowered the PK boost at 1.5ml / gallon and total TDS to 640 PPM. Seems like leaves damage to stop and my PPM to stay stabile at 630-640. Trying to keep PH at 5.8 max 5.9.
I will post pictures of my Ca deficiency/ PK toxicity.
If you guys have any suggestions please leave me a comment.

Likes
2
Share


@ChiTaN
Follow
The girls are developing properly, frosting is beginning to be clearly visible.Also the smell has become clear and very intense.White Widow X Big Bud is the most noticeable.From today, the girls are switching to a different spectrum of light, UV light will be added.


Likes
170
Share


@Master_weeda
Follow
Bonjour à tous les padawans et les maîtres jedis
Jour42 ma plante entre bien en floraison je pratique sur elle une defolliation pour permettre aux têtes de prendre la lumière
La floraison des plantes de cannabis
La plante de cannabis passe par différentes étapes de vie avant de parvenir à la récolte. Ces étapes sont : la germination, la pré-croissance, la croissance et la floraison.
Pour les autofloraisons il n'est pas nécessaire d'avoir de changer le cycle de lumière elle entre en floraison automatiquement voilà d'où elle tient son nom "d'autofloraison"
L'origine de l'auto-floraison vient de la sous-espèce "cannabis sativa ruderalis" , qui à l'origine produit de très faibles niveaux de THC. C'est en croisant cette variété de marijuana avec d'autres qui produisent des niveaux de THC plus élevés qu'à vu le jour ce magnifique compromis que sont les variétés auto-fleurissantes avec des taux de THC très satisfaisants. En parallèle, cela a permis d'améliorer la production de ces variétés, qui initialement étaient exceptionnellement basse.
Pour des résultats optimaux, en culture Outdoor (extérieur), je recommande que la germination des graines de marijuanaAuto-flo se fasse entre avril et août.
En culture Indoor(intérieur), la photopériode idéale que ce soit pour la croissance comme pour la floraison est de 20h de lumière. N'oubliez pas que ces graines ne sont pas tributaires de la photopériode pour passer en floraison.
Il est préférable d'utiliser des pots d'une capacité de 10 à 20L dès le début, étant donné que leur cycle de vie est réduit, les auto-flo n'ent pas besoin de plus de volume pour se développer. Vu sa petite taille (et la discrétion) elle fait l'objet d'un bon choix pour la culture de cannabis sur balcons.
La première variété de Lowryder auto-floraison a été créé à partir de cannabis indica sativa croisé avec des génétiques de cannabis sativa rudelaris par la banque de graines de marijuana "The Joint Doctor". Puis vinrent la White Dwarf de "Buddha Seeds", la Roadrunnerde "Dinafem", l' Auto Stoned d' "Autofem", la Speed Devil de "Sweet Seeds" , la Maxi Gom de "Grassomatic", la Flash, la Gnomo de Kannabiaet bien d'autres.
Jour42 defolliation (video)
Avant toute chose n'oublions pas de bien désinfecter ses outils et bien ce laver les mains.
Quesque la defolliation ?
LES CULTIVATEURS AMATEURS, PRENEZ GARDE, MAIS NE PRENEZ PAS PEUR
La défoliation consiste à retirer les feuilles des plants de cannabis en intérieur afin d'accroître le rendementfinal. Le cultivateur amateur doit faire preuve de vigilance lorsqu'il commence à appliquer cette technique de taille. Malgré le débat sans fin entre ceux qui prônent cette technique et ceux qui la dénigre, il n'y aucune raison pour qu'un amateur ne s'y essaie pas afin de voir si ça lui convient ou non.
COMMENT DÉFOLIER
Que vous tailliez les feuilles ou les branches des plants de cannabis, il vaut mieux utiliser un sécateur stérile qui est confortable en main. Arracher des feuilles à la main manque de finesse et engendre souvent par accident, l'arrachement des couches d'une tige en plus de la feuille. L'objectif principal de la défoliation est de permettre une meilleure pénétration de la lumière et de promouvoir la production de plus grosses têtes. Les feuilles éventails qui font de l'ombre doivent être retirées. Tailler la tige principale et/ou les pousses secondaires n'est pas de la défoliation.
La règle d'or lorsque vous donnez à vos plantes un rafraîchissement est de commencer avec les feuilles nourricières les plus grandes et les plus larges, en taillant du bas vers le haut. Il est important de retirer les feuilles stratégiquement et non pas au hasard. Pensez également qu'il vous faut limiter votre rafraîchissement à approximativement 10 à 20 % des feuilles totales de votre pied. Il est très facile de s'emporter durant la taille et de se retrouver avec des plantes chauves. Un excès de taille de feuilles empêchera la photosynthèse et paralysera vos plants.
QUAND FAUT-IL DÉFOLIER
Il est assez rare d'appliquer la défoliation comme seule technique pour obtenir un fort rendement. La taille des feuilles est généralement associée à d'autres méthodes de tailles et de palissage pour un meilleur rendement telles que le topping ou étêtage, le FIMming, le LST, le manifolding, le supercropping et le ScrOG. Les cultivateurs utilisant la méthode ScrOG auront besoin de retirer toutes les croissances inférieures ainsi que les feuilles et les tiges se trouvant sous le filet.
Les plants de cannabis peuvent être défoliés dès lors qu'ils sont passés de la phase de plantule vers la phase de croissance végétative. Cependant, il est recommandé aux cultivateurs amateurs de laisser aux plantes 1 à 2 semaines de croissance végétative avant de s'attaquer à la défoliation de celles-ci. De plus, certaines variétés sont plus sensibles à la taille que d'autres et de ce fait, seront plus stressées par la taille des feuilles. Surveillez minutieusement le comportement de vos plants après la taille. Une période de convalescence de minimum 3 à 7 jours avant de recommencer la défoliation est fortement recommandée pour éviter trop de stress aux plants. Les cultivateurs peuvent également défolier pendant la phase de floraison, ce qui permettra à l'énergie de la plante d'être concentrée vers la production de têtes tout en limitant l'ombre et l'excès d'humidité. Néanmoins, il est important de ne pas défolier trop tard sous peine de simplement blesser ses plants inutilement.
LES AVANTAGES DE LA DÉFOLIATION
Évidemment, l'avantage numéro un de la défoliation, c'est l'augmentation du potentiel de rendement de cette technique de taille pour tous types de cannabis allant de la photopériode aux variétés autofloraison. Ce n'est pas un secret que les fleurs qui reçoivent plus de lumières deviennent plus grandes et larges que celles dissimulées dans l'ombre des feuilles. De plus, retirer les feuilles intérieures des plants touffus aide à prévenir toutes menaces de moisissure. Les plants très feuillus avec un feuillage intérieur dense produiront une quantité importante de têtes pop-corn. Dans le pire des cas, les branches de têtes et les têtes qui sont denses succomberont au pourrissement.
Si vous observez des gouttes d'eau se former sur la surface des feuilles, il est grand temps de penser à faire de la défoliation. Libérer la zone inférieure et médiane des feuilles est un excellent moyen d'améliorer la circulation de l'air.
LES DÉSAVANTAGES DE LA DÉFOLIATION
Les plants de cannabis en intérieur bénéficient de la défoliation pour deux raisons. La première est parce qu'ils reçoivent la lumière d'une source stationnaire au-dessus d'eux, et la deuxième est parce que les conditions environnementales sont contrôlées par le cultivateur et non Mère Nature. Les plants d'extérieurs eux, n'y gagnent pas beaucoup, car les cas échéants se vérifient pour eux. Le soleil traverse le ciel, illuminant sur sa route, différentes portions de la plante de son lever à son coucher.
Les cultivateurs en extérieur n'ont pas besoin de manipuler les plantes afin qu'elles se développent en adoptant une structure plate puisque le soleil est infiniment plus puissant que n'importe quelle lampe de culture et qui plus est, il est toujours en mouvement. Tailler les feuilles des plants extérieurs les rend également plus vulnérables aux conditions humides et brise leurs barrières naturelles contres les nuisibles.
De nombreux cultivateurs d'intérieur peuvent, et malheureusement, c'est souvent le cas, réduire le rendement final à cause d'une défoliation faite au mauvais moment et/ou excessive. Tailler les plantules n'est pas conseillé et engendre souvent des plants nains. Scalper les plants matures est encore pire, et au lieu d'obtenir de longues branches de têtes, vous obtiendrez probablement encore moins de fleurs. De même, tailler des plants malades ou en mauvaise santé à n'importe quelle période de la croissance risque de paralyser la croissance plutôt que d'encourager la formation de fleurs denses.
Jour44 Arrosage une fois sur 2 topmax de biobizz
Jour46 arrosage avec de l'eau ph6.3 à laquelle j'ajoute 0.8g par litre d'eau de feeding enhancer greenhouse.
Jour47 léger arrosage.
Jour48 léger arrosage

Likes
91
Share


@Greenwolvesfarmer
Follow
Me encantó la cepa y su facilidad de cultivo ! Aun que tuve muchos problemas ambientales y climáticos . Me atrasé unas 3 a 5 semanas con estas nenas , pero nos recuperamos bien ! Usamos malla scrog chilena #kanovicultivo , lo mejor que he usado en malla scrog , no se le comparan , su espacio preciso! .
Las 4 comenzaron en pequeños vasos , luego de 1 a 2 semanas , trasplanté a macetero de 5.8lts , finalizaron 3 en maceteros textil 19lts y 1 en macetero de 20lts AirPot !
Comencé a brindarle 20hrs de luz / 4 hrs oscuridad , a la 3era semana 19hrs de luz y a la 5ta semana bajé hasta el 18 / 6 .
Usé un panel QB de 480w regulables , chips marca Samsung de 3500k , chips epistar UV 660nm iR , el mix completo gracias a mi bro MKleds chile ! Se pasó ! De todas maneras recomiendo una potencia mínima de 600w ( QB LED ) para espacio de 120x ..
Usé un bio estimulante chileno , que a mi parecer fue uno de los mejores que he visto y usado ! El grande #trichomemania , te cuento que este producto activa un mecanismo de defensa en la planta (SAR) , haciendo que reaccione y se trate de defender con mayor producción de resina , terpenos y tricomas ! Es increíble ! A los 24hrs tienes resultados , un saludo grande a los hermanos ! El mejor producto 10000000%....
Grande eva seed , buenisima esta cepa , me dí cuenta que si se deja madurar un poco más , su sabor es más frutal candy , exquisita cepa !....
Estamos probando con un papel de blunt organico 100% libre de tabaco marca *jamaican buzz*...al fumarla su efecto es notorio , enseguida viene el efecto psicoactivo y cerebral , se viene a la vista un tanto distorsionado el entorno ...la vision un poco más brillante , y a la vez relajado ..
Hoy 18 de agosto estamos probando con un papel de celulosa organico marca lion rolling circus ( foto al final del album ) , quema bastante bien , al parecer ya está casi en su totalidad secado , combustión lenta , buen sabor afrutado citrico con toques candy diesel ...uuff efecto despues de 3 quemadas ya por los cielos , totalmente cerebral y estimulante , un gusto charlar con amigos !
Al manipular su fruto , la planta expele un olor afrutado con limon maduro y skunk , con finales de candy terra , una delicia , muy buena cepa , ahora mientras escribo me siento un tanto "mareado" con esa mitad de blunt ! Buenisinaaa!...
____
La verdad cuando comencé a cortar cada planta era como llenar "infinitamente" el armario donde dejaría secandola , se llenó casi la mitad y un poco más sólo con 1 planta cortada ! Increíble producción , yo estimo unos 90g por planta aprox , ya he consumido un buen peso además ...veremos en estos días que esté por completo su secado ! Esta riquísima , sus efectos fuertísimos ...100% ...
___
Una cosecha buenísima, muy parecido como obtengo resultados en comparación con el sodio , todo bien me gustó la experiencia !....
Además tuve la oportunidad de hacer extracción en seco de su materia vegetal . Obtuvimos entre un 18 a 20% de retorno ! Para mi primera vez , geniaaaal ! Su utilizó prensa de 12 toneladas , de apretó a 80°C por 4 minutos .
.
.
Usen lemon king ! Una delicia .

Likes
35
Share


@SmokingTiki
Follow
- I didn't weight wet buds.
- The trichomes photos have been taken just before the harvest on buds all over the plant.
- The hash ball was a little less than 1cm diameter.
- Drying was made at 20°C and around 50% of humidity.
- Humidity in jar around 50% on the first day, temperature around 20°C.
Veg time : 53 days.
Flowering time : 68 days.
Total time from seed to harvest : 121 days.
Height : 120cm
Pot size : 26l


Likes
7
Share

@GERGrowDesigns
Follow
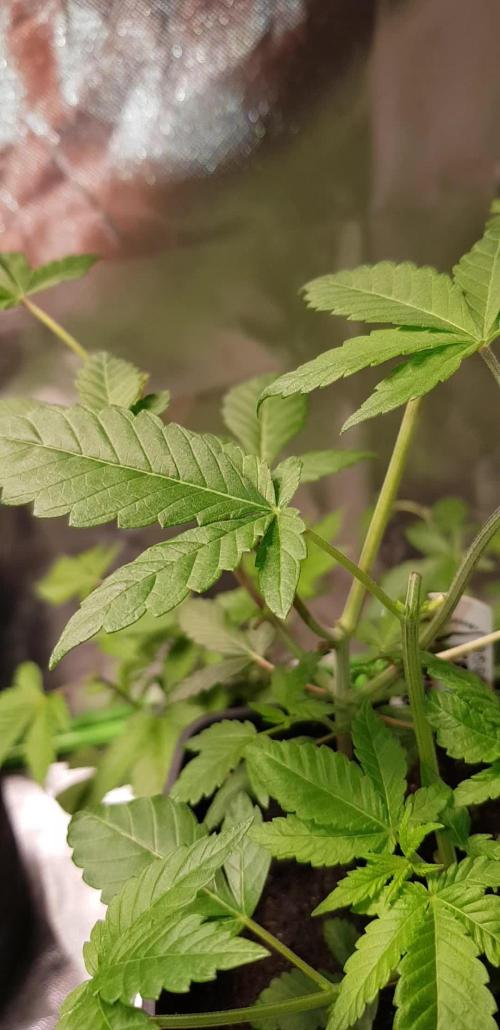
Welcome to Veg Week 3 of Kannabia Apple Fritter BioBoost Edition
Need a Fail-Safe Germination and Express Flowering?Kannabia Makes It Easy with BioBoost, Sproutly and Its Fast Genetics . More informations to find at The Kannabia Blog on GrowDiaries.
Check out Kannabia Seeds with my link [https://www.kannabia.com/de?ref=61966] and grab the germination device or the strains I used . Trust me – it’s worth it for sure !
Get another 20% Discount at all products using the code [GGD] at the checkout. little Holiday Present to the Community btw ☃️
For this Project , I’ve chosen the Feminized Photo Strain Apple Fritter BioBoost :
Here’s what I’m working with:
• 🌱 Tent: 120x60x80
• 🧑🌾 Breeder Company: Kannabia Seeds
• 💧 Humidity Range: 60
• ⏳ Flowering Time: 63 Days
• Strain Info: 24%THC
• 🌡️ Temperature: 26
• 🍵 Pot Size: 0.1
• Nutrient Brand: Hy-Pro
• ⚡ Lights : 600W x 2
A huge thank you to Kannabia Seeds for allowing me to try my Best with this amazing collection from Photo Strains they managed to Sponsore . Big thanks for supporting the grower community worldwide! Your genetics and passion speak for themselves!
Let’s grow together – and don’t forget to stop by again to see the latest updates!
Happy growing!
Stay lifted and stay curious!
Peace & Buds!


Likes
13
Share


@cheesensugar
Follow
left for couple days only to arrive home to an empty resi lol 😲 filled about 3gal before leaving but im learning how much these girls drink and i should of left them at least 5g in the tank...still they look unfased by it and are still streching a bit...just been adding Dr.Higas Em-1 and fish sh!t to resovior once every couple weeks
Likes
35
Share


@InhaleXhale
Follow
Nach langer Zeit ist es endlich soweit, ich habe sie geerntet.
Bei dieser Pflanze habe ich mich dafür entschieden sie gegen den natürlichen Lebenszyklus outdoor eher zum Blühen zu bringen.
Ich pflanzte sie in einen Hanffasersack den ich mit Erde auffüllte. Diesen platzierte ich auf einer Schubkarre.
Wo ich wohne wird es manchmal schon im Oktober sehr kalt, sodass die Wahrscheinlichkeit für eine sichere Ernte realtiv gering ist (at this point i hope the best for my other outdoor plants).
Ich rechnete mir aus wann der perfekte Zeitpunkt zur Ernte ist um noch im Sommer das Resultat genießen zu können.
Ab diesem Zeitpunkt fuhr ich die Schubkarre jeden morgen um 8 Uhr nach draußen und um 18 Uhr wieder nach drinnen um optimale 12 Stunden Lichtzufuhr zu gewährleisten.
Während den letzten Wochen der Blüte sind ein paar männliche Blüten aufgetaucht wie auch bei meinem indoor grow.
Für einige war der Zeitpunkt der Ernte vielleicht zu früh, aber ich finde es so sehr angenehm zu rauchen und auch der Effekt ist in diesem Stadium optimal für mich.
Die einzige Methode die ich hier verwendete ist das Pruning.
Es erspart dir einen Menge Zeit beim beschneiden der Blüten und lenkt die Kraft auf die verbleibenden Blüten, um diese zu stärken.
Nachdem ich bei meinem letzten outdoor grow viel zeit beim trimming verbracht habe, habe ich mir eine Erntemaschine gekauft (look at the video).
Mit dem Ergebnis der Maschine bin ich zufrieden, da ich es per Hand in der gleichen Zeit unmöglich in der Qualität geschafft hätte.
Die Blüten wurden ungefähr 2 Wochen bei guter Durchlüftung getrocknet, um am Ende wurden es 255g.
Für mich persöhnlich ist es ein sehr gutes Ergebnis.
Die Blüten sind schön fest und klebrig mit einem sehr süßlichen Geruch.
Ich habe versucht ein paar schöne Fotos zu machen und habe meine Kreativität spielen lassen (my wife also got a great idea, you can guess which idea was mine ;D)
If you have any questions feel free to ask. Im also open for criticism
I hope you enjoy the pictures and the report stay safe and happy growing.
____
i will update the smoke report soon.
Likes
29
Share


@GrowPro3500
Follow
Just two more days in the dark, then it’s chop time!
This run I’m testing out my DIY dry box — got a fan rigged up for airflow, should do the trick.
Final harvest update dropping in like two weeks… fingers crossed for some sticky fire!
Stay tuned, it’s about to get frosty!
Likes
9
Share


@TheWeedaltor
Follow
She took her first (and maybe only) natural sun before going direct under the HPS hell 😂🤙
Likes
59
Share


@JeyGanesha
Follow
Gente !! sono arrivate alla 4° Settimana di fioritura...pensavo diventassero hermafrodita, per il forte stress subito,ma invece ho visto che ha solo fatto un paio di nanners(bananine)...sto controllando giornalmente che non c'è n'è altri e specialmente che non rilasciano polline altrimenti mi impollina tutto.e per ora non ho bisogno di semi,🤣😂💪.cmq stanno bene

Processing
Likes
34
Share


@DudeGrowsWeed
Follow
Sour Diesel Haze is coming along nicely, lots of upward growth and node development. I gave her a FIM pinch this week. Expect the flowering stretch to start at any time. 👍


