


Likes
22
Share


@Prilyfe13
Follow
May 5, 2024 Day 15
This week we will be focusing on getting the plants into their 3 gallon containers. That should be happening this afternoon when I'm up for it, or tomorrow. However, some roots are starting to show on the sides and the plants are starting to get a bit big for the Germination Center. There's still a this one small plant. It seems to just be a smaller plant. I don't know if I'm going to keep it. Just a waste of soil I think.
Speaking of Sour Diesel, all four plants are really healthy. The three normal sized ones are all the same size. Same everything. I can't wait to see how they come out. Still nothing to do with individual plants. They are still too young.
I increased the light power to 100%. They all seem to be loving the light, so why not treat them. Plus they will only be in that light for another few hours to a day. Still no idea what the DLI is. I don't have a PAR map to to refer to. So it's mostly guess work. So I'm guessing by the look of the plants, they don't mind at all.
The environment is still spot on. The temp is hovering around 77° and the humidity is still at 84%. I'm assuming the night temp is around 75°, but the light is on and the heat mat is going. When I plant them, I'm going to have to work the heat and humidity in the 2x2. Happily, this size tent is a pain to keep dry, and I don't need dry, I need humid at least for the next 2 weeks. Then they should be going in the 3x3 with the better light and more space. Perfect.
Update: it's mid afternoon and all 4 babies have been planted in their final 3 gallon containers. Watered in and easy to go. I'm using a 100 watt light for now while I wait for the other plants to finish. Still deciding if I want to keep the small one or not.
Germination Center Environment:
Temp: 78.3°
RH: 85.6%
VPD: unknown
May 6, 2024
So I measured all 4 plants today. 3 of the 4 are 4" flat with the final one being at 3". I already have her in the final container, but if she doesn't catch up soon, I may put her in the 2x2 tent for a solo grow so she doesn't get cannibalized.
I have to wait though. I have plants that are days from harvest, so I'll have to wait a couple of weeks to get her in there.
When that time comes, I'll separate her daily entries so everyone knows what's actually going on. I won't be basing the weekly stats on her though. She will be separate.
I finally labelled each plant. A,B,C and D. You guessed it, D is the small one. I'll be doing daily entries for each once I start seeing more veg.
Watering should be the same, lighting and environment will also be the same for A,B,C and different for D. So just a note for each plant daily.
The light has been turned on in the 2x2 where these babies love for now. It's a 100 w Mars Hydro TS600. I don't really like using it, it's only 100 w. Which will be fine for the time being, but I prefer my better 3x3 240 watt AC Infinity light.
DLI readings for this set up is just under 20 mol/m²/d. Should be good right there for the time spent in here.
The environment is stable at 78% humidity and a temperature of 76°. I'll keep it that way for the rest of this week and see how things go next week. I'll most likely bring the humidity down to 60%. But I'd like to keep the temp up. I've read that Sour Diesel likes heat. Apparently it likes humid and dry climates. Which makes absolutely no sense to me, but whatever. I'll keep it at 60% in veg and then drop it 5% at a time until late flower and 40% will be the where it ends.
Grow System Environment:
Temp: 76°
RH: 78%
VPD: unknown
May 7, 2024
I finally added a hydrometer that will read properly and works.
All 4 ladies look great. I'm still concerned about the small one. I'm willing to bet, I'll end up placing it in the 2x2 for the solo grow I was talking about before.
A,B,C all look the same. They are about 5" tall now and have 3 nodes. D on the other hand is just behind. Only 2 nodes and generally smaller.
The light was a bit out of whack. It wasn't level and was pulling super hard to the back of the tent. I fixed that though. I think the DLI is around 20 mol/m²/d. It should be good for this stage. I'll definitely have to drop the light down t
A bit when they get a little older. I'd like to see 25 mol/m²/d before going in the main tent.
The environment is alright. The temp was a bit low this morning. The humidity was also at 61%. Definitely too low for these ladies. It should be up to 70% in a couple hours. The temp already bumped up to 78°. Now I just need to get a humidifier in there.
Grow System Environment:
Temp: 73.8°
RH: 65.6%
VPD: 1.01 kPa
May 8, 2024
Watering day! So for the first full watering I gave everyone a half gallon of water PHed to 6.0 from the top. I use a stick, so it takes a good bit of time to do it, but I don't need to wait for the soil to absorb. It does so gradually as the water is added gradually.
There seems to be 2 different phenomes. A and D are one with B and C being the other.
A and D have fatter leaves, but they are a bit droopy. Not in a stressed out way. Maybe they needed a bit of water. Not sure, but they look the same besides the height difference.
Speaking of D, I have officially decided to keep her and finish her in a solo 2x2 grow. I just need to wait a few weeks while the other 4 plants are harvested and dried up. In the mean time, I'll keep her in the 3x3 when it gets moved there. Maybe I'll keep her there if she can keep up with the rest. I'm not sure. It's honestly too early to tell.
A, B and C are still all the same height with A being a slightly different structure.
I'll check back later to see how they take to the watering. I don't think a half gallon of water in a 3.4 gallon container will be any problem. It will moisten the whole container to probably about 45% saturation. When the bottom feeding starts in a few weeks, the saturation should go up to 55%. And it should hang out here until the last week or so of the grow. It may spike a bit because the plants doesn't need that much water anymore, but we will cross that bridge when we get there.
The light seems to be perfectly fine for these ladies. In a few days, I'll pull a DLI reading and see where it needs to be. I still feel like these babies are still establishing themselves. Anyway, for another day.
The environment was really good for a while. Now that I have them out of the Germination Center, I needed to figure out the humidity. The solution is a small humidifier. Works perfectly. We have a temp of 77° and the humidity is around 79%. Perfect for this stage. It could stand to be a bit warmer, but this is fine. Plus it should get a bit warmer today after the watering. Science and all that.
Grow System Environment:
Temp: 74.5°
RH: 71.5%
VPD: 0.84 kPa
Note: these numbers are daily averages including lights out. It gives a better idea of what both temps look like. For example. 74.5° is less than 77°, so the night temp much drop below 74° for a 6 hour average to drop the daily so much. But there's a lot to learn once you get the jist of it.
May 9, 2024
Not a bad day. These ladies, even D, are looking great. Good leaf structure, fantastic color. Just all around some nice plants.
They seem to really like the DLI. I'll be taking that reading tomorrow. The plants haven't grown enough to record it more than once a week. So lighting stays the same.
The environment is fantastic. Right within range of not nearly perfect. The temp is around 76° and the Humidity is around 73%. It doesn't fluctuate much, but it still does. Naturally, I expect fluctuations, so I'm not worried about it. As I said, right within range. On the other hand, last night's temp dropped entirely way too low for this stage. I'll have to figure out a happy medium for my room heat and night time temps. Also, you can clearly see the drop in the leverage temp from yesterday. It's super low.
Grow System Environment:
Temp: 73.1°
RH: 77.5%
VPD: 0.66 kPa
May 10, 2024
Not much going on today. No watering needed. The light looks perfectly fine. Also, the plants are each started to grow at their own pace and size.
While A,B and C are the same height, B is slightly ahead of the others. Strong stem and starting to grow side branches and another node.
D looks like she may catch up after all. She's still not as big as the others, but the slight difference looks like it will either work itself out in veg, or I will just let her get bigger during the stretch with less training.
I don't think I'm going to use a SCroG net this run. I plan on ordering silica to improve stem strength. I think a SCroG net works better in larger setups when you have multiple plants. My tent is just too small to work 4 plants in a SCroG setup. I can only access the front of the tent and the back and sides get neglected. So training and silica it is.
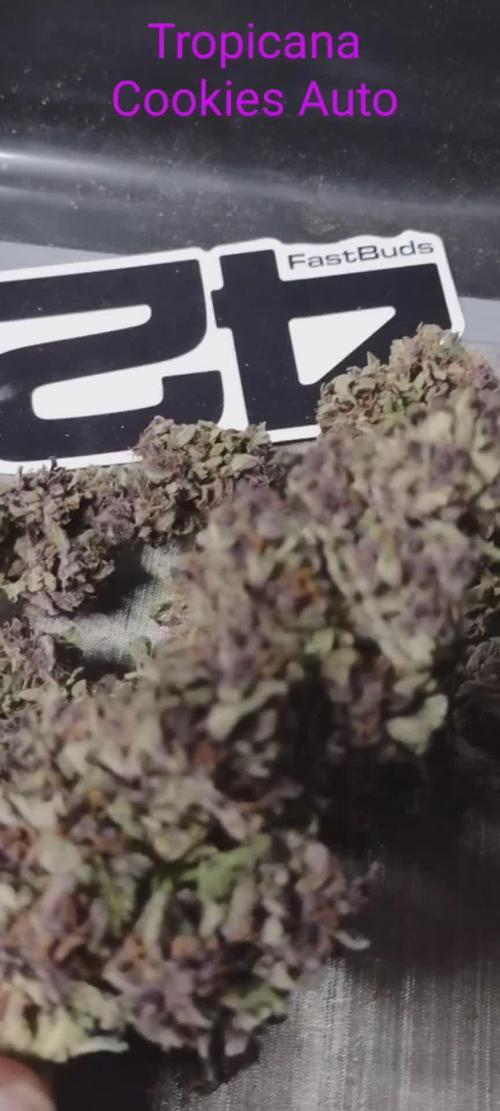
As I said above, no watering needed today. However, I did reactivate the wick system for Tropicana Cookies today. She was drying out fairly quickly, so hopefully with the dryer container, it takes more time for the bottom to saturate.
The lighting is staying the same. I'll check it at the beginning of next week. Although, with a tent this size and lack of space for the light, I'd just assume let the plants grow into it. Maybe I'll drop it to 24" when I see 4 nodes on all plants.
The environment looks great! Cooler at night and nice and warm during lights on. The day temp is about 77° with a humidity of 66%. The night temp is 67° with a humidity of 78%. The humidity is a bit high, but I don't have an automated exhaust system like I do in the 3x3.
I may turn the the exhaust on before I go to bed, but then the morning time will be dry before I wake up. Only for 2 hours, but still. The fluctuation is definitely not welcome.
Grow System Environment:
Temp: 74.1°
RH: 73.6%
VPD: 0.78 kPa
The VPD is a bit low. But that's due to the night time environment which I'll be adjusting tonight.
May 11, 2024
Last day of the week for these 4. They have grown significantly over this week. Excellent leaf growth, beautiful green. All 4 plants look fantastic. Perfect structures. I can't ask for better.
D is still a bit smaller, but is catching up. I don't expect her to stay small forever. I believe she will grow the same size at the end of the flowering stretch.
B seems to be the largest, or most advanced, of the bunch. She is definitely ahead by a node, and a bit taller than the rest. However, her stem is a bit shorter than the rest. A and C both have longer stems, but lacking the robust growth of B.
A and C are about the same. Nearly identical. These could be the same phenotype. With B and D being separate phenotypes.
This coming week, I'll start reporting on the plants individually. It's a bit more work, but much more organized and easier to read.
The light is definitely where it needs to be. I'll check DLI tomorrow.
The environment is still near perfect. However, it was a bit low this morning. Apparently I didn't set the heat high enough. It's fixed now. The temp is around 77° and the humidity at 70%.
No watering today. The pots are still fairly heavy. I think I'll water again tomorrow or test to see how moist the soil is. If I water tomorrow, I think it will only be a quarter gallon.
Everything looks good and that's all there is to report today.
Grow System Environment:
Temp: 72.6°
RH: 72.3%
VPD: 0.79 kPa
Likes
29
Share


@GrownwithLED
Follow
In week 7 the 12 plants have filled out the space inside the HOMEBOX grow-tent very nicely and therefore its time to switch to flowering. I change the timer, which I put infront of the supply of my SANlight EVO4-120 LEDs, to 12/12 hours of light/darkness. This will induce the flowering of my babies and they can start to develop buds. The BIO NOVA nutrients work very well, which can be seen in the nice healthy green color of the plants. I follow the SOIL-CULTIVATION chart from the BIO NOVA website, but use only half the recommended dose, because my tap-water already has a very high EC-value of 0,8 when it comes out of the faucet. Since I have used REGULAR seeds for THE PURPS from BC-BUD-DEPOT, I have to check for males on a regular basis. Two plants show clear male pollen-sacks already now (see above in video) and have to be culled right away. I cut the plants off at the main stem right above the soil and take away the plants and throw them into the trash right away. This way I make sure NO pollen can mature inside the male pollen-sacks and be released later and inseminate my babies on accident. In the places of the male PURPS plants, I put a MAC and KK-plant into the AUTOPOT-system, so all 12 placed are filled again. Now its time to wait until the first flowers start to appear. 👍😎


Likes
21
Share


@Mr_Motalovah
Follow
Hello growers and tokers! 👋 👩🌾 🧑🌾.🔥💨
There has been a couple changes this week!!
First there was a big defoliation done, I cleaned the bottom of the plant.
All the growth that wouldn't amount to anything because the light doesn't penetrate that low.
Also took off the biggest fan leaves to give more light penetration.
Then finally switched to 12/12..
Just 36 hours after the defoliation she looked fuller than before.
Leaves pointing up and out. By how she's doing I'm sure she'll stretch a good bit these next few weeks.
Great reaction to the defoliation.
I'm still watering every other day, After the defoliation I watered with only Enzymes 2ml/L to clean the roots a bit then started with the nutrientes again.
I dropped the amount of grow nutrients from 3ml/L to 1ml/L and started adding bloom nutrientes 2ml/L for now.
I'll slowly be upping the bloom nutrientes and after week 2 I'll no longer add grow nutrients.
That's it for this week. Stay tuned to see how she flowers.
Stay safe!

Likes
33
Share


@microgrowshow
Follow
Week 3 of flowering is in the books for the Auto Gelato girl from Fast Buds Genetics <3 ... this week I did some minor cleanup with dying leaves, and the lower branches that were being blocked out by the top colas. This girl has recovered exceptionally well after being supercropped the previous week, so excited to see how she'll continue to grow and stack up in the coming weeks! Considering I snapped the stalk while cropping, I was really surprised to see just how well the wound healed up over the week. These plants are awesome! Anyway, be sure to check back next week for more updates! Happy growing 💪
Likes
22
Share


@Willy_Balls
Follow
Girls grew a lot these two weeks. I was away on vacation and they did fine. Except I wasn't there to control the stretch perfectly. But you don't have to be perfect every time.
I managed to take some clones from one monster plant. Fingers crossed she will end up with purple flowers.

Likes
29
Share


@Myrcene_Dream
Follow
-Began flowering at the beginning of the week
-Watering every second day
-Will give a small top dress soon of Gaia Green all purpose
Likes
11
Share


Likes
2
Share

@IndigoMist8
Follow
Absolutely stunning grow to watch! Smells like a bowl of sweet tropical fruit.
Likes
2
Share


@QoverQ
Follow
Hey guys :)
The girls got topped once now, they still recovering from the light burn i did,
Trying to ‚LST‘ 😄
Started giving nutes in a Half dosage at week 3 !


Likes
10
Share


@SamDo
Follow
Week 28 – Flowering Week 5
This week represents an important transition phase in the Pineapple Upside Down’s flowering cycle.
Early floral sites are clearly evolving into real buds.
Density is starting to build, and the plant is visibly shifting from initial flower formation toward true bud stacking.
This change is now easy to observe in photos, making this a critical stage not to miss.
To support this transition, PK levels were slightly increased.
The goal is not to force growth, but to ensure the plant has sufficient resources to bulk steadily and without stress.
Light intensity remains unchanged from the previous week.
PPFD has not been increased yet, as the plant is responding well and stability remains the priority.
Nutrient management and environmental consistency are the main focus this week.
pH is monitored closely and maintained within a 5.8 to 6.2 range to ensure optimal uptake during this sensitive phase.
No other major interventions were made.
The strategy remains simple: observe, maintain balance, and allow the plant to progress naturally into heavier bud development.
See you next weeek.

Likes
20
Share


@Hashy
Follow
Week 10
Light cycle=12/12
Light Power=140w
Extractor controller settings
High temp= 24c
Low temp= c
Temp step=0c
High Rh= 45%
Low Rh= %
Rh step=0%
Speed max=10
Speed min=1
Smart controller settings (during lights on).
Lights on=10.01-21.59
Radiator on= below 22.0c
Radiator off= above 23.0c
Dehumidifier on= not in use
Dehumidifier off= not in use
Smart controller settings (during lights off).
Lights off=22.00-10.00
Radiator on= below 18c
Radiator off= above 19c
Dehumidifier on= not in use
Dehumidifier off= not in use
Thur 29/2/24
#2 (Day 64)(Day 32 flower)
📋
Fri 1/3/24
💧💧💧💧💧💧💧💧💧💧💧💧💧💧💧💧
Method= automatic
Feed=bloom nutes.
Neutralise=0.1ml/L
Silicon=1.0ml/L
Calmag=0.5ml/L
Terra Bloom=3.0ml/L
Sumo Boost=2.0ml/L
P/K 9/18=0.5ml/L
Easy Ph down=0.115ml/L
Ec=1.65 PH=6.5/6.8
Time start=12.00pm
Finish time=13.45pm
(11×5 minute runs with 5 minute gaps)
Total flow rate=190ml/min
Flow rate per plant=47ml/min.
Total volume made=13L(L)
Total volume left=3L
Total volume used=10L
Volume per plant=2.5L (Est)
Runoff.
Total runoff=2.25L
Ec=2.22 PH=6.2/6.3
💧💧💧💧💧💧💧💧💧💧💧💧💧💧💧💧
#2 (Day 65)(Day 33 flower)
📋 I'd say that this one is the furthest ahead and if it keeps up at this rate she will come down 1st.
Sat 2/3/24
#2 (Day 66)(Day 34 flower)
📋
Sun 3/3/24
#2 (Day 67)(Day 35 flower)
📋
140w to 130w
Mon 4/3/24
#2 (Day 68)(Day 36 flower)
📋
Tue 5/3/24
💧💧💧💧💧💧💧💧💧💧💧💧💧💧💧💧
Method= automatic
Feed=water
Neutralise=0.1ml/L
Easy Ph down=0.008ml/L
Ec=0.2 PH=6.4/6.4
Time start=12.00pm
Finish time=13.45pm
(11×5 minute runs with 5 minute gaps)
Total flow rate=190ml/min
Flow rate per plant=47ml/min.
Total volume made=13L
Total volume left=2.5L
Total volume used=10.5L
Volume per plant=2.6L (Est)
Runoff.
Total runoff=1L
Ec=1.6 PH=6.3/
Didn't run as should because forgot to plug it in.
💧💧💧💧💧💧💧💧💧💧💧💧💧💧💧💧
#2 (Day 69)(Day 37 flower)
📋 Defoliate some lower stuff
Wed 6/3/24
#2 (Day 70)(Day 38 flower)****
📋 H=100cm D=12cm DLI=60
She is the furthest along and if she carries on like this then she'll be coming down 1st. Next feeding I'll switch this one to Dragon Force. I'm estimating 2 weeks before she will be harvested.
Back soon.
Take it easy.
Processing
Likes
2
Share


@Chronicbastard
Follow
These girls are going good so far.i really botched my last grow so I'm trying to be way more careful.less harsh nutrients for veg.i will start in on lower doses when flowering starts.


Likes
30
Share


@Green_Dream
Follow
It's been a pretty good week. I did quite a big defoliation, as things were getting crowded.
I switched to a more flowering dominant feeding, I decreased the Nitrogen and pumped up the phosphorus and potassium.
I will soon do a flush, as it looks like the nuts are starting to accumulate at the roots.


Likes
40
Share


@BudBoutique
Follow
! this is my current status, gonna upload my last veg weeks within the next week - got a bit busy around Spannabis - thank you for your understanding! 💚
Welcome to Bud Boutique Grow Diary - really appreciate all your love and support :)
Don't forget to check out my other current grows!
🗓️ This Week:
- still lack of nutrients, which got worst
- Day 24: attaching once a week APTUS Foliar with Regulator & Nutrispray with the amazing CannaFogger by Petra Grow
- Day 26: as you can see its the only plant out of 9 in this run and I really can't catch up with her that well. Giving my best over the next week.
- Bud sight development accordingly slow
Thank you for still staying with me 💚
___________________________________________
--- 🌱 Strain (Sponsor) ---
🏷️ Wedding CheeseCake by Fast Buds
https://2fast4buds.com/seeds/wedding-cheesecake-fast-flowering
--- 🥗 Nutrients and Feeding (sponsored by APTUS: APTUS Ambassador) ---
🍸 APTUS: full nutrient schedule extreme
-- Regulator, N-Boost, P-Boost, CaMg-Boost, K-Boost, Allin1 Liquid, Startbooster, Topbooster, Enzym+ every feeding
-- Fulvic-Blast, NutriSpray as Foliar each once a week
🔗 https://aptus-holland.com/
--- ♻️ Grow Control (Sponsor) ---
TROLMASTER: TENT-X + LM14 Light Adapter to dim/sunrise/sunset lights + Temp & rH Sensor all remote on App
🔗 https://www.trolmaster.eu/
--- 🚿 PetraGrow (Sponsor) ---
CannaFogger Foliar Spray
🔗 https://www.petratools.com/product/petragrow-cannafogger-atomizer-new-mini-fogger
--- 🏭 Grow Setup ---
💡LUMATEK Zeus Pro 600
* 🏠🌿 Indoor: Homebox 120x120x200cm (4x4)
* 📐🌀 PrimaKlima exhausting Fan 1180m3/h (running on 60-80%)
* 🌀 Can Light Filter 800m3/h & 1x Fanbox 1x Dyson fan for Air circulation
🔗 https://lumatek-lighting.com/zeus-600w-pro-29/
🔗 https://primaklima.com/de/shop/ventilatoren-de/ec-ventilatoren/pk160ec-tc/
🔗 https://canfilters.com/products/filters/
All Likes and comments are highly appreciated!!!
👨🌾 don't forget to check out my Instagram for daily educational content: budboutiquee
- Bud Boutique


Likes
7
Share


@Adkguerrilla44
Follow
Oh man I messed up by not cutting candy kush #3 before the rain last week and lost a little less than half to botrytis 😓😓😞 but can only be mad at myself for not chopping her down sooner and I will still end up with a few ozs from CKE #3. Candy kush #2 just exploded with trichomes and orange pistils over the last 8 days so I'm very glad I left #1 & #2 out,going to chop #2 today or maybe tomorrow if it stays warm and sunny!!! Candy kush #1 is the biggest of the 3(makes sense since I put her in a full 15 gallon grow bag). When I chopped #3 last week cke #1 was no where near done but now almost all her pistils have turned brown and she has milky trichomes all over!! Im the most excited for CKE #2 ,she smells like the old school west coast og kush with a hint of chem to her it's amazing!! Candy kush #1 got more of the sweet special traits in the nose smells very sweet and earthy but im sure both will be amazing smoke no doubt in my mind!! ✌️ ☮️
Likes
26
Share


@HowtoBubatz
Follow
The second week of vegetation is over and watching the plant grow is a rewarding experience for me.
Now that the plant is well-established, it is time to begin training it. This involves LST to ensure it reaches its full potential in this case.
I look forward to discovering what this plant will become 😋😊