


Likes
Comments
Share


@Terpyboyz
Follow
So this grow came to a finshed but I had a. Few issues that’s held me up from finishing up the diary, but in due time I will reupload it all in order soon. But over all I will also update with a final weigh in of each strain produced so stay tuned 🤙🏻🔥


Likes
2
Share


@KeemBboomin
Follow
It’s now time to start flower. They are looking amazing and I’m going to go ahead and throw his crocs in there. I have one tent that I have not put in flower yet just for the main fact that one of my seats became a auto flower so I’m letting them run more time to let that auto flower finish and see what that becomes
Likes
12
Share


@GREENPHOENIX6262
Follow
Week 1 Flower 09/04
Everything is running smoothly
Introduced NPK Phosphorus - Potassium
Scrog net dropped - Flowering evenly.
Veg nutes stopped.
*Mimosa (1&2) end of week recap -09/09
Both plants are in early flower and proceeding accordingly.
Nute feeds remain the same.
Plants have grown in height approximately 5inches.
Moderate defoliation on the bottom half of both the plants
Will LST to trellis next coming week.


Likes
30
Share


@SAC87
Follow
Day 35 Flower
Hey Growers.
Things are going well here, other than the delicious funk that is emanating from my house. The carbon filter is not able to keep up with these beauties and the FastBuds flowering at the same time. It’s also about 5 years old so…..time for a new one. It also doesn’t help that the 4 ft of snow around the house is melting and I have to have the grow room door open for the sump line, but whatever.
These girls are just cruising along. I watered with 950 ppm and 1650 was the runoff. I’m noticing a bit of tip burn but I hear that normalish for full spectrum leds. They make the plants draw extra mag, seems like the Epsom is helping with that. I’m getting to a point where I may need to water twice a day to achieve denser quality buds, the next couple weeks will dictate that. Hand watering hydro is a terrible idea!!!!!!!!!! Too late to turn back.
I am running the Vipar Spectra XS2000 at the recommended 16” at 100%. I’m also alternating from the right to left side of the tent each day like a poor man’s light mover. I’m noticing leaf edge curl (tacoing) but it’s nothing major and they pointing upwards. They seem happy.
All in all I’m happy with how it’s going, just gonna keep it on cruise control and tuck or remove leaves causing problems.
Happy Growing 🌱

Likes
101
Share


@morganfreeman420
Follow
Una cosecha linda y abundante como toda cosecha exterior las flores de muy lindo color huelen mucho y muy bien, se ve mucho tricoma y mucha resina tengo muchas ganas de probar los resultados

Likes
19
Share


Likes
31
Share


@MMSC16
Follow
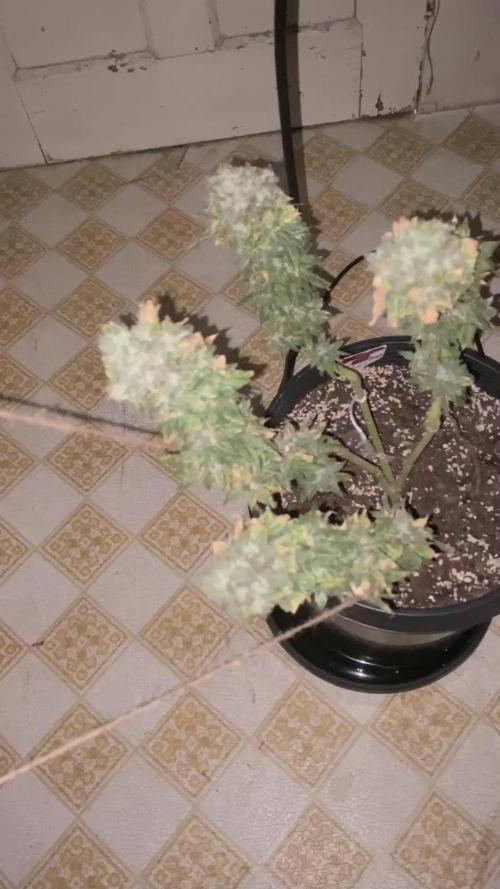
Oct 30 - Milky and clear Trichomes on mature plant, I suspect she's very close to harvest. The other plant is a little behind, with mainly Clear and Cloudy Trichomes. Continued to defoliate dead leaves as they're found. Senescence is starting to resume with colder temps.
Oct 30 - Watered Mature plant at 7.30PM. Checked Trichomes, they seem pretty close. However some calyx' aren't pumping in volume + Stigma/Pistil colour whilst others are full with brown / orange coverage 50%.
Oct 31 - Defoliated and Watered younger plant at 9PM.
Nov 1 - Watered mature plant at Noon, purple starting to present on more colas.
Nov 2 - Watered younger plant at 10AM. Trichomes on younger plant are mainly clear with one or two amber on calyx.
Nov 3 - 8AM Watered mature plant, checked trichomes - more amber appearing in calyx - although clear trichomes still very present. Day 83, I suspect Day 90 will be chop day. I'll put both plants in 50 hours darkness on Day 87. She's Oily, when defoliating, My knuckles were slimy.
Nov 4 - Amber Trichomes definitely present on calyx' Lower budsites are slightly behind, I might be chopping earlier - In fact, I'll put them in 48 hours of darkness starting tonight. If the younger plant is not ready, which I suspect the case - I'll resume regular lighting for another week or two.
Nov 5 - After getting feedback, I'm surprised to see I have another 2 weeks. The purple plant is definitely putting on size. I suspect the weight of buds will be too much to stand freely.


Likes
11
Share


@Ninjabuds
Follow
They already have a really great start. Both of the seedling pushed the seed shell off without any help. Every day that passes these 2 plants are showing there going to be really strong plants already. I'm already getting excited to try the final flower from these plants even thou there seedlings idk what it is about the name blackberry moonrocks just has me seeing stars I think these plants are going to be winners

Likes
102
Share


@love_2_grow
Follow
D13 - BOOM! The new #1 had made her modest appearance. Only the top of the seed is visible so far, but it's a start. :)
#2 is moving along nicely, quietly doing her thing.
D14 - #1 is still shy and hasn't fully emerged yet, but she is at least poking up more than yesterday, so there's progress at least.
#2 is doing great, and I like her structure. Short and stout with large leaves and very short internodal spacing. She is 7 cm tall but already 11 cm wide.
I also cut back the cover crop as it was getting a bit wild and partly overshadowed the girls.
Since starting the grow, I have yet to water the girls properly, but they did get a little bit a couple of days ago when I had some extra after watering nematodes (against fungus gnats) to our regular houseplants. Better to be proactive than reactive ;)
D15 - I started a simple compost tea consisting of worm casting, rock dust, algal limestone, bentonite, biochar, and molasses. I'll leave it brewing overnight, and then it's watering/feeding time tomorrow.
D17 - No idea what is going on with the first girl, but it sure isn't much. The seed has maybe emerged for another two millimeters from the soil, but that is it. The seed hasn't cracked, and no leaves are visible. Hell, I can hardly see the stem.
Yesterday, I gave each girl about one liter of the compost tea that I started a couple of days ago. Let's see if that helps, although, at this point, I kind of doubt it.
As always, I completely forgot to check the pH of the tea. I have no idea why I keep forgetting that with my teas when I have no problem checking the pH when I use plain water. Oh well. Not the end of the world but something I need to keep in mind for the next tea in a couple of weeks.
The second girl looks great, though, so that's something at least.
D20 - Alright, it is official. The third girl died as well. The seed never cracked, and the stem went limp. I have no idea why this happened, and now I'm out of Colorado Cookies seeds, so that's that.
I have already planted another seed to see if the problem persists with another strain. I will make a separate diary for that one, though.
On the positive side is that the remaining girl looks strong and healthy. She is now 9 cm tall and 18 cm wide on this last day in week two of veg. Upwards and onwards!

Likes
98
Share


@Tropicannibis_Todd
Follow
💩Holy Crap We Are Back At It And Loving It💩
👉WE R ALMOST THERE👈
Growmies we are at DAY 63 and there just killing💀it👌 The Smell has kicked in and is wonderful 😀
👉We are in full out flowering 💐 and its looking great 👈
So Shit , I gave them just a tad to much nutes on the first few feedings 👈 But I have since fixed it
So I'm helping out with some low stress training 🙃 and some defolation 😳
Lights being readjusted and chart updated .........👍rain water to be used entire growth👈
👉I used NutriNPK for nutrients for my grows and welcome anyone to give them a try .👈
👉 www.nutrinpk.com 👈
NutriNPK Cal MAG 14-0-14
NutriNPK Grow 28-14-14
NutriNPK Bloom 8-20-30
NutriNPK Bloom Booster 0-52-34
I GOT MULTIPLE DIARIES ON THE GO 😱 please check them out 😎
👉THANKS FOR TAKING THE TIME TO GO OVER MY DIARIES 👈


Likes
5
Share

@GREENPHOENIX6262
Follow
*Week 4 Veg - Seedsman Critical+2.0 - 10/29 - She has grown about an half an inch since yesterday (8.3inches) - Her fan leaves are twice in size in width*
* End of Week 4 Veg - Seedsman Critical+2.0 - 11/04 - Hard defoliation - LST tie down - (11 inches ) - Fan leaves removed *
*End of Week 4 Veg - Critical 2.0 - 11/4 -11 Inches - End of week recap - Split Cola - Sideview pic added.

Likes
10
Share


@BR1CK_SANCHEZ
Follow
Just chuggin along this week, didn't do much... struggled to keep temperature at stable 68°
Likes
3
Share


@WeedM8
Follow
Hello m8 welcome to this journey with me in this diary will have very interesting strains hope u find something useful
O.G. Kush Titanium
- [ ] 1st week Veg: germinated in substrate lighting very close so it jets medium high humidity after the 3rd day they started sprouting
- [ ] 2nd week Veg: this week my ventilator broke down and as the temperature stayed very warm nothing developed much
- [ ] 3rd week Veg:fortunately this week i had fixed the ventilation and the temperature has go down a bit allowing the little plants to develop and reinforce
- [ ] 4th week:very good developments in this week I already started feeding a bit two times but i didn’t have to…once was enough
- [ ] 5th week Veg:this week they were very strong green i only had to water them good and keep the ventilators going no stop .They have good hight already ,but as i have to strains together. I want to transplant them when the hight of the other one have stretched… I’m thinking to transplant next week if not the next one
- [ ] 6th week Veg: this week it went great fortunatly i dont have pests that eat my buds i’ve givven a fed once the substrate is very rich already the plants streached very well i will transplant today so be ready m8 i cant wait to show you the progress
- [ ] 1st week Fl:they started stretching and looking very healthy just transplanted
- [ ] 2nd week Fl this week I’ve been away i had a friend taking care of them they stretching very well i hope that she starts putting energy into the flo
- [ ] 3rd week Fl:they are streaching very well ..getting the light very well
- [ ] 4th week Fl:there we aree guys the good stage is heree good high hope dosent effect de prod
- [ ] 5th week Fl:pumping very good this week a lot of changes started already being frosty
- [ ] 6th week Fl:this diaries its not daily updated this week its going’s so great we are close to harvest between next week and the other one . Ill harvest them at diffrent time just because they are not all at the same point of flowi
- [ ] 7th week Fl


Likes
42
Share


@cheetah844
Follow
Jack's one of the tallest plants out of all of them right now.
I topped and defoliated every plant. I'm trying to form them into canna-bushes. Hopefully I'm doing the correct training procedures to make them all grow that way both indoors and out.
Likes
16
Share

@DapperDabber
Follow
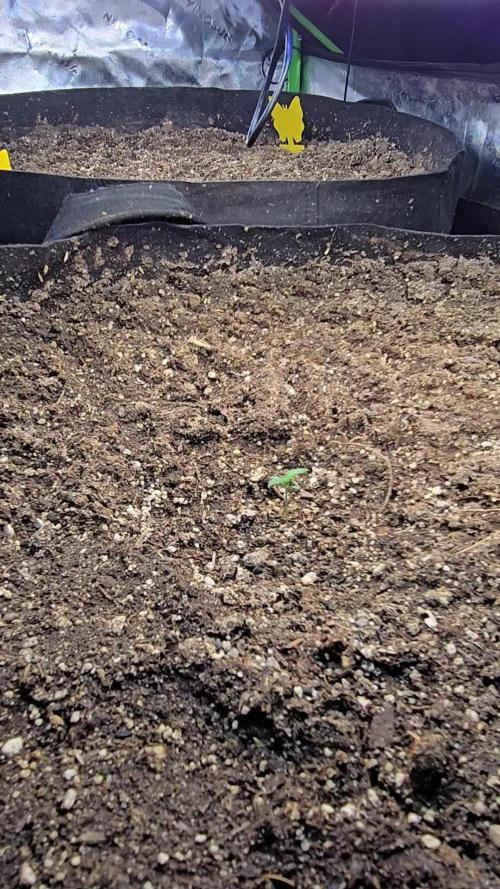
Out of the 4 that cracked open, 2 of them will move forward which is all I need! Especially if they're as vigorous as the NL Auto from Sensi.
I have the A100 Aerolights at %25 for a 20/4 light cycle really close to them.
They're loving life in the new pots, while tilling is saw many worms and the topsoil was a lovely bunch of worm castings. The next move for the 5x5 is going to be either a buttload of small pots for a phenohunt or a massive pot to carry on my single tent single plant modus operandi.
14 days from dropping them into a shotglass of water. When I transplanted them I coated the taproot with rootwise mycrobe complete.
Thanks for keeping up and take care fellow Growers!
