The Grow Awards 2026 🏆 


Processing
Likes
Comments
Share
@TheoRehtisch
Follow
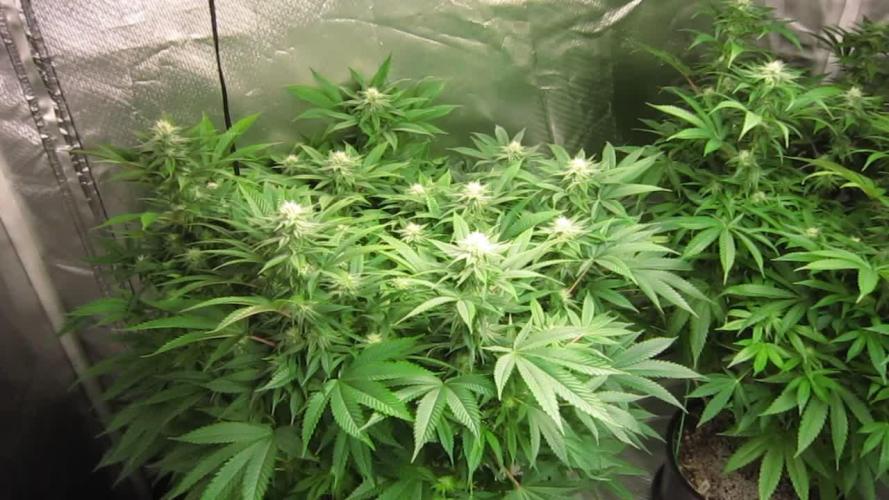
Week 3 - It’s Friday again, and that means a new update!
Today’s update comes a little earlier, at least in terms of time. It’s been an exciting and eventful week in the grow tent, with a lot of progress and key changes taking place.
-------------------------------------------------------------------------
Key Growing Parameters
-Humidity: 60%, reduced to 50-55% today
-VPD: Max 1.4
-Airflow: Always active at level 1, auto-adjusts when needed
-Day Temperature: 25-26°C
-Night Temperature: 22°C
-Light Cycle: 20 hours light / 4 hours dark
-Lamp: IONBOARD S24 from AC Infinity (240W)
Watering Schedule:
-Day 14: 600ml
-Day 16: 600ml
-Day 18: 700ml (with full BioBizz nutrient dosage)
-Day 21: 1 liter
-Nutrients are applied with every watering
Light Adjustments:
-Started at 60 cm distance, intensity level 6
-Increased to 75 cm distance, reduced intensity to encourage stretching
-After pre-flowering began, gradually reduced distance and increased intensity:
-70 cm distance, intensity level 7
-65 cm distance, intensity level 8
-------------------------------------------------------------------------
Watering and Nutrient Adjustments
On Day 14, I increased the watering amount to 600ml per plant, marking the beginning of more intensive care. Alongside this, I started regulating the water’s pH to 6.5 to ensure the plants were receiving the best conditions for growth. At this stage, I also introduced nutrients into the watering routine, but I began cautiously, using only half of the recommended dosage of BioBizz nutrients to see how the plants would react.
By Day 16, the plants received another 600ml of water, and since they responded well to the first dose of nutrients, I increased the nutrient concentration to 3/4 of the recommended dose. The plants continued to thrive with no signs of stress, and they appeared to be absorbing both water and nutrients efficiently.
On Day 18, I increased the watering amount again, this time to 700ml per plant, while applying the full BioBizz nutrient dosage for the first time. The plants showed no adverse reactions, and the soil remained moist even 48 hours after watering, indicating the plants were getting sufficient hydration without any issues.
As we progressed through the week, I established a pattern of watering the plants 2-3 times per week, depending on how quickly the soil dried out. I’ve continued to use the full nutrient dosage with every watering, as the plants are now in a more advanced stage of growth and require more resources to support their development.
On Day 21, after closely monitoring the moisture levels, I decided to increase the water amount to 1 liter per plant for the first time. This adjustment came at an ideal moment, as the plants are now in the pre-flowering stage and seem to be taking up more water and nutrients.
-------------------------------------------------------------------------
Adjusting Light Intensity and Encouraging Stretching
At the end of last week, the light was set at 60 cm distance, but the plants appeared shorter than expected. To encourage vertical growth and stretching, I decided to increase the distance to 75 cm and reduce the light intensity. The goal was to stimulate the plants to reach upwards. This adjustment seemed to work well, as I noticed increased height in the plants as they stretched toward the light.
However, once pre-flowering began around Day 18, I shifted the strategy. I started gradually reducing the light distance and increasing the intensity to optimize conditions for the flowering phase:
After the plants stretched, I reduced the distance from 75 cm to 70 cm and increased the intensity to level 7
Finally, I lowered the light to 65 cm and increased the intensity to level 8
These changes were made over 24-hour intervals to ensure the plants adapted smoothly. They responded positively to the adjustments, with no signs of light stress.
-------------------------------------------------------------------------
Signs of Pre-flowering and First Scent
On Day 18, I noticed the first signs of pre-flowering. Several plants have begun to show small pistils, indicating that they are transitioning into the next phase of their life cycle. This timing aligned well with the increase in water and nutrients, ensuring the plants have everything they need to support their upcoming flowering stage.
In addition, over the last 3-4 days, I’ve begun to notice a distinct smell when opening the tent. As a beginner, I’m still not sure if this is the smell of cannabis itself or just the scent of young plants in general. Since this is not only my first time growing cannabis, but also my first real interaction with it, I find myself a bit uncertain and naïve when it comes to identifying the typical smell. So far, I can’t really tell the difference in smell between the Gorilla Cookies and Amnesia Zkittlez plants.
However, I am noticing the first differences in growth behavior. While the Gorilla Cookies had a height advantage at the beginning of the week, the two previously smaller Amnesia Zkittlez plants have now outgrown it. The Gorilla Cookies is growing more bushy and compact, while the Amnesia Zkittlez is starting to spread outward and gain height. It’s interesting to see these early variations between the strains as they move into the pre-flowering stage.
-------------------------------------------------------------------------
Personal Reflections and Lessons Learned
It’s fascinating to see how much I’ve learned in just a few weeks of growing. Every adjustment—whether it’s with the light intensity or watering—has a direct impact on the plants, and I’ve become more aware of how sensitive they can be to their environment. As a beginner, it’s exciting to realize how flexible the plants are in adapting to the different conditions I’m testing out. The responses to the light adjustments, in particular, have shown me how much control I can have over the plant’s development, even with small changes.
This journey has been a humbling experience, reminding me that growing plants isn’t just about following steps, but also about observing and learning from the plants themselves. Every day brings new insights and challenges, and it’s incredibly rewarding to see these changes reflected in the health and growth of the plants.
-------------------------------------------------------------------------
Looking Ahead
In the next week, I’ll continue to monitor the pre-flowering phase closely. I expect the water and nutrient demands to increase even more as the plants transition into full flowering, so I’m preparing to increase the watering amount to 1.2 liters per plant soon. I’ll also be keeping an eye on the structure of the plants, especially the differences between the Gorilla Cookies and Amnesia Zkittlez. I may begin defoliating some of the lower leaves to give the plants more room to breathe and allow light to penetrate deeper into the canopy.
There’s a lot of excitement ahead as the flowering phase approaches, and I’m eager to see how the plants respond to these new stages of growth. I’ll also be paying attention to how the aroma develops, as this will be another clear sign of progress!
-------------------------------------------------------------------------
Conclusion
As I wrap up this week’s update, I’m excited to see how the plants will continue to develop, especially as they enter the flowering stage. With each passing day, I’m learning more about their needs and how small changes in the environment can have a big impact. The next week will be crucial as I adjust the watering and nutrient amounts to match their increased demands. I’m also looking forward to seeing how the differences between the Gorilla Cookies and Amnesia Zkittlez strains evolve in both structure and aroma.
If you have any feedback, suggestions, or questions, feel free to leave a comment—I’m always open to learning from others and improving along the way. Let’s grow together, and I can’t wait to share next week’s progress with you all!

Likes
20
Share
@Miss_Greenthumbs_Garden
Follow
Really enjoyed growing this strain , she has very nice taste like fruits🍍and candy 🍬 and a hint of gas ⛽️ hard hitting too

Likes
28
Share
@Go4Gav
Follow
Bounced back lovely from deflowering and back to there normal selfs
End plant didn't stop stretching so had to snap and bend them over ..
So many bud sights 😊😊😋.. added pk to the feed few days ago so hopefully see some juicy big buds soon ..
They have there days when the drink 12 to even 20 litres a day each ..
Nothing to report only good news 👍


Likes
8
Share
@eldruida_lamota
Follow
Que pasa familia, vamos con la novena y última semana de floración de estas Drizl Pickl feminizadas de Seedstockers.
Vamos al lío ,se trasplantaron en macetas de 7 litros definitivamente.
El ph se controla en 6.0 , la temperatura la tenemos entre 24/20 grados y la humedad ronda el 50%.
El ciclo de floración puse 12h de luz, el foco está al 75% de potencia.
Al final a salido todo bien ahora a pegar machete y a preparar el proceso de secado.
Las flores salieron bien densas y tricomadas.
- os dejo por aquí un CÓDIGO: Eldruida
Descuento para la tienda de MARS HYDRO.
https://www.mars-hydro.com
Hasta aquí todo, Buenos humos 💨💨💨
Likes
12
Share
@Fabii
Follow
I pretty much stopped All Nutrients only giving small doses of A&B once every other watering soon i will only pour regular Water (not ph) just a couple of videos this time not to many because they haven’t gained size .
Pure Videos today of both Mazari & Strawberry OG.
Likes
25
Share
@mrlovesgrow
Follow
My first ever harvest went great! I trimmed 3 different ways as well as flushed for different amounts of time.
24hr flush and wet trim with bowl trimmer, dried on dry rack. Aprox 4 ounces as i was smoking it soon as it dried, small buds first. 🤷♂️🏻
3 day flush. Wet trimmed by hand. Hung to dry. 119 grams
Last two ladies were the bushy ones. I let them flush for a full week and then hung to dry. We hand trimmed them both(not as close of trim) to make edibles and oils with. 412 grams!
I think I did pretty well on my harvest. I have over a pound of bud! I’m all smiles!

Likes
1
Share
@GnomeMoe
Follow
Flowering nice.
Madarin Cookies are two in back and one in center
Silver Kush are two up front.
I ran out of room for scrogging branches in back, letting them just strech.
Unfortunately that has me keeping the light higher than Id like.
Since S.K. are shorter, the one at right side is 30" from light, while stretched branches in back are 12" from light.
Averaging 18" overall from lights....
Hope i dont get light bleaching!
UPDATE:
Added 2nd screen on Day2 to keep stretchy branches lower
Cookies are flowering nice, one of the silver kush is just starting to flower while the other hasn't started yet.... hmmm
2-3 gallons water/nutes per 5 plants, alternating with plain water (just calmag, malassis, Ph. 6.4) every other day.
Ph.6.4


Likes
5
Share
@Chucky324
Follow
Hello. This is the end of week 4 and the beginning of week 5 of flowering.
Did a smell check of the resin and found that
Plant #1 smells of Sweet Mandarin Orange.
Plant #2 smells like a freshly washed Sweet Carrot right out of the garden.
Plant #3 smells like a average Sweet Round Orange.
I'm hoping plant #1 have big, dense, strong smoking, buds. Love that smell.
OK. Be Cool.
Chuck.
Likes
2
Share
@Growshh
Follow
Jus watering in calmag silica and brix. The terps are amazing. I got seeds tho, that one blueberry that herms jizzed on the grow!

Likes
13
Share
@DrewbieDoobieNoobie
Follow
This was the best yielder of the 4 but only by 1 gram VS the Tangie-matic Another amazing smelling strain, It is like sweet creamy berries in a candy bar this will be great as desert after a nice meal.
happy with the out come of this auto from MSNL


Likes
15
Share
@RussianGrower
Follow
Greetings to all my friends from all over the world, greetings to you from Russia! Another week has gone and I am updating my diary. The plants show healthy growth, but when I arrived at a secret place, I found that one of the 400 watts burned out, so part of the tent was not lit. This lamp has served me for about seven years, but nothing lasts forever. When I did the defolation, the second 250-watt lamp burned out, but unfortunately it worked for more than a year. It's good that I had replacement lamps.
Due to the problem with the lamp, one side of the plants did not develop very well. But despite this, the processes of the plant became of sufficient size so that I took them for cloning. I took ten shoots, placed them in a hormone gel and transferred them to Rootriot, moving the clones into the greenhouse creating a microclimate there.
If you are interested in following the adventures of weed in Russia, subscribe to my diaries

Processing
Likes
8
Share
@eldruida_lamota
Follow
Bueno pues lo dicho familia, es una cepa dulzona y acaramelada, con un porcentaje medio de 16% thc , me parece bastante potente está indica en verdad es un cebollazo épico, si te pasas sentirás hormigueo en las extremidades asegurado.
Sencillisima de cultivar, muy rápida de verdad tamaño entre 45/60cms no es muy grande pero las flores son muy compactas.
Espero que os guste este último trabajo, os dejo muchas fotos y algunos vídeos finales , un saludo y buenos humos.

Likes
6
Share
@TrickzGrowz
Follow
In 1 bis 2 wochen geht's dann in die neuen Töpfe. Je nachdem wann das große Zelt frei wird.
Likes
1
Share
@Bones_1986
Follow
Day 43
Lowered grow dose
Increased bloom & top max
Replaced rhino skin with big bud
buds are stacking nicely, pistils are exploding, and frost is coming in.
All 3 plants showing slight stress which I believe is from the strong 600w HPS light. Nothing of concern, however not a lot I can do as light is already as full height, however Will Increase air flow more upward.
Day 44
Frost has arrived. Bud sites really started to fill out now. Drinking 3L every 1.5 days. Last feed was no grow as wanna cut back on N, and a 50% feed of other nutrients to reduce nute burn. Very happy with progress so far.
Day 46
Increased bloom dose, and cut back on all other nutes. Very happy so far.

Likes
7
Share
@Bmy88
Follow
Las pequeñas tienes bastante fuerza a excepción de una purple punch que está algo estancada pero sus hojas se ven sanas, esta semana apliqué enraizante y luego solo agua hasta 3 semana volveré a aplicar, las blue mammoth vienen hermosas al parecer son más resistentes.
Likes
96
Share
@Tonino
Follow
What can I say about this one she’s my pride and joy she’s got so much buds growing on her it’s amazing I just hope that in the next couple of weeks they will swell and fatten up besides that I couldn’t be happier she’s got a beautiful fruity smell and an amazing frosting I’m planning to feed her for another two weeks And then will start flushing
Description
Candida (CD-1) has the highest CBD and lowest THC content of any strain currently available on the seed market. It was named after the founder of Medical Marijuana Genetics’ late mother and means ‘bright light’ in Latin.
Our Laboratory results show CBD levels of between 20.6% and 10.9% CBD with THC levels rising with higher CBD levels - but never passing 1% THC. The balance between CBD and THC remains more consistent than any similar strain.
With these ratios of CBD to THC, the anti-psychotic capabilities of the higher levels of CBD outweigh the relatively small amounts of THC, and effectively remove the "high", psychological effect, ensuring a non-psychoactive cannabis plant.
Candida can be grown both indoors and outdoors. It is recommended for all environments and grow-media and has a unique lemon flavour and aroma that compliments its medicinal properties. CD-1 will flourish in any climate. It has impressed many with its highly vigorous early growth
Candida will noticeably produce two different phenotypes; a sativa and an indica. Initial research has suggested that the sativa phenotype will produce lower, whispier yields often associated with sativa strains. We have noticed to date that the sativa pheno produces higher CBD counts. In comparison, the indica pheno will produce bigger, denser yields with lower CBD levels but still with significant CBD content. It is recommended to give good care to the sativa phenos as these can be harder to manage and will have larger distances between the internodes making the plants more vulnerable.
Generally, the sativa pheno is better suited to making extractions than to smoking and vaping, whilst the indica pheno is suitable for all.
Characteristics
BREEDER/BRAND Medical Marijuana Genetics
GENETICS ACDC x Harlequin
VARIETY Indica / Sativa
FLOWERING TYPE Photoperiod
SEX Feminised
THC CONTENT 0.3%-0.9%
CBD CONTENT 10.6%-20.6%
YIELD 400 gr/m2
GROWS Greenhouse, Indoors, Outdoors
FLOWERING TIME 9 weeks
MEDICAL CONDITIONS ADD/ADHD, Anorexia, Anxiety, Autism, Depression, Epilepsy, Inflammation, Seizures, Stress
MEDICINAL PROPERTIES Depression, ADHD, Anorexia, Epilepsy, Autism, Anxiety, Inflammation, Seizures, Stress.
AWARDS 2nd place CBD category. Spannabis Champions Cup Madrid 2017

Likes
127
Share
@DutchFarmer
Follow
1 week done!
Really impressed with how strong she is!
Let’s gooo we will keep on pushing forward
Time to start the plagron sauce
