


Likes
23
Share


@NordicCropz
Follow
Long time. Day 106 from seed, flowering into eternity because of silly feeding mistakes. But at least I now have a bit of some incredible weed, harvested one plant day 101. Even though I'm sure it would have been even better with a perfect life cycle. 40 grams, trimmed to their bare bones. Was I expecting more? Yes, but given my mistakes, and the fact that it must be at least top 3 in my 8 year long cannabis career, I am nothing but thrilled with the outcome.
The one thats gonna be my biggest yielder is also the slowest one, by far. Guessing around 3 more weeks.. If it doesn't die on me, it has a coverage of yellow leaves which makes me slightly nervous.

Likes
31
Share


@Crybabypete
Follow
The buds are beginning to put on some weight and thicken and she is still growing upwards.
I’ve been having to re-tie her every 2-3 days.
Still got a ways to go but I’m really proud of her so far!

Likes
13
Share


@Ghosttown
Follow
After 48 hrs darkness I've finally trimmed buds to prep for hanging.
Plant 1 .82kg wet weight
Plant 2 .88kg wet weight
Plant 3 .77kg wet weight
Total wet weight incl stems 2.47kg or 2470g
Equate to 5.438 lbs wet weight.
I can't wait to see dry weight. I'll be happy with half loss in water.
Likes
42
Share


@Pr3m_85
Follow
Day 16 : flowering intensifies ! It seems she stoped her stretch. I will begin PK 13-14 in 5 days.
(Sorry, I couldn't make some pict Day 17 & 18 cause of my disease. I've passed all the week end in the bed. 😔😔😔)

Processing
Likes
13
Share


@GrowGuy97
Follow
Flower day 10 - Everything is going great so far, currently trying to find a bigger dehumidifier cause RH is staying a little higher than I would like! Thanks for following & happy growing friends!🌱✌️🏼
Flower day 11 - Finally got the last 2 plants from the first run cut down & now these ladies have much more room! Watering tonight with just PH water. Happy growing friends!✌️🏼🌱
Flower day 12- Buds are starting to show, can’t wait to see how different they all look😍😍
Flower day 16 - End of Week 8, all the plants are coming along beautifully! Definitely will not have 10 In my next flower run though the tent is way to packed lol! Thanks for following & happy growing friends!✌️🏼🌱


Likes
33
Share


@Hydro_sweetness
Follow
Hey guys welkome back in week 14 this will be the last week of flowering, yesterday i gave the last part of nutrients and ill start flushing and continue doing till next week monday that will be harvest day, Im very excited!!
After cutting them down ill at least let them dry for a week and after that week il put the buds in glass jars for 2 weeks (at least 2 week without me smoking it...)
As soon the buds go in the jar the NL X Haze will be put in to flower for atleast 8 weeks or so.
After that ill cut clones from the “leftover” NL X Haze for outdoor growing.
Thats it, see you guys at the harvest next week!!

Likes
9
Share


@FrostyCloudzz
Follow
Budding phase ,
Scorg angepasst
Dünger erhöht - Blüte /
1-0-1 -0 immer um turn
Verschiedene phenos ,
Duftet stark
Super Kondition
Kleiner Fehler beim defoiling
Also im ganzen bis jetzt zufrieden , bin noch vorsichtig und ein Tag mal net und schwups ausversehen ein bis geköpft …
Naja man lernt ja aus Fehlern
Likes
3
Share

@Growhome_90
Follow
07.07:
Nach dem Stress die letzten Tage (Umtopfen, Toppen), darf sie sich in den nächsten Tagen ein wenig regenerieren und neue Blattmasse ausbilden.
Der Plan für die Zukunft:
*4-Way-Main-Lining*
Im laufe der Zeit nehme ich die Triebe unteren Nodie ab und habe somit 2 Nodien (2./3.) mit der ich weiter trainieren werde.
Likes
12
Share


@Microsemilla
Follow
Estas tomas fueron hechas el 19 de Febrero de este 2022.
Es dificil determinar el inicio de la flora en exterior, pero estamos en el dia 122 desde germinadas. Empiezan a encogollar los fenos mas indicones.
Se volvió a podar bajos y se rego con Top Bloom + Top Candy
El mes con menos calor que enero con temperaturas entorno a los 30° Celsius como máximos. Aumento ligero de las precipitaciones.
ig: @micro.semilla


Likes
3
Share


@Doobster42
Follow
Cherry Cola has brown top leaves but the rest of the plant is doing great. Gorilla Cookies is just that a gorilla already on 3rd tier leaves and thick stalks. Will start LST .

Likes
12
Share


@Chuckwaggon420
Follow
It's going great with these girls oya by the way there is only 2 now! Thats what happens when growing regular seeds you get males no biggie clones will make these 2 more!! 1 I have taken clones off already since100% female and toped and defoliated to produce many tops with net in flower tent. Getting a interesting smell off her it's sweet and skunky but it's very mild rn. Took some clones a day after moved them into 3 gallon show no sign of stress during transplant but play safe did next day and even after toping/ clone take and defoliate still stay strong no sign of shock!! So now have a clone off 1 will take other soon as preflower shows.
Giving them there normal 5.6-5.7 ph and about a gallon of water every 3 days at the moment with the same dose of food for now. They seem to both be very happy and they love the 3 gallon pot. They both are very short and have indica dominate traits. The leafs are cute but still show hybrid traits as they are not fat like a thumb but still short fingers. Small spacing between nodes so that makes them both nice and get a star on there pots for 2 good traits! 1 with most stars at end of flower is the winning clone!!!
Stay tuned
Always changing
Likes
62
Share


@masterofsmeagol
Follow
8/9 It didn't rain last night and there is no rain in the forecast so I lightly watered. I actually had a copper fungicide in my hand yesterday but decided against buying it after research saying it burn cannabis. I didn't research enough and I may end up going that route. I may also move the problem plant. We shall see. Instead I treated all plants early this morning with the amazing Dr. Zymes. I'll follow up with another form of treatment and see what happens. All around I can see foliage with septoria. Not around my grow but still. It's in the area. Burdocks, maple trees and other small foliage on the ground. I hate having to make decisions like this. Otherwise plants seem to be doing great. Definitely transitioning to flower. Found moth eggs and damage on inner leaves in the pm.
8/10 No water today as the plants were soaked. It rained last night. 68 at 9am. This morning I defoliated and really got on the inside of my plants. I wanted to see if I could find what was damaging leaves. I found an earwig on a plant. That makes me fairly certain they are responsible for the sporadic damage I'm finding. Lower branches have some small leaves dying and in a couple spots it looks like the ate off a bud site. It was were I would've lollipoped but still. I think another application of Spinosid may be needed. Plants are definitely in flower with the dreamcatcher's leading the bunch with small little buds formed. Flowering seems much later than the strains I grew last year. I need to go in the cage at night with some kind of light to see what's going on then. pH meter wouldn't read.
8/11 It had rained earlier but it's been so hot that the plants needed water. I watered but not thoroughly as pots weren't completely dried out. I didn't see any earwigs. I was prepared this time with a spray bottle with dawn. That is supposably supposed to kill them on contact. Unfortunately I haven't had the opportunity to test it. I did find a jpn beetle this morning. I believe they may be responsibly for some of the damage I've noticed. I had a very early appointment this morning so I didn't get a chance to take any pictures or a chance to feed. Plants are definitely flowering. The seedling (I say seedling only because the others are clones) in the 50 gallon pot hasn't been watered as much and I'm not sure if I have been watering enough. I figured the rain would help but I noticed that the soil is very compressed and appeared dry before watering. I also had no idea how much the nutrients effect the pH of the water after added. I have the drops I use to measure pH but that's basically impossibly with big bloom murking the water all up. Also I don't think the plant I was going to cull has leaf septoria. I think it's just been ravaged by pests and has white powder mildew. I will continue to monitor. Temps are supposed to be very high the next few days.
8/12 Fed two gallons to the garden today. Used tiger bloom as I think it plays better. I'll use the Kool bloom though. I do need to say my plants were much further along by now last year. Different strains though. Added a pinch of pH up but it appears the pH is fine after mixing my nutes. Rained AGAIN last night. All this rain brings the earwigs out to climb plants. I included a picture of the damage. I need to do another app of Spinosid it appears. Then alternate with a spray treating the wpm that I see. It's a bad year for mildew. UPDATE 90 degrees out at 2pm. Defoliated the dead spots inside and looked to see what kind and how much damage from ear wigs. It's all minor but still. A few lower branches (bottom that probably should've been clipped) have shoots that are damaged. At spots it appears the earwigs lollipopped the stem. Nothing up high or middle though. Buds are developing and they (luckily) haven't gotten there. I've tried a few things already but today I put petroleum jelly on all my stocks and supports so hopefully those little bastards can't get up to the plant. If the rain laid off it would probably be better. Not a single aphid though and no signs of typical cannabis pests so I guess it's a little give and take. Made a video but will have to upload later.
8/13 Didn't water this morning. A storm came through at 6pm last night. Torrential rain and high winds but no damage. Found more moth eggs and two spots where leaves were rolled up with webbing and inch worms emerged when opened. Other growers suggested the damage could be from inch worms so I think before I do much else I'll apply BT tonight.today is going to be even hotter than yesterday. 85 at 9:30. Will update as I progressed. Added a video.
8/14 Watered this morning as it's been dreadfully hot. In the 90s with super high humidity. Found another leaf with moth eggs and a inch worm crawling on a bud. I did a treatment of BT this morning that I hope will take care of things. Plants look amazing. Walking down to the cage I get hit in the face with a pungent skunky smell. Plants are huge and seem to be flowering more everyday. Strange the amount of difference I notice in just a days time.
8/15 No water today as it rained yesterday off and on and soil was damp. Plants are flowering nice with dreamcatcher in the lead and ice cream cake bringing up the rear. Everyday the little buds seem a little bigger. I will probably need to do another application of BT since it rained yesterday. Still finding some lower branches stripped of new growth shoots where a bud site should be. I don't know if inch worms are capable of this or whether it's earwigs. I WILL find out though. I'll go out LATE tonight and look with a flashlight and spray bottle. Smell is incredible. As long as we have a nice September and a warm fall this is going to be a good year. It got down to like 50 last night but it was 90 yesterday. These plants are resilient to take temp changes like that without it phasing them.


Processing
Likes
9
Share


@High_Grade_Dadli
Follow
Main crown got damn last week on plant with lil to no training done to it...leave are also a bit yellow going to straighten it out this week
Likes
8
Share


@smoothbutter07
Follow
5/30 update: both plants have been jarred for curing! A little disappointed with the over all yield but a lot to learn from this first grow! Expert seeds gg#4 comin next 👌0

Likes
7
Share


@GhostByte
Follow
Did some defoliation and lst this week. Spread out the branches a little better because they were too close together.
I lollipopped them a couple days ago.
Theyre growing very wide, bushy and fast.
Budlets will form any day now.
Giving her one last shot of sugar royal. Only one of them isnt getting it because she looked quite packed with nitrogen. Dont want the same like my last grow to happen this time. :)

Likes
185
Share


@yan420
Follow
🌈💐🍬🌈💐🍬🌈💐🍬🌈💐🍬🌈
Hi and welcome to another grow
of mine this time from Kannabia which is a 1st for me an we are talking about the strain Runtz Auto it's going to be a single plant diary, and I'll be topping once if vigorous enough✅.
Thank you Kannabia for the chance to try out your awesome seeds 🙏🏻❤️
01.08.24 Bad news🤬 I'm mad with myself I left the seed dry out so it's💀I put the next one today✅.
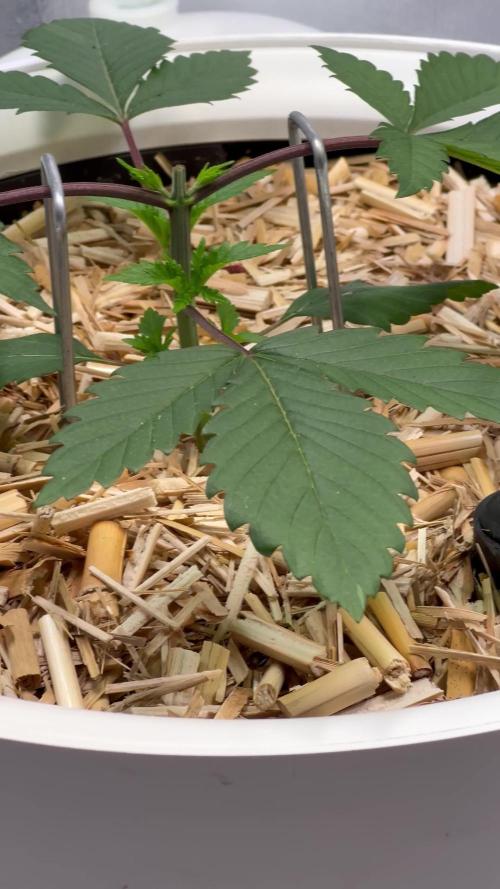
04.08.24(GW)Seed germinated and put in final pot last layer of clay pebbles after it grows a bit.(📸)
12.08.24(VW2) I'm having a pest problem with my 🍌💜✊🏻 so I preemptively dosed this one as well, already got burnt leafs so next weeks pics won't be as pretty 😐more details in my 🍌💜✊🏻 diary.
14.09.24(VW7) Showing signs of flowering so I won’t be touching her much for the next 1 or 3 weeks until the final cleanup and readjustment (LST/HST)✅.
10.10.24(FW3) Did a last cleanup (📸)
🌈💐🍬🌈💐🍬🌈💐🍬🌈💐🍬🌈
💭❗💭❗💭❗💭❗💭❗💭❗💭
❗Events"&thoughts worth noting❗
💭❗💭❗💭❗💭❗💭❗💭❗💭
28.07.24 pre soaked coco coir with (*1) and planted
01.08.24I left the seed to dry out🤬 next one planted today.
04.08.24(GW) Seed germinated and put in final pot last layer of clay pebbles after it grows a bit.(📸)
12.08.24(VW2) I'm having a pest problem with my 🍌💜✊🏻 so I preemptively dosed this one as well.
26.08.24(VW4) Topped and pruned her in preparation for flowering(📸).
31.08.24(VW5) Did some LST&HST (📸)
08.09.24(VW6) Did some LST&HST (📸)
14.09.24(VW7) She is showing signs of flowering so I increased GreenBuzzBloom from 10ml to 20ml and fed with (*1) 3l, next week I’ll switch the diary to flowering.
21.09.24(FW1) Some brown spots on some of the leafs, so tomorrow I’ll increase GreenBuzzBloom to 30ml TriPart Bloom to 20ml and see what happens.
22.09.24(FW1) Did a heavy LST/HST session (📸)
28-29.09.24(FW2)I didn’t notice my ph drift upwards because of work and my update today won’t be pretty 🤬 but I’m still optimistic I’ll get a few good buds out of her I fixed the ph back to 6 diluted my nutes to 50% added a couple of ml per l of GreenBuzzBloom and flushed 28-29.09.24, I’ll observe and act accordingly , I have more seeds so I’ll definitely try her again regardless of result as I’ve seen others grow her and they seem happy with her.
05.10.24(FW3) She seems to have recovered from the ph issue in (FW2) 🥂🍀❤️
08.10.24(FW3) Now that the stretch is over I’ll readjust the nutes accordingly, TriPartGrow 0ml from 10ml,TriPartMicro 10ml from 20ml,FermentedPlantJuice 10ml from 30ml the rest stays as it is unless she complains, first feed with new nutrient schedule tomorrow 09.10.24(FW3)
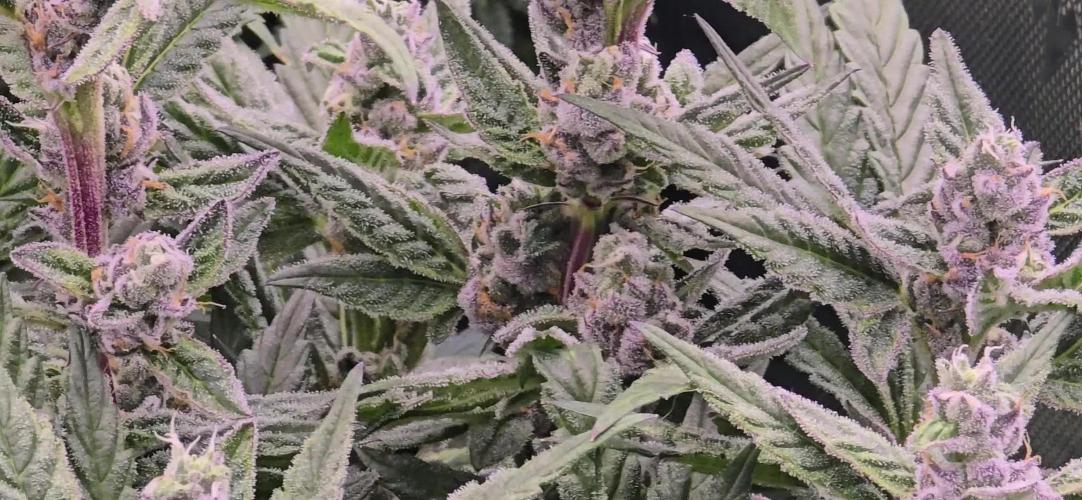
10.10.24(FW3) Did a last cleanup (📸)
19.10.24(FW5) drop TriPartMicro to 0ml, increase TriPartBloom to 30ml, buds are fattening up but a touch to leafy hope she reacts well, change and first feed tomorrow 20.10.24(FW5)
28.10.24(FW6) feed 5l of (*1) last feed and only clear water in the tray until end of this week (harvest)
💭❗💭❗💭❗💭❗💭❗💭❗💭
🐝🌼🐝🌼🐝🌼🐝🌼🐝🌼🐝🌼
🌼Day to day tasks & actions🌼
🐝🌼🐝🌼🐝🌼🐝🌼🐝🌼🐝🌼
25.10.24(FW5) no water no feed
26.10.24(FW6) feed 5l of (*1)
27.10.24(FW6) feed 2l of (*1)
28.10.24(FW6) feed 5l of (*1) last feed till harvest end of this week.
29.10.24(FW6) „threw“ some distilled water in the tray from my dryer.
30.10.24(FW6) „threw“ some distilled water in the tray from my dehumidifier.
31.10.24(FW6) Did nothing
01.11.24(FW6) Did nothing
🌼🐝🌼🐝🌼🐝🌼🐝🌼🐝🌼🐝🌼
🍶💦🍶💦🍶💦🍶💦🍶
💦Nutrients in 30l(*1) 💦
🍶💦🍶💦🍶💦🍶💦🍶💦🍶💦🍶
💦TripPartGro :10ml *0ml
🍶TriPartMicro: 20ml *10ml *0ml
💦TriPartBloom: 10ml *20ml *30ml
🍶
💦 Fermented🌿juice:30ml
🍶GreenBuzzBloom: 10ml *20ml *30ml.
💦Cal-Mag: 60ml
🍶buxXtrade citric acid Ph-
💦🍶💦🍶💦🍶💦🍶💦🍶💦🍶💦
⚙️✂️⚙️✂️⚙️✂️⚙️✂️⚙️
✂️Tools & equipment ✂️
⚙️✂️⚙️✂️⚙️✂️⚙️✂️⚙️✂️⚙️✂️⚙️
✂️➡️2xMarsHydroSP3000
⚙️➡️MarsHydro150mmVentilatorACF
✂️➡️Trotec (big) dehumidifier
⚙️➡️Small no name dehumidifier
✂️➡️Kebab stainless skewers 3 (LST)
⚙️➡️wire+roast beefskewers(LST)
✂️➡️trimming scissors.(HST)
⚙️➡️Waterproof vacuum cleaner for
✂️spills.
⚙️✂️⚙️✂️⚙️✂️⚙️✂️⚙️✂️⚙️✂️⚙️
🍭🍦🍬🌈🍭🍦🍬🌈🍭🍦🍬🌈🍭
🍦RUNTZ AUTO KANNABIA
🍬🌈🍭🍦🍬🌈🍭🍦🍬🌈🍭🍦🍬
🌈Seed:Auto Zkittlez&Gelato😋.
🍭Effect: Balanced
🍦THC: 20 %.
🍬Features: For beginners
🌈Flavor: Earthy, Floral, Sweet
🍭Complete cycle: 70 days.
🍦Average height: 100.
🍬Yield: 450-500 gr/m2
🌈🍭🍦🍬🌈🍭🍦🍬🌈🍭🍦


