The Grow Awards 2026 🏆 


Likes
Comments
Share
@TheoRehtisch
Follow
Week 4 - It’s Friday again, and that means it's update day!
Another week has passed, and as usual, there's plenty to report. A lot has happened, and once again, I’m bringing you along on my journey as a total beginner in the world of growing. Every week is a new learning experience, and I’m excited to share what’s been going on in the tent as my Amnesia Zkittlez and Gorilla Cookies continue to grow.
-------------------------------------------------------------------------
Key Growing Parameters
-Humidity: 43-55%
-VPD: Max 1.4
-Airflow: Always active at level 1, auto-adjusts when needed
-Day Temperature: 25-26°C
-Night Temperature: 22°C
-Light Cycle: 20 hours light / 4 hours dark
-Lamp: IONBOARD S24 from AC Infinity (240W)
Watering Schedule:
-Day 24: 1 liter
-Day 26: 1 liter
-Nutrients are applied with every watering
Light Adjustments:
-Light distance now at 50 cm
-Intensity increased to level 10
-------------------------------------------------------------------------
Growth Update
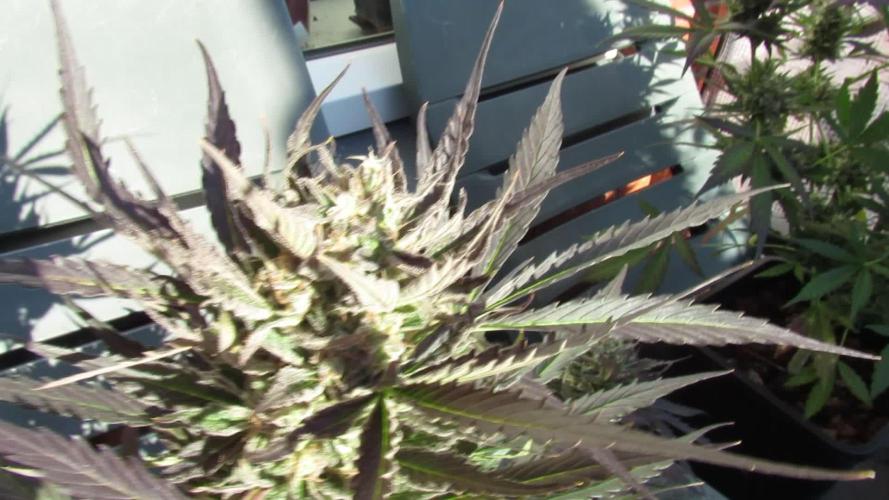
The most noticeable change this week has been the incredible growth of the plants. I’ve uploaded some new photos for everyone to see, and it’s amazing how much they’ve shot up compared to last week. The differences in growth behavior between the Amnesia Zkittlez and Gorilla Cookies are becoming even more pronounced.
The Amnesia Zkittlez has more than doubled in height since last week, shooting up and stretching outward. Meanwhile, the Gorilla Cookies hasn’t grown as much in height, but it has become noticeably rounder and bushier, almost like a pufferfish. It's fascinating to watch these plants develop in such different ways.
While the Zkittlez focuses on vertical growth, the Gorilla Cookies is spreading out horizontally, forming a dense, compact structure. All around the plant, small flower sites are emerging, extending from within the plant and beginning to take shape. This difference in growth styles really highlights the unique characteristics of each strain, and I’m excited to see how they continue to evolve.
-------------------------------------------------------------------------
Training: LST and Defoliation
This week, I’ve also focused heavily on training the plants using Low-Stress Training (LST) and some selective defoliation to optimize light exposure and encourage better growth.
I applied LST more aggressively over the past few days, using clips to gently bend the stems of individual branches outward, almost to a 90-degree angle. This technique has helped the plants spread out horizontally, allowing more light to reach the inner and lower branches. I’ve been adjusting the clips nearly every day to refine the structure and ensure that the light penetrates deeper into the canopy. The goal is to encourage outward growth and create more space for the lower branches to thrive.
In addition to LST, I began selectively removing leaves. I started with the first set of fan leaves, followed by leaves growing inward toward the plant’s center. These were either shading promising bud sites or simply not contributing to the plant’s energy needs. I’ve also removed the lower bud sites, which likely wouldn’t have developed into anything substantial. This way, the plants can focus their energy on the more promising, higher-up buds that are receiving better light.
Throughout the defoliation process, I’ve been careful not to remove too many leaves at once. I’ve only taken off leaves that were either blocking key bud sites or were small and shaded, ensuring that the plant still has enough foliage to continue its healthy growth.
-------------------------------------------------------------------------
Nutrients and Watering Routine
There haven't been any changes in my nutrient schedule or the way I water the plants this week. I’m still using the same BioBizz nutrients at the recommended dosages with each watering, and the watering process itself remains unchanged. Each plant receives a consistent 1 liter of water every couple of days, and so far, the plants are responding well.
However, based on some recommendations I’ve received, I’m planning to introduce CalMag from BioBizz into my watering routine over the course of the next week. This will help ensure that the plants have enough calcium and magnesium, which are essential for strong cell structure and nutrient uptake, especially as we move further into the flowering phase.
-------------------------------------------------------------------------
Personal Reflections and Lessons Learned
As I progress through this grow, I’m realizing how much more there is to learn, especially when it comes to managing light exposure and training techniques. It’s been rewarding to see how the plants respond to LST and defoliation, but I’m still figuring out the perfect balance. Every small change seems to make a big difference, and I’m constantly amazed by how quickly these plants adapt. Being a beginner, this process has been both challenging and exciting, and I can’t wait to see how the flowering stage develops.
This journey has been a humbling experience, reminding me that growing plants isn’t just about following steps, but also about observing and learning from the plants themselves. Every day brings new insights and challenges, and it’s incredibly rewarding to see these changes reflected in the health and growth of the plants.
-------------------------------------------------------------------------
Looking Ahead
In the next week, I’ll continue to monitor the pre-flowering phase closely. I expect the water and nutrient demands to increase even more as the plants transition into full flowering, so I’m preparing to increase the watering amount to 1.2 liters per plant soon. I’ll also be keeping an eye on the structure of the plants, especially the differences between the Gorilla Cookies and Amnesia Zkittlez. I may begin defoliating some of the lower leaves to give the plants more room to breathe and allow light to penetrate deeper into the canopy.
There’s a lot of excitement ahead as the flowering phase approaches, and I’m eager to see how the plants respond to these new stages of growth. Stay tuned for more updates, and feel free to drop any advice or questions in the comments—this journey is all about learning together!

Likes
57
Share
@Hologram
Follow
BEELZEBUB is ready 2b harvested!
Next update is gonna be a harvest. after drying a bit so i can make a 'smokereport' (i use vaporizer) at the same time
The R is now back in the months (septembeR) so its gonna b RRRainy and cold..
luckily the sun is still shining now and then (yeah) ..butshe has 2b harvested soon, the weather is not getting any better..
can see that on her leafs.. beautiful puprle and autumn colours..
Her buds are very solid and demonic, i can even smell some brimstone LOL (nah just my imagination going wild i guess
😸
Happy growing4all✊
***KISS! growingtechnique: Keep It Simple, Stupid!✊


Likes
28
Share
@TheHighentist
Follow
Start of week 4 of flower!
Off to a troubling start, as the light switched on over 1 hour ealiere than scheduled.
I took a spare timer, and set it up to continue it's 12/12 schedule, but now moved one hour back.
I cross my fingers they forgive me for this error.🙏
👽👉31/10 The day after watering and the day my timer messed up my 12/12 schedule. But hope it brings no problems.
I defoliated lightly and only removed most under the SCROG line.
Even a couple of underdevoloped branches that stretched below SCROG-net got cut.
👽👉 1/11 Been having a battle with humidity after watering, but upped my air circulation to help.
👽👉 2/11 Waterday*
Upped my nutes on BioHeaven, BioGrow and BioBloom.
👽👉 3/11 They seem to be responding good to the upped nutrients.
👽👉 4/11 Humidity under control.
👽👉 5/11 The VPD on point, has really speed up the trichome production.
👽👉 6/11 Waterday*
Stayed on the same schedule, as last watering. They seem very satisfied and no signs of mistreatment.
Likes
81
Share
@UnorthadoxDude
Follow
Hey! Welcome to week 8! Karen is mid way through her flowering stretch. Please check back to last week as I update daily so the week is now complete. I count about 20 colas now.
Day 51: Have reconfigured the tent, see video. Karen is now 36cm and still stretching. Karen has more light now. Smell is still there hits you when you open the tent. Fertigated 2l.
Day 52: Height: 39cm. Karen's scent is heavenly. I have reconfigured again and installed some upgrades. Better reflector. Much bigger carbon filter. Increased airflow. Better config. More efficient pot layout. Karen is lovely.
I am grateful to her and for her, so I wrote her a little poem, I hope she liked it.
"Karen! Oh Karen! The phoenix of flowers,
Three lowly weeks she struggled in vain,
Shadowed and starved for five hundred hours,
He slowly wept to witness her pain.
Karen! Oh Karen! I P-H'd your showers,
and in the fourth week you started to gain,
Hallowed and hard you survived as you cowered,
I thought you meek, I was wrong once again.
Karen! Oh Karen! Forgave me my howlers.
She set a pace, a pace she maintained,
Now shes a girl at the peak of her powers,
And so I'm a geek, with buds on the brain."
Day 53: Approx 48h into a simulated dry spell.
Alright I think it is time for Karen to get her first MAJOR defoliation. I will update shortly with photos and info. I will also be doing some gentle LST to separate the colas a bit.
Day 53.5: Defoliation and LST. Finally got chance to photograph that bunda. Enjoy!
Day 53.75: Bit of a fail. Messed up the timer and the lights ended up being off for about 3 or 4 hours. Because I was cooling the room (open window) to keep temperature in the tent down, without any light the temperatures absolutely plummeted as it is sub-zero outside. By the time I realised and turned the lights on, the temp in the main tent had dropped to 14 degrees celsius. Whoops! How is that for mistreating your girl? Defoliated about 80% of her leaves, 4 nodes, significant LST, then stuck her in the cold and dark for 1/6 of a day. Not to mention she is now almost 3 days into a "dry spell". There do not seem to be ill effects, and Karen has already begun to respond to the LST; all the colas that had been changed in angle are now upright again.
The dry spell I keep mentioning, there is a method behind my madness, I have spotted one or two small flies and I think they may be fungus gnats. I am starting to suspect that the 2nd seedling in the Purple OG Punch Auto grow was actually beheaded by fungus gnat larvae. So I am drying out the mediums as much as I dare. I am closely monitoring the plants, so far the only one I have had to break the drought for is Enigma; all the girls in big pots haven't even noticed it's dry yet. How far am I going to push it? Well I will judge it on a plant by plant basis, but quite honestly I am hoping to see physical signs of thirst before I breakdrought. Of all the plants the two I think will respond most strongly to this will be Karen and Bertha, because of where they are. Karen here is actually probably 4 weeks into flowering rather than two, so about now is a good time to give her a little hydration stress. I do not think I will push it past 5 days, as RH is 34%. By now all the plants will be compensating for the lack of moisture and the high temperatures and low humidity. They will be taking more and more moisture out of the coco, and as the coco dries further and further down, those plants that have space will start desperately growing roots to find moisture. Mark my words, 24 hours after I end this drought, every plant in the tent will throw out crazy growth.
Day 54: Ended drought and fertigated 6l, no run off, I will re-fertigate tomorrow. Karen is still stretching her height post LST is now 37cm. The two tallest colas seem to have stopped but the other colas are still stretching.
Day 55: Alright so it has been 5 hours since lights on, and Karen is looking in good shape, all her drooping leaves have perked back up and she has added quite a bit of foliar growth. The colas are all still rising, except perhaps the two tallest. This girl is absolutely loaded with pistils, I'm starting to see trichomes on the sugar leaves, but trich production hasn't started in earnest yet. She has a least 20 colas, and 6 of them are thicker/taller than the primary cola at her tip. Every one of her nodes has reinforced itself with a bulbous growth and these cola branches are swelling rapidly. I am increasingly of the opinion that, all being well, this girl is going to surprise us all with her yield. My first grow, which was just mucking about really, I got 60-70g of the two main plants, and they were just bare sticks with 2 colas. Although her height is less than theirs was, 2/3 of their height was bare stick... whereas every mm of her is befoliaged and living. So in terms of the height of the actual cola I think they were about comparable in usable space on a per cola basis. The main difference being that Karen has 20+ colas whereas they had 2 primary and 2 lower. I know that it is probably unrealistic to expect more than 70g from a single auto grown indoors. Nevertheless my gut tells me this baby could achieve at least 100g, perhaps as much as 150g. The next few weeks will determine that, but given where we were in week 3 I will be grateful for any yield of quality bud. I have dropped the lights down to 18/6 from 'tonight' onwards.
I really have no idea how long we have left for Karen. According the the "brochure" she flowers for 7-8 weeks, with a total crop time of 9 weeks. The problem is I don't know what a total crop time is? Does that mean from seed to finish? If so Karen is clearly not going to be anywhere near that timescale.I am going to go ahead an assume that, for my plant anyway, the first 4 weeks were veg weeks. I think it is fair to count week 5 and 6 as flowering because pistils were popping out very early in week 5 if not before. So that makes this week four of flowering. I am going to assume 8 weeks rather than 7, so I think we have another 4 full weeks give or take a week. On that basis I am expect harvest week to be around week 12 or so. I am not fixed on this though, I am determined not to harvest this girl early.
Day 55: Photos taken 00:00 9/3/23 Strong 24h of veg growth as predicted.
Day 56: Existing leaves continue to swell. Stretch appears to be slowing. I've taken so many media this week that I cannot scroll down far enough to select a recent thumbnail. Probably Karen's biggest week in terms of changes. She is looking like she is going to impress. Height 39cm.

Processing
Likes
28
Share
@Elysian_gardens710
Follow
I'm watering both of these plants 1 gallon ever 2 days. They're starting to build up!! As an overview You can see from the pictures that both are dealing with a little bit of heat stress. They are in a tent where all other plans love it hot and the temperatures are in the low eighties. if you look at the top leaves you can see canoeing my guess is it's heat.
Other than that they're doing great #1 has shot up she stands nearly 12" tall now. this is the plant that we are letting grow completely natural no topping, No training. #2 on the other hand stands almost 8" tall and is much bushier, thicker, and squatter. You can see clearly in the video that we topped her and also are employing some low stress training to tie down her lower branches. both plants are beautiful and doing great! I expect #1 will be transplanted this week sometime
#1 is 15" from the light #2 is 25" from it.
Day 30: quickly measured because it looked like they grew a bit since watering Thursday. Definitely have too! #2 has easy gone up an inch. #1 is close to the limit of her pot I think.they both have asymmetrical growth 🤨 each have a branch on one side much taller than the other sides so I have begun rotating them daily to help light penetration.
Day 31:
Today I transplanted #1 she was in a 1Gal nursery pot for 31 day and starting to show some issues. I moved her into a 10x10 square nursery pot. Approximately 3gals. From here she will go into a 10Gal for flower in about 6 weeks!(I'm letting them get some size)Very faint yellowing of the leaves and needing to be watered daily. Attached is a video, showcasing her roots. Idk why, but everytime I transplant they look like the video. Everyone else seems to have an insane amount of roots.🤷♂️ #1s roots are some of the thickest I've seen tho, a regular tree! I transplanted using real growers recharge. That's about for today hope u had a great 4th!!🇺🇸🇺🇸🇺🇸
Day 33:
Just a quick update today. Check the video I say more in that than here. #2 has nutrient burn from the recharge. These are such easy plants!! They need and want nothing! Water them once every 48 hrs or so and that's it! Im obviously going to back off on the recharge tho for then next couple waterings.✌️💚🌱
Day 35:
Finishing off the week with a transplant. We put #2 into a 10"x10" nursery pot. Works out to be 3 weeks in the small 3 weeks in the medium then she goes into a 12gal for flower. I used Azos and real growers recharge during transplant
Soil: fox farm happy frog
Light: ES300 LED
18/6 on/off
2x4 vivosun tent
6" oscillating fan, 8"tunnel fan
6" inline duct fan
Watering this week: pH 6.5
1 watering of real growers recharge
Maggie's 3-1 garden spray preventative

Likes
6
Share
@Muravushka
Follow
will edit this text, the page closes all the time because of lack of the memory or something, so im saving it all the time


Likes
5
Share
@Trinidad
Follow
I think I over dried. Next time I will not wait for stems to snap and start dry trim a bit earlier.


Likes
13
Share
@AutoCrazy
Follow
This fine lady is really starting to add some nice colours due to some cold temps in our neck of the woods. She has a ton of trichomes development now! I am really impressed with the look of the buds. They aren’t all full of leaves which should make trimming her a pleasure. 😎
She has really been fattening up this week. I am guessing she needs another week or so to finish up. Her colouring should be quite something once she is done. 🤩
I am still having the odd spot of powdery mildew pop up but nothing too serious. I have been treating it with greencure every 3-4 days and it’s keeping it under control. I haven’t found any affecting the buds yet which is a win! This is the reason a good effective regimen of treating plants for pest and mould/mildew is an outdoor growing must!! I have yet to lose a plant to mould or peat so I swear by it. I’ve seen a bunch of my associates with some powdery mildew beast. Such a shame to see😱
Stay tuned for the final week
😎🍿

Likes
13
Share
@cookingwithninja
Follow
Week 9 day 1 video pheno.
Gonna chop this week
Week 9 day 7 well chop this weekend so on week 10 Day 1-2. Just waiting on a light to reveg one.
Everything is magic


Likes
14
Share
@9LittleGrow
Follow
The last day of week 7 vegetative stage and the next day I’ll change my light cycle from 18/6 to 12/12. I flushed my babies with tap water last 2 days ago and so they gonna be thirsty and tomorrow I’m gonna feed with flowering nutrients. So, I’m very excited with the flowering process of they gonna be.


Likes
85
Share
@Tropicannibis_Todd
Follow
Start of day 98 ...... January 15 2022 Start of week 14 ........ 72 DAYS INTO FLOWERING
😕 LOOKS LIKE THERE GONNA GO A LITTLE LONGER THEN EXPECTED ? 😕 Gonna be honest , I didn't expect it to go over 85 days but here we are ........
( I BELEIVE IT HAS ALOT TO DO WITH THE SIZE OF MY GROW MEDIUM , AND THERE HEALTH AS I AM RUNNING 45 LITERS OF SOIL MEDIUM) .... SHE SEEMS TO WANNA RIPEN ON HER TERMS
( OMG THEY SMELLING GREAT ) !!!!!!!
Check out the full grow video on latest weekly update
Super Exceptional Growth Daily
Still adjusting LST when needed and leaf tucking.......
Water Only when needed but its drinking more every otherday and adjusting lights when needed......
Rain Water Only .......
( DAY 26 AND BOTH NL 1 & NL 2 SHOWED PREFLOWERS )
( DAY 49 AND RESIN PRODUCTION HAS STARTED )
( DAY 57 , EQUIPMENT FAILURE , main FAN , over heated😡 tripped breaker , reset light timers , lost a DAY, REPLACED new Main Fan 😁 back up running 👌)
( DAY 70 DID ITS FINAL FLUSHING TODAY TO GET RID OF ANY BUILDUP )
( DAY 77 AND IT SHOWS A SLIGHT DEFICIENCIE MAYBE A CAL/MAG GETTING CLOSE TO END OF LIFE ) IM ALSO DOING VERY LITTLE, SLIGHT DEFOLIATION
( DAY 101 AND ALL IS GOOD , THERE FATTING UP )
DAY 101 .....NL 1
SHOWS SOME CLEAR TO MOSTLY CLOUDY RESIN HEADS , LOOKS LIKE THERES STILL AWAY TO GO😩😩 .......
DAY 101 .....NL 2
SHOWS MOSTLY CLOUDY TO MILKY RESIN HEADS ( 💀 PROBABLY PEAK THC LEVEL 💀 ) , AMBER IS JUST GETTING STARTED , GETTING CLOSE BUT SEEMS MORE TIME NEEDED...... VERY CLOSE ( AS I WANT SOME % OF AMBER 😁 )
I hope you enjoy my growlog...
(Who the hell is TropiCannibis Todd😎 Well This is not only my FIRST AUTOFLOWER but my FIRST GROW in over 11-12 Years😳 I Grew from 2002-03 TO 2010-11 , I'm back nahnahnahnahnah , Been a fun grow , learned alot , and it looks like I am gonna have a great harvest with some great smoke....... who new 😁 )


Likes
58
Share
@nonick123
Follow
Bienvenidos la semana #3! 😁
Día #18.
Crystal Candy XL Auto ha empezado a crecer de forma espectacular! Northern Lights auto ha mostrado las primeras preflores y también están empezando a crecer muy rápidamente
Royal Bluematic ha pasado por el bloqueo de nutrientes por el ph alto en el agua de riego (es la única strain que la ha manifestado). Se ha regado con agua con ph ajustado para controlar el bloqueo. Orion F1 están yendo más lento que el resto...
Día #19.
Crystal Candy XL Auto y Northern Lights han empezado una carrera hacia el cielo
Se decide empezar con LST en todas las variedades (ver fotos)
Es primera vez con LST, así que espero hacerlo bien! Pero supongo tendré una curva de aprendizaje o ensayo y error
Día #20.
Crystal Candy XL Auto se muestra muy sedienta. Sus compañeras siguen con 100 ml de agua desde hace unos 4 días, y ella necesita 250 ml de agua cada 3 días (también es la más rapida). Se ha regado Crystal Candy XL Auto con 250 ml de agua más 2 ml/l de Bio-Grow de Biobizz
Es necesario ajustar el LST a diario
Día #21
Se hace un riego con 100 ml a todas las plantas (excepto Crystal Candy XL que se regó día anterior). LST es exigente en su revisión diaria pero divertido! 😃
Día #22.
El tiempo se está volviendo soleado y hacemos el primer baño de sol.
Crystal Candy XL Auto está respondiendo muy bien al LST, necesita ajustes a diario
Royal Bluematic tbm responde bien al LST. Las Orion F1 están yendo lentas...
No sé si cogerán velocidad la próxima semana
He detectado que Northern Lights tiene una pequeña plaga de minadores de las hojas (solo una hoja afectada). Para atacar la plaga y por precaucion, se hace aplicación foliar a todas las plantas de jabón potásico y aceite de neem.
Día #23.
Descubro que he quemado algunas hojas tras la aplicación foliar de ayer y meter demasiado rápido bajo la lampara...
Salimos al exterior! 😂
La idea es dejarlas en exterior el resto del cultivo, a no ser que vuelvan las lluvias (espero que no! 🙏) Pequeños ajustes de LST
Gracias por leerme! 😄


Likes
29
Share
@Basementganja
Follow
This C4 auto was very fast to flower, and stretched up to produce some very pretty, berry smelling/tasting nugs!
The buds didn't flower very dense, they formed as fox-tail shapes.
Yield is on the low-end of acceptable, but good considering the bud structure!
I'm growing another next run, to compare phenotypes!
Likes
50
Share
@Hou_Stone
Follow
Here are my 3 nori cake that i keep 👶 They look in good shape to me💪🎊
For this grow, I plan to let each plant grow with a large main bud, without topping.
Next week I will cut the lower branches closest to the ground.
-----------------------------------------------------------
💧Watering each pot:
day 9 : 1L
day 12 : 0.5L
I use tap water, adjust the ph to around 5.8 and water
------------------------------------------------------------
🤩Equipment of the week :
Light FC3000 Mars hydro. power 80% at 50cm
Extractor 6 inch Mars Hydro. power 1/10. ON 24/24h
2 fans to circulate the air inside the tent. Each on for 30 minutes then off for 1 hour. this rhythm repeats itself in a loop
Heating mat Romberg 95x95cm. ON 45 minutes. OFF 30minutes. In a loop
I am adding anti-midge bird stickers 🐦
------------------------------------------------------------
Thank you for your visit and your support with the likes, comments. It's always nice to see you!💚
------------------------------------------------------------
My Instagram 🌱❤️️ :
https://www.instagram.com/hou_stone420/