
Likes
Comments
Share


@Autower
Follow
The first line from the right main cola is the banana punch second line with the left main cola is the dos si dos they have a very strong smell looking forward to tasting these no quick drying here so no early testers for me lol.


Processing
Likes
4
Share


@XoticGROW666
Follow
Due to the messed up leafs I had cut my losses on this gelato41 big bushy pheno
Striped all the big leafs and imma finna flush her soon and cut my loses she wud ave been a nice chunky girl but sometimes u gotta roll wid the punches 😅😅

Likes
13
Share


@WeedM8
Follow
Hello m8 welcome to this journey with me in this diary will have very interesting strains hope u find something useful
O.G. Kush Titanium
- [ ] 1st week Veg: germinated in substrate lighting very close so it jets medium high humidity after the 3rd day they started sprouting
- [ ] 2nd week Veg: this week my ventilator broke down and as the temperature stayed very warm nothing developed much
- [ ] 3rd week Veg:fortunately this week i had fixed the ventilation and the temperature has go down a bit allowing the little plants to develop and reinforce
- [ ] 4th week:very good developments in this week I already started feeding a bit two times but i didn’t have to…once was enough
- [ ] 5th week Veg:this week they were very strong green i only had to water them good and keep the ventilators going no stop .They have good hight already ,but as i have to strains together. I want to transplant them when the hight of the other one have stretched… I’m thinking to transplant next week if not the next one
- [ ] 6th week Veg: this week it went great fortunatly i dont have pests that eat my buds i’ve givven a fed once the substrate is very rich already the plants streached very well i will transplant today so be ready m8 i cant wait to show you the progress
- [ ] 1st week Fl:they started stretching and looking very healthy just transplanted
- [ ] 2nd week Fl this week I’ve been away i had a friend taking care of them they stretching very well i hope that she starts putting energy into the flo
- [ ] 3rd week Fl:they are streaching very well ..getting the light very well
- [ ] 4th week Fl:there we aree guys the good stage is heree good high hope dosent effect de prod
- [ ] 5th week Fl:pumping very good this week a lot of changes started already being frosty
- [ ] 6th week Fl:this diaries its not daily updated this week its going’s so great we are close to harvest between next week and the other one . Ill harvest them at different time just because they are not all at the same point of flowering
- [ ] 7th week Fl


Likes
4
Share


@GreeneScene
Follow
Not too much to report here .
Added 3 new pieces of “equipment”
1. Plant watering saucers
2. Small electric dehumidifier
3. Even smaller non-electric dehumidifier
Anywho , still only watering when dry with PH’d water & LSTing . The growth rate I would describe as moderate . One of the 3 GDPs have thrown preflower pistals at the very end of week 3 which is disappointing but I’ll trudge on & try & get 5 minimum 4 solid weeks of veg out of the other two .
That’s pretty much all to report , another week in the books 📚 here at the GreeneScene


Likes
14
Share


@Hempy_The_Kid
Follow
05/18/22 changed nutrient water PH 6.20 TDS 870 now on bloom nutrients. Will give foliar feeding tonight at lights out.
05/19/22 PH 6.13 TDS 890 gave LST to even canopy and get some airflow.
05/20/22 PH 6.19 TDS 878
05/21/22 PH 5.95 TDS 906
05/22/22 PH 6.15 TDS 750
05/23/22 PH 5.95 TDS 780
05/24/22 PH 5.90 TDS 850
Likes
22
Share


@HighRangeFarmacy
Follow
Slowly tapered the nutes mainly just watering with 1/8 tsp per gal. of open sesame. Since I'm new I'm compiling everything I've read and making an educated guess at how I am supposed to flush these girls for 2 weeks. But simultaneously never just feeding plain water... What do you guys think? How close are we. Need tips

Likes
7
Share


@greenflipcali89
Follow
Going to give it 1-2 more weeks in vegetative. Want to fill out the table as best as possible before switching to flower. It is still actively growing as I am lightly defoliating to maintain good lighting throughout the plant. She is getting thirstier so watering on average about a gal every 1-2 days.
Likes
10
Share


@CanadianFillmore
Follow
End of week 9 flush week, cut the blueberry ladies and put them in the mesh drying rack. Will update in 2 weeks with first smoke and dry weight, assuming she's dry in 2 weeks.
Flush week for the Super Lemon Haze, she'll get chopped this coming Sunday.

Likes
27
Share


@TheCannaProphet
Follow
-----------------------------------------
~BARNEYS FARM DOS SI DOS 33™️~
-----------------------------------------
This strain from 'Barneys Farm’s Cali Collection gets another jolt of super power with this explosive collection of terpenes fused together from some of the world’s most astounding US cannabis phenotypes.
Dos Si Dos was developed from OG Kush Breath, a knockout Girl Scout Cookies pheno crossed with Face Off OG, then crossed again with their legendary Cookies Kush (OG Kush pheno x GSC) AND THAT’S ONLY HALF OF THE STORY.
Add in a subtle blend of Gelato #33 to the pot with its star struck Sunset Sherbet x Thin Mint GSC heritage and boom! A new champion was born: a sativa burst of euphoric energy is followed by tranquility with sedative properties capable of happily tranquilizing an elephant, if you’re overzealous or uninitiated!
DOS SI DOS 33™️ Cannabis Seeds Strain Specifications
~Type: Feminized
~Photoperiod: Normal
~Genetics: Dos Si Dos x Gelato #33
~Effect: Relaxed, Sedative, Happy
~Outdoor Yield (g): up to 2000
~Indoor Yield (g):up to 700 gr/m²
~Flowering Time (days): 60 - 65
~Feminized Outdoor Harvest Month: October
~Feminized Outdoor Harvest Month Week: 1st-2nd week
~Height Indoor (cm): 90cm
~Height: Short
~Indica %: 60%
~Sativa %: 40%
~Indica/Sativa: Mostly Indica
~Taste: Mint, Lime, Spice
~Aroma: Cookies, Sherbet, Lime
*Above information credit to Barneys Farm
__________________________________________________________________________________________________________________________________________________________________________________________________________________________________________________________________________________________________________________________________________________________________________________________________________________________________________________
THE SETUP:
~Planted into Jiffy Peat Pellets that were hydrated with de-chlorinated water with SuperThrive added then ph'd to 6.0 @ 80℉
~Grown 100% organic in 10g fabric pots with Mother Earth 70/30 Coco/Perlite medium amended with 2tbs/g of Down To Earth 4-4-4 / 2 cups/g of Earthworm Castings / 1tbs/g of Dr. Earth Flower Girl 3-9-4, 1tbs/g of Dr. Earth Bat Guano, 3/4 cup of Down To Earth Azomite and 1 tsp/g Down To Earth Fish Bone Meal.
~24hr light cycle during Germination / 19/5 light cycle for Vegetation and 12/12 for Flower
~Straight water ph'd @ 6.2-6.8 when needed and weekly Compost Tea's.
__________________________________________________________________________________________________________________________________________________________________________________________________________________________________________________________________________________________________________________________________________________________________________________________________________________________________________________
Weekly Updates:
9/27- Week Seven of flower here we go! She's looking good to go with her flowers stacking and her trichome production continuing to coat her flowers!
Today she was given 1.5g of de-chlorinated water which was ph'd to 6.2 @ 72℉ which I gave her half through her drip pan (bottom chuggin), the remainder trough the medium. I also gave her pot a 1/4 turn.
9/29- Yesterday I didn't water her, only turned her pot and checked her over... Wow! She's really ramping up the trichomes making her flowers look like their sugar coated! 🤩
I watered her today with 1.5g of de-chlorinated water with 1 tsp/g of unsulfured molasses added which was then ph'd to 6.4 @ 72℉.
The molasses will give the microbial colony some additional food as well as supplying micro-nutrients to the plant. I finished out the daily maintenance giving her a check over and turning her pot 1/4 turn to ensure she gets light to every inch of her.
10/1- Yesterday was a 'no water' day as her pot was still fairly heavy to lift. Today she was watered with her usual of 1.5g of de-chlorinated water which was ph'd to 6.2 @ 72℉.
Her flowering continues to impress me with her trichome production covering her flowers, that have these incredibly beautiful blood red hairs in them, with 'frost' making her a sight for sore eye's! 😍
The end of next week will be the beginning of her wrapping up with the 'Finish Line' approaching by Week 8 or 9!
10/3- With Week Seven coming to a close we're going into the last 2 weeks for this lady and she's right on track, looking like a Rock Star! 🤩
I watered heavy yesterday and added 1 tsp/g of Unsulfured Molasses to the 1.5g of de-chlorinated water which was then ph'd to 6.6 @ 72℉.
Her pot had some weight to it when I checked today so I'll skip watering her until tomorrow. I finished up today by checking her over and giving her pot a turn.
~Thanks for stopping in! This epic run will be wrapping up in the coming weeks...Stay lifted and be Blessed! 😎🙏~

Likes
1
Share

@Tropical_Grow
Follow
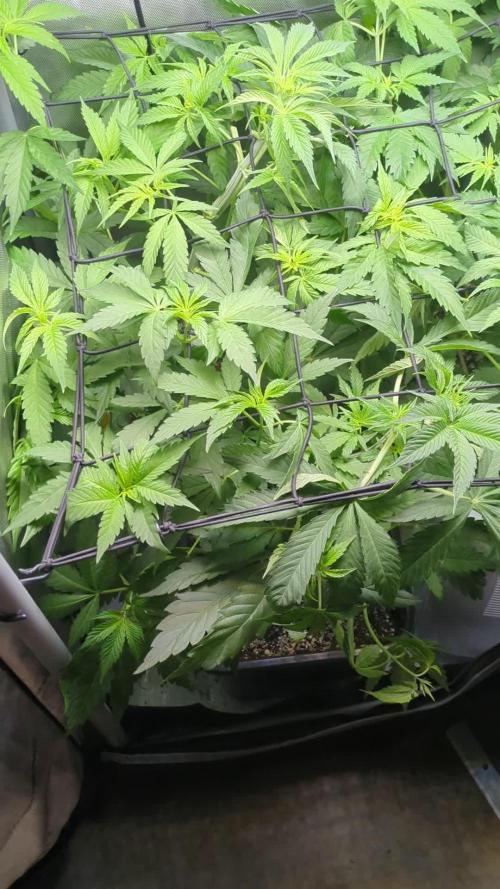
The plants are developing well. You can tell we're nearing the end. They don't smell too strong.
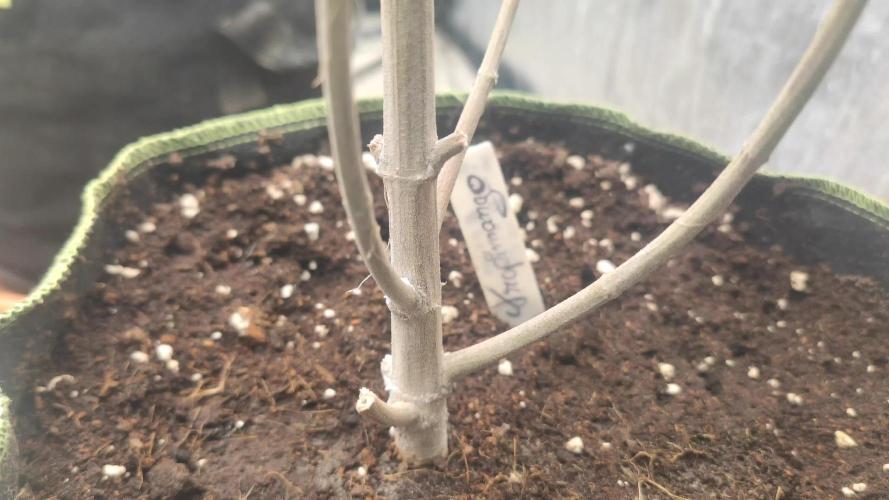
The first two plants from left to right are kiwi x papaya, followed by Super Larry OG, which has a structural problem. The rest of the plants are grown from given seeds that have shown good visual results.

Likes
16
Share


@MUZ_Farms
Follow
Started to flush my plant today ... I love the smell of this plant it’s sweet as they come


Likes
3
Share

@Chrisandweed
Follow
Engorde weenooo engoorde real jajajajaja
Bueno, pues buenas noticias dado que la población tan bestia de araña roja ha descendido a minimos! Por lo general ni veo ya, pero se que aún queda alguna, por ello, les meteré una limpieza mas con aceite de neem y jabón potásico, pero una sola mas, quizá esta noche o ya mañana. A partir de esta aplicación ya se acabo el uso de estos productos, y el siguiente lavado foliar que le haré será un té de canela, haré un concentrado hirviendo agua y con canela en polvo, filtrándolo para wue no quede residuo. Esto lo haré con intenciones antifungicas y de controlar un poco mas la humedad para mantener los bichos controlados.

Processing
Likes
2
Share


@FolloMiSensi
Follow
Flipped sides; week 8 on right and week 7 on left. Canopy is filling out really nice.
Week 8 - growth slowing down as buds starting to form all over. Crystals starting to develop.
Week 7 - growing out quite nice, actually stretched above the plant a week older.
Cleaned up older leaves from the bottom on the plant, only those that came off with a gentle tug. Did a little tucking to expose bud sites.
Changed out the res, maintaining my 1:2:3 GH floraseries ratio (20ml gro, 40ml micro, 60ml bloom in 20 gal tote). Added 30 ml 30% h2o2.


Likes
24
Share


@Lycheegrow
Follow
Ramping up the EC continued. 1.2 for this week. It is increasingly hungry though so I need to find the balance for how much to ramp. I'd rather go a bit too low than too high though so taking it slow.
Flowers have appeared and are slowly starting to develop. A subtle and very delicious smell is starting to develop.
Also since last week they've been drinking a lot more obviously. Been giving around a liter a day each. Once a week a lot less to dry them out.
Did some LST again as I wanted them to cover more surface. Lets see how next week goes.

Likes
11
Share


@masterofsmeagol
Follow
6/30 I messed up and put 8 days last week so I'll have tp do a six day week to get back on schedule. Pounded rain last night I guess. Very intense but very brief. As you can see in the video the plants are found great. A few have revegged so I'll need to defoliate the middle. I could make a TON of clones but it's pretty late for that. I might clone a couple outstanding plants to keep the genetics. Still seeing some pillar damage. Might do bt tonight. I'll keep this updated.
7/1 Super hot yesterday. Reached 90°. We are getting SOME rain today and thunder showers day after tomorrow. Bags still had some heft and everything looked good. I went back aroundcand found about half were at the point of needing water. He'll, they probably all did. My watering can is 2 gallons not 1.5 as advertised. So that means I used 5 gallons on the garden (not watering the 50) focusing the more water on the lightest bags. That tenth planet I'm seeing more septoria like leaves. This makes enough for me to be fairly positive ill need to treat it. I have plant doctor but I think copper works better. I also see more pillar damage so I've gotta apply something. I also need to lst more and I keep to clean put the interior of the plants so they don't get pm.
EDIT: IT WAS 80° and no rain at 6:30. Humidity close to 100% bit plants look AMAZING! I'm hoping this may be my best year yet! I won't grow a bigger plant than tjat blue cheese in the 50 but so far everything is looking good. I may add some nutes to the pink kush in the 50 due to tje slightly less green color. I assume it's just because the other soil is all New amd this was a mix. I defoliated lightly to prevent pm but I have more to do. I just wanted to get a video of the girls looking good.
7/2 82° at 9am. Glad I decided to water even thoughvi watered yesterday. I need to up my volume. Thirty degree temp swings don't help much either. I said I used 4 gals but I used 5. I had one phed already. I'm hoping this will be one of my best years. IT looks like it! I won't have that MONSTER blue cheese in the 50. It was the smallest plant anyway and shows the difference between using NEW soil and mixing old soil WITH new soil. It's a much lighter green. Still need to apply bt and do a little more defoliation.


Likes
8
Share


@TorvicKofran
Follow
ESPAÑOL:
Hola chicos, espero se encuentren muy bien!
Esta semana las chicas han mejorado un poco, se detuvo el amarillamiento, descubri que Cal-Max de Grotek interfiere en la composicion de la linea hesi por lo que las chicas sufren un bloqueo de nutrientes, dejé de utilizarlo y las chicas han continuado con su desarrollo relativamente normal.
ya estan en su 5ta semana de floracion, Tutankhamon ha producido una cantidad gigantesca de resina, Lennon esta engordando a toda velocidad y aun le quedan 6 semanas aprox.
Anubis a pesar de su color intenso amarillo palido esta engordando bastante bien y su produccion de resina es inimaginable y ya solo que quedan 2 semanas y media aprox.
espero que a partir de ahora ya no surjan mas problemas y que las chicas terminen su floracion de la mejor manera.
esto es todo por esta semana chicos, espero que se encuentren muy bien !
INGLES:
Hello guys, I hope you are very well!
This week the girls have improved a little, the yellowing stopped, I discovered that Cal-Max from Grotek interferes with the composition of the hesi line so the girls suffer a nutrient lock, I stopped using it and the girls have continued with their relatively normal development.
They are already in their 5th week of flowering, Tutankhamun has produced a gigantic amount of resin, Lennon is gaining weight at full speed and he still has about 6 weeks left.
Anubis, despite its intense pale yellow color, is gaining weight quite well and its resin production is unimaginable and there are only about 2 and a half weeks left.
I hope that from now on no more problems arise and that the girls finish their flowering in the best way.
This is it for this week guys, I hope you are doing well!

Likes
4
Share


@bobtheblob
Follow
Not everything went well this week - I've used some stress stimulator and burnt leaves a bit, changed aero rocks in hydro since old ones got cluttered. Solutions PH goes up for some reasons, better learn some chemistry to figure out why ahah. It's still about ~ 1300, so I'm not adding any nutrients this week nor I plan to change the solution completely. I guess I'll add a bit big bud and monitor ph and ppm

