
Likes
Comments
Share


Likes
17
Share


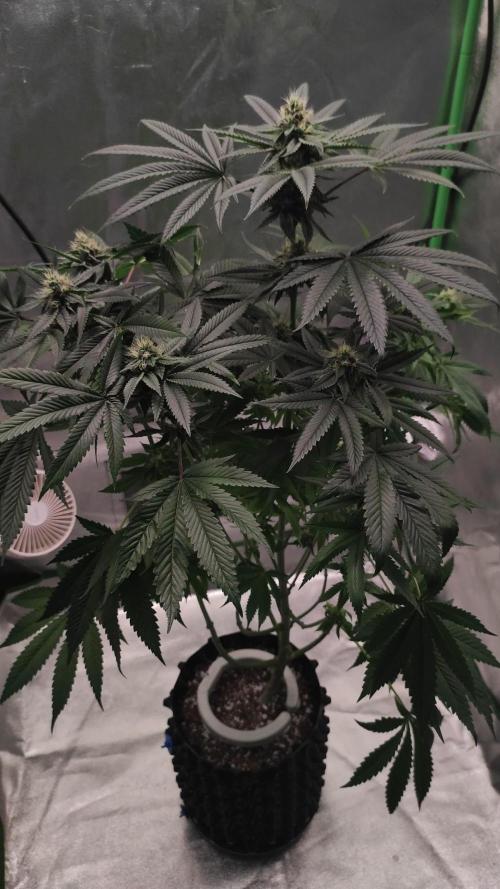
@MasterKush714
Follow
SOOO GANG UPDATE!!!!!!!!!!!
I have put the Strawberry Pie Auto, Zkittles Auto, and the Gelato Auto
On the chopping block, will update those within the next day or so,
The Mimosa X Orange Sherbert is on the left (see photo) and the GMP on the Right!!!!
They are starting to beginning the calix's and white hairs are forming lets GOOO!!!!!!


Likes
1
Share


@Ambz_1990
Follow
Got 6 autos going at 3 different stages, kulled the rs11 as it was very bad genetics, cheese, sweet critical, Orion f1. Watermelon z, white widow and northern lights


Likes
5
Share


@ertaverd
Follow
Empieza el adiestramiento! Corte apical en el brote central y defoliacion general😋

Likes
8
Share


@MrGrowthSpurt
Follow
It's week 14 total and week 7 of flowering (maybe week 5 for WR and Caramel. I thought they were autos and it took me about 2 weeks into the Blueberry beginning to flower to realize they were photos 😂. I sacrificed the 18/6 on my BB auto and flipped them to 12/12) everything is going pretty well considering I know not wtf I'm doing, lol. Tips are all crisp obvious some sort of nutrient burn, but hey it is what it is, they still look pretty decent If I might say so myself for my very first grow of anything ever.
I cranked up the nutes to we exactly what the bottle says now.....1 tsp/gal of the green macroflora 2 tsp/gal of the dark red micro stuff, lol and 3 tsp/gal of the Bloom, they fattened up a bit since, I also feed them just plain p.h.'d water.
I need to get a lope, I'm pretty sure the BB has got to be reaching its peak. The once all white colored hairs or pistols are now about 30 to 45% amber colored. I'm not sure if you can see them in my pictures but if your reading and care to help out do you think it's ready?


Likes
4
Share


@7circleshg
Follow
5 dias despues de la semana anterior, buen desarrollo de flores aunque preferiria mas engorde. Optima produccion de resina
Se dejo el blossomblaster y empezamos, el viejo y confiable, Monster bloom y heavybud
Likes
15
Share


@RDWCGrowing
Follow
2/1/2024- Pre-Germination Activities Day 1
I have 21 weeks until final photo is do.. I took 3 seeds out of cold storage and will let them get to room temp for the next 48 hours before I go with Glass of water for germination. I have 3 beans because I will start from the very beginning helping ensure I present the best Pheno. This is going to be a fun one.. I am a few days away from being able to clear my tent out for this run.. I have a breeding run in right now and the Seeds are a few days away from being mature enough for me to take down the girls.
Once I get them down I will need to get my tent cleaned up and turned over right away. This is going to be close, I will have to time them to the water and into the tray at the right time.. because I will need to get lighting on them right away.. I have my 2X2 and my light ready incase I need to hold them in the cloning machine if the others are not done in the next few days.. Glad I have options that can stretch me out for a week or 2 to give me a little more time.
2/2/2024- Pre-Germination Activities Day 2
I checked on my breeding run to see how close the seeds are and if the tent is ready for me to clear and clean but alas I am still going to need a few days. I setup the emergency 2X2 and that should give me 2-3 weeks. The plan is to still wait one more day to allow the beans to warm up to room temp and then drop them in Water sometime tomorrow.
Form my Emergency 2X2 I have the following:
4" inline fan and carbon filter
Fan
VS-2000 light
2/3/2024- Germination Activities Day 0 - Dropped the Beans in.. Today is 0 day.. Go.. Go .. Go..
2/4/2024- Germination Activities Day 0-1 - Checked in on them this morning and no tap roots yet.. covered them back up and back in to the closet they went. I setup the Root Riots and the Seed tray for them. I Ensured my water that I was soaking the root riots in was PHed to 5.8 and I used RO water.
Afternoon Update: Checked on my Breeders and they are done. I started to harvest them, I took down the one I had reversed with STS and I took down the Black African Magic- All but one bud, I wanted to get some pics of that one today.
I was only able to get 2lbs into the Cannatrol because I had to be very careful to keep the bud from the plant that was treated with the STS separated from the other seeded bud that was pollenated from the plant I reversed.
Cannatrol could have held an additional 2oz of wet but not today. Ideally I need 1 more Cannatrol so I can take an entire Tent, but will figure that out. I put an additional 1.5lbs into the freezer to wait it's turn into the Cannatrol, I would have left it on the plant and taken it in 4 days when the dry cycle gets done but wasn't sure how much 2.2 lbs was equivalent to chopped and wet trimmed.
2/5/2024- Germination Activities Day 0-2 - Checked in on them this morning and 2 of them have very small tap roots out.. one still doesn't going to give them some more time. I will check in on them this evening and see if they are more open if so I will transfer the ones that are ready to their medium and seed tray.
2/6/2024- Planting Day TRUE Germination Day 0- Checked in on them this morning and all 3 of them have tap roots out. I broke the bottom of the tap root for #1 which was the biggest.. pretty sad.. I hope she survives.. I tried to be careful it just snapped off when I was trying to get it in the root riot right. Other than that all three are now in their in-between home in the 2X2 while if finish clearing and cleaning out their forever homes.
2/7/2024- Germination Day 1- Checked in on them and no surprise no sprouts yet. Sprayed the dome to moist it and light spray to the tops of the Root Riots.
2/8/2024- Germination Day 2- #3 is popped and it looks like #2 will be popped by this evening.. I got my second Cannatrol today so now I can take down the rest of the tent and get it into the dry/cure.
2/9/2024- Germination Day 3- #2 is popped as well.. so I have #2 and #3 up and still waiting to see on #1 but that might be a loss since I accidently broke off some of the Tap root when transplanting.
2/10/2024- Germination Day 4- #1 has Popped... We have ignition on all 3.. YAY!! I finished clean up and install of RDWC system, this time was unique the back left buckets 3 inch pipe wasn't seated correctly so I had to clean up about 12 gallons of water all of the floor. I also had two leaks coming from one of the Waterfall return junctions, this is why I do a full pressure test before I put anything in. I will continue to monitor it through tomorrow to ensure that I am good to go and then I will finish setting up the baskets and prepping the water to be ready for the ladies planting day!!!
2/11/2024- Germination Day 5- #1 Of course is going to be my trouble plant.. No matter what If she lives through planting in the system and making it, I think I might not cull her at all regardless, she has been such a problem, makes me wonder if she will be super worth it towards the end.. We will see as we go through this grow, but #1 has a piece of the shell on the leaves,
Other than that I set up a new thing I have been doing since last grow converting my Baskets into Sure plants so I can see exactly where the water is when I plant them and ensure I have the water up high enough that they are able to access it and grow but not too high were they are drowning.
2/12/2024- Germination Day 6- Everything seems to be going good.. will just keep them moist and let the roots grow for a few more days before I transplant to forever home.
2/13/2024 - Germination Day 7- Just keeping them Moist.
2/14/2024 - Germination Day 8 - Planting day.. they are now in the system.. :-)I had to fill the water to the bottom of the basket where I could see water on the bottom rocks and just coming up where I had created my whole/ sure plant.
2/15/2024 - Germination Day 9- Top fed just a little to keep them moist and encourage root growth towards the water. I ensured the PH is right at 5.98-6.02 range.
2/16/2024 - Germination Day 10- Top fed just a little to keep them moist and encourage root growth towards the water.
Likes
117
Share


@Ageddd
Follow
Yesterday i give her last PK nutrients. Last week only used it (BioBloom) one time so leaves will be turning yellow next days. Last week used 2 doses of Plagron Green Sensation which i get from my growshop as free sample.
I am using last Sugar Royal dose(1 time each week - 27/9 -), and 3 more doses of Green Sensation (1ml/l every day - 27/9 - 28/9 - 29/9 -).
I thought about harvesting around -30/9-, think buds can get fatter than they are today, but i will check trichomes from a microscope and then decide.
Sensi Seeds info:
-Compact plant
-Flowering 50 - 55 days
-Heavy Yield
-95% Indica

Likes
7
Share


@BIYEI
Follow
Floracion (Tiempo estimado 64 dias)
Sexta Semana de Floracion
12/02/2024 - 5:00hrs y 22hrs: Se hace cambio de solucion nutritiva, con parametros ajustados a la semana, Se hace Lavado de cubetas, tuberias, bomba, humificador, y perifericos, Se realiza limpieza completa del indoor y se cambia de posicion la cubeta de reserva, Se verifican parámetros básicos del agua, mantener cuidados específicos, el olor es mas penetrante pero gracias al filtro de carbono se mantiene fuera del indoor sin aroma, empiezan a observarse mas el crecimiento de los Cogollos.
Agua de osmosis: Ph 6.0, PPm 650-850, Ec 1.4-1.7, Temperatura 18°C - 24°C
Ambiente: Temperatura 19-25 °C, Humedad 55%, Ventilación 20%, 12 hrs de luz , 12 hrs de obscuridad.
13/02/2024 - 5:00hrs y 22hrs: Se verifican parámetros básicos del agua, mantener cuidados específicos.
Agua de osmosis: Ph 6.0, PPm 650-850, Ec 1.4-1.7, Temperatura 18°C - 24°C
Ambiente: Temperatura 19-25 °C, Humedad 55%, Ventilación 20%, 12 hrs de luz , 12 hrs de obscuridad.
14/02/2024 - 5:00hrs y 22hrs: Se realiza poda por la mañana de media planta baja de hojas que cubrian los cogollos de la luz, Se limpian restos de poda del indoor, Se verifican parámetros básicos del agua, mantener cuidados específicos.
Agua de osmosis: Ph 6.0, PPm 650-850, Ec 1.4-1.7, Temperatura 18°C - 24°C
Ambiente: Temperatura 19-25 °C, Humedad 55%, Ventilación 20%, 12 hrs de luz , 12 hrs de obscuridad.
15/02/2024 - 5:00hrs y 22hrs: Se realiza poda por la mañana de la planta en su totalidad de hojas que cubrian los cogollos de la luz, Se limpian restos de poda del indoor, Se verifican parámetros básicos del agua, mantener cuidados específicos.
Agua de osmosis: Ph 6.0, PPm 650-850, Ec 1.4-1.7, Temperatura 18°C - 24°C
Ambiente: Temperatura 19-25 °C, Humedad 55%, Ventilación 20%, 12 hrs de luz , 12 hrs de obscuridad.
16/02/2024 - 5:00hrs y 22hrs: Se verifican parámetros básicos del agua, mantener cuidados específicos.
Agua de osmosis: Ph 6.0, PPm 650-850, Ec 1.4-1.7, Temperatura 18°C - 24°C
Ambiente: Temperatura 19-25 °C, Humedad 55%, Ventilación 20%, 12 hrs de luz , 12 hrs de obscuridad.
17/02/2024 - 5:00hrs y 22hrs: Se observa una mejoria en las raices considerablemente desde que se cambio de posicion la reserva del dwc gracias a la disminucion de temperatura del ambiente del indoor, Se verifican parámetros básicos del agua, mantener cuidados específicos.
Agua de osmosis: Ph 6.0, PPm 650-850, Ec 1.4-1.7, Temperatura 18°C - 24°C
Ambiente: Temperatura 19-25 °C, Humedad 55%, Ventilación 20%, 12 hrs de luz , 12 hrs de obscuridad.
18/02/2024 - 5:00hrs y 22hrs: Se verifican parámetros básicos del agua, mantener cuidados específicos.
Agua de osmosis: Ph 6.0, PPm 650-850, Ec 1.4-1.7, Temperatura 18°C - 24°C
Ambiente: Temperatura 19-25 °C, Humedad 55%, Ventilación 20%, 12 hrs de luz , 12 hrs de obscuridad.
Likes
18
Share


@Sti_Cazz
Follow
What to say about last week...I learned a lot about what NOT to do next time! the Northern Lights had all the leaves curl up and die on me so I decided to take it out and cut it...fuck it....a bit of a disappointing stick of nothing that prolly wont yield much, I'll add a 'Harvest for it next week when It's finished hanging. I messed up the watering (about once every 3 days) and gave em all (3) cal-mag instead of the overdrive I wanted to give...facepalm.... I guess that finished off the NL for good:P
Anyway, the Diesel gals are looking healthy-ish... seeing some heavy leave coloration and curling but buds are looking frostier by the day! nice and compact, sweet smell, checked the trics but still waiting to spot the 1st brown ones, I'll try and keep em cooking till I feel its time (2 more weeks:P)
😁
Likes
7
Share


@HookahCli
Follow
d71
Se han cosechado 3 plantas de las 8, se han regado 3 que están mas avanzadas con kleanse y las 2 KOK que van más atrasadas en la floración, se les ha regado como la semana anterior nos quedan 5 plantas, pronto quedarán menos hasta terminar con este seguimiento.
He cosechado KOK1, luego LK y para terminar con el día KAK3, han sacado buen cogollo central, la LK esta super dura y se siente pesada., se ha pesado en húmedo, cuando se seque todo añadiré información sobre la cosecha de LK. KOK y KAK me esperaré hasta cosecharlas todas.
d74
Se han regado con igual, con Kleanse las que estan por terminar y las dos KOK que van mas lentas con TricoPlus, SugaRush y EnzymBoom.
Likes
65
Share


@3lementa1
Follow
August 23: Just finishing up about 36 hours of darkness, then I'm going to wash the buds, then hang them. Harvesting a bit early due to time constraints but it looks good. The smell is very dank, not a tropical skittles smell, much more like wood glue as I've seen mentioned in other reviews, although I'm starting to occasionally catch a sweeter tropical scent as well.
I wanted to leave it a little longer. There were still a lot of white hairs when I started the dark period, but a lot of them seem to have developed into swollen calyxes so I'm pretty happy. I was a little worried they were making seed pods after last time, but I broke one open and all that was inside was red hairs. I'm going to keep an eye on the RH while they're drying and get them into jars and try to wait as long as possible before I start sampling. I can tell this is one of those batches that's going to get better and better if left alone for a couple months.
Just did the wash, did 1.25 cups of 34% food grade H202 and a squeezed lemon in a 5 gal bucket. Another bucket of just water to rinse. Then I had a fan on it while hanging in the sunlight from a skylight in the bathroom for 30 min, then put the fan further back and on oscillate, then turned it down an hour later. Left it in there for a few hours, then hung it in the grow tent with everything removed except an oscillating fan, pointed away from the buds. I have the whole plant hanging in the middle of the tent and the tent is holding at 60% rh.
Next run I'm going to do 2 buckets and only top once. I might leave them a bit longer in veg too to maximize the height in my grow space, and I'll get a proper 500w bulb instead of continuing to run 1000w bulbs at 50% to lower the heat a bit. The weather will be cooler and I'll only run one air stone in each bucket which should help with res temp. I'll probably foil-wrap the buckets again as well. I should be able to get another run done by the end of the year. I have a White Widow fem seed I've been waiting to use but I'm not sure what else I want to grow yet. Maybe Granddaddy Purp.
I'll take some micro pics of the trichomes this week and start curing, and I'll post a proper review in a couple weeks.
Happy growing everyone!
August 24: I took it out of the tent to inspect. No mold or mildew. The middle of some buds are still pretty wet. I'll keep an eye on it. Wet weight on the stem is 158 grams/ 5.5oz.
I harvested a couple branches last week and hung them up. I just ground up one of the buds, left it overnight and vaped some today. There was a bit of Chemdawg Tangerine in the grinder already but overall I got a lot of thick vapour, instant effects, and a really great tropical taste.
I busted out the microscope camera and I realized I had a couple buds that fell off before I washed the plant in the H202, and a couple buds that came off in the washing process. It doesn't look like washing the buds took off any of the trichomes. I do seem to find less debris in the buds, not that there was much there before. The trichs look great. Just a light toasting of amber. The washed bud actually seems more dry than the unwashed bud.
August 25: there's a real chlorophyll smell coming from the drying room today, it was much terpier yesterday. Leaves are getting crunchy, stems are still fully bendy. I ended up taking it down in the evening. The drying room rh dropped from 60% to 55% and the buds were starting to look too dry based on my last grow. I put it all in a paper bag for the night and I'll put it in jars tomorrow morning. Broken down most of the way it came out to 48-49 grams. From the bud structure, I definitely feel like it would have benefitted from more grow time if I didn't have to travel. More to come.
August 26 - the edges of the buds are getting really crispy and the buds are getting tighter. I checked the paper bag earlier and it was 65-70%. I got the impression it was time to put it into jars. I'll keep the lids off for a bit.

Likes
8
Share


@Pierrougarou21
Follow
11/09/2024
La croissance se passe bien . la plante est vigoureuse et repond tres bien a l entraînement. Je viens de couper les apex pour une seconde fois avant la mise en flo je devrais l avoir realisé au minimum 4 fois.
Elle a tres réagi au rempotage dans son pot definitif. Un peu tot pour elle .Mais le rempotage devait etre réalisé en meme temps que les autres filles.

Likes
27
Share


@CannbellFarms
Follow
I’m overjoyed with the phenos this strain is producing, strong vibrant purples with some serious flavour profiles!
Scent Profiles we have:
Candy Lemon Sherbet 🍬🍋
Sweet & Piney Diesel 🍭🌲⛽️
Sweet & Tangy Tropical Punch 🏝️🥊
Alongside this, these beauties are the frostiest and the most insanely dense koala looking nugs I’ve ever produced!
Likes
12
Share


@Jays_Not_Here_Man
Follow
This was an easy grow, and had some amazing results. This is some of my best homegrown to date ❤️ the ladies were easy to manage, no PM, pests or disease. The root balls were enormous, wasn’t much soil to recover. They got heavy in the end from the weight but managed to stay upright for the most part. They were big stretchers , prepare for that, scrog was a good way to go but some of the eager beavers got away from me, which ended in some massive colas. Overall easy to grow, no surprises and you won’t regret the results! 10/10 ❤️👊🤤

Likes
5
Share


@PhatRobs
Follow
End of week four. I cant believe the growth this last 7 days. Had to double check my calendar.
Pyramid seeds is one of my favorite seed companies, extremely hard to get in the states!

Likes
23
Share


@frogDUDE
Follow
So far so good - starting to move indoors at night as the overnight lows are dipping to 5 degrees C- just a bit too cold!! Daytime temps still between 20-25 so still good for life outdoors during the day 💚💚

Likes
8
Share


@Xabii
Follow
So after finding litteral balls no bananas the plant isn't doing much anymore, not stretching at all, just flowering.
I had some issues this grow but the perfomance should still be better, the plant is also not "Red" Gorilla Girl, bummed about that as well.
Values are average of the day.
DATE - EC(us/cm)
20250503 1735
20250504 1719
20250505 1750
20250506 1796
20250507 1811
20250508 1788
20250509 1729
DATE - PH
20250503 6.24
20250504 6.21
20250505 6.15
20250506 6.13
20250507 6.13
20250508 6.11
20250509 6.15
DATE - ORP (mV)
20250503 233
20250504 222
20250505 235
20250506 307
20250507 289
20250508 299
20250509 286
DATE - °C - RH% (Tent Temp/RH)
20250503 24.2 51
20250504 23.7 46
20250505 24.5 45
20250506 24.0 47
20250507 23.8 44
20250508 24.3 40
20250509 24.7 44
DATE - °C (Reservoir)
20250503 21.1
20250504 19.5
20250505 19.3
20250506 19.6
20250507 19.3
20250508 19.1
20250509 19.9
DATE - CF
20250503 17.35
20250504 17.19
20250505 17.50
20250506 17.96
20250507 18.11
20250508 17.88
20250509 17.29

Likes
77
Share


@DogDoctorOfficial
Follow
Week 10 Flower — The Beauty Before the Finish
This week marks a very special chapter in the Eternity Grow Cup. As we approach harvest, the garden is simply glowing with beauty. Every corner, every canopy, every branch tells a story — and this week, I’ve taken the time to slow down and capture that story as best I can through the lens of my camera.
All the photos you’ll see in this update were taken with care and intention. I use my Sony camera in full manual focus mode, and I don’t just snap and go — I spend time with each plant, each angle, waiting for that perfect moment when everything aligns. These are not just photos to document — they’re my attempt to reflect the feeling of the room, the energy of the grow, and the soul of each plant.
Just like with the videos, I don’t shoot randomly and decide later. I record what matters, and what I record, I use. It keeps me focused, organized, and deeply connected to the process — and I believe it helps me tell the story more clearly, whether through stills or moving pictures.
All five Runtz phenos are finishing beautifully. Each one expressing unique traits, but all carrying the same stunning quality — dense, clean, colorful, resin-rich flowers that fill the room with pride. This garden is finishing spotless, and I couldn’t be happier.
This week’s YouTube episode will reflect that beauty. If you’re seeing this here on GrowDiaries, I highly recommend checking it out in full 4K once it’s live — there are moments that simply can’t be translated in photos alone, even though I try my best. But for those who love the details, the full spread of pictures is right here, as always.
t this point in flower, the girls are not eating — they’re just drinking clean water with nothing but System Clean in the reservoir, at a rate of 0.25 ml per liter. This is part of a gentle, prolonged flush phase I like to implement, giving the plants a chance to metabolize and fade naturally. The goal is to promote clean, vibrant flowers that finish with optimal expression, without rushing the process. No forced flush, just time and care.
Lighting-wise, the spectrum has been tuned with precision — we’re currently running 40% on the whites, with reds and UVs at 100% to drive trichome development, resin production, and color expression in these final days. The plants are loving it — they’re soaking in the deeper wavelengths that signal the end of their life cycle and responding with a final push of energy.
And yes — we’ve been running 11 hours of light and 13 hours of darkness from the very start of flower. It’s not the usual 12/12, and it comes with its pros and cons. On the upside, it helps speed up ripening slightly, encourages more compact flower formation, and mimics the natural seasonal decline in daylight. On the flip side, it slightly reduces the overall DLI (daily light integral), so you need to ensure your PPFD and spectrum are dialed in just right to avoid sacrificing yield. For me, the trade-off is worth it — the plants are expressing themselves beautifully, finishing strong, and packing on the final magic.
Now it’s your turn — I’d love to hear from you. Which phenotype is standing out the most to you in this garden? Which one is catching your eye with its colors, its fade, its structure, or just that vibe that speaks to your soul? Is it the frost? The density? The posture? Each of these girls has her own personality, and I know many of you have been following closely — so drop a comment, let me know: which one is your favorite? Which one would you take home?
This run has officially earned the Dog Doctor Official Wax-Sealed Stamp of Approval. These genetics are beautiful — expressive, vibrant, clean. It’s been a joy to grow them, and an even greater joy to share this journey with all of you. Of course, we still have the final word coming after harvest, drying, and curing — that’s when the full picture reveals itself. But until then, based on everything we’ve seen and lived in this grow… this is the real deal.
To everyone following the journey — thank you. To the sponsors, the community, the silent observers, the passionate growers, the haters, the lovers — I see you all, and I appreciate every bit of energy you send.
This cup has been about more than just growing. It’s been about sharing. Connecting. Creating something beautiful together. And we’re almost there.
Next stop: harvest? provably yes lets see !
Growers love always 🌿❤️
DD
Genetics - Runtz https://www.zamnesia.com/6000-zamnesia-seeds-runtz-feminized.html
Nutrients - Plagron https://plagron.com/en/hobby
- Aptus Holland https://aptus-holland.com/
Controls - Trol Master https://www.trolmaster.eu/
LED - https://www.futureofgrow.com/en
LED - https://www.thinkgrowled.com
Soil - https://www.promixgardening.com/en
Germination - Cannakan https://cannakan.com/?srsltid=AfmBOopXr-inLXajXu3QFgKXCXXos4F1oEvScjMKIB5MR5dk8-GJ-F49
DOGDOCTOR 15% off
Smoking Papers - https://ziggioriginal.com/
Terpene saver - https://grovebags.com/
As always thank you all for stopping by, for the love and for it all , this journey of mine wold just not be the same without you guys, the love and support is very much appreciloved and i fell honored with you all in my life
With true love comes happiness Always believe in your self and always do things expecting nothing and with an open heart , be a giver and the universe will give back to you in ways you could not even imagine so
As always, this is shared for educational purposes, aiming to spread understanding and appreciation for this plant. The journey with nature is one of discovery, creativity, and respect. Let’s celebrate it responsibly and continue to learn and grow together!
Growers Love To you All 💚
#EternityGrowCup #RuntzHunt #GrowersLove #CannabisCommunity #AptusHolland #ProMixSoil #TrolMaster #Zamnesia #Plagron #ZiggiPapers #Grovebags

Likes
17
Share


@PatriciaGant
Follow
what a journey, such a beautiful result i should retire now how can it become any better. thx everyone watching by. have a nice day and an even better grow
