
Likes
Comments
Share


@DrLaggis
Follow
HELLO GROWING FRIENDS - Please look at my Aftermovie Growvideo, which cost me about 4 hours to create. hope you like it!
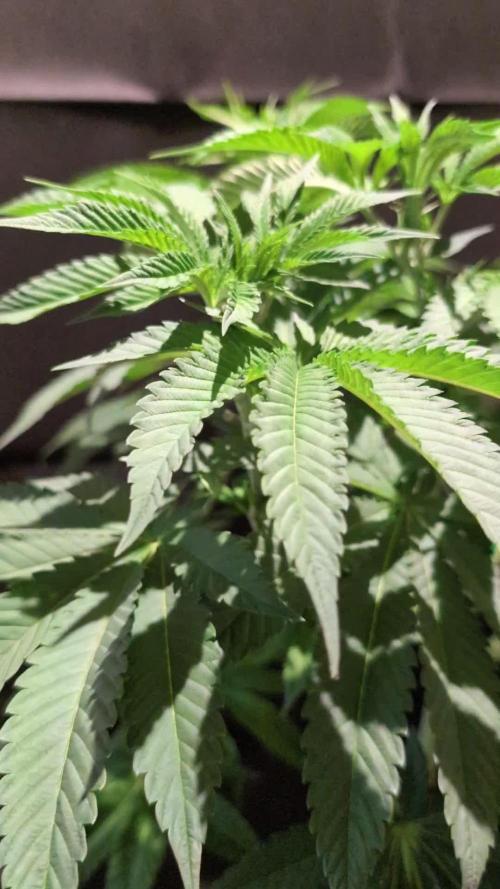
Day 72: The Finale 🌿🌟
It’s finally time. My very first grow is coming to an end—at least the cultivation phase. The plant is now ready for harvest, and I can’t believe how incredible this journey has been. I never expected to enjoy the whole process so much—from nurturing the plants to watching them grow and evolve. I’m absolutely hooked and can’t wait to dive into the next steps: harvesting, drying, curing, and of course, starting a new grow soon with fresh ideas and experiments!
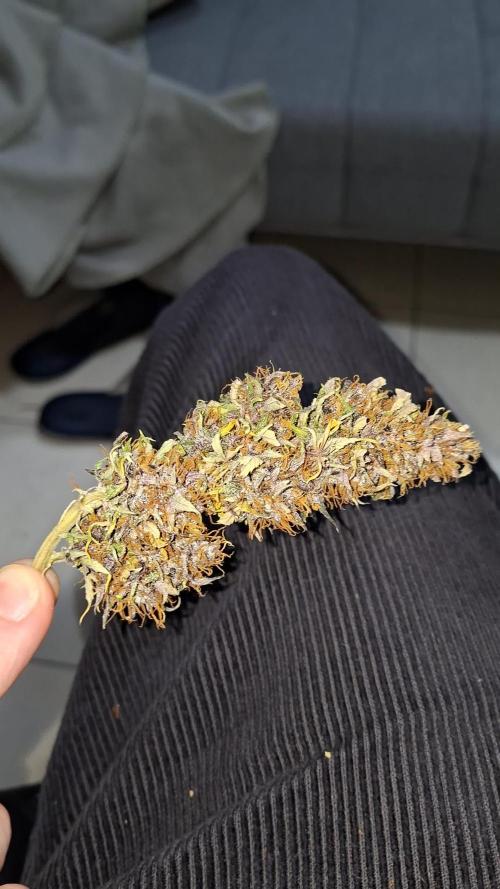
While it may not be the largest yield, the quality of the buds speaks for itself. The time, love, and care I’ve put into this grow is visible, and I’m pretty proud of the results. I’ll admit, I was a bit impatient at times (which I think every first-timer can relate to 😅), but the experience was priceless.
Here are a few interesting highlights from my trimming and harvest process:
1️⃣ Dark Phase Before Harvest
Two days before harvest, I put the plant in complete darkness to encourage resin production. I'm not sure if it really made a difference, but it was worth trying!
2️⃣ Wet Trim vs. Dry Trim
I decided to go for a wet trim because the buds were really dense, and I wanted to avoid any risk of mold. I’ve read that wet trimming can speed up drying and may slightly impact the quality, but this is part of the learning experience. Next time, I’ll try a dry trim for comparison!
3️⃣ Yield Update
Wet, the total came in at 209 grams from my plant. Trimming took around three hours, and it was actually a lot of fun, despite the time commitment.
4️⃣ Curing Plan
The buds are now hanging in the tent for about 8 days. Once dried, they’ll go into jars with Boveda Packs (62% humidity) for another 3 weeks of curing. I'll update the smoke report once they’re fully cured, but I’ve already had a sample of the same strain from a friend, and I can say it’s pretty amazing.
Final Thoughts on My Grow 🌱✨
As mentioned earlier, this grow has been an absolutely incredible experience, and it has definitely set me on a path to jump right into my next grow. There were ups and downs along the way, such as over-pruning, which I believe stressed the plants a bit. Additionally, I think they could have benefited from an extra week to mature. We also faced many temperature fluctuations this summer, which impacted the plants due to external weather conditions.
I’m really pleased with the quality of the buds. The quantity is okay—I can’t fully gauge it yet—but I’m sure there’s more potential to unlock. I’ve gained valuable experience in what worked well and what didn’t. Overall, the countless lessons learned during this grow far outweigh the few mistakes made. I’m incredibly proud of my first results!
As this long journey comes to an end, I want to thank everyone who followed along. I hope you enjoyed all the content. In that spirit, happy growing, and see you next time! 🌟

Likes
69
Share


@nonick123
Follow
Día 66 (05/08) Cerrado por vacaciones
Día 67 (06/08) Mi amigo viene a casa a hacer un riego con 1 Litro de H2O pH 6,5
Día 68 (07/08) Cerrado por vacaciones
Día 69 (08/08) Vuelta de vacaciones! A ver como están después de 5 días sin verlas... 😱
Riego con 1 litro de H2O pH 6,5
Añado 3 cm de sustrato nuevo porque se ha compactado y se ven las raíces! 😢
Día 70 (09/08) Riego 500 ml H2O pH 6,55
Eliminación de algunas ramas bajas
Día 71 (10/08) Riego 500 ml H2O pH 6,55
Sesión de fotos semanal!
Día 72 (11/08) Riego con 1 Litro de Té Vegetativo de Lurpe Solutions. Preparación: 24 horas con bomba de aire (oxigenación) con ingredientes:
Green Sunrise 8 ml/L + Insect Frass 16 ml/L + Hummus Lombriz 8 ml/L + Melaza 1 ml/L + Kelp Hidrolizado 0,25 g/L
Aplicación foliar Kelp hidrolizado de Lurpe Solutions a 0,25 ml/l
💦Nutrients by Lurpe Solutions - www.lurpenaturalsolutions.com
🌱Substrate PRO-MIX HP BACILLUS + MYCORRHIZAE - www.pthorticulture.com/en/products/pro-mix-hp-biostimulant-plus-mycorrhizae
Likes
30
Share


@Grower_Of_Persia
Follow
week intel:
we had some dear guests of family from foreign country to meet again after years so i had to make some free space for their stuff therefore girls are going to be gusts too for a week in their neighbors home :D some times unpredicted things happen you must be ready to change at any time , so i moved some and chopped off weak ones
stresses :
E.C stress around 1.2 3 times per week
feeding:
replaced b-52 with Bloom base nutrient
i feed them 3 times this week with this order :
day 1 : i feed them high with base nutrients(calcium & micros (half dose) + Bloom) about 631 ppm - 1.2 e.c to cause a little stress.
day 3 : i feed them high dose of Top-Max + Bloom Base nutrient around 600 ppm - 1.2 e.c to let them recover a little but not fully recover still a little stress will caused.
day 5 : i feed them high dose of Feeding Booster around 630 ppm - 1.2 e.c to cause stress this last week
guide of the week :
we are in the final phases of this run , i'm happy about quality but depressed about quantity :D
Likes
2
Share

@GoodTimesOrganics
Follow
Welcome Back!💚
Die Sleepy Joe befindet sich nun in der ersten Blutewoche und bis jetzt ist wenig an Stretch zu beobachten.
Die Blatgrösse hat dennoch nochmal ordentlich zugenommen.
Die Vorblüte ist in vollem gange und die Pistolen bilden sich allmählich aus.
Die Pflanze wirkt relativ kompakt und gut beieinander, was so typisch für eine starken Indicawuchs ist.
Die Umgebungsgegebenheiten sind weiterhin optimal:
—————
🌞 Temp: 23, 2
🌚 Temp: 18°C bis 19°C
💦 RH: 43%
💨 VPD: 1,28 kPa 🧐
😎 PPFD: 750 mqm
—————
Grüne Grüße 🥦


Likes
12
Share


@m0use
Follow
Plant did ok, not the best result and far below my expectations for it. I found that growing them in pots with other plant is a no go from now on for autos. they just don't grow all that well when their root space is being shared, all my autos from a few breeders did poorly when I grew them like this. however the ones I kept in their own pot did much better, the Ganja farmer brand is good, just wish they had some CBD/CBG strains in their catalogue. This will all be for friends and family.
@GanjaFarmerSeeds, If you like the images or videos I can send you raw files that have not been shrunk and contain no watermarks, if you feel I am in the top 3 of your BDOTY Contest that is :D

Likes
19
Share


@Paultemp
Follow
Hi all! 👊😊
Another week started ohh yeaahhh
I do foliar 3 times this week and i see pistil white change in orange
Smell very good pine and citrus :)


Likes
73
Share


@Andres
Follow
I'm happy .. because of the evolution of my zombie kush outdoors ... I grew 25 centimeters in a week ... and I think that I would be in flowering the other week ... I edged out the best potential of it in height and fattening the maximum only with organic products .... she is measuring 81 cm ... I am very happy ...

Likes
5
Share


@littlefoot
Follow
Very compact and bushy, trimmed the crap outta her to get some air flow so she can start getting some height. I'm pretty sure I over fed in the beginning and at the end of my troubles hopefully, and she will start filling out properly.
Likes
55
Share


@Hellishjam
Follow
Well there’s 6 weeks of veg down, tonight will be the first night of 12/12 with HPS bulbs in. I’m going to be running the lights from 9pm to 9am due to summer heat and hopefully the tent will run cooler at night. Everything was super cropped today to limit the stretch a little bit, she’s 95% indica so might not get to much stretch, I also don’t have a clue as this is my first photo run with the HPS. All light leaks to the room have been addressed with green bulbs in the room. I’m at least hoping to get an ounce per plant if more great just not really sure what to expect. I feel as tho there is still lots of N in the pots but maybe over the next two week they’ll chew right thru it. Maybe I should have lowered the lights but I’m just going to leave em at the top of the tent..... well that’s it for now, I leave tomorrow for work so the next time we see em they should have some bud starting hopefully!

Likes
10
Share


@Mooogli_12
Follow
Originally wanted to sog 25 strawberry banana from advanced seeds..
Those seeds been stolen🤬💢
So i threw 9 seeds that i already had
1 blueberry and 1 passion fruit didnt pop out, its 7 plants left so its not 100% germination rate..
Bought a new light 'lumatek 200w' cuz the actual 'lumatek 300w pro' is to powerful for this tent.
So today is officialy DAY 1


Likes
56
Share


@Aedaone
Follow
The temperatures, humidity, and watering volume(if measured) in grow conditions are all averaged for the week. The pH is soil pH. Any watering done by me is well water which is 7.6 pH and 50° F. Any listed nutrients are ml/gallon of soil.
Day 1 we had lots of sunshine and a lite breeze. The soil began to dry out and I watered about 1.5 - 2 gallons per plant, from the water hose, that afternoon.
Day 2 we had rain early morning and showers throughout the day. The girls look like their roots found the iron I added last week.
Day 3 we had early morning rain, drizzle and showers in the afternoon. I added an additional 50ml of ferrous sulfate top dressed. I also spread just enough peat moss to cover the ferrous sulfate to prevent the rain from splashing it onto plants. Previously the rain splashed granules of ferrous sulfate onto the leaves, burning them. I used 50ml or 1.66ml/gallon of soil. as I've only got about 25 gallons of soil. I'm waiting to top off after this excessive rain is done.
Day 4 we had more rain, drizzle, and mist intermittently throughout the . The good news is the ferrous sulfate has lowered soil pH to 6.2 👌. There's still a small excess of phosphorus, but the girls will grow into it.
Day 5 we had more rain. It rained all morning for about 8 hours. The pots are soaking wet.
Day 6 We missed the scattered showers but it's been 80-90% humidity all day. Even with the beautiful sunshine the soil isn't drying out. I'm looking at the nodes to see when I'll be topping.
Day 7 we had lots of sunshine and temps over 80°F. These girls are loving it. I'm looking at the 4th node to top. I'll wait for more stem above the 4th node.There needs to be enough stem above the node that it won't split as the branches grow heavy from large buds.
This week was a success. The girls more than doubled in height. They performed their job while battling excessive rain and winds. I'll be looking to top these girls and add soil to top off their pots next week. I'm hoping for less rain and more sunshine next week.
Likes
15
Share


@Roberts
Follow
She grew well for the little time I spent with her. She grew fast as upping my room temps a few degrees sped the process up. She has a good smell and I will be back to update on a smoke report in a few months once it is dried, cured, and trimmed. Thank you, Medic Grow, and ILGM. 🤜🏻🤛🏻🌱🌱🌱
Thank you grow diaries community for the 👇likes👇, follows, comments, and subscriptions on my YouTube channel👇.
❄️🌱🍻 Happy Growing 🌱🌱🌱
https://youtube.com/channel/UCAhN7yRzWLpcaRHhMIQ7X4g.

Likes
14
Share


@Phurlax
Follow
Good grow ended up curing some for a couple months still smoking it truly gets better the longer it sits the color gets messed up in most of the pictures when I upload them btw
Likes
22
Share


@Chumpkilla
Follow
7/14/23 - Day 32 - Switched to flower today. It will get its first dose of 12 hrs. of daylight, 12 hrs. of dark. This will tell the plant to start budding. I'm excited to see the bud's form. So far everything with the Leaf system is going great. I'm excited to show the next few weeks as they happen!
7/16/23 - Day 34 - The plant is bushing out big now. It's getting tall. I'm a little worried we waited for a little too long, but who knows? We shall see.
7/20/23 - Day 38 - She is a few days into flower, and she is sprouting up like crazy. I bought another Scrogg net. I'm going to try and double Scrogg? is that a thing? Lol I just know that I need to keep these buds from hitting the lights. I think I'll be able to get all of this to work well, but I am nervous about the height. I can see some pistils starting to poke out!
7/21/23 - Day 39 - The lights turn off at 2am and back on at 2pm, so right now I'm waiting to open the box up for the day. But I was looking back at the pictures and trying not to freak out about how big she is (I'm worried about the lights, they don't move, and Shes is MASSIVE already) One thing I noticed about the pictures is that I have not had a single leaf turn yellow, or get spots, or have curling leaves, or have any issues with the plant. I would expect some sort of dying leave somewhere, but no. Not one single leaf has been less than perfect, I mean PERFECT. It seems like this LEAF growing box is literally the perfect environment.
If you are looking for this experience, check out https://www.getleaf.co/

Likes
11
Share


@420DeepGrow
Follow
Gracias al equipo de MSNL Seeds y XpertNutrients sin ellos esto no sería posible.
💐🍁 CBG SOUL FEMINIZED:
CBG Soul es un híbrido rico en CBG con una proporción Indica/Sativa 50/50, creado por sus efectos calmantes y relajantes. Sus sabores dulces, limón y cítricos se complementan con terpenos limoneno y mirceno, ofreciendo una mezcla única para el alivio y disfrute terapéutico.
🚀🌻 Consigue aqui tus semillas:
https://www.marijuana-seeds.nl/cbg-soul-feminized-seeds
🍣🍦🌴 Xpert Nutrients es una empresa especializada en la producción y comercialización de fertilizantes líquidos y tierras, que garantizan excelentes cosechas y un crecimiento activo para sus plantas durante todas las fases de cultivo.
Consigue aqui tus Nutrientes:
https://xpertnutrients.com/es/shop/
📆 Semana 6:
Buena semana, ha habido sol agradable y buenas temperaturas, empieza q tomar fuerza.
Mantengo las dosis de nutrientes a 1/3 de lo recomendada por el fabricante al estar en suelo virgen ☘️🌲🌳.

Likes
15
Share


@MG2009
Follow
09/14/2018
I'm not sure if any pollen took. New flowers coming in so fast, and I cant see much but pure white pistils,so we will see in about 6 weeks.
No feeding this week just molasses for soil microbes 1tablespoon to a gallon and let mother nature do her thing.😎
Likes
Comments
Share

@Mrd1ez
Follow
A pesar de sufrir el estrés de la sobre fertilización terminó estando con un muy buen aroma a arándanos y un gusto marcado frutal.
Likes
4
Share


@HighOhioAn
Follow
Rainbow melon what can I say? Fast buds has outdone themselves with these fem photos I’ve grown a few other genetics, but fast buds checks all the boxes plants almost grow them themselves🔥💪
Likes
10
Share


@FlavoursUk
Follow
Last day of week 4 and the girls are looking well, growing and thickening up well. No problems so far. If you're following along make sure you follow my Instagram and YouTube for more in depth details on my grows. Both links can be found on my profile. Instagram.com/flavoursuk_v3