


Likes
Comments
Share


@skaterblasted
Follow
Days 120 - 126 (from sprout)
9/20/24 - 9/26/24
The Good Shit - week 13 of flower and trichome heads are looking far more swollen
For IPM I sprayed existing mulch layer with tweetmint, followed up with topping all pots off with build a soil 3.0 and forest collected IMO's - fungus gnats almost completely eliminated overnight
Pots were cover cropped with build a soil seed blend + grape tomatoes, oregano + thyme, snap peas and napoli carrots
Fingers crossed harvest is on the agenda for this lady next week

Likes
39
Share


@eldruidamx
Follow
Day 57. Watering with clean water.
The light schedule has been changed (12x12). Replaced lamp.
Day 58. Watering with fertilizers.
Day 59. Watering with clean water.
Day 60. Watering with fertilizers.
Day 61. Watering with clean water.
Day 62. Watering with fertilizers.
Day 63. Watering with clean water.

Likes
25
Share

@Only_Dankzz_Terps420
Follow
🌿 ONLY_DANKZZ4200 🌿
Welcome to the channel! Here you'll find cannabis grow diaries, strain reviews, cultivation tips, harvest updates, genetics spotlights, harvests, and everything related to the cannabis growing lifestyle. Follow along as we document the journey from seed to harvest and share our passion for quality cannabis cultivation.
🔥 Indoor Growing
🌱 Grow Diaries
✂️ Plant Training & Techniques
Nutrient Guides & Grow Tips
🏆 Harvest Updates & Smoke Reports
💨 Strain Reviews & Genetics
📸 Instagram:
🌱 Grow Diary:
🎟️ Support the Channel with These Promo Codes:
DEBO
SPUNKY
SPUNKY4200
DKREW
Also save 15% on 42fastbuds using this link!!! Get your genetics now before the ban!!!!!
https://2fast4buds.com/?af=281965
⚠️ DISCLAIMER – 18+ ONLY ⚠️
This channel is intended for viewers 18 years of age or older. All content is provided for educational, informational, documentary, and entertainment purposes only.
Viewers are responsible for understanding and complying with all local laws and regulations regarding cannabis in their jurisdiction. This channel does not encourage or promote illegal activity, substance abuse, or unsafe practices.
By viewing this content, you confirm that you are 18 years of age or older.
🌿 Stay Lifted • Stay Learning • Stay Growing 🌿
#OnlyDankzz4200 #SpunkyTerps4200 #CannabisCommunity #GrowDiary #HomeGrow #IndoorGrowing #CannabisCultivation #420Life #GrowersNetwork 💚🔥🌱💨


Likes
283
Share


@love_2_grow
Follow
FD15 - Today was the start of the third week of flowering. I gave #1 2.5-liters of water @ pH 6.1.
FD18 - I gave #2 2-liters of water @ pH 6.6.

Likes
5
Share


@pzwags420
Follow
I sowed cantaloupe bag seeds directly to flower box drip irrigation.I transplanted my white widow seedling to flower box. So the new line up this run is cantaloupe, blueberry, Girl Scout cookies and white widow. Cantaloupe seeds sprouted and i will keep the most vigorous grower.bb is throwing pistils.GSC is producing first set of true leaves. At the end of week 2 cantaloupe has first leaves so does white widow. My Gsc has first set of true leaves and my blueberry is putting out pistils and trichs.Things are going well

Likes
5
Share


@Kloud9gardenz
Follow
Don't have a lot of time these days to take pics so I'll sum things up. CO2 got outta control and the plants took tf off literally. The video is around middle of week 3, I had to flip at week 4 BC I literally ran out of room and I had to constantly defoliate.

Likes
5
Share


@TranquilBottleWizard
Follow
Week 9 veg
We are doing well, the ladies are growing quickly, I do believe I need to add a foliar spray to the mix or up the nutrients because we are still short on nitrogen and a bit of magnesium it seems.
But its not a massive deficiency so ill just push more nutrients one way or another.
The one plant with the genetic issues seems to have wanted split its Main on its own.
So apparently i have and auto main plant? XD, i will keep an eye out of herms but it find this genetic issue interesting.
I am beyond happy with the way training came out on the ladies. I just need to make sure I keep them all low next batch of seeds. I'm used to the fuckery of aux clones so running seeds was a treat.
2 weeks of veg left about and we flip!


Likes
19
Share


@Comfrey
Follow
Tropicana flowers 🌞☀️🌤️🌦️🌧️
Plant is 15 cm high because of low stress training. The length is 31 cm.
Day 36:
Sun is shining, 15-23 degrees, high humidity. Tropicana gets two liters of pure rainwater. Spend the day in my veggie garden working. In the evening I brought some 🐞for Tropicana because I spottet a few lice. My mood changes drastically as I find spider mites eggs, first and second stadium. Don‘t overthink that and decide to defoliate the plant immediately.
I prepare a tee out of the leaves which brings fast relaxation. My mood is much better now.
Day 37
In the morning with better light I find more spider mites and decide to wash the plant with rainwater. Can‘t find after any more of these little killer dwarfs. I decide to bring more beetles and check the leafs more often. Temperature is felling under 20 degrees, it‘s raining and the humidity is 87%.
Day 38
In the early morning I couldn‘t find any mites on Tropicana. Got to continue controlling this in the next weeks regular. I‘m sure they are still there somewhere hidden in a dark spot.
🌦️ 13 - 21 degrees and humidity is around 60-70%.
Day 39
🌦️🌧️ Very rainy day. Just let Tropicana enjoy life and tie down the top one more time. 🐞 stay since some days. One on every plant. I think the mites are a result of their start inside and no hygiene at all. Have the same with my peppers some years.
14 - 21 degrees, humidity around 84%
Day 40
🌧️☁️🌤️☀️15 degrees, humidity 83% We listen to Roots Reggae, Tropicana is happy and quite busy with producing new roots, I guess.
Don‘t understand when to stop low stress training. I think it’s enough now. She needs a rest.
Day 41
🌧️⛈️🌧️🌧️ 15 - 19 degrees, humidity up to 89%
We had rainfall today around 65 liters of water. I collected enough of it for the next weeks.
Day 42
☀️ 6 - 23 degrees. Humidity is falling.
Tropicana enjoys the morning sun while she drinks and drinks and drinks…. Coffee. 😅

Likes
5
Share


@Rizza78
Follow
Malt is sad after transplant. Red Hot good. Oozecake good. Seedlings are liking the new environment.


Likes
9
Share


@MMVSS
Follow
A GREAT WEEK! Transplant From Living Soil Into Hydro Was A Success! Can't Wait To See This Baby Progress...From My Stickiest Most Intoxicating Strain Last Round And She Gave Me A Baby! This Is Her Seedling....
Likes
86
Share


@Tropicannibis_Todd
Follow
ALRIGHTY THEN
REMINDER I DO 2 UPDATES PER WEEK 👉WEEKLYROUNDUP👈👉MIDWEEKLY UPDATE👈
At this very moment , hint of Grape Crush Soda smells 😛 Which is awsome
We just hit week 8 and all is well , for the most part , had some Cal/Mag issue early week 5 but hopfully with some adjustments ive made I got it under control 😃 .......
Her little sister was also showing Cal/Mag problem but like her big sister I have made adjustments and hope that works 😲 They are so quick 👈 Baby Sister Plant #2 Is 6 weeks 42 days from seed
rain water to be used entire growth👍
Lights being readjusted and chart updated .........👍
I GOT MULTIPLE DIARIES ON THE GO 😱 please check them out 😎
👉IF ANYONE IS LOOKING FOR A PLACE TO HANGOUT VIA GROWDIARIES AND TALK GROWING AND JUST CHILL AND WHATEVER .....👈
👉I CREATED GROWDIARIES DISCORD SERVER !!!!!!!!!!!👈
LINK IS 👉
https://discord.gg/zQmTHkbejs
AND SEE HOW IT PLAYS OUT !!!!!!!


Likes
22
Share


@DankeyeBeaverjuice
Follow
Pretty boring week its almost like the plants stall at this stage and its always super boring waiting for them to take off. Plants adjusted well to the bigger room and new lights.. umol jacked up to 800


Likes
23
Share


@F1yboy420
Follow
Back from vacation. Gone 8 days and this is what I came back to! A lot of work ahead.

Likes
25
Share


@Ferenc
Follow
I had to take a big decision. I know it is not good it is way too hot in the tent but needed to remove from my garden because of some reasons.
Firstly, illegal which is fine but I do not want to take a risk for 3 g of harvest. She should start flowering in autumn when less sun and weather is basically shitty here in London it is okay to grow but when starts flowering.... so I planted an auto and saw that it wont yiled good so I was thinking what will happend to my Zkittlez in autumn when mush less sun and weather is going down. So realised I can have a 2-3 m plant but it ain't gonna flower just a bit. Soni decided to put under artificial light but it is summer my plants are suffering in the tent. Inhave no choice I will try to manage maximum I will cut back. Hopefully all goes ok.
Day 86: Fucked up she was totally wilt I removed all the leaves basically the stalk left only..... she will be okay
Likes
151
Share


@PEAKYPLANTERS
Follow
I can not believe.😲
We have reached the end of another magnificent journey made together on this splendid platform which gives ease and opportunity to learn and perform in the best crops
I can already tell you that this baked tent is one of the best weeds I have ever grown so far!
But this can also be seen from the contents. Spectacular colors, solid gems....and resin in rivers
Stay updated for the white smoke 😋😎

Likes
9
Share

@Greenthumb85
Follow
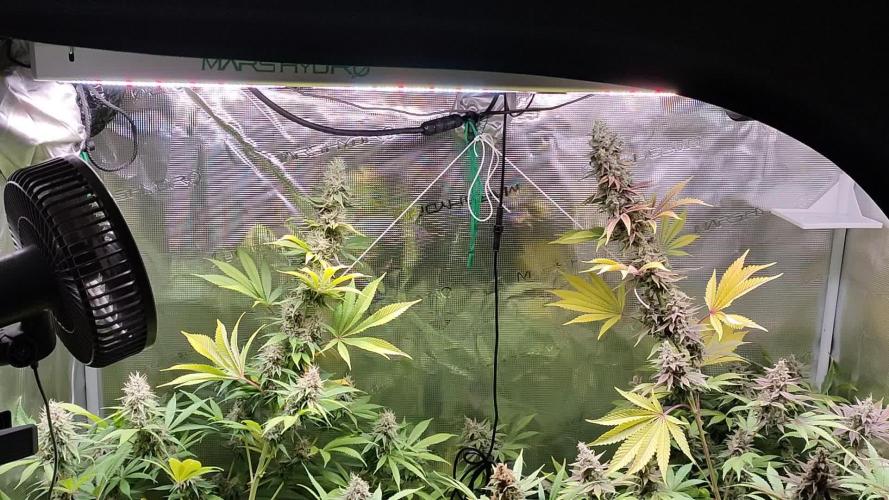
We have reached the final week of flower with these ladies. I plan to harvest these girls within the next few days. The trichromes are pretty much all cloudy with some slowly starting to turn amber. Allot of the leaves have started to turn yellow and are slowly dying. It's natural life cycle is slowly coming to an end. By leaving the window cracked at night, cold air has been allowed in to cool down the room. This helps simulate the autumn and tells the plant it's time to finish. The girls are drinking allot less water.
The buds have swelled up and are very sticky. One plant is quite greasy and super sticky. All have quite a sweet smell. Looking forward to the dry and cure to see how they turn out.
I have been using the Plagron Green Sensation to help with bud development. However, since we are now close to finishing I have stopped using it. The ladies are receiving just plain water.
Thanks again to the sponsors Plagron and Zamnesia. Happy growing and see you guys for harvest soon.
Likes
11
Share


@Paradox_1ste1
Follow
The plants look very healthy and they have big and dense buds , ill havr to wait anothe week or cuple days until harvest even tho it may be a bit soon for it. One of the plants has started to root its top head of the buds , but i soupose its because of the temp . The air is getting dry cuz of the hot weather even tho im using 250w-400w lights on them . Trichromes look preety good and the bud is frosty . Some of the plants are not ready yet for some reason so i think i have to give them a bit more time
Likes
12
Share


@L_Choppa
Follow
I don’t know what’s going on with my big girl I think is wind burn by me increasing the airflow I’m thinking it’s windburn well anyways I don’t know if it’s budrot cause I really want to chop thoses two tops off just incase help anyone if you know what this is
