
Processing
Likes
Comments
Share


@Buurman
Follow
The summer really affected my outcome, three weeks of near 40 degrees made most of my buds fluffy and deformed, then the dry room was left open so the humidity was at 30 percent.. 3 days and all my buds were completely dried out. After 4 weeks of curing the taste came back a little but still not the best
Up to the next one ❤️


Processing
Likes
46
Share


@PureMedicin
Follow
Nice growth and bud developtment. Hps still doing its thing while im sitting back and relaxing. Got to keep an hawk eye on watering. I feed full strenght going over to full canna so they were transplanted into soil. Clones doing good but the Lemon skunk clone dont feel to good. Lets see what the week will bring.

Likes
3
Share


@BigDirt
Follow
Entering week 3, Co2 was implemented and the plants love it. Will be spraying for pests this week.


Likes
Comments
Share

@Antarctic
Follow
Week 8 update (full bloom):
The autos are now in full flowering mode 🌸 Buds are stacking well, pistils are everywhere, and trichomes are starting to show up. Stretch is nearly finished – now it’s all about building flowers.
Nutrients this week:
• Hesi Bloom Complex (base bloom) – plants are responding really well.
• Hesi PK 13/14 introduced at low dose to push flower sites.
• Athena Bloom + Athena Grow (light mix) to balance nutrition and keep a steady NPK ratio.
• CalMag still in rotation at ~1 ml/L.
• Silic Rock small dose for stem strength.
• Total feed around 800–950 ppm, depending on the plant.
Observations:
• Canopy looks uniform and healthy – green leaves, no big issues.
• Runtz shows the most aggressive bud growth – dense flowers already forming.
• Amnesia autos a bit more stretchy, but flowers are catching up fast.
• Mike Tyson slowly recovering from early stress, but now producing pistils.
• Aroma becoming stronger – fruity and slightly spicy terps in the tent.
Training:
• Final LST adjustments to spread colas.
• Light defoliation to open budsites and improve airflow.
• From now on: minimal interference, just supporting the flowers.
Plan:
• Keep PK booster for another week, then evaluate.
• Maintain bloom feed and slowly reduce nitrogen.
• Watch trichome development – early frost is starting, but still weeks to go before maturity.

Likes
183
Share


@OrganicNature420
Follow
Germination date 🌱 12/07/2021
Day 36 19/08/2021
Strain 🍁 Ethos Genetics Banana Hammock R1
(Mandarin Sunset x Grapegod)
THC% • Unknown
💡 Mars Hydro FC4800
• Power draw 480W + 5%
• Max coverage 5 x 5
• LED 2070pcsSamsungLM30B1&Osram660nm
• Max Yield 2.5g / watt
• Noise level 0 DB
• Removable Driver +2m cable
• Daisy chain (multiple lights)
https://marshydroled.co.uk/products/mars-hydro-fc-4800-led-grow-light-samsunglm301b-commercial-greenhouse-medical-indoor-kit 🇬🇧
https://www.mars-hydro.com/buy-fc-4800-480w-4x4-energy-saving-full-spectrum-commercial-led-grow-light-mars-hydro-for-sale 🇺🇸
PROMO CODE • (ORG420) DISCOUNT 👍🏻 marshydroled.com
⛺ Mars Hydro 120 x 120 x 200cm
📤📥 AC infinity 6inch
💧 10lt dehumidifier
❄️ 3.1kw air con system
💉 Nutrients GreenBuzzLiquids
Organic Grow Liquid • 1-4ml until 2wk flower
Organic Bloom Liquid • 2-4ml flower stage
Organic More PK • 2-4ml +wk3 of flower
Organic Calmag • 1-2ml/lt whole grow
Fast Plants Spray • first 3days at night lights off
More Roots • 2-5ml veg +2wks flower
Fast Buds • 5ml +wk2 of veg until 1wk flower
Humic Acid Plus • 2-5ml whole grow
Growzyme • 2-5ml whole grow
Big Fruits • 2-5ml flower stage
Clean Fruits • 5ml flush 1wk
Ph powder
Root Gel
Living Organics
PROMO CODE • organicnature420 15%off ✌️🏼
https://greenbuzzliquids.com/
🥥 Growing Media • Coco Coir
Notes 📝
Looking good and will be ready for flower in 2weeks. 4 main heads so look forward to this. Might become a new thing if it works out 🙈
Happy growing fam ❤️🌱🍁👍🏻

Likes
8
Share


@GrowNugzCanada
Follow
Growth is great but not as good as the lemon pie. Started mor full watering this week with some LST. Nice green and healthy leaves
Processing
Likes
2
Share


@Wuutownwarrior
Follow
Really bad weather this week no sun and rained everyday including storms so had to get a big tomato tent , the ladies really stopped growing for few days worried me but last 36 hours they have started to shoot up
Edit : the weather is great now plants are living it

Likes
16
Share


@DeepRootsGrowTrees
Follow
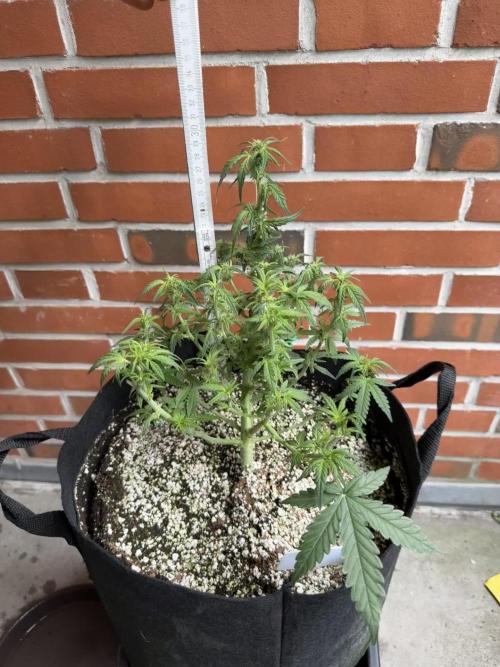
GORILLA MELON / 420FASTBUDS
WEEK #12 OVERALL
WEEK #2 FLOWER
This week was another good week for this lady she doing her thing she's right about 2 feet tall 16 inches in width and she might be done stretching as she grown about 2 inches the last two weeks. This my first grow of a photosynthetic plant in a small container. Stay Growing!!
Thank you for stopping by and taking a look it's much appreciated!!
THANK YOU 420FASTBUDS!!
BUDTRAINER.COM
BUD CLIPS/BUD CUPS
Likes
16
Share


@Mrs_Larimar
Follow
2022-12-22
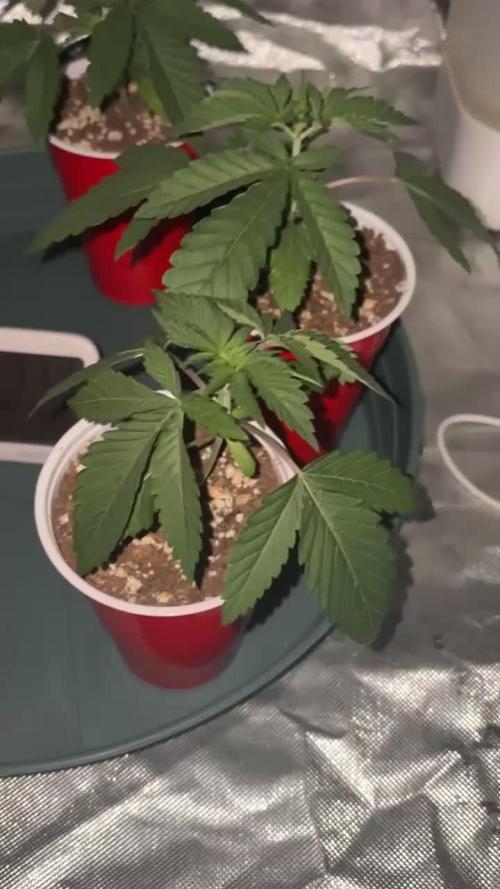
I love growing Solocups,
Because you learn soooo much. If you manage that Grow, you can grow everything.
This thime i ad alot of Medium ( around 0,5l), and for me it was quite easy to keep them happy.
I was watering them every day with a " light" Feedingsolution.
Plants stayed happy and turned out very well
seems i forgot to take Pictures of the second Skull in a Plasticup- but yeah the
Glassvessel ( Skull) is the Mainattraction

Likes
27
Share


@Basementganja
Follow
Cleaned up the #10 mother, with some defoliation, and LST! She's getting ready for her adventure outside this summer!
Took more clones from the #4 mother, and cleaned her up.
Happy growing! :)


Likes
7
Share


@CreatureCreator
Follow
Just getting started on the right foot. Coco and bags sterilized and flushed thoroughly with 0.7EC at 6.0pH solution. Will transplant tomorrow once the coco drains down a bit. Plants look great and excited to push down the accelerator.
4/2 - transplanted into 3 gal and watered in.
4/4 - Reservoir cleaned, sanitized, and online. Switched to tap water (0.3EC) and nutes at 0.8EC for total of 1.1. Ph 5.9. New feed pump installed (no more getting electrocuted when I put my hand in the bucket. YAY!) and 5" watering rings installed. PPFD 550.
4/5 - really quite chuffed. PPFD to 600 and they are looking great. Moved Zoey up 2" to match canopy height.
4/6 - switched Silica Boost to foliar spray at rate of 40ml / gal in RO water, pH to 5.8
Likes
2
Share


@TheGourmetWeed
Follow
Day 36- 20/6
General:
She keeps growing at a very nice pace, flowering stage just started. Today I cut a good amount of foliage, and accidentally broken a nice branch while training her. It broke in a place I couldn't really 'cast it' so I had to let it go. I'm so sad, it was the first time ever. After some very hot days, now came rain, and an exponential increase of RH. Turned off the humidifier for now and still have peaks of 60% with light off and ventilation full on. But RH outside is 95%, so it's hard to do much better for now.
Techniques:
Training day, moved a little the stems and broke one in the very bottom, so had to discard it. Took some foliage away to get more light in it.
Feeding:
Fastening day
Smell:
She's still the queen of the tent when it comes to this topic, no doubts about it.
Temps and RH recorded today:
26c - 20c
60% - 39%
Pests and plagues:
Nothing to record.
Day 37- 21/6
General:
She's gettin really taller this last days. Up is the way! Need to do a little more training tomorrow or the day after to make sure all the plant gets the same amount of light. Today I didn't touched her, just took some pictures and let her do her thing. The heavy rain brough 96% RH outside, so I had a little peak oh 70% inside the tent for an hour, but it kinda locked on the 62% with the lights off and extractor full on.
Techniques:
Nothing to record.
Feeding:
Later today, before lights on, she'll have her first feed with flowering nutes. 1250ml
Smell:
She's still the queen of the tent when it comes to this topic, no doubts about it. When you trim some foliage, it comes a nice passionfruit punch. So good I can't believe in it. For those who know Rubicon or Brisa passion fruit sodas, it's just like that. 😍 Now my biggest stress is keeping my girlfriend away from the grow and keep it closed, because she loves that smell and is constantly nosing around. Love it.
Temps and RH recorded today:
27c - 21c
70% - 42%
Pests and plagues:
Nothing to record.
Day 38 - 22/6
General:
It's stretching season for #3. She really needs a bit of training before it starts full on, and some defoliation. After breaking a stem, I'm a bit traumatised and avoiding touching them for some days. I'm giving her water now for a couple days to see if it gets a bit better, looks like I was giving her a bit too many nutes for this stage. So, first let her dry a bit, then start with PH'ed water.
Techniques:
Nothing to record.
Feeding:
I'm giving her water now for a couple days to see if it gets abit better, looks like I was giving her a bit too many nutes for this stage. So, first let her dry a bit, then start with PH'ed water.
Smell:
Same same, nothing new to record.
Temps and RH recorded today:
26c - 22c
62% - 41%
Pests and plagues:
Nothing to record.
Day 39 - 23/6
General:
This days I really haven't done much. I wanted to give them a week to be themselves, and see after what can I do to improve them, so this weekend I'll use some time to eventually start a Scrog training, If I'm still on time. She's looking good, but I'm afraid the time between them and the advance stage of #1 might not be the perfect condition to do this.
Techniques:
Nothing to record.
Feeding:
Only h2o, ph 6.5
Smell:
Same same, nothing new to record.
Temps and RH recorded today:
27c - 21c
60% - 37%
Pests and plagues:
Nothing to record.
Day 40 - 24/6
General:
Another day is gone, nothing new, keep giving her water and thinking about the ScrOG to make this more effective, as they start to fight for space in the middle of the grow. She's outgrowing #1
Techniques:
Nothing to record.
Feeding:
Aqua vulgaris - A.K.A. - Tap water
Smell:
Same same, nothing new to record.
Temps and RH recorded today:
28c - 23c
53% - 37%
Pests and plagues:
Nothing to record.
Day 41/42 - 24-25/6
General:
Big big stretch.
Techniques:
Nothing to record.
Feeding:
Aqua vulgaris - A.K.A. - Tap water
Smell:
Same same, nothing new to record.
Temps and RH:
30c - 17c (26 average)
62% - 24% (43% average)
Pests and plagues:
Nothing to record.

Likes
25
Share


@DrGanj
Follow
Started flush now. I'm adding Nature Delight Active Sugar Boost as it's been recommended to boost terpene production. No idea if it will work this late into flower but trying anyway as apparently it has no need to be flushed and is fully organic.
Likes
13
Share

@Mrs_Larimar
Follow
2022-10-30
It was pure Joy to Grow them again.
In the Beginning of Flower i was not so happy with them,
but after another Week in the Floweringroom and some Nutrients, they packed up.
Plants loved the Setup with god Temp,VPD, Wind, Nutrients and Light!!
They are colorful and absolutely Pleasing.
a Big Role in this Grow were the new Lights Playing
All the Plants loved the Spectrum of the
HYPHOTONFLUX HPF-4000 (2x)
Plants were growing vigor, looking superhealthy
Harvest was an easy Job!
Bringing me well formed thick and dense Buds with alot of Frosting on them
Just look at the Pictures

Likes
13
Share


@HashCakes
Follow
Finally starting to show some preflower but I'm calling this a veg week. Nutes the same still.

Likes
7
Share


@Lily_Bloom
Follow
Wet trimmed Frankie completely. I took my time with it and finished it in the evening hours of 3 days. Pictures of the cured buds will follow.