
Likes
Comments
Share


@FatnastyzBudz
Follow
10-1
Day 2 week 3 of flower.
The roof was on fire, ppm 9k, fire dept came, put it out, ppm 1750. Still a amber burning, maybe it will settle! Ph 7.2
Doesn't seem too mad atm!
Ouch
.
Looked up my water report all I could find was mag ppm7 out of tap. Nothing about cal.
It makes complete sense, I have an issue with cal/mag every time. Still figuring it out. I would have never figured this out. Ty amazing people!!
10-5
Water .2 mg epson per liter. Cal/mag, yucca
Fingers crossed. 🤞 So maybe I have soft water and need to add. Gonna just use dolomite lime next grow and for now on I guess.
10-6
1/4 cup poo, 3 tbs buildaflower, scoop connect.
.

Likes
34
Share


@Spliffi
Follow
Germination 20 September 2023
Heya 🤙👍🤙🌱🌱🌱
In the heart of a humble garden, a miraculous journey is about to unfold. Beneath the soil's dark, nurturing embrace, a seed lies dormant, awaiting the precise moment to burst forth into life. It is a marvel of nature, a tiny capsule of potential, encoded with the blueprints of the plant it aspires to become.
As the heavens open, raindrops penetrate the earth, quenching the thirst of the soil and signaling to the seed that its time has come. The seed absorbs this life-giving moisture, swelling as it takes in water. It's as if the seed is awakening from a long slumber, stretching its embryonic limbs for the very first time.
Within this subterranean realm, the seed's outer coat softens, and a tiny rootlet begins to emerge. This is the radicle, the seed's first root, and it instinctively knows to journey downward, anchoring itself into the soil. It is the plant's lifeline, seeking out water and nutrients essential for growth.
Simultaneously, a delicate shoot, known as the plumule, makes its way upwards, drawn by an invisible force towards the sky. It is a daring expedition, fraught with obstacles, as it navigates through the soil. Yet, guided by an innate sense of direction, it perseveres.
Finally, breaking through the soil's surface, the shoot unfurls its first leaves, miniature versions of what they will one day become. These are the cotyledons, a pair of leaves that have been stored within the seed, packed with nutrients to sustain the young plant in its earliest days.
As the sun's rays touch these fledgling leaves, photosynthesis begins. It's a momentous occasion, the plant's first breath, as it converts sunlight into energy. The seedling, still fragile yet full of promise, has successfully embarked on the first chapter of its life. From here, it will face countless challenges and opportunities, but for now, it stands as a testament to the remarkable resilience and complexity of nature.
Thank you for Reading 👍🤙👍🌱


Likes
9
Share


@Bread_n_Buds
Follow
Excellent strain of 70-80 cm, with a very abundant resin both at the top and at the bottom, trichomes as big as mushrooms. We also love it very much because in the end the leaves above take on colour. Super crossing d for sure!
Music of the week is provided Radio Nula
https://radionula.com/
The seeds were made by the King.
https://greenhouseseeds.nl/
The light is not solar it comes from Mars
https://marshydro.eu/

Likes
48
Share


@Aleks555
Follow
Hello, folks. The week went well. We are feeding at 1200 ppm and have activated CO2 supplementation 1500 ppm

Likes
3
Share
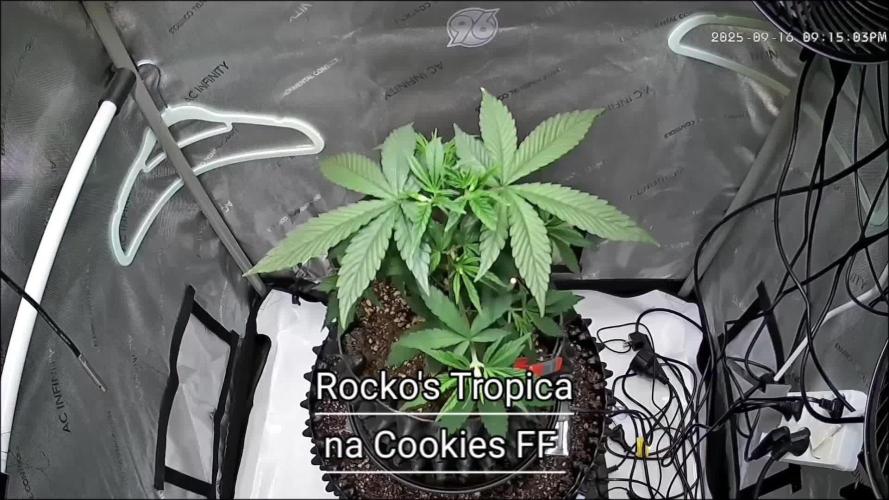

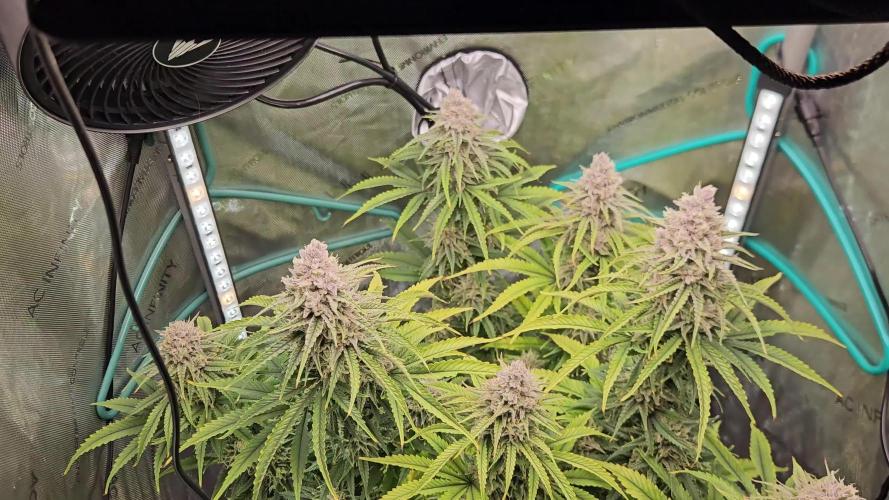
@RockoCalenberg
Follow
Stretch hat sich verlangsamt und die Blütenbildung schreitet rasant voran. Sie fängt auch an zu duften und zu funkeln und wird täglich schöner 😍

Likes
33
Share


@Mrs_Larimar
Follow
Saturday, Feb.20th
The CBD White Widow moved into the bigger Tent too
Now she has lots of Space and good Humid Air.
I think shes going to stretch more, because i dimmed the Light intensity
She looks happy and Green, no big Actions to take
Lights are running at 50 Percent
If you want to buy the tent or the Lights, here are the Links:
Light: http://bit.ly/marshydro-sp3000
Tent: http://bit.ly/marshydro-120x60tent

Likes
14
Share


@Quintall
Follow
Hallo lieber Grower,
hier mein erster Grow^^
Nach 3 Tagen Wasserbad alle in die Erde gelegt mit der Wurzel nach unten zeigend.
Bis alle aus der Erde kommen 24/7 Licht. Dann 18/6
Luftfeuchtigkeit auserhalb des mini Gewächshäuschens 60-70 %
Temperatur 20-25 grad


Likes
23
Share


@Barebaby
Follow
Flowering kinda early buying a new stronger light so stems can gain some strength.

Likes
35
Share


@PapasGrow
Follow
Northern Lights (fem) ✨✨✨✨
105 days from seed to harvest.
Flowering week 9.
Before she goes into 24hrs of darkness.
Magnificent plant, very relaxing body high with calm head buzz. Love this strain, she is a special girl.

Likes
19
Share


@LordSpl
Follow
Stanno iniziando i primi segnali di fioritura sono molto soddisfatto delle mie bimbe.
Processing
Likes
70
Share


@CBD_Sweden
Follow
@MephistoGenetics,
Hi all the happy people here in GrowDiaries.
This is my second cultivation ever and it will be fun to try a bigger space than my closet grow.
First, I'm just going to say I'm done with the construction of my new growroom.
The room is 2.14 meters by 1.7 meters and has a ceiling height of 2 meters.
It provides a floor area of 3.6 square meters.
I use a 54 Watt Lightwawe T5 for germination and 2 Pcs 400 Watt HPS lamps.
I have a channel fan that replaces the room air about 40 times an hour to get a comfortable environment in the room, the air enters a fresh air intake from the outside.
The air is purified through a carbon filter to then leave the room to the rest of the basement.
Then I use that heat to heat the rest of the basement.
I will use 10 pcs 15 liter Autopots to grow with and a 100 liter water tank that supplies the pots of water and nutrition.
I will grow completely organically in soil and will watercure my buds to get the best possible medicine for me.
But there are no cultivation rooms to be displayed here, so I continue with what is most important.
I am very excited to see how the new growroom will work and how this Illuminauto 21 - Sour Crinkle will turn out.
Illuminauto 21 - Sour Crinkle (Grape Crinkle x Sour Crack)
Two of our fastest and frostiest varieties collide to make a sweet and sour delight!
Expect super frosty, compact nugs that won't be a toke for novices.
Destined to be a great strain for extraction work too!
Plant size - Small - Medium
Cycle time - 60-65 days from sprout
Indica/Sativa - 80/20
Frost level - Extra Ridiculous
https://www.mephistogenetics.com/product-page/illuminauto-21-sour-crinkle
--------------------------------------------------------------------------------------------------------
2017-09-18. Start of week 4. I have defoliated her and she got water and nutes. She is 20 cm high and have not start to stretch yet.
--------------------------------------------------------------------------------------------------------------------------------------------
2017-09-20. Kl 23.00. Did some massive defoliation, added video and pics
------------------------------------------------------------------------------------------------
2017-09-22. The girl has recovered well after my massive defoliation. She is now 24 cm high. Gave her water and nutrition today.

Processing
Likes
13
Share


@DudeGrowsWeed
Follow
White Widow is looking very good. Nice bud site development coming along. I backed down a little on the Recharge this week, but still giving twice the suggested amount. Also still giving her Mammoth P. Will start with MegaCrop (Greenleaf) nutrients later this week. 👍


Likes
14
Share


@Canna96
Follow
Hey now, hope everyone is having a great weekend. Not much to report on the Durban Nights, she popped above soil on day 3 and is now on day 7 and has her first true set of leaves. I started prepping the Coco Coir by flushing down to .4 EC and then soaking in water with an EC of 2.0 with Cal Mag and a PH of 6.8. I will let it soak until the seedlings are ready to be transplanted hopefully by next weekend or shortly thereafter. The weather in my region is perfect for cultivating seedlings as it is fairly hot and humid and I only have the Spectrum X running at 30% so it is not putting out much heat and I also have a humidifier running in the tent on low which is maintaining a RH of around 68%. I do have the AC Infinity fan kick on here and there just to keep some fresh air in the tent but no real issues with heat. Super excited for this strain as it is a cross of Durban Thai and Jack Herer which are two of my favorite Sative Strains. I hope everyone has a safe weekend.
Thanks for stopping by, Stay Safe and Blaze On!!! 💪
Website: https://medicgrow.com/
https://growdiaries.com/grower/medicgrowled

Processing
Likes
4
Share


@LedboxCulture
Follow
Two Weeks, enter to flowering Time💫
Beautiful Plants I like it 💯


Likes
12
Share


@Skunkiest_bender39
Follow
Wieder 2Wochen rum, pro Woche ca 10cm dazu gekommen. Mängel zu erkennen, CalMag gekauft ActiVera wird folgen.
Likes
2
Share

@BobbersDown
Follow
Last feed tomorrow, looking like 10 days until harvest. Can't wait to try this plant out it smells like nothing else! Pretty much cruise control right now.

Likes
Comments
Share


@Prof_Weed
Follow
Transplantation from Easy Plug to Terra Aquatica Cultimate S.
1 week faster than in Rockwool, yes baby!
Likes
11
Share


@Le_Che
Follow
10 semaines de Flo tout de même à voir une fois sec, galère mais content du résultat, à voir une fois sec, instable