The Grow Awards 2026 🏆 


Likes
Comments
Share
@Oyziphar
Follow
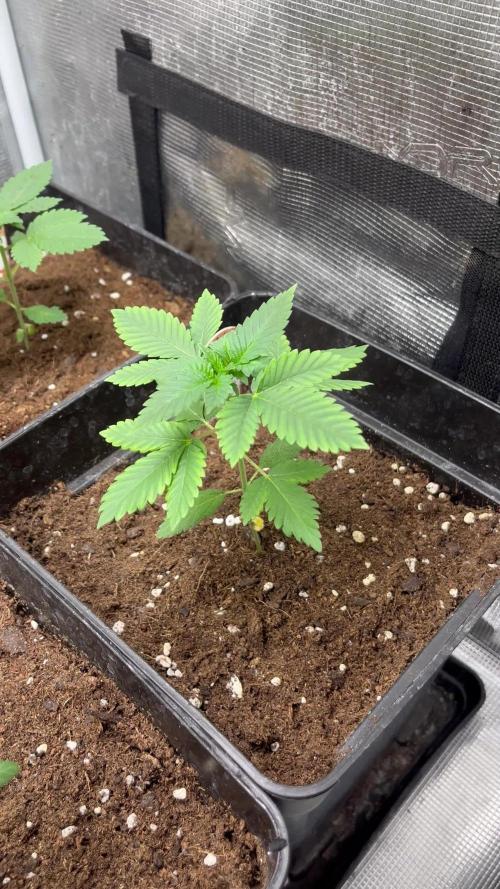
Second week of the flowering period 😻😻😻
This week on DAY 8 of the flowering period I started replacing the wooden sticks with bigger plastic plantsticks. 👌
The plants grew like crazy the rest of the week 😵😵😵 And they drank a lot of water 😱😱😱
I did a bit of pruning this week; I removed some lower and smaller branches. 👉👉
My ceiling slopes from left to right, so on DAY14 I moved the largest plants (Triple G) on the left side. 👍
On DAY14 I also reattached the branches to the plant sticks 👌 and again bending (LST) of the branches to get a flat canopy. 🙌
👆 Largest plants = Triple G = 90cm
👇 Smallest plants = Wedding Gelato = 70cm


Processing
Likes
7
Share
@vs4836
Follow
Began flush on cca with molasses and water ph to 5.8, rest are as noted for nutrients inc molasses. Also canna rhyzotonic is now bio version.


Likes
16
Share
@Lazuli
Follow
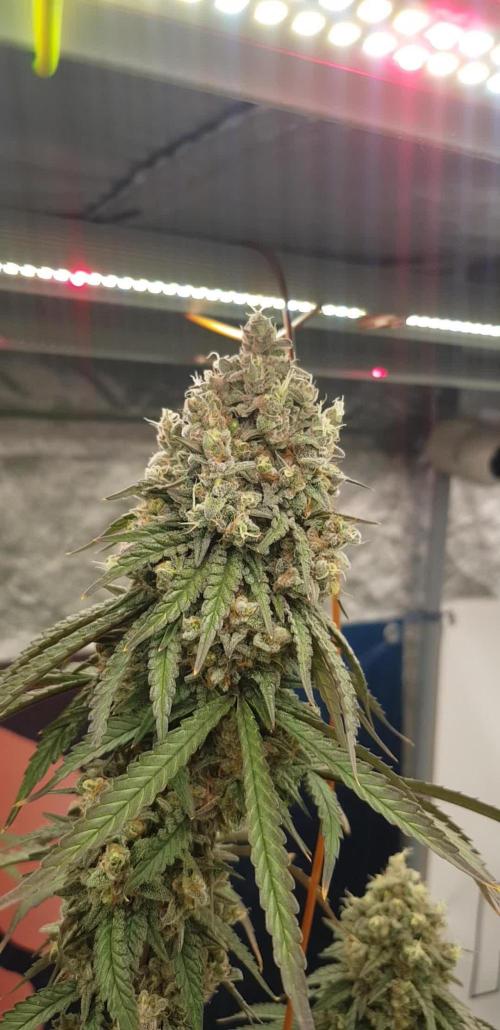
started with lockout but then the weed fairy came by and the plant produced major colas lmao


Likes
7
Share
@Huntress007
Follow
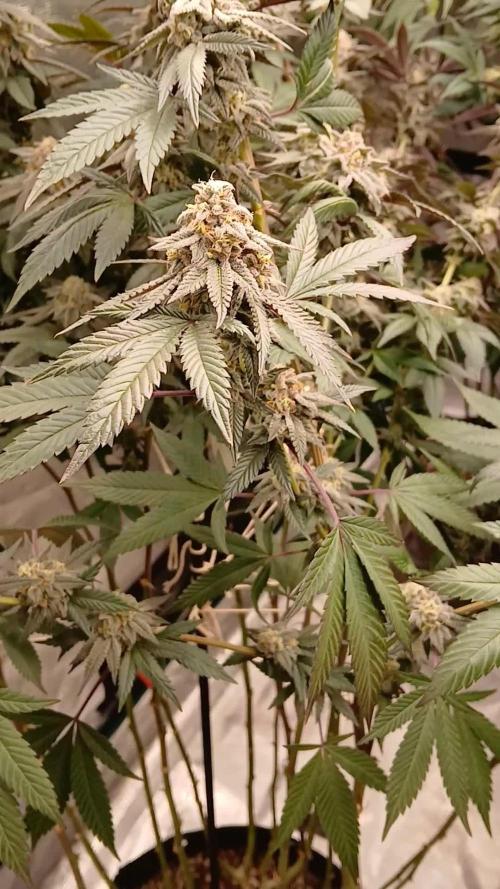
I am pretty happy for this being my 1st grow ever! Nice looking buds and lots of fun! I did expect the nugz to be bigger but I an happy with the experience!
Likes
9
Share
@Miguels_Fuego
Follow
Both started to flower faster than I wanted. I would have preferred another week of veg. Blooming nutes were transitioned during this week. Mimosa is smaller then her counterpart, but is smelling stronger.

Processing
Likes
2
Share

Likes
13
Share
@STAYINGONMYMAINCBATORUNTWO
Follow
Such a graceful girl... she is developing her flowers with such finesse! I defoliated a little every few days so I didn’t cause any stalls in the growth and shows to have worked! I really feel i am showing I know what I’m doing with feminized plants! It’s a great feeling to actually be so relaxed during too!

Likes
9
Share
@Mr_nugs_lover_David
Follow
Hello everybody!!,I'm very very sad this time guys,a few weeks ago I had some kind of fungal infection because humidity went to high with the rain and I had to take away 3 of this 4 ladies plus the other one I lost at the beginning because they were 5 and it was due also to a fungal infection however she was in seedling stage and I got the evil dumping off,the good news is that I'm enjoying soo much the only one I have,she's in full flowering and she's producing amazing sweet terps,you can't imagine how disappointed I am,I would have loved to have my 5 girls in full flowering now,I'll griw her Photoperiod version no matter what,I'm in love with her suoer floral and sweet aromas,I recomend this strain to everyone,you will enjoy her so much.peace growmies and cannalovers! ❤️💚💛🌱✌️ #LEGALIZEIT!!!!!!
Likes
2
Share
@eldruida_lamota
Follow
Vamos familia, actualizamos la cuarta semana de vida de estas NoName de Seedstockers.
Tuve problemas con la temperatura que estuvo alta 28/26 grados y humedad dentro de los rangos correctos, la única queja es la temperatura por empezar pronto, 16 horas luz, 8 oscuridad, estiraron un poco, pero van lentas por el momento, que cojan fuerza.
El trasplante a sido realizado a la maceta definitiva, 7L con sustrato Top crop.
Hasta aquí todo, Buenos humos 💨💨💨
Likes
43
Share
@TheCannaProphet
Follow
~ GG4 SHERBET FAST FLOWER by FastBuds ~
Well fam, here we go again with another epic strain from FastBuds Fast Flowering stable. After having such tremendous success growing their Gorilla Cookies Fast Flower outdoors last year, I've decided to run another of their fast flowering strains outdoors this year... GG4 Sherbet Fast Flower!
The best description of this awesome cultivar comes directly from my friends at FastBuds which is as follows:
"Bred from extremely potent and flavorful Gorilla Glue and Orange Sherbet genetics, GG4 Sherbet FF (Fast-Flowering) takes all the best traits to the next level, offering a high-yielding strain that can produce up to 600 g/m2 in a 7-week flowering time. This super resilient Indica-leaning hybrid thrives indoors and outdoors, and in all types of climates while producing mouth-watering sweet, fruity, spicy and earthy terps that translate into a delicious sugary hazelnut aroma. Expect an extremely relaxing and overall happy effect that’ll leave you with a huge smile from ear to ear. It’s the perfect strain for growers of all levels of experience seeking low-maintenance yet highly productive photoperiod varieties that deliver quality and quantity without extra effort.
GG4 Sherbet FF grows chunky buds with long dark orange hairs and spade-shaped calyxes that get encrusted with trichomes by harvest time, giving them a gorgeous silvery-white appearance. This medium-sized photoperiod can reach up to 200 cm in height and yields up to 650 g/m2 while developing that typical hybrid structure. GG4 Sherbet FF grows with a stocky, bushy appearance, developing one sturdy main cola and fat side branches that support huge yields without much effort. This super-fast variety produces distinctive light-green buds with a high bud-to-leaf ratio, making your trimming sessions a breeze. It’s a top-notch resin producer that doesn’t need much maintenance and will thrive in almost every climate, rewarding growers of all levels with extremely flavorful resin that makes for outstanding hash end extracts."
________________________________________________________________________________________________________________________________________________________________________________________________________________________________________________________________________________________________________________________
The Setup:
This is going to be an outdoor grow, but I have started the GG4 Sherbet Fast Flower indoors as our weather is still too cold to put her outside (nighttime temp's dipping regularly into the 30's℉).
The plan is simple... let her grow inside under a 19/5 light schedule until the nighttime temperatures stay above the mid 40's℉, at which point she'll be moved outside and transplanted into the soil which I have already setup and inoculated with beneficial microbes, and then let the fun begin!🤪💚
________________________________________________________________________________________________________________________________________________________________________________________________________________________________________________________________________________________________________________________
Weekly Updates:
9/4- Here we go into Week 6 of flower for this epic GG4 Sherbet Fast Flower from FastBuds and she is on fire!🔥 I'm praying that our weather stays cool and dry for as long as possible for this gorgeous lady!
9/6- I have switched my watering schedule to mornings now with the GG4 Sherbet Fast Flower, I want to do whatever I can to keep the nighttime moisture levels as low as possible in order to help prevent mold from forming on the flowers as they are huge and dense. I am also checking her trichomes every other day to try to dial in the ideal time to harvest her.
9/8- I'm continuing to water in the mornings on days that we do not get any substantial rain with well water via the garden hose. Today I went through the plant and removed as many old dead leaves as I could along with any shade leaves that were yellow.
9/10- I checked the GG4 Sherbet FF's trichomes today and they are getting very close, and I anticipate that she will be ready in the next few days!
There's another week of flowering done for the GG4 Sherbet Fast Flower and she is just about ready to be harvested which will, from the looks of her trichomes, will be in the next 4-5 days... I'm so excited!🤩


Likes
113
Share
@Skunky
Follow
Hi!
I'm actually growing some White Walker Kush from DNA Genetics but I didn't have that option when selecting the strain so I just chose Martian Kush. Sorry about that. It's a seed I found in the weed from my last grow and I wanted to see if I could get sth out of it. Still not sure if it's male or female so wish me luck on this one. Looking good so far :)
PS: Right now, I still have the plant in my living room, under a 50W plant bulb with uv, so no strong lights used right now to prevent it from growing too fast. I'll move it into the box and under the 400W as soon as my actual grow is done.
Potsize is 65L.
I kinda lost track of the weeks since I didn't really wanted to grow this plant so I'll just assume it's around week 9... but I may be so wrong... 👻

Likes
10
Share
@GERGrowDesigns
Follow
Welcome to Flower week 8 of Sweet Seeds Mental Rainbow F1
I'm excited to share my grow journey with you from my
Sweet Seeds Project . It's going to be an incredible ride, full of learning, growing, and connecting with fellow growers from all around the world!
For this Project , I’ve chosen the Feminized Photo strain Mental Rainbow F1 :
Here’s what I’m working with:
• 🌱 Tent: 120x60x80
• 🧑🌾 Breeder Company: Sweet Seeds
• 💧 Humidity Range: 40
• ⏳ Flowering Time: 7-8weeks
• Strain Info: 22-30%THC
• 🌡️ Temperature: 26
• 🍵 Pot Size: 16
• Nutrient Brand: Narcos
• ⚡ Lights : 600W x 2
A huge thank you to Sweet Seeds for allowing me to try my Best with this amazing collection from Photo Strains they managed to Sponsore . Big thanks for supporting the grower community worldwide! Your genetics and passion speak for themselves!
I would truly appreciate every bit of feedback, help, questions, or discussions – and of course, your likes and interactions mean the world to me as I try to stand out in this exciting competition!
Let’s grow together – and don’t forget to stop by again to see the latest updates!
Happy growing!
Stay lifted and stay curious!
Likes
9
Share
@Changman
Follow
17-07-2024
We have decided to flip them this week as certain light disruptions have caused complications and we are going to avoid anymore. Let's see how they react to the nutrients and go from there


Likes
13
Share
@NordicClosetGrower
Follow
The strain has proven to be extremely sturdy compared to the autoflower version. The smell has been a bit problematic. Some terpenes just can't seem to be tamed even with a brand new carbon air filter. I hope this pays off in terms of aroma quality :)

Likes
3
Share
@GrowinHome
Follow
25 days in to flowering.
The garden is still looking very good and healthy.

Likes
2
Share
