
Likes
Comments
Share


@valiotoro
Follow
The trim was easy and the buds are super fat full of resin✂️🤩
The smell is delicious🤤


Likes
20
Share


@eldruida_lamota
Follow
Vamos familia ya traigo la novena semana de floración de estas Lava Cake de Zamnesia.
Vaya color, están bastante sanas , van produciendo tricomas y van formándose y madurando las flores correctamente.
Ya estamos en la recta final , se están poniendo a punto de caramelo.
Temperaturas máximas en 28.5 y mínimas en 26 y una humedad estable en torno al 40%.
Os comento que tengo un descuento y para que compréis en la web de Zamnesia de un 20%, el código es ZAMMIGD2023
The discount 20% and the code is ZAMMIGD2023
https://www.zamnesia.com/
Agrobeta:
https://www.agrobeta.com/agrobetatiendaonline/36-abonos-canamo
Mars hydro:
Code discount: EL420
https://www.mars-hydro.com/
Espero que lo disfrutéis, buenos humos 💨💨.
Likes
10
Share


@HerbalEdu
Follow
(Expected flowering: 9 weeks)
Germination:
24h 7/9, 48h 8/9, 72h 9/9
Transplant:
4(6)/9 not sure yet, some issues with overwatering, rot and previous week Paris heatwave prolly
luckily i have some back up plant nearly ready for transplant in the veg area, so gonna use them to fill the tent empty slot this cycle.

Likes
31
Share


@Coopmc
Follow
She rocking it pretty good
Almost regret not keeping a cutting from this one!!

Likes
45
Share


@D33jW
Follow
📅 Week 11 – Day 76 / FLO42
Conditions are still challenging – warm and humid, making it hard to maintain a high VPD.
This week I removed some fan leaves to improve airflow between the buds.
Despite the tough climate, the flowers are swelling nicely, and the trichome coverage is looking great – no complaints here.
The forecast says a cooler and rainy week is coming, so I'm hoping to push them further into ripening with the help of a dehumidifier.
We keep moving forward – the finish line is getting close! 💪

Likes
8
Share


@ButterfliesLittleFarm
Follow
Hello Diary,
As we slowly approach harvest, Milky Way F1 has started to show signs of being ready to cut soon.
Looking under the microscope, the trichomes have started to milk, so another week and it will probably be ready.
The flowers have covered the branches and fill in nicely, they are as hard as Titan but I am satisfied.
The leaves are still of a healthy green color, here and there some leaves feel but that is normal.
Still watering every three days.
As of this week, I have stopped adding supplements, I only water with clean water that I lowered the pH of earlier. value.
The conditions on the farm are still good (unchanged), the temperature is around 28 degrees while the humidity is around 45%.
Here's what it looked like last week.
18/06/2023 - Day 50.
Watering.
I prepared the usual 7 liters of water, lowered the p.H. at 6.0 I watered all three plants evenly with the hundredth amount.
21/06/2023 - Day 53.
Watering.
I repeated the same procedure as three days earlier.
24/06/2023 - Day 56.
Photography for the end of the 8th week and after that I watered the plants.
That's all for this week, see you soon.
Likes
7
Share

@Susquihanna
Follow
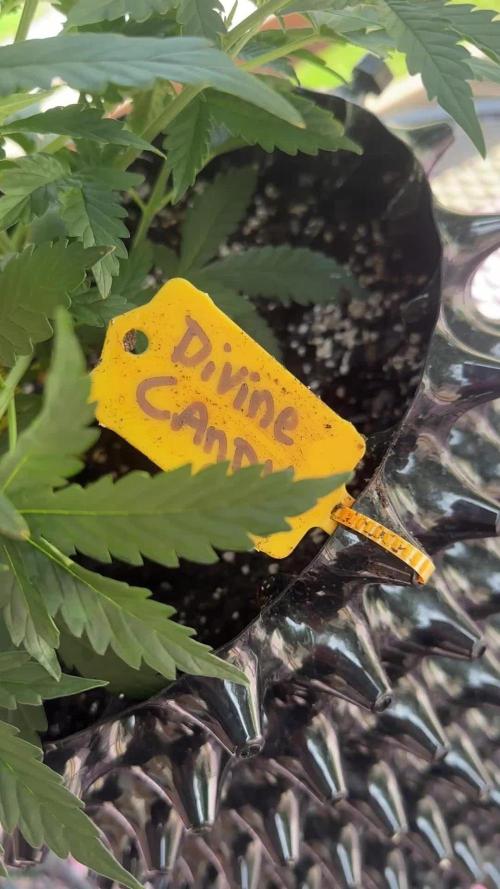
2nd Time Around "I WANT CANDY" grew 4 inches this week and is very bushy. @DivineSeeds website says that Auto Candy will have thick growth on the sides of her plants and I can attest that it is true. I tried to take a couple of pictures that showed how thick she is. It rained a little this week, so I only fed her a couple of times.
I can't wait for her to start flowering and smell her melted sugar aroma.
As always, Let's chat it up! See ya next week.
Likes
45
Share


@masterofsmeagol
Follow
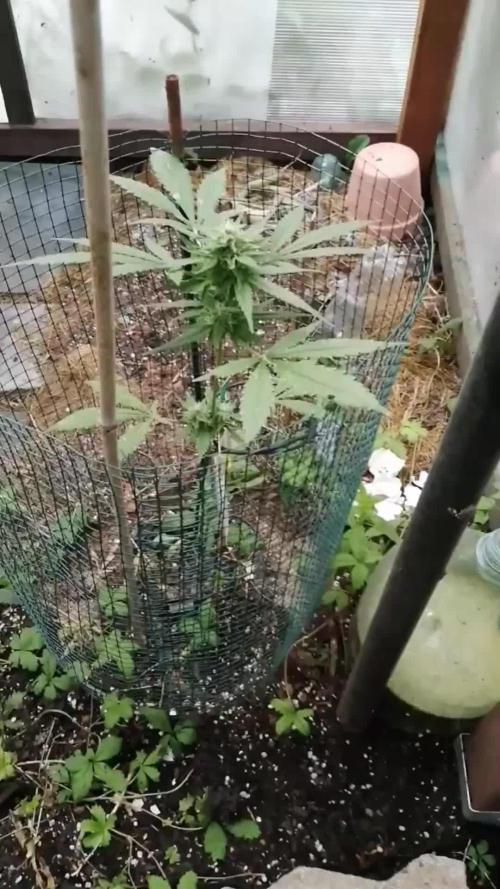
8/27 I think I mightve been overwatering. It's so hard to tell when the conditions change week to week. That's Maine for ya. Bags were still heavy and plants were soaked. I tried to shake the more advanced flowering plants without sending water everywhere. That's how septoria spreads. The event horizon I treated with plant doctor looks the best it ever has. It's tile for another application on the toasted toffy. I'm seeing a few spots again. I didn't have time to take pictures or do a video. This video is from last night. I'll treat that toasted toffy again today and I'll record it here. After I see it working u may treat the others. I see some residue of k bicarb but it has pretty much eradicated the pm. I know it will always be there but these treatments seem to be working. I'll be adding beastie bloom to my line up soon. EVERYDAY I go over the buds are bigger more compact and dense. Event horizon, toasted toffy and the red runtz (I think) in the 50 are flowering to beat hell! The get bigger everytime I see them. I can smell them as soon as I round the corner. This is going to be a good year. These strainsxare high in thc. Maybe I gave up some mold resistance and a harder to grow strain but if I can make it to the end it will be fire.
WENT BACK OVER AROUND 5. OBVIOUSLY IN THIS SCORCHING 80°+ day the seedling in the 10 was dry as a popcorn fart. Some other plants seemed dry when I stuck my arm down the bag but I could feel some moisture when I pushed my finger through the medium. They WILL need water but I'm not giving it to them tonight. Took a shit ton if pictures and a video this morning. I'll uploadcthat shit tomorrow. I'm trying to do a couple right now. Anyway I continued to defoliate what needs it. Flowers are swelling. I GAVE THE TOASTED TOFFY ITS 2ND TREATING OF PLANT DOCTOR. I USED A QTR GALLON OF A 4 TSP PER GALLON MIXTURE. I MADE SURE TO GET AS MUCH OF THE FOLIAGE AS POSSIBLE AND THEN I USED THE RESTCON THE MEDIUM. I SHOULDVE PROBABLY WATERED THAT ONE BUT ITS GOING TO RAIN TONIGHT. AT LEAST I HOPE IT IS. Looks like some of the pics are uploading! Yay! The plants looked the best I've ever seen them tonight so I held off watering. My wife is I'll and may need to go to the hospital. So instead of watering prematurely I can monitor the situation and make a decision in the morning. I made enough phed water for my father to go around and water everything. He is aware of the situation. Hopfully that will not be necessary. However, I don't want to over water and I feel like they didn't want it. Just going with my intuition. It's done me pretty good so far.
8/28 Luckily no hospital. It's sprinkling out. Plants are covered in water so we got SOME rain. It says we will get 0.00 but that can't be right. I watered the 10 yesterday and everything else this morning with a gallon each except the middle gmo in the 30 which got 1.5 gallons. Did not water the one in the 50 gal pot. It looks a little overwatered. Also looks like it has a slight calcium/magnesium deficiency. I'll up the calmag and i'll make sure when I do water I'll water thoroughly. Like usual toasted toffy is looking better after the treatment. The all star has been the k bicarb. I haven't seen shit for pm. Just a little residue from the k-bicarb. Took a video and some pictures. This is the fun time. I like watching the buds develop. Some of these plants were monster cropped so they are STACKED. I'll keep what I do updated.
8/29 Made an awesome video today bit it won't upload. Probably because its a little over 2 minutes. I'll do another one if it won't upload. Nope it won't even attempt to upload it now. Oh well. They flowers just looked so pretty this morning. I noticed some WPM on the event horizon in the middle. I noticed SOME on the bottom and interior of the GMO that I had already identified. I'll do another k-bicarb treatment and see how that goes. Plant Doctor seems to he doing a pretty good job on the septoria on toastedctoffy and my favorite event horizon. That plantvis THICK. it's going to be stacked and have some huge colas. I need to LST it and suppirt those giant colas and separate them a bit more. There is never any shortage of work to be done I can tell you that. I have defoliation to do on the sherb pie and the middle event horizon. It seems like crisis after crisis. Bu my plants are STRONG.
8/30 It was in the 40s at 6am. Shook off the plants. Bags are still heavy. I see some septoria climbing a bottom branch of the toasted toffy. It's foggy as hell out. Can't see a foot in front of me. Saw a LITTLE PM on the gmo I've been treating. It's just time to apply the ki bicarb. Plant Doctor is working wonders on even horizon in the back. I see some pm on the one in the middle. I think I'll treat that with plant doctor as well. I'm not sure. I messed up the video. I've got work to do. I'm waiting until I water and I'll feed again. I'm going to add beastie bloom to the lineup this time I think. Only one plant seems like it m9ght be too early for it. We'll see. I need to look back. I'll document what I do. Video won't upload. I'll try later but it's sideways
WENT OVER AROUND 3PM AND EVERYTHING LOOKED FABULOUS. WELL....THE PLANT I DIDNT WATERCLAST TIME IN THE 50 WAS DROOPING SO I GAVE IT A GALLON AND A HALF. THE TEN WAS LIGHT SO I GAVE IT A GALLON. IT WASNT DROOPY BUT ITS A HUGE PLANT IN A 10GAL AND USES A LOT OF WATER. I WAS PLANNING TO GO CHECK THEM TONIGHT AND SEE IF THEY NEEDED WATER BUT EVERYTHING IS PRAYING TO THE SUN! I DONT WANT TO OVERWATER AND I BELIEVE THESE WOULD BE BEST SUITED TO BE WATERED IN TGE MORNING. ILL FEED THIS TIME AS WELL. IM CONSIDERING ANOTHER APP OF K BICARB. TOOK A FEW PICTURES AND VIDEOS BUT ILL NEED TO UPLOAD
8/31 FED AND WATERED EVERYTHING. TOASTED TOFFY DIDNT GET FED DUE TO SEPTORIA AND THE 10 ISNT FAR ENOUGH ALONG.. THE 50 WAS WATERED YESTERDAY BUT GOT THE FEED WITH A LITTLE MORE WATER THIS MORNING. I ADDED ABOUT 1/16 TSP BEASTUE BLOOM TO THE REGULAR LINEUP TO SEE HOW IT GOES. MY BUDDY TOLD ME LOTS OF PEOPLE HAVING PROBLEMS WITH PM. I WENT BACK OVER TO DEFOLIATE AND LOOK FOR PM AND I FOUND IT. ON THE GMO INTETIOR AND SOME BOTTOM BRANCHES. I DEFOLIATED WHAT WAS BAD AND THEN I SPRAYED 3 GMO'S, EVENT HORIZON IN THE MIDDLE AND SHERB PIE WITH K-BICARB. HOPFULLY THAT WILL KEEP THINGS OUT OF CONTROL. I WILL BE WATCHING AND KEEPING UP WITH FUNGACIDES. IF I FIND ONE NOT WORKING ILL SWITCH IT UP. I HAVE A FEW OPTIONS. BUDS ARE EXPLODING IN GROWTH! WINDY OUT. I SAW A SECONDARY BRANCH LIMP AND MY GEART SUNK. I LOOKED DOWN THOUGH AND SAW THAT IT JUST WAS BLOWN HATD AGAINST THE TOMATO CAGE AND SNAPPED. I REMOVED IT WITB A SIGH OF RELIEF. MY BUDDY SAYS THE SEPTORIA DOESNT LOOK TO BAD AND ITS PRETTY FAR IN FLOWER SO HE THINKS ILL BE ALRIGHT. NEVER GROWING CLONES AGAIN. ILL STICK TO SEEDS AND STEAINS MADE FOR MAINES
9/1 Forgot to write an entry. IT RAINED FOR A BIT BUT TURNED TO BRIGHT 80'S
9/2 WATERED EVERYTHING. I THINK ITS TIME FOR ANOTHER TREATMENT OF PLANT DOCTOR TODAY. The septoria is getting a little worse. The buds are swelling everyday though. I think this plant only has a month left. I just need to outrun it. So far so good. I think my watering habits are better now. It's different depending on weather. Potassium bicarb has been wonderful treating the pm on that gmo. I treated the middle event horizon with it as well. It seems to work awesome. I'm losing tons of leaves. I hope that's normal senescence. I think it is seeing as how I see SOME foliage in the woods. Its matching other diaries. The plant must shed some leaves to make these flowers that seem to double in size every time I see them! Trying to upload a couple videos but they are long so we'll see what happens.
WENT BACK OVER AT NIGHT ANDCAPPLIED A LITTLE BIT OF K BICARB AND DEFOLIATED WHAT I SAW ON THAT GMO. IVE BEEN DEFOLIATING WHAT SEEMS LIKE A LOT BUT BUDS ARE SWELLING AND ITS CONGRUENT WITH THE MAJORITY OF MY DIARIES. I WISH I HAD PERFECT CONDITIONS BUT I DONT. I TREATED THE EVENTHORIZON WITH PLANT DOCTOR AGAIN. I USED APPROX A QTR GALLON OF 2 TSP/GALLON AND TRIED TO AVOID BUDS WHILE STILL GETTING THE LEAVES. I KINDA USED THE REST AS A SQUALCH SINCE I HAD WATERED THIS MORNING. THE WIND WAS STRONG. I ADDED A GARDEN STAKE AND ROPE SUPPORT TO THE TOASTED TOFFY AND ATTACHED IT RIGHT TO THE FRAME OF THE CAGE. LOOKS GOOD FOR NOW. ILL KEEP THINGS UPDATED.

Likes
12
Share


@Bruce_Leroy1
Follow
I believe I have a little Nute burn so going to flush this week and reduce nutes going forward. Thanks to everyone looking out. I’m having an issue with grow diaries confirmation email so I can’t respond to anyone or say thx.
@buddy1968 how long did it take from seed to harvest and how much did you yield?

Likes
16
Share


@Siriuz
Follow
Very happy to start my new Collection from sweet seeds 👽🌱
Thanks a lot for all your kindess
May God bless you always
We are running photoperiod
For the very first time
I think its time for us to grow big
And hopefully we get her into bloom
Happy growing everyone
Day 1 - Place seed into peat pellet and left her fully in a dark
RH was 45/60%
Temp 22/25C
Day 2 - took her out of the dark to get light for 12 HRS
Then back to darkness again
Until next morning
Day 3 - She is finally up and got to fix her a lil since its root was not attach well to peat pellet, just cover her lightly with more Peat moss and place better its root and cotyledons for better growing
She is all set and good to grow
Happy growing everyone 🌱👽

Likes
13
Share

@All_our_small_plants
Follow
Bewässerung: 1000 ml jeden 3 Tag in der zehnte Woche
pH-Wert: 6
EC-Wert: 1.2 mS/cm
Temperatur: 20ºC
Luftfeuchtigkeit: 65%
Schädlingsbekämpfung: im Moment haben wir keine Anzeichen von befall wir haben nur mal zur Prävention etwas Sand gegen die Schnecken um die Pflanze gemacht, dies verhindert das diese sich nähern. Wir haben aber auch Raubmilben ins spiel gebracht zur vorsorge gegen Spinnmilben und andere Schädlinge 😷
PPFD: Direktes Sonnenlicht
DLI: Direktes Sonnenlicht
-Tag 63 bei der Space Cookies #2 werden die Blüten immer dichter 😍

Likes
26
Share


@Wicked_Stix
Follow
I really like the colors coming out in these buds. They are getting more purple every day. Looks like they are going to stack up pretty fat too. I spread the plants out a little this week so they get better light and air flow. Other than that I haven't done anything besides keep the reservoir full. Still pumping nutrients 1 minute on 20 minutes off. They are getting .5 tsp maxibloom per gallon. Not going to run any boosters this round. They dont look like they want or need it.

Likes
5
Share


@FlyHighhh
Follow
Deze week 4 dames overgepot in 10 lt potten en een mag als reserve op de bank blijfen zitten .😁 Wat spaarlampen erbij gedaan zit nu op de 125 watt een voer dit met de tijd op naar 250 watt. Mijn eerste 2 oogsten waren autoflowers ben benieuwd wat het gaat schelen met gewone old scool zaden .


Likes
31
Share


@SkunkyDog
Follow
Hallo zusammen 🤙.
Das war die letzte Woche für sie morgen werde ich sie ernten habe etwas Angst das sie sonst Schimmel bekommen könnte weil die Buds so hart sind und draußen ein Scheiss Regenwetter ist.
Sie erhalten 25 Prozent Rabatt in unserem Shop
Mindestbestellwert beträgt 75 Euro
https://greenbuzzliquids.com/en/shop/
Code: GD42025

Likes
7
Share


@BIYEI
Follow
Floracion (Tiempo estimado 64 dias)
Cuarta Semana de Floracion
29/01/2024 - 5:00hrs y 22hrs: Se hace cambio de solucion nutritiva, con parametros ajustados a la semana, Esta vez no se lavan recipientes, Se verifican parámetros básicos del agua y se mantienene constantes apesar de no lavar los recipientes, mantener cuidados específicos, el olor es mas penetrante pero gracias al filtro de carbono se mantiene fuera del indoor sin aroma, empiezan a observarse mas el crecimiento de los pistilos .
Agua de osmosis: Ph 6.0, PPm 950-1200, Ec 1.9-2.3, Temperatura 18°C - 24°C
Ambiente: Temperatura 19-25 °C, Humedad 65%, Ventilación 20%, 12 hrs de luz , 12 hrs de obscuridad.
30/01/2024 - 5:00hrs y 22hrs: Se verifican parámetros básicos del agua, mantener cuidados específicos.
Agua de osmosis: Ph 6.0, PPm 950-1200, Ec 1.9-2.3, Temperatura 18°C - 24°C
Ambiente: Temperatura 19-25 °C, Humedad 65%, Ventilación 20%, 12 hrs de luz , 12 hrs de obscuridad.
31/01/2024 - 5:00hrs y 22hrs: Se verifican parámetros básicos del agua, mantener cuidados específicos.
Agua de osmosis: Ph 6.0, PPm 950-1200, Ec 1.9-2.3, Temperatura 18°C - 24°C
Ambiente: Temperatura 19-25 °C, Humedad 65%, Ventilación 20%, 12 hrs de luz , 12 hrs de obscuridad.
01/02/2024 - 5:00hrs y 22hrs: Se verifican parámetros básicos del agua, mantener cuidados específicos.
Agua de osmosis: Ph 6.0, PPm 950-1200, Ec 1.9-2.3, Temperatura 18°C - 24°C
Ambiente: Temperatura 19-25 °C, Humedad 65%, Ventilación 20%, 12 hrs de luz , 12 hrs de obscuridad.
02/02/2024 - 5:00hrs y 22hrs: Se verifican parámetros básicos del agua, mantener cuidados específicos.
Agua de osmosis: Ph 6.0, PPm 950-1200, Ec 1.9-2.3, Temperatura 18°C - 24°C
Ambiente: Temperatura 19-25 °C, Humedad 65%, Ventilación 20%, 12 hrs de luz , 12 hrs de obscuridad.
03/02/2024 - 5:00hrs y 22hrs: Se verifican parámetros básicos del agua, mantener cuidados específicos.
Agua de osmosis: Ph 6.0, PPm 950-1200, Ec 1.9-2.3, Temperatura 18°C - 24°C
Ambiente: Temperatura 19-25 °C, Humedad 65%, Ventilación 20%, 12 hrs de luz , 12 hrs de obscuridad.
04/02/2024 - 5:00hrs y 22hrs: Se verifican parámetros básicos del agua, mantener cuidados específicos.
Agua de osmosis: Ph 6.0, PPm 950-1200, Ec 1.9-2.3, Temperatura 18°C - 24°C
Ambiente: Temperatura 19-25 °C, Humedad 65%, Ventilación 20%, 12 hrs de luz , 12 hrs de obscuridad.
Likes
140
Share


@MrJones
Follow
mrjones - Slurricane #7 S1
🌱Slurricane #7 S1
@inhousegenetics_official
👨🌾🏽GD Grower: MrJones
🔹🔹🔹🔹🔹🔹GOALS🔹🔹🔹🔹🔹🔹
🌞Environment - 75/80℉ and 55% Humidity
💧 Feeding - Advanced Nutrients Organic
⚗️Soil - 50% Ocean Forest / 20% Tupur Royal Gold / 10% Earth Worm castings / 10% lobster Compost / 10% Additional Perlite
🍃Training / HST, Will be topping, Cloning, and creating larger plants, and placing to flower under a trellis
🕷️ IPM - Will be using Green Cleaner" 1 OZ per Gallon, and CannControl from Mammoth alternating between products each month for Integrated Pest Management.
💡Using 480 Watts of LED Lights.
🔹🔹🔹🔹🔹🔹🔹🔹🔹🔹🔹🔹🔹🔹🔹
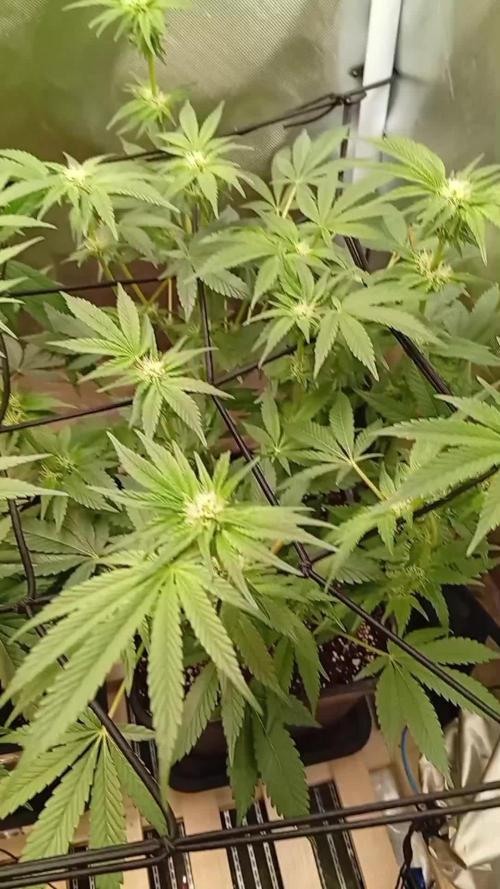
📜 Rambling - Week 17 / The number of buds that are growing here is just insane, the smell coming from the tent is amazing, I am noticing the leaf color getting a bit too green, I will decrease the PPM/EC by 200 for the next few weeks.
🔹🔹🔹🔹🔹🔹🔹🔹🔹🔹🔹🔹🔹🔹🔹
▶️ Sunday - 05.30.21 / No watering today - these ladies are looking great
▶️ Monday - 05.31.21 / Fed with half a gallon of above-mentioned nutrient / continue defoliation will need to focus this down,
▶️ Tuesday - 06.01.21 / No watering today - these ladies are looking great
▶️ Wednesday - 06.02.21 / Fed with half a gallon of the above-mentioned nutrient
▶️ Thursday - 06.03.21 / No watering today - these ladies are looking great
▶️ Friday - 06.04.21 / Fed with half a gallon of the above-mentioned nutrient
▶️ Saturday - 06.05.21 / No watering today - these ladies are looking great
🔹🔹🔹🔹🔹🔹🔹🔹🔹🔹🔹🔹🔹🔹🔹


Likes
18
Share


@ZouzouCanna
Follow
So far so good 🤘
Blumat watering system works great. No feeding other than water. Might do a little compost tea later.
Le système d’arrosage automatique Blumat fonctionne nickel, pas de nutriments autre que de l’eau. On fera ptet un ptit thé de compost plus tard.

Likes
4
Share


@DaddyPrime2
Follow
11/18/24
looks great. packing on weight and trichomes. very low leaf to calyx ratio. in my experience i havent had a plant form buds like this one.
the smell is complicated. once again never experienced. spicy almost peppery but sweet piney orange rind. its very contradictive and confusing. it almost smells differently each time i try to get a nose on the smell.
Likes
22
Share

@Brotanical
Follow
Und das nächste Giesswasser steht bereit 🌊
Hesi Schema auf 10L💧
Supervit💥
Hesi PZ 20ml🍃
Hesi Bloom 35ml
Hesi Phosphor 15ml🌳
Plagron CalMag Pro 10ml
Ph angepasst direkt beim gießen mit lemon🍋 kick
Wächst super und bin gespannt auf Bud Entwicklung bei den unterschiedlichen LEDs🔮
Es geht entspannt weiter und es gibt bereits markante Unterschiede zwischen den LEDs dazu mehr wenn der Grow sich dem Ende nähert 🤚