
Likes
Comments
Share


@PalmaGrow
Follow
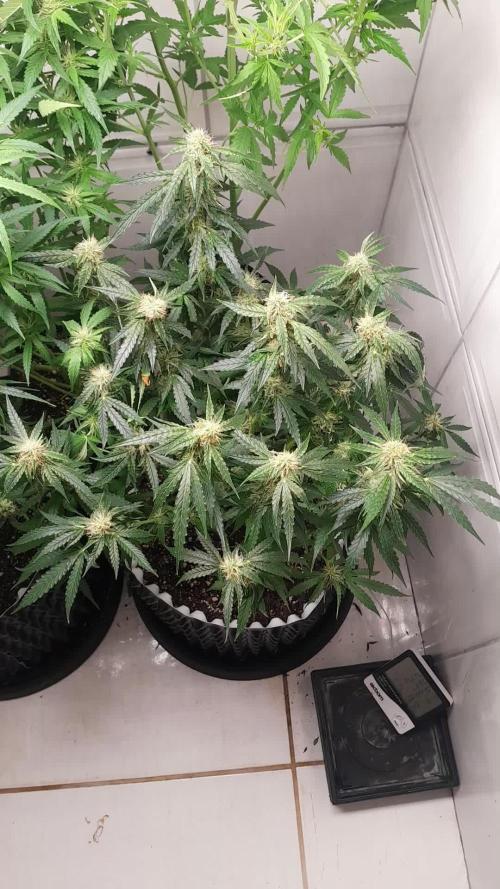
No se cómo expresar mi felicidad después de casi 3 años sin poder cultivar consecutivamente he podido cosechar esta belleza gracias a @blacktunaco por la K.O una genética llena de resina con flores compactas. Cometiendo errores desde el principio se pudo obtener una excelente planta corrigiendo todo para así mejorar el aprendizaje continuo. Se dieron 12 días de lavado de raíz y 3 de estos estuvo expuesto a lluvia constante durante los 3 días por tal razón se decidió cosechar para evitar dañar las flores

Likes
6
Share

@Jardineiro_Br
Follow
Agora sem nas aplicações de técnicas, apenas fertilizantes e água, para que a energia da planta seja usada nos botões, quero ver lindos botões, densos e resinados . Por enquanto estou bem satisfeito com o resultado, essas próximas 3 semanas , acredito, serão decisivas para definir um boa produção.
Likes
17
Share


@ILoVeThiSpLaNt
Follow
Sono contento e difficilmente sono contento. Cinque piante identiche e sembra di fumare la vera gorilla glue con note dolci quasi a ricordare delle caramelle. Una pianta invece ricorda di più la zkittlez. Davvero contento di aver scelto questa casa 😊


Likes
6
Share


@Black_Widow
Follow
Привет садоводы
мой цветок потихоньку растет
выглядит хорошо
тот , что номер 2 прижился на природе и тоже отлично выглядит

Likes
14
Share


@GanjaReaper
Follow
Day 56:
Like I said in the 2 weeks before this one, I was on vacation and a friend took care of my plants.
This is the last week he helped out, I will be taking care of them again in the upcomming week.
Well what can I say about this week;
- Weather/climate was still bad. Lots of rain and cold temps.
- They kind of failed with Low stress training, they went up and stretched without proper bending.
- One plant has already mature looking buds but still on the small size. Two/three of them are going well and one is falling behind flowering wise.
- They look nicely green tought.
Until next week.


Likes
20
Share


@eldruida_lamota
Follow
Variedad con una floración corta, entre 8/9 semanas.
Procedente del original Exodus Clon (UK).
Predominancia indica con un nivel de thc superior al 16% .
Es muy fácil de cultivar y la alimentación la acepta muy bien en general .
Cada etapa cumplió con mis expectativas y por ello aparte del sabor el colocon ... en cuanto a todas sus etapas le doy 9/10 .
CEPA BRUTAL enserio.

Likes
12
Share


@Daviz_42
Follow
Como podemos ver ya todas están para el corte o casi, en algunas tendré que seleccionar el pheno, ya que hay alguna que me gusto más que la otra, en general un terpeno muy diferente en cada variedad y también la calidad de la resina, en general mucha resina, pero por ejemplo he podido observas que los tricomas de la Gorilla Melon son más grandes y se oxidan de una manera más lenta, ideal para hacer extracciones, en cambio, la Reinbow Melon .... ese terpeno dulce intenso tanto que es hasta abrumador...me muero de ganas ya de probarla... la Lemon Mandarín es exagerado el olor que tiene a mandarina si cierras los ojos y ueles fuere parece que te vayas a comer una buena mandarina y la Paya Sherbet tiene un olor dulce y muy agradable, pero nada que aún pueda relacionad del todo..... un saludo y buenos humos fam.
Likes
12
Share


@NorthernChemist
Follow
July 11: Finally this week getting some heat with 25-30 deg C daytime highs. Plants are thriving with a lot of vertical growth and flowers starting to build. Resin is developing nicely. CBD Crack is a smaller plant comparatively, but the resin smells spectacular.
Likes
13
Share


@DreamIT
Follow
Sponsored by:
🏡GANJA FARMER SEEDS🏡-💡VIPARSPECTRA💡-💐GREEN BUZZ LIQUIDS💐-🛠️WEDRYER🛠️
8/7 After several days of Growdiaries making it difficult for me to write and respond to comments, I found that I can still update the journals. I apologize to everyone for the non-replies but I have replaced the main email and the email to confirm the account never arrives, and Growdiaries' customer service seems to be non-existent
10/7 everything is going well, nothing special to add🤘🦄
12/7 everything goes perfectly, one week before cutting
__________________________________________
Personal advertising (contains affiliate links)
__________________________________________
🦄 Huge collection of exquisite genetics since 2009! Anonymous shipping!
✅https: //bit.ly/Ganjafarmer
__________________________________________
Did you know that Green Buzz Liquids fertilizers are 100% vegan? A complete line of products ready to give the best to each of your plants! Visit the site and see my journals to see how they work 🦄
🤯 And with the code "dreamit" you will immediately receive a 15% discount on your purchases
✅https: //bit.ly/GreenBuzzLiquidsPro
__________________________________________
👀 Are you looking for a good lamp to start with? 👀
🌞Viparspectra has something more than the others, take a look at their site.
⏩ Use "GDVIP" for an extra discount or "DREAMIT3" for an extra 5 %% discount
👀 Search for it on Amazon
✅Amazon USA: https://amzn.to/30xSTVq
✅Amazon Canada: https://amzn.to/38udUVe
✅Viparspectra UE: bit.ly/ViparspectraUE
✅Viparspectra USA: bit.ly/ViparspectraUS
______________________________________________
🌈 Tired of blowing on your weed hoping it dries quickly? Check out the Wedryer website! You will find a well-made accessory that will help your weed dry in just 8-10 days without the annoying risk of finding mold or other annoyances! (no affiliate links)
✅https: //bit.ly/Wedryer_
______________________________________________
📷🥇Follow the best photos on Instagram 🥇📷
https://www.instagram.com/dreamit420/
Backup ig
https://www.instagram.com/dreamit4200/
🔻🔻Leave a comment with your opinion if you pass by here🔻🔻
🤟🦄💚 Thank you and good growth 💚🦄🤟

Likes
17
Share

@ILoVeThiSpLaNt
Follow
Non male quest'autofiorente. Praticamente 400gr da 6 piante con una che ha reso 118grammi e quasi 5 di battitura a120micron.Le sei piante sono tutte leggermente diverse. Quella che mi piace di più aprendo il barattolo dopo 1mese di concia sa di formaggio stagionato.Al prossimo diario e grazie a chi ha seguito, commentato e messo like grazie 🙏 ❤️

Likes
66
Share


@Hashy
Follow
Week 13 9th week of flower.
Light settings
12/12 on at 9.00am off 9.00pm
Light power= 100% 240w
Radiator settings
LIghts on
Turn on if temp drops below 21.5c
Turn off if temp goes above 21.5c
Lights off
Turn on if temp drops below 18.0c
Turn off if temp goes above 18.0c
Extractor settings
temperature 23c with 1c steps
Humidity 35% with 2% steps
Max speed 10
Min speed 4
VPD aim 1.0-1.4
DLI aim 35-40
Wednesday 19/4/23 Day 85 (Day 57 flower)
Massive defoliation.
Thursday 20/4/23 Day 86 (Day 58 flower)
Nothing
Friday 21/4/23 Day 87 (Day 59 flower)
Flawless 2ml/L
Ec=0.4 Ph=7.1/7.1
5 drop Ph D Ph 6.3/6.0
Autofeed 8 runs (2,3,5,10,15,15,15,15 total 80 mins)
Flawless Ec=0.4 Ph=6.3/6.0
2L left
Roughly 2L each.
#1 0.1L runoff
Autofeed 8 runs (2,3,5,10,15,15,15,15 total 80 mins)
Water Ec=0.2 Ph=6.3/6.0
2L left
Roughly 2L each.
#1 0.1L runoff
Saturday 22/4/23 Day 88 (Day 60 flower)
Sunday 23/4/23 Day 89 (Day 61 flower)
Cut scrog net and moved plants about.
Monday 24/4/23 Day 90 (Day 62 flower)
Raised plant #1
Tuesday 25/4/23 Day 91 (Day 63 flower)
Manual water 2.0L
This is the last weekly update for the grow as they are all being chopped sometime next week. The next update will be the harvest update in a few weeks time once its dried and had a 2 weeks cure.
#1 Wedding Cheesecake FF is ready for the chop. She is very sticky, trichomes are just about where I want them to be. She is smelling absolutely gorgeous.
Power used for week
Light
(2.69+2.68+2.68+2.68+2.69+2.69+2.68)=18.79Kw
Extractor
(0.58+0.58+0.58+0.58+0.58+0.58+0.58)=4.06Kw
Fans
(0.92+0.95+0.97+0.94+0.90+0.93+0.92)=6.53Kw
Dehumidifier
(++++++)=Kw
Radiator
(1.39+1.45+1.38+1.45+0+0+0)=5.67Kw
Water pump.
(0+0+0.03+0+0+0+0)=0.03Kw
Total for the week=Kw
Back in a few weeks with harvest and smoke review.
Thanks for stopping by.
Likes
4
Share

@NSABND
Follow
Welcome to Day 36 .... first Day of pre flowering 😍🙏👍
Day 37 .... massive leave cuttingto get space for the queens 😶🙏
Likes
42
Share


@wolfvb
Follow
We made it to the finish line and cake is out of the oven and drying, another one has been done.
Thanks everyone for the support and love!

Likes
11
Share


@Willy_Balls
Follow
24.02.24 - 1.03.24
Red hot cookies performing stunnigly as always. This is a true beauty and a wonderful plant. Very healthy and sturdy. Yesterday I already noticed some distinct candy mandarine aroma with some chocolate cookies mixed in. Lets hownshe develop those lovely colours ans smell.
One of the older plants is already fed 7 times a day. Thats a record for me. In around 9l of coco.
Likes
19
Share


@A_Rolling_Stoner
Follow
Was not so strong in the beginning, but then became good.
It just fidn't cath up with the others.


Likes
7
Share


@Dairon
Follow
Hola tod@s, pues aquí tenéis las RQS North Thunderfuck
Como podéis ver en las imagenes están a tope, el resultado de las podas no puede haber sido mejor, plantas compactas con 3 - 4 colas principales, pues al hacer la poda apical las ramas inferiores han alcanzado la altura de las principales.
Al final no las trasplante a 11l, no quería que se hiciesen demasiado grandes para que tuviesen más espacio entre ellas y así fomentar la circulación de aire para evitar el oidio, en los últimos días ha estado lloviendo y como os he comentado en otras entradas, a no ser que tengas una sala de cultivo con opticlimate o te hallas gastado mucho dinero en aislamientos y equipo, el clima de fuera afecta al interior también.
Lo mejor es usar preventivos, así se evitan las sorpresas indeseadas.
Pronto empezarán a asomar los primeros pistilos blancos, iré subiendo la EC poco a poco, en esta ocasión creo que podré subir un poco más, esta variedad es una comilona de cuidado, así que llegaré a los 1.9 - 2.0 de EC.
Hace tiempo que buscaba una variedad que reaccionase así a las podas, al tener las ramas casi todas a la misma altura recibiran mucha más luz y más tratandose de iluminación LED que penetra menos que otro tipo de iluminaciones, lo cuál debe traducirse en una mejor producción.
he realizado una última poda de bajos, ya no podré hacer más, para estimular el crecimiento de las ramas superiores, aparte en estas variedades de hoja tan ancha hay que quitar bastante, sin miedo, por la misma razón que comentaba antes de la penetración de luz.
Espero que todo siga así y pronto empezarán a tener las primeras flores, saludos!!! 😃

Likes
7
Share


@GTools
Follow
The plants fully recovered from light burn are putting up a nice show .. well grow.
They are all still very green, and the buds are fat with a good density.
All three start some kind of foxtailing. All the buds, top, center and bottom on the three plants produce extra flowering sites that protrude from the bud. Now, hopefully these will fatten up until harvest somewhere in two weeks from now.
I'm keeping a close eye on humidity and temperature in order to keep the bud rot at bay!
Likes
38
Share


@Zurban_Poison
Follow
I won't say anything! look at the photos and videos and you yourself will understand everything! namely that this is just a cool bush!
