Likes
Comments
Share
@proxx87
Follow
09.10 After the problem with the brown spots on the Gorilla Cookies on the left did get worse I decided to flush with 60l auf just ph‘ed water. Runoff ph tended towards 7 when I poured the first liters in and ended up at around 6.4. After the soil was dry again I fed her again but took a lighter dosage. The other Gorilla Cookies does also have some brown spots but not nearly as much as the other one. I went here also easy with nutrients and it didn’t get worse for some time now. I think she needs 2 more weeks until I can harvest her. The Mango Smile got the stretch I was hoping for and is now the biggest plan in my tent. Hopefully she is done soon though 😄.
Likes
15
Share
@HeavyHead
Follow
Starting to take off this week :) have really been liking how easy the new advanced nutrients line is. added the runt back to the tent since it started to recover nice. Will be testing force pollenating on it with some colloidal silver a friend made for me since its been stunted anyway. Other two are really bush out so need the space :p
Likes
18
Share
Well, she's starting to pull through. She's a little slow, but i'm not holding it against her because she has had a very rough start... She is a seed from a friend. So I will do everything in my power to help her be the best she can be .. i've always heard great things about in house genetics so needless to say, very excited about this.. Hope everyone is doing well.Big shout out @Grow4releaf...God bless everybody and happy growing ✌️
Likes
6
Share
end of heat alarm: outside temp is 28˚C, in tent 29°C / 65 rh ____________________________________________ light- and watering schedule: see photos now: 16 plants 3 x Auto Orange Bud > Dutch Passion (early80's) 3 x Haze Berry Automatic > Royal Queen Seeds (2018) 2 x Auto Euforia > Dutch Passion (late 90's) 2 x Auto Bubblegum > TH Seeds (late 80's) 2 x Original Auto BubbleGum > Fast Buds Company (late 80's) 1 x Strawberry Pie Auto > Fast Buds Company 1 x Gorilla Cookies Auto Seed Stockers (2015) 2 x Auto White Widow x Big Bud > Female Seeds setup + strategy: 18 seeds 3 x Auto Orange Bud > Dutch Passion (early80's) 3 x Haze Berry Automatic > Royal Queen Seeds (2018) 3 x Auto Euforia > Dutch Passion (late 90's) 2 x Auto Bubblegum > TH Seeds (late 80's) 2 x Original Auto BubbleGum > Fast Buds Company (late 80's) 2 x Strawberry Pie Auto > Fast Buds Company 1 x Gorilla Cookies Auto Seed Stockers (2015) 2 x Auto White Widow x Big Bud > Female Seeds setup: 18 x gronest 2 liter 60 cm x 120 cm x 180 cm (2 x 4) growtent 4 l humidifier 25 watt axial fan 15 watt clip fan ro-filter bath room with a 50 watts room fan (-> carbon filter not necessary) ...and a lot of odds and ends. grow strategy: max yield by stressing with: 1. tiny shoes (2 l fabric pots standing on 3 plastic rings (4 cm) for max oxygen) 2. tiny growspace (18plants on 0.72 sqm) 3. many strains (8 strains) 4. annoying neighbourhood (mixing old - i.e. bubblegum (late 80's) - with young- i.e. hazeberry (2018) - genetics) 5. no stress by light or food or water 6. unintentionally too much food plus: - no lst - no hst - just leaf tucking - positioning bigger strains (euphoria, orange bud, haze berry) or just bigger phenos on less intense light spots (end of tent + edges) - music-rotation: 24 hrs reggae (for sativas) - 24 hrs classicals (because it's scientifically proofed) - 24 hrs traditionals from the hindukush region (for the indicas) max efficiency (min electricity - max yield): - light: 23 h on - 1 h off - keeping the distance of 18" (45 cm) and dimming to the right par (lux) - value depending on growing stages (see sheet: beginning 185 par ( 10000 lux/100 watt )/end 340 par ( 18000 lux/175 watt )) => ends up in approx. 170 watts in average over max 15 weeks temperatur management: - using approx. max. half of what the lamp can do keeps temperature low: my tsl 2000 is pulling max. 360 watts of the wall - i need only 175 watts, results in less temperature than using a 175 watts lamp - adjusting the temperature by using a humidifier outside of tent: blown in humidity is soaking degrees and is transported out by fan, works much better than doing the same with pure air summer extreme: no humidifier: 36°C / 35 rh - with humidifier: 29°C / 65 rh works for 1-2 weeks of real hot summer days, no mould, no signs of stress in two summers germination: seeding in waterglass spraying "basic"-water: ro-water (22 ppm) + calmag to 180 ppm every 4 - 8 hours until sprouted man versus fungus gnat: 5 days before seeding i'm running the tent with "basic"-watered pots as if there were plants inside - led on, fans on, humidifier on. Fungus gnats coming with the soil might take the chance to come out now for breeding. i'm waiting with a 9 mm rifle. in the past i found 6 gnats in 2 of 8 x 50 l biobizz lightmix bags coming out of the soil. i could eliminate every single gnat successfully ;) rotating harvest: the little ones will be harvested completely when ready. at this point only the top branches of the big ones will be cut...and the new (basic-watered) pots of the new grow will move into the tent. 2-3 weeks later the secod half of the big ones will be cut and the second half of the new grow will move in... nutes: biobizz / soil: biobizz lightmix bloom,grow,topmax,activera,algamic + aminopower instead of bio heaven (too expensive) individual feeding schedule/once a week: veg: 200 - 600 ppm bloom: 600 - 900 ppm water: ro-water with: veg: 100-150 ppm calmag bloom: 150 ppm calmag
Processing
Likes
13
Share
@Gdot96
Follow
day 46, a couple of the plants are showing signs of a deficiency.. i think it might be calcium, but i have no calmag. so i've sprinkled some bonemeal on top of the soil and watered it so it washes through to the soil.. hopefully 😅 ill see how they react tomorrow.. some really nice bud growth going on.. every day i go in i notice swell.😎
Likes
2
Share
@Cannabot
Follow
if you love blueberry then this strain is for u,absolute nug fest.Nice colas.wasnt the tallest plant but short and stocky with decent meat on the bones.Very resistant
Likes
Comments
Share
@Grow4ever
Follow
Ein paar Tage nicht da und dann solche Büsche im Zelt. Das hieß heute gehts ran ans defolieren und Scrognetz einspannen. Zudem haben Sie leider einen ganzschönen VPD Schock erlitten, auf dem einem Foto sind an der Chocholate Mint OG deutlich Calcium Symptome und nach oben gerollte Blätter zu erkennen. Habe heute morgen also erstmal eine Ladung Wasser mit Cal/Mag und etwas algamic gegossen und die Lampe höher gehängt. Heute abend ging es dann direkt ans defolieren, da ich ehrlich gesagt, die Woche sonst wenig Zeit finden werde. Jetzt sollen Sie sich erholen und ins Scrog einfügen.
Likes
15
Share
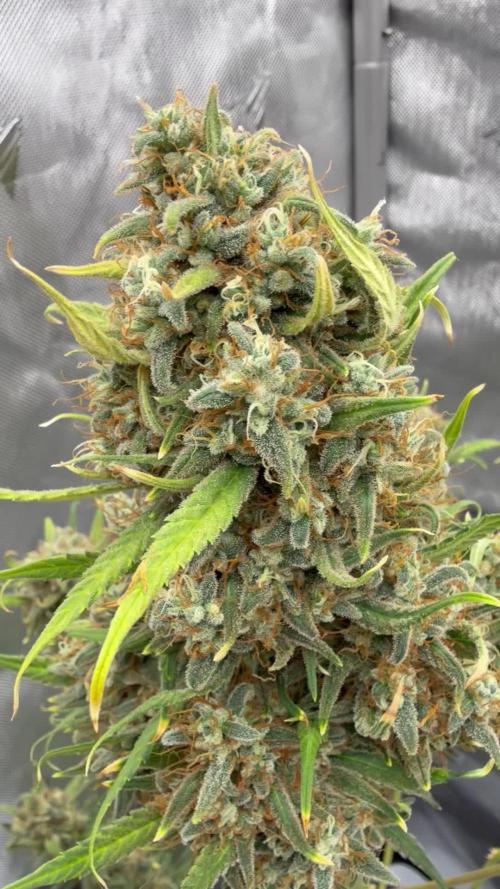
The buds look good and smell strong; Mix Two has some monster buds growing. I'm still trying to determine its variety, but I'm leaning towards a Bruce Banner. Looking at the grow overall next week, I will drop the PK13/14 out of the mix, and I'm thinking maybe the week after I start the flush. I've put up a little fly-through video to get a better idea of the grow.
Likes
2
Share
@Thedibber
Follow
29/12/25 - Transplanted into fresh 20L livingsoil and watered 2L each
Likes
22
Share
@Targona
Follow
18/09/2022 - 42 days since my little girl sprouted from seeds🌱 The second week of flowering of my Mandarine XL 🍊🍊🍊 Nutrients: Jungle Indabox - the girl responded well to the nutrient change, so I continue to feed the same as last week, when I set the nutrients for flowering Jungle Environ X - bud stimulators 🌼 I am giving Advanced Nutrients - bud stimulators, Bud Ignitor for the last time this week Atami - ATA Calmag - it is recommended to use Calmag when growing under LED lights Training: LST: just a slight LST, I attached some small twigs with string so that more light shines on them 💡💡 Defoliation: I did a bigger defoliation in the middle of the week so that the girl could breathe well and the big leaves wouldn't shade the twigs 🍃🍃 Light: Mars Hydro TS1000, the girls are doing amazing under this great light, I can see a big difference compared to my past results 💡💡💓 The girl is slowly turning into a big lady, her stems are strong, regularly grown, so that massive buds can form on them 🌸👩🌲 You can see white tufts of pistils on the stems, in this week of flowering they are just right and look like a blanket of snow ❄️❄️ She is already a strong lady revealing her beauty. 🌲💓 The box emits a soft scent that reminds of fruit and earth, but it's a gentle whiff 🍇🌍 Thanks for the likes and you can follow me on Twitter 🐦: @ Targona666 See you soon 😍
Likes
4
Share
20 weeks from flowering
Likes
2
Share
This week 18hr will be reduced to 12 hr end of the week, next week 12/12
Likes
10
Share
@Bud_vista
Follow
Welcome to week 7 growmies! She’s doing great in her second week of flowering! She is still stretching and got a bigger defoliation at the end of week 6. For the start she’s getting only ph regulated water from top and some nutrients from bottom. There a little signs on the leaf tip why I skip nutrients for one watering cycle. On mid of week 7 she’s still stretching and first orange pistils shown up. On weekend she’s getting another defloration and another round of nutrients.
Likes
30
Share
@BC_Green
Follow
It has been another amazing week of the plants growing. I have been watching as the Fruity Freak leaves become progressively more fern-like, and ornamental as a result! Based on my Banizzle grows, I knew I needed to understand plant nutrients in a more meaningful way if I wanted these plants to thrive. So, I decided to get a soil test (see Ref. 1 below on how to perform a test) to understand what nutrients my plants needed. The report I received advised that I needed to add 200 lbs/acre of nitrogen, 150 lbs/acre of phosphorus, and 190 lbs/acre of potassium (see picture labeled Pic.1 (FYI you can't see these images unless you login to growdiaries)). I then researched what to do with my results (Ref. 2 helped), and I figured out that my nutrient needs of 200-150-190 fall close to a 2-1-2 ratio. I then looked at different types of organic fertilizers (see Ref. 3 and Ref. 4) and considered that I already had a 3-10-5 fertilizer (Vermibloom) on hand. I discovered Dr Earth’s Alfalfa Meal is 2-1-2 and includes beneficial bacteria and mycorrhizae (to promote healthy plant growth and disease resistance). However, I knew I would be low on nitrogen if I only used those two fertilizers. Therefore, I decided to buy some blood meal (12-0-0). I also liked that blood meal is more fast acting while the other two are more moderate. I hunted around for a solid fertilizer calculator and found an amazing tool from the University of Georgia Extension (Ref. 5). I entered all three fertilizers into the calculator, and it kicked out the exact amount of each fertilizer I needed to apply to 1 square foot (see Pic. 2). As I am using 10-gallon fabric pots (that can hold 1.5 cubic feet, but I put stone on the bottom and there’s space left at the top) I decided to use the one square foot application rate as I can always add more later, but I can’t take it away. Not only did I want to understand the nutrients I needed, but I also wanted to understand the structure of the soil (as it was not included in my test results). North Dakota State University has a nice page that discusses this (Ref. 6), and I performed a soil ribbon test (see Video 1) based on this information. I determined my soil to be medium textured (which is great), but I have seen occasional water pooling on the surface, suggesting that it may be more of a medium-fine. This means adding peat moss, coco coir, or other amendments might improve drainage (and plant hydration) and allow for roots to grow more easily. In the long run, I plan to use compost to enhance the soil structure and nutrients. I filled the bottom of my 10-gallon fabric pots with a ½” of pea stone to allow for drainage (Pic. 3). I then partially filled two 5-gallon buckets with topsoil from near where I will plant (but not in an area the roots will reach). I used a digital scale to measure the amount of fertilizers recommended by the calculator (Pic. 4, 5, and 6) and added it to one of the 5-gallon buckets (see Pic. 7). I mixed the fertilizers into the soil as evenly as possible (Pic. 8 and 9). I then poured a two-inch layer of non-fertilized soil, then peat moss, and then fertilized soil (in a roughly 2:1:1 ratio) and blended them together. I repeated this until the pot was full (getting additional soil as needed), and then I repeated the process for the other three pots. I set the filled fabric pots in my garage (Pic. 10) for two days to allow any upset bugs to flee into my garage instead of my house. I then moved the pots (wrapping them in a contractor garbage bag to prevent making a mess) into the room with the grow light. I placed a board on top of the fabric pots to insulate the plants (in their smaller pots) from the cold soil (Pic. 11). Once the soil in the fabric pots reaches room temperature, I will transplant. (Ref. 1) This video shows the method I used to take a soil sample. I didn’t have a field to test, so I took four samples from the area where I will eventually plant outdoors and blended them together. I then mailed my soil sample off to the lab, and about a week later, I received an email with a PDF of my results (included with my pictures this week). https://www.youtube.com/watch?v=N9AwxmFxBwg&t=8s (Ref. 2) This video from the University of Minnesota Extension (many universities have agriculture extensions that can assist you with soil testing and growing information for your area) discusses what to do with your soil testing results: https://youtu.be/HYrkcfE62Pg (Ref. 3) This is a nice article that discusses organic fertilizer solutions: https://www.grow-it-organically.com/npk-fertilizer.html (Ref. 4) This article lists the NPK values of many organic fertilizer solutions: https://www.epicgardening.com/organic-fertilizers/ (Ref. 5) Many websites tout a fertilizer calculator…but this one is hands down the best I have found. If you scroll down to the bottom, you can enter any fertilizer type you want (and the cost, if you want). It will give you the exact blend of multiple fertilizers to solve your nutrient deficiencies (I included a snapshot of the solution I used in my pictures). https://aesl.ces.uga.edu/soil/fertcalc/ (Ref. 6) This is an excellent article that discusses how to evaluate your soil: https://www.ndsu.edu/agriculture/extension/publications/evaluating-preparing-and-amending-lawn-and-garden-soil
Likes
27
Share
@Dunk_Junk
Follow
Wow she's looking nice! Getting close to the end now. 😎
Likes
25
Share
First full week of flowering and they are finally on
Likes
17
Share
The week started off rough because I noticed light stress and what I thought to be a potassium deficiency. The growth was non existant, but after some research I raised my light from 36 - 40" and set the dimmer to level 4. On top of this I dropped the RH from 65 to 60 and once I did this within the next hours I saw the leaves begin to purk back up. This was also my 1st time feeding my plants a compost tea which I made from Green waste compost, bio char, bokashi, fish hydrosolate powder, azomite, langbanite, humic acid, Fish Sh!t, insect frass, and kelp meal. I airated the compost tea in a 5 gallon bucket for 24 hours before drenching the soil with it, and I added some Recharge by Real Growers after the compost tea. This week's IPM; -Mosquito bits -Regalia -Venerate -Attak
Likes
23
Share
@Chi_K24
Follow
Hey folks, as you can see, the ladies did not do well after the transplant. I have have burned the plants a bit by spraying them down with neem oil as a preventive maint. The next few days after spraying, it got really hot and I belive the spray left too much oil residue for the plants to transpire. Also to note that I did not take time to harden the plants. As usal watered the plants every 2-3 days with pH and mixed with 1tsb per gal of molas. New growth is looking good. I also topped them also.