
Likes
Comments
Share


@killerjoint
Follow
10-8-2024 TOP DRESSING AND WORM TEA.....
NOTHING MORE
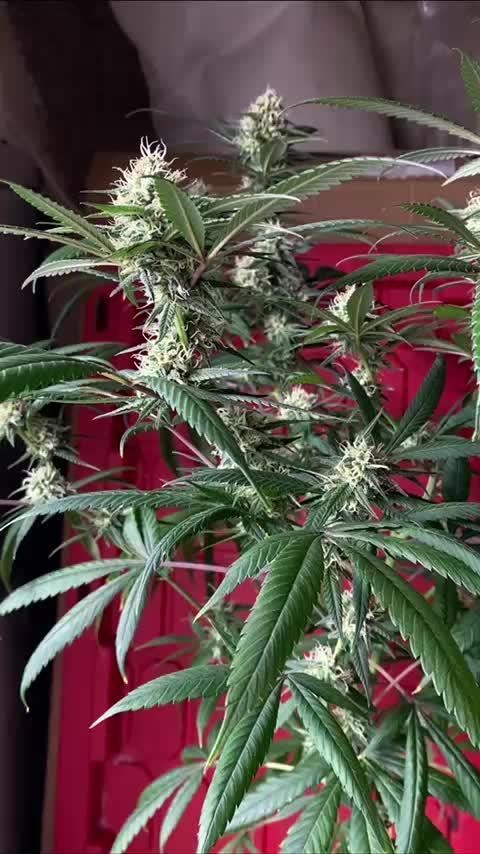
10-9-2024 22ND DAYS INTO FLOWERING
SMELLS CRAZY ON THESE STRAIN
GETTING SOME SNOW ON TOP
LET'S GO
10-11-2024 DO NOT HAVE ANY PEST BUT JUST IN CASE
NATURESGOODGUYS HOOK ME UP WITH LADYBUGS
JUST GOT HANGING PATCH ABOUT /WITH SHIPPING
10-14-24 NOTHING TO DO...JUST WATER (PH6.6)AND WATCHING THE PLANTS.......
COPY CAT GENETIX STRAINS ARE CRAZY!!!!!!!!


Likes
2
Share


@MarianoDoBom
Follow
Seguimos com as meninas agora no scrog, estão desenvolvendo bem, daqui a pouco começamos com a fase de engorda.


Likes
32
Share


@Roberts
Follow
Critical x animal cookies has grown into the nutrition now good. She did get topped today and roots pruned. She has been doing okay beside the nutrition burn early on under the Hortibloom Solux 350. She should start making some decent progress now with growing. Thank you Hortibloom, and Ripper Seeds. 🤜🏻🤛🏻🌱🌱🌱
Thank you grow diaries community for the 👇likes👇, follows, comments, and subscriptions on my YouTube channel👇. ❄️🌱🍻
Happy Growing 🌱🌱🌱
https://youtube.com/channel/UCAhN7yRzWLpcaRHhMIQ7X4g

Processing
Likes
52
Share


@CBD_Sweden
Follow
@MephistoGenetics,
Hi all the happy people here in GrowDiaries.
This is my second cultivation ever and it will be fun to try a bigger space than my closet grow.
First, I'm just going to say I'm done with the construction of my new growroom.
The room is 2.14 meters by 1.7 meters and has a ceiling height of 2 meters.
It provides a floor area of 3.6 square meters.
I use a 54 Watt Lightwawe T5 for germination and 2 Pcs 400 Watt HPS lamps.
I have a channel fan that replaces the room air about 40 times an hour to get a comfortable environment in the room, the air enters a fresh air intake from the outside.
The air is purified through a carbon filter to then leave the room to the rest of the basement.
Then I use that heat to heat the rest of the basement.
I will use 10 pcs 15 liter Autopots to grow with and a 100 liter water tank that supplies the pots of water and nutrition.
I will grow completely organically in soil and will watercure my buds to get the best possible medicine for me.
But there are no cultivation rooms to be displayed here, so I continue with what is most important.
Today I have put my seeds in paper towel and hope the seeds have germinated within a few days.
I am very excited to see how the new growroom will work and how this Stilton Special will turn out.
Strain Name: Stilton Special F1
Genetic heritage - Sour Livers F3 x Northern Cheese Haze F3
Strain behaviour - Stilton grows well from the off, and develops into a stout but branchy specimine that leads to a fine yield of awesome flowers. She's not too stretchy but also is sizeable enough with good growth, to train and shape to your liking. Flowers develop pretty fast and grow to a good size, it may to advised to clear out some undergrowth and if needs be a very gentle defoliation mid-way through the grow, although leaf tucking may suffice well enough.The end product is of top shelf quality and she doesn't lack in yield either.Give your garden, nose, and body a treat and be sure to indulge in a slice of Stilton this year, You won't regret it.
Size - 50 - 70 cm
Structure - Medium height but bushy
Flower Density - 9/10
Indica/Sativa - 65/35
Cycle Time - 65 to 70 days from sprout
Yield - 90 to 140 grams as a single plant
Best Method for overall high yield - 9-12 per 1,2m x 1,2m sq in 10-15 Liter pots (Soil)
Aroma - Very strong, Cheesey/fruity/sour/spicey/ with a dash of coffee.
Taste - Dank berries
Effect - Good hybrid powerful but balanced effect
Medicinal Benefits - TBA
Best Grown - Indoor/Greenhouse
Cannabinoids - TBA
Extract information - Ideal extract candidate - High in resin, oil and terps.
.................................................................................................................................................................................................................................................................................................................................................
2017-08-21. Started to germinate the seed.
.....................................................................................................................................................................................................................................................................................................................................................
2017-08-23. Seed germinated and put in small pot in the humidity dome.
.........................................................................................................................................................................................................................................................................................................................................................
2017-08-27. Slow and steady she grows.
----------------------------------------------------------------------------------------------------------------------------------------------------------------------------------------------------
2017-08-28. Transplanted to the 15 liter autopot.
--------------------------------------------------------------------------------------------------------------------------------------------------------------------------------------------------------------
2017-08-29. New movie of the girl and a new pic of the grow room from now.
-------------------------------------------------------------------------------------------------------------------------------------------------------------------------------------------------------------
2017-08-29.
Hello to you who read my diary, I just want to say that I am pleased that you have chosen to check in with me and in my diary.
I just want to say that I do this for myself and for a steady flow of my medicine.
Everything you read and see in my diary is 100% honest and I will never distort or beautify anything here.
I document my crops so that I can learn from my mistakes and also to look back at those different crops.
I try to update with pictures every day and with text if something special has happened in the garden.
This is my strainhunt for the best medicine and the beginning of my journey with cannabis and the cultivation of it.
-----------------------------------------------------------------------------------------------------------------------------------------------------------------------
2017-08-30. Cleaned the room this morning, just vacuuming and cleaning with chlorine solution. Im testing the fan to control temp and humidity, it works great.
Added a movie. Everything is looking great right now.
------------------------------------------------------------------------------------------------------------------------------------------------------------------------------------------
2017-08-31. 3 new pics.
--------------------------------------------------------------------------------------------------------------------------------
2017-09-01. New pics and a video of the room from today.
-----------------------------------------------------------------------------------------------
2017-09-02. New pic
----------------------------------------------------------------
2017-09-03. Video of the girl this morning.
----------------------------------------------------------------------------------------------------------------------
2017-09-04. Week 2 starts, new pics.
----------------------------------------------------------------------------------------------------
2017-09-05. KL 08.00. Cleaned the room this morning, just vacuuming and cleaning with chlorine solution.
KL 12.00. The girl got 2 liters of water with nutes in it, added a video.
----------------------------------------------------------------------------------------------------------------------
2017-09-06. KL 08.00. The girls woke up after their beauty sleep, the leaves are always a bit down after 6 h of darkness, but they will stretch now when the HPS lamp starts.
Everything looks good and I keep trying to tuck the leaves so they get the maximum amount of light where needed. Added pics and video.
--------------------------------------------------------------------------------------------------------------------------------------------------------
2017-09-07. Day 17 from sprouting. I have never tested PH in my grows, when growing organic in soil iv learned that it adapt PH by it self. But im curious by nature so i had to test.
Kl 10.00 Tested PH in the soil, it was 6.9 and tested my tap water and it was 6.8. Added video of the girl.
Kl 22.30. New pics
------------------------------------------------------------------------------------------------------------------
2017-09-08 KL 08.00. Good morning, added new video.
2017-09-08. Kl 23.50. Gave every girl 3 liters of water and nutes, added new video.
--------------------------------------------------------------------------------------------------
2017-09-09. Kl 21.00. Defoliated a lot and added pics.
------------------------------------------------------------------------------------
2017-09-10. Kl 08.00. Last day of week 2. New video.
2017-09-10. Kl 23.00. 3 new videos.
-----------------------------------------------------------------------------------

Likes
16
Share

@Northern_Ent
Follow
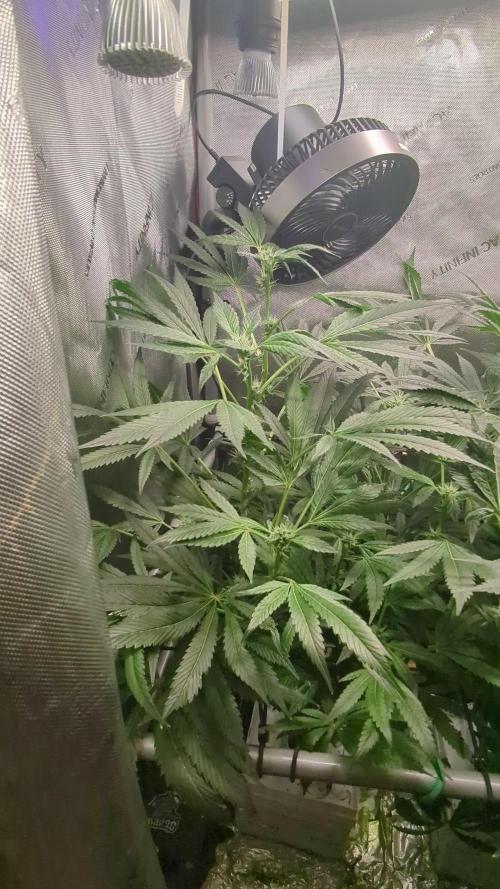
Aug 16: Lemon Cream Kush has stretched a bit and the buds are starting to fill in. Should be a decent yield and I’m looking forward to the tast of this one.
Aug 18: video shows use of 730 nm far red light at dusk. Just a few seconds at the light time of day, everyday, during bloom, is all it takes. To keep to a natural schedule, I use Civil Twilight as listed on timeanddate.com for my location. Currently getting 2-3 minutes earlier each night.

Likes
31
Share


@Mrs_Larimar
Follow
2024-08-17
in my garden standing 2 Tangerine Snow Plants
One was growing Indoors, and was already harvested, and is revegetationg now
and it looks promising
The other Plant was the most Time of her life Outdoors, and is in flower for week 2 now ( almost week 3 because
the last Update was 10 Days ago.
i made videos and Photos of Both plants
the outdoor lady drinks and eats a lot
She sits in a 15l Smartpot, and drinks around 5liters per day ( i have to give her water twice a Day
because its quite hot.
shes around 160 cm tall and shows already lovely buds ( entering week 3 of flower)
i need to get more of these Genetics for next year, shes one of my favourite Genetics
but thats what i tell every week
to me the perfect plant.
BREEDER INFO
Tangerine Snow F1 Fast Feminised is a 75% sativa, four-way cross of (Boost x Tangelo) with (Lavender x Power Plant).
This Fast F1 hybrid is bred from Cali genetics and boasts great citrus terps, high resin production for extracts,
high levels of THC, very good yields and excellent mould resistance.
Tangerine Snow F1 Fast can be grown indoors as well as outdoors. Indoor flowering times are between 8 - 10 weeks
while harvest time in northern latitudes is during September while in the southern hemisphere growers will be harvesting during March.
Recommended climate regions are hot, dry, humid and warm. These are tall, semi-branched plants that grow in excess of 200cm
and display a high degree of vigour with very good uniformity.
In common with many other heavily sativa-dominant strains, Tangerine Snow F1 Fast offers excellent resistance to mould
as well as to plant pests and diseases. The combination of citrus terps and plenty of resin makes thi
a very good extract strain with the 'washing' method delivering very good yields of hash.
The citrus terpene profile is reminiscent of mandarins and tangerines and also has sweet candy notes.
THC production has been lab-verified at a strong 24% while CBD is low. The effect is uplifting and energising,
perfect for use during the day and early evening.

Likes
16
Share

@GoldenWeedGrower
Follow
📅 26/05/26
🗓️ D085 (B7 / D1)
🌡️ 1.2
💨 1600
💧 -
🥗 -
⚗️ 1.9
🔬 4.3
🛠️ -
📋 -
📅 27/05/26
🗓️ D086 (B7 / D2)
🌡️ 1.2
💨 1200
💧 1L
🥗 -
⚗️ 2
🔬 4.3
🛠️ -
📋 -
📅 28/05/26
🗓️ D087 (B7 / D3)
🌡️ 1.2
💨 1200
💧 1L
🥗 -
⚗️ 2
🔬 4.3
🛠️ -
📋 -
📅 29/05/26
🗓️ D088 (B7 / D4)
🌡️ 1.4
💨 1500
💧 1L
🥗 -
⚗️ 1.9
🔬 5.5 (added pH+)
🛠️ -
📋 -
📅 30/05/26
🗓️ D089 (B7 / D5)
🌡️ 1.4
💨 1500
💧 1L
🥗 -
⚗️ 1.9
🔬 5.8 (added pH+)
🛠️ -
📋 -
📅 31/05/26
🗓️ D090 (B7 / D6)
🌡️ 1.4
💨 1500
💧 1L
🥗 -
⚗️ 1.9
🔬 5.6
🛠️ -
📋 -
📅 01/06/26
🗓️ D091 (B7 / D7)
🌡️ 1.4
💨 1500
💧 1L
🥗 -
⚗️ 1.7
🔬 5.8
🛠️ -
📋 -
=============================================================
Legend:
📅 DATE
🗓️ DAY (StageWeek / Day)
🌡️ VPD
💨 CO2
💧 WATER ADDED
🥗 FOOD ADDED
⚗️ EC
🔬PH (adjustements)
🛠️ ACTIONS
📋 NOTES
📅🗓️🌡️💨💧🥗⚗️🔬🛠️📋

Likes
27
Share


@LSchnabel
Follow
This plant was amazing from start to finish.
I will update a final comment soon as well as final weigh and a review of the smoke once sent out to a group of testers.


Likes
2
Share


@Growstopher
Follow
3.23.25
Fastbuds LSD-25 auto #1
Germination 1st week
Only watering with spring water. Going to be using foop nutrients with Humboldts secret cal/ mag and nectar for the gods ph up and down!
Here we go!
Likes
10
Share

@HuskyHouse
Follow
Her buds are starting to fill in nicely, she is centered now with two nets and has the tent all to her self! Humidity has stabilized recently besides power surges in the room and power outage from a storm. Think it was from the dehumidifier I had in the room outside of the tent. Recently put a 4 pack of vivo sun 24 watt lights under the canopy to help prevent popcorn buds.


Likes
4
Share

@Canna055
Follow
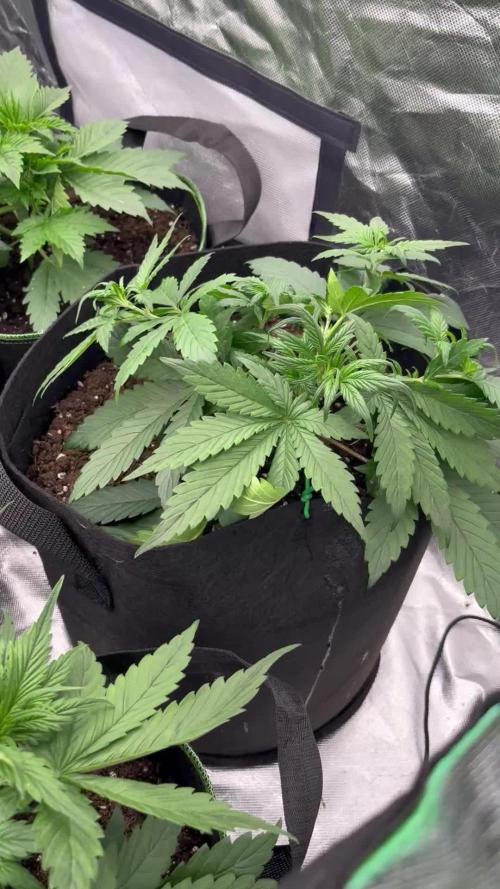
Zweite Woche überstanden die Autos machen sich gut nur die Frostbanger struggelt noch
Habe angefangen mit ein wenig LST
Eine Ztrawberriez wurde getoppt
Likes
11
Share


@AestheticGenetix
Follow
Looking good. Trying to get over the leaf necrosis. I probably over fed them. It seems the shorter stalkier, indica style plants are handling everything a little bit better than the taller more stretched out ones.
Maybe it's just a genetic sensitivity to overfeeding?


Likes
23
Share


@NordicCropz
Follow
Long time. Day 106 from seed, flowering into eternity because of silly feeding mistakes. But at least I now have a bit of some incredible weed, harvested one plant day 101. Even though I'm sure it would have been even better with a perfect life cycle. 40 grams, trimmed to their bare bones. Was I expecting more? Yes, but given my mistakes, and the fact that it must be at least top 3 in my 8 year long cannabis career, I am nothing but thrilled with the outcome.
The one thats gonna be my biggest yielder is also the slowest one, by far. Guessing around 3 more weeks.. If it doesn't die on me, it has a coverage of yellow leaves which makes me slightly nervous.


Likes
14
Share


@CANNASIM
Follow
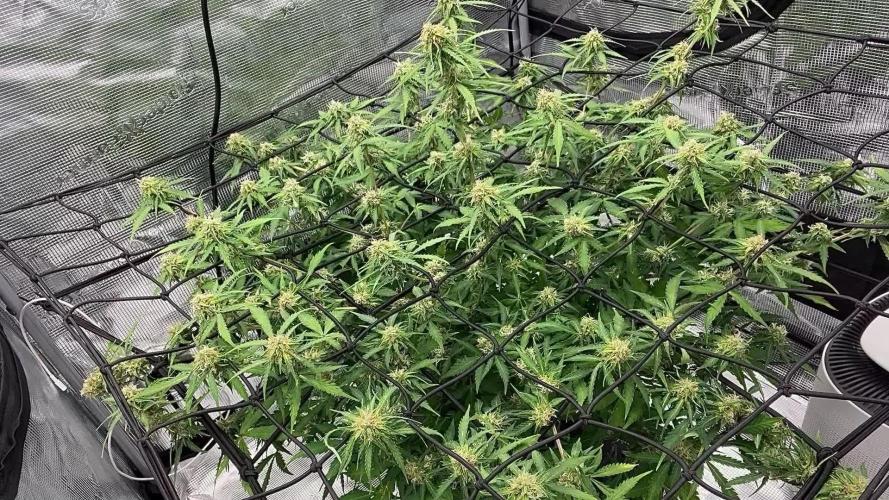
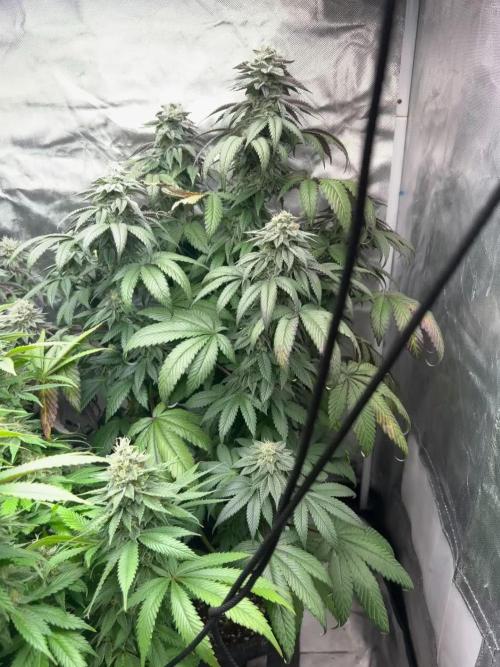
Moving forward, blooming nice, this second gen is taking form and gaining weight.
A few weeks and we will have a nice harvest.
Tent is nicely populated and filled. Once i have setup the “semi scrog” it has conformed to it in a couple of days and did a massive difference.
It really opens the canopy and create a huge surface to take advantage from the light as opposed to letting it go naturally.
I’m defining the technique as semi scrog because i did not setup the net in a traditional early way knitting in veg... It was done later.

Likes
2
Share

@Budnotwar
Follow
It’s been looking good I have a lot to take away from these two strains being the first time growing both the buds are pretty beefy the smell is amazing and the frost is a bit above average
Drop in let me know what you guys think

Likes
61
Share


@Dingle_Dangle
Follow
Formerly "Outdoor Spring Failure (Autos)"
───── ⋆⋅☆⋅⋆ ─────
11/06/2021
Day 70 - First day of the 11th week.
Last update before harvest.
Lot of sun but also lot of rain this week. Had to check weather constantly to move the babies in the shelter in case of storm, since I don't want water causing moisture in the buds.
I reported the usual temperatures graph provided by a national meteorological society.
They are so cute.
- DD
( PS. I'm using stupid diary info (lamp distance growing outdoor, nutrient = none, ...) because of how GD algorithm work. Sorry for this. )
