
Likes
Comments
Share


@MindFlowers68
Follow
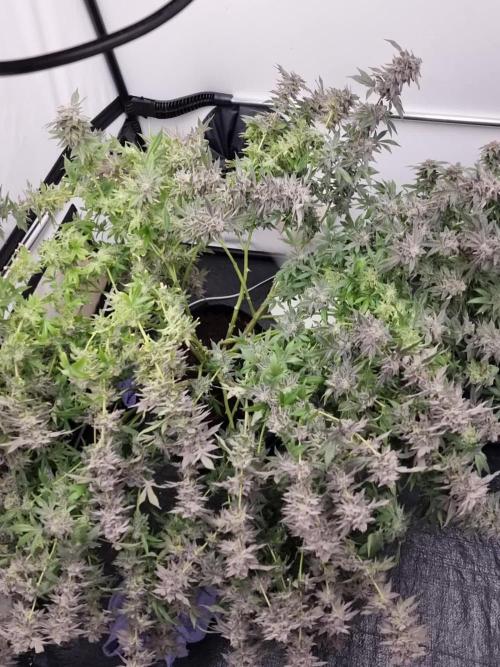
Stopped feeding this week other than one watering with molasses. Needing to be watered every 3 days. Other wateringsu using ph'ed filtered water set on my air bubbler for a few hours before watering.
Bud height is tapering off but this plants buds are getting very plump and dense. They are much larger than I expected for the number of tops i have. The canopy depth is also very good and should amount to a great yield. Very happy with the frostiness and odor. She is going to be very potent. Looking like it will be on the easier aide to trim as well. No real signs of fading yet but most of the hairs are orange and not seeing many new white ones. Trichomes still look like they are developing but getting very close.

Likes
6
Share


@Comfrey
Follow
Growing well. Some insects hovering around. Soil is moist so I watered only because I wanted to give some field horsetail.

Likes
10
Share


@yamadafakka
Follow
Deze week werd verstoord door een stroomstoring van een dag (oorzaak gelukkig niet in de kweek apparatuur!) Er zijn inmiddels veel meer lieveheersbeestjes, erg leuk om ze te zien hoe ze hun eigen gang gaan.
E.c. zit inmiddels op 1,3/1,5 Dit lijkt misschien wat hoog, maar de stekken kunnen best wat hebben. De dames groeien zo hard dat ik nog een keertje blad heb moeten wegknippen om de boel niet t laten verstikken bij de Powerplants.De Runtz begint al topvorming te laten zien.
Ook een irrigatiesysteem aangelegd. Dit is later handig als het bader dek te dicht is en je niet meeer overal bij kan komen.
Regeren is vooruitzien !
UPDATE!!!
Vraag aan de gemeenschap die ervaring heeft met cree cobs:
Ik heb begrepen dan de cobs een kleine 20 cm door het blad dek kunnen penetreren als je goed hebt ontbladerd.
Aangezien mijn scrog maar max 40 cm hoog word, heeft het dan zin om de boel in week drie te dieven? Het licht bestraalt immers de hele plant?
Antwoorden graag in de comments!


Likes
6
Share


@Headies
Follow
I topped and trained them two more times. I also lolipopped them, that is cut the bottom 2 sets of leaves and branches.


Likes
13
Share


@Luv2Grow
Follow
Day 43 - Starting week 7 and did a little adjusting to a couple of the tie downs. A few branches were starting to get really lengthy so wanted to keep them somewhat tied down so when the bud weight starts coming, it’s not too heavy. Other than that, she seemed to of liked the drink yesterday and is doing really well overall.
Day 44 - Nothing much new today, just gave her a little once over, snapped a few new pictures and put her back into the tent. All seems to be going well.
Day 46 - This girl is still going strong and she’s starting to smell a bit more each day. For the most part, LST is done with the exception of a few that may still be bendable here and there. Had to give her a little under a half gallon of water today and tucked her leaves.
Day 48 - Still chugging along and budding up nicely. Not much happening with her, just giving her water when she needs it and tucking leaves but I have removed a couple that just stayed in the way. Should be ready for some water in another day or two.
Day 49 - Ended week 7 today with a full on of water, she’s really starting to drink a lot. Not much else going on or done with her today besides removing a couple fan leaves and tucked the rest.


Likes
17
Share


@Naujas
Follow
wow wow !!!! 404 gr ! from the suitcase!!!!!!!258 gr of wet dried buds!!!!!!! I am impressed with the result, and I don't really believe that I will ever be able to improve it :) It was a truly amazing journey with FastBuds Gorilla cookies auto, my house is filled with a wonderful sweet smell, the buds look really full and very very shiny :) I also collected a lot of sugar leaves from which I will make bubble hash:) the girl coped with high temperatures and high humidity throughout her growth, which is why I was afraid of rot, but everything went well!!!! She is amazing. smoke review and dry weight will be up very soon, good luck to everyone :)!!!
Likes
226
Share


@Kitties_and_Colas
Follow
~_~_~_~_~_~_~_~_~_~_~_~_~_~_~_~_~_~_~_~_~_~_~_~_~_~_~_~_~_~_~_~_~_~_~_~_~_~_~_~_~_~_~_~_~_~_~_~_~_~_~_~_~_~_~_~_~_~_~_~_~_~_~_~_~_~_~_~_~_~_~_~_~_~_~_~_~_~_~_~_~_~_~
09/04/21
🐱 boy are we ever starting to stretch...too much in fact, im not liking the node spacing with this strain (far too wide)..we lowered both lights in the tent to get this to stop (we never need to do this) and turned up the fans to really beat on these for a few days..hopefully this will strengthen them up and we can avoid steaking them...we'll update again midweek, thanks for reading and happy growing everyone!!
🐱❤️💡🌱
~_~_~_~_~_~_~_~_~_~_~_~_~_~_~_~_~_~_~_~_~_~_~_~_~_~_~_~_~_~_~_~_~_~_~_~_~_~_~_~_~_~_~_~_~_~_~_~_~_~_~_~_~_~_~_~_~_~_~_~_~_~_~_~_~_~_~_~_~_~_~_~_~_~_~_~_~_~_~_~_~_~_~
09/07/21
😺👌
We seem to have gotten the stretch under control, lowering the lights really seemed to have helped (or she's finished lol), the fans have gotten them pretty strong in the last few days, everything is lookinng great..a few leaves with mechanical/ wind dammage but nothing too majior and the high wind has been benificial... this is a very lengthy strain, had i known i would of done a few things differently with the others but still very happy overall..thanks for reading if you made it this far and happy growing everyone!! 😻

Likes
14
Share


@TOMI08
Follow
9.hét
Rég voltam itt
A lányok szépen fejlődnek
Tegnap kaptak neem olajat
Csak esővizet kapnak
Lehet a tápanyagot növelnem kéne?mit gondolsz?

Likes
6
Share


@luxgrower
Follow
9.02.2025
Came back from the holiday and was very surprised by the plant's growth speed. Now it's in flower and can consume new nutes that I'm giving in accordance with the scheme. Going to feed exactly by the numbers it tells me to.
32nd day. Got very sick with some modern virus, wasn't even in my power to take pictures, the plant is doing really good.
was sick in bed the whole week 😥
Likes
17
Share


@Targona
Follow
Technical and general parameters of the breeder:
Sativa dominant citrus terps that hash makers and extractors will love. An excellent autoflowering hybrid that boasts an impressive 24% THC to match her amazing flavor with potency. Well recommended for novice growers looking for a low maintenance, yet extremely productive cultivar that will flower from seed to harvest in 9-10 weeks. This strain can grow to become one of the larger autoflowering hybrids, making it a wise choice for commercial growers looking for something special.
Technical Specifications:
Taste: Orange, Sweet, Sour, Creamy
THC: Up to 24%
CBD: < 1%
Indoor harvest EU: 500 – 650 gr/m2
Indoor yield US: 1.6 – 2.1 oz/ft2
Harvest outside EU: 60 – 300 gr/plant
Outdoor harvest US: 2 – 11 oz/plant
Size: XXL
Height: 110-150 cm
Height US: 43 – 59 inches
Flowering: 9 – 10 weeks
Room: Indoor/Outdoor
Gender: Feminized
Genes: Sativa 70%/Indica 30%
Genetics: Orange Sherbet Auto
Autoflowering. Yes
For cultivation I used:
Cultivation area: 80x80x180cm
1x circulation fan: 15W
LED lighting: Mars Hydro TS 1000 - 150W - vegetation and flowering 💡💡
Exhaust: pipe fan - RAMTT100
Odor filter: PRO-ECO HF carbon filter 160-240m3/h - 100mm - maximum air flow up to 240m3/h
4x textile flower pots 11l
Substrate:
Plagron Lightmix
perlite
coco coir
Thank you to all my friends who support me in growing, who give me advice - @Happy_Rakosnicek, thank you to my friends from Grow Diaries for likes, advice and support 😍❤️❤️
Many thanks to the Fast Budsb team especially @fast_buds_jessie for providing the sponsor seeds 🌱🌱😍
Thanks for the likes and you can follow me on Twitter 🐦: @ Targona666
Many thanks to Mars Hydro, specifically @Coco_Pan2022 for providing the Mars Hydro TS1000 sponsor light💡💡😉
Smoking Review:
I will add the buds after about 10-15 days of drying 💨💨


Processing
Likes
10
Share


@BodyByVio
Follow
After 21 days in turbo cloner I transplanted 4 Sweet seeds Green Poison into 1 gallon plastic pots filled with Cana coco. Few days later I transplanted another 4 clones into DWC!
Stay tuned!
Coco feed at 700ppm
Dwc feed at 480ppm
Likes
2
Share

@LittleBigTrees
Follow
This week they were ready for harvest.
one went into a drying rack the other was hung upside down to dry

Likes
245
Share


@Roberts
Follow
Hey everyone, so Thc bomb has grow into a big girl. Ph has been a lot more stable I was pushing too much potassium, and it was causing issues as coco got less wet. If you were growing in a 2x2 tent this 1 plant is too big. Lol thanks again Bomb seeds, and Spider farmer. 🌱🔥💣💥🤤💨💨💨
Thank you grow diaries community for the follows, likes, comments, and special thanks to my YouTube channel subscribers. Happy growing everyone, and be safe🌱🌱🌱
If interested in purchasing a Spider Farmer SF-1000 please follow appropriate link below :
US:https://amzn.to/396hXXb
CA:https://amzn.to/3ol4oK4
DE:https://amzn.to/3q15SJT
UK:https://amzn.to/2L7NVKN
AU:https://amzn.to/3pZD6ZQ
FR:https://amzn.to/2Xkomsi
IT:https://amzn.to/3nk7A7h
ES:https://amzn.to/2XhtGwB

Likes
6
Share


@Kirsten
Follow
Orion F1 Organic dry amendments grow:
This week the plant has started to show some progress.
I will top the plant soon. Now that everything is growing steadily.
8.5.25:
The plant was watered with 1ltr of dechlorinated water PH'd to 6. This may be the last watering before she's done. I added per litre;
♡ 1ml Trace
♡ 1/4 TSP Ecothrive Biosys
PPM: 636
PH: 6.1
Thanks for stopping by and hanging out 💚 ✌️ 🍃 😊 🌱
Likes
67
Share


@Basementganja
Follow
She was a "slow and steady wins the race" phenotype! 6 weeks veg + 8 week flower.
She vegged strong through week 6, and then stacked up some intense colas, because of being lolipopped before flower!
During her transition to flower, she was defoliated every 3 days to allow light and air to penetrate the canopy, and allow for maximum stackage!
This is possible because, she didn't stretch much during her transition. Instead, she was stacking a tight node structure; and with every new node, comes a set of two leaves!
This lady holds my personal record, for my largest yield from an indoor plant!!!
Likes
10
Share


@Cocogrow1234
Follow
Week 4 flower : everything’s looking nice still got the lights about 7-9” from top of canopy without any issues . The humidity has gone up to 50% in day and I can’t really get it any lower I’ve already got a dehumidifier so don’t want to get another one . I would like to lower to 40-45% and lower for last 2 weeks but can’t see that happening .
I’ve started the pk from end of week 4 (day 28 )at 1ml per litre this took my ec to 2.2 I will see how it goes and maybe up it to 1.2-1.5 and I’m going to use the pk for 7-14 days then I will start the flush
I also lowered the silicone to 0.5ml per litre
3x blue cheese plants are on the left but has spread over
and 1x sunset sherbet on the right