The Grow Awards 2026 🏆 


Likes
Comments
Share
@Stoolboxx
Follow
Last time I trust autofocus because lazy...
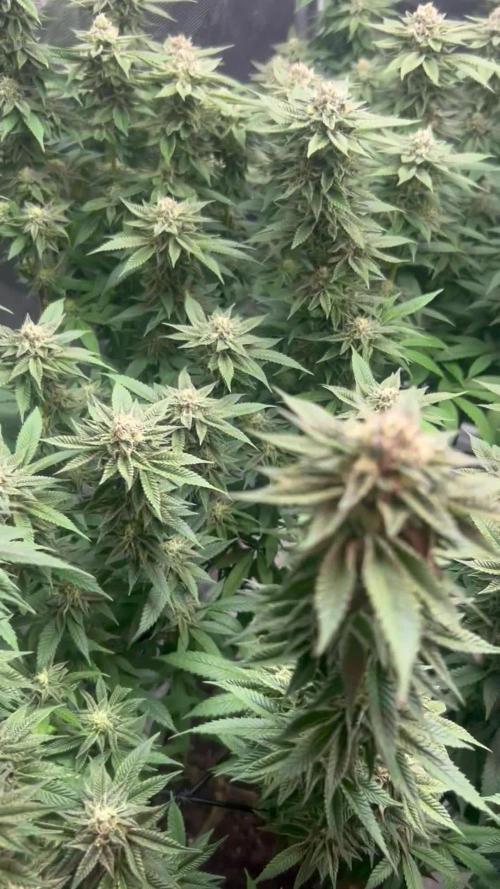
Week 8 is going good, still some burnt tips but just letting it go. The smell is too much for the carbon filter to handle at times which is a good thing.
Need to start thinking about a drying setup as the left plant will definitely be done first.
Likes
3
Share
@fabialien
Follow
Estas gorillas les esta costando un poco de trabajó incorporarse, oara sus segunda semana, una va bastante bien, y la otra va muy pequeña, le daremos una semana más si no la sustituimos por una Auto Lebron.
Dia sábado 27 de Julio 2024 primer riego con bases Advance Nutrients


Likes
Comments
Share
@GreenLashes
Follow
This cement shoes has handled everything I've done to it!! Such a strong plant. Let's hope it gets me some oz!!
Likes
9
Share
@BB_UK
Follow
She was the second to pop up (and purple punch earlier that day) I won’t be topping any autos this run! I will be only low stress training until scrog and then I’ll high stress train if necessary! I’ve given the first feed today of biobizz (doing fastbuds organic the other 3 synthetic) my aim is to keep the veg period vigorous! As a great veg equals great bloom! All other
Likes
39
Share
@Hazecat_420
Follow
Se ven tantos brotes que está todo hermoso y lleno de colores. Vamos de maravilla. Seguimos con este proceso terminando ya su 4ta semana de floración

Likes
12
Share
@2Stones1Bird
Follow
Checkout my Instagram @smallbudz to see the Small budget grow setup for indoor use, low watt, low heat, low noise, step by step.
13/12/2019 - Change the light schedule to 12-12h after 8 weeks of no signs of flowering I think is a photo not and auto.
16/12/2019 - Fed her 1.5l of 6.5PH water with 0,5ml of each: Grow, Bloom and Max, and 1ml of each: Heaven, Alga-mic and Vera, noticed about 10% run off, I use about 1/3 of the nutrient dosage on the chart, to achieve about 200/300PPM (500 scale).
17/12/2019 - Did some defoliation on the lower branches mainly.

Likes
407
Share
@LegacyMarketFarm
Follow
APRIL 18TH 2024 - The 3rd batch of clones was taken yesterday and mother plants stripped back aggressively now that focus will be going toward the beds and clones. The generation 2 mom's are going to be vegged up and ready to produce our second harvest's set of clones. We have taken 3 batches of clones kept them in half gallon bags in each of the beds so we can pick the absolute best of each to transplant into the beds & proceed into the grow with. Next update will be of each individual diary! We got @Seedsman Purple Ghost Candy in this cycle by splitting the Exotic Animal bed half Purple Ghost Candy !
On the Kitty cat front, Barns finally got the courage to approach us over a few days, Maybe a week. We where finally able to pick her up and bring her inside, She has been a happy new member of the family ever since, Making that another successful rescue animal adopted from outside.
FOLLOW US ON X for EXCLUSIVE UPDATES : https://twitter.com/LegacyMrketFarm
MAKE SURE TO CHECK OUT OUR YOUTUBE CHANNEL FOR IN DEPTH TUTORIALS : https://www.youtube.com/@LegacyMarketFarm
SUBSCRIBE TO OUR GAMING CHANNEL TO JOIN OUR AWESOME COMMUNITY & GAME WITH US : https://www.youtube.com/@LegacyRadioGaming
AND MOST IMPORTANTLY DON'T FORGET TO TAKE ADVANTAGE OF OUR PROMO CODES FOR EACH OF OUR GREAT SPONSORS !
PROMO CODE GREEN PLANET : LEGACY
PROMO CODE MARS HYDRO : LEGACY
PROMO CODE SEEDSMAN : LEGACY10
Strawberry Cookies · Super Sativa Seed Club
Exotic Animal · Exotic Seed
Jungle Lava · Original Sensible Seeds
GG4 Sherbet FF · Fast Buds
Stinkin' Bishop · Original Sensible Seeds
Lamb Chops · Thug Pug Genetics
Purple Ghost Candy · Seedsman
Fuel DOG · Seedsman
Peyote Zkittlez · Seedsman
RudeBoi OG L.E. · Seedsman
Banana Jealousy · Seedsman
Sugar Cane · In House Genetics
Likes
25
Share
@Esoteric_growing
Follow
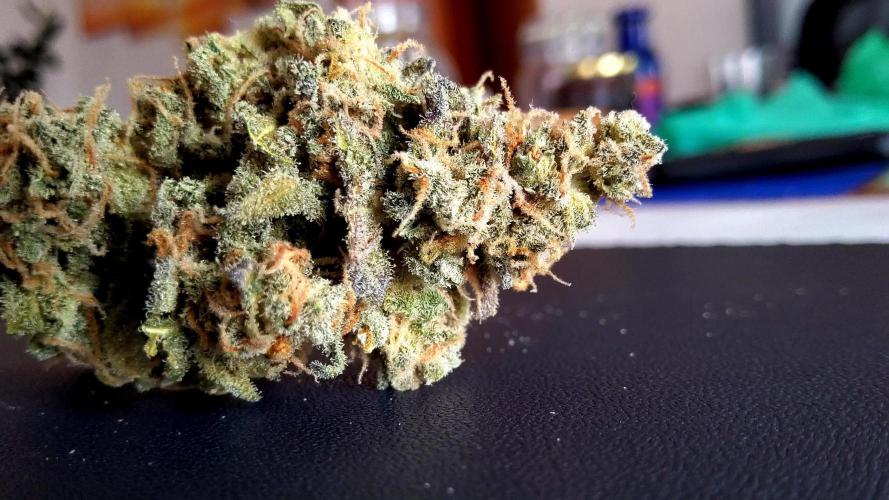
The hardest buds I have grown, like rocks. Thc content is like the last grow insanely good. Bag appeal, smell and bud structure is 10/10.
After growing this strain in organics and then coco I am now going to try it in hydro.
I really do like barneys farm seeds and highly recommend the Runtz Muffin strain.

Likes
12
Share
@TMGrow
Follow
9.20
Good dose of LST from great growth over the weekend.
9.21
LST
.5 Gal water, 2ml CalMag, 1/4 tsp Recharge
9.22
LST
9.23
LST
9.24
LST
9.25
Set up ScrOG and train
9.26
.5 Gal water, 2ml CalMag, PH 6.3
ScrOG train and defol


Likes
13
Share
@gadjoo
Follow
🔵⚪️🔴
Passer de 25cm à 80cm en deux semaines c'est fou, je suis un peu surpris ^^'. Changement de tout l'eau, passage aux engrais de floraison. J'ai construis le bio-filtre, j'attends que le silicone sèche et je le mettrais entre les deux cuves, connecté à la pompe de circulation.
🦅🇺🇸/🇬🇧🦁
Going from 25cm to 80cm in two weeks is crazy, I'm a little surprised ^^'. Changed all water, switched to flowering fertilizers. I built the bio-filter, I'm waiting for the silicone to dry and I'll put it between the two tanks, connected to the circulation pump.


Likes
18
Share
@Grower_Of_Persia
Follow
week intel:
its time for second pruning they grew up too fast and need second pruning as below :
first i remove big fan leaves and only leaves then let them rest for 1 day then the second part of pruning will get done that is removing branches based on these conditions:
1-if the branch is very low and never can make it to the top ,
2- if branch is in shade even after pruning fan leaves ,
3- if there are too many branches at the small space then non of them will get resources so if there is no space for branch then , they must get remove.
everything is perfect!
stresses :
pruning big fan leaves and lower branches + a little E.C stress around 1.7 once a week
feeding:
i feed them 3 times this week with this order :
day 1 : i feed them heavy with silicate +base nutrients(calcium & micros + Bloom) about 884 ppm - 1.7 e.c to cause a little stress.
day 3 : i feed them low dose of Feeding Booster + Karbo Boost around 325 ppm - 0.6 e.c to let them recover a little but not fully recover still a little stress will caused.
day 5 : i feed them with low dose of Top-Max + B-52 around 213 ppm - 0.4 e.c to let them recover the stresses to get ready for another stress next week.
guide of the week :
no more stresses from now on till the end and from next week i'll reduce the amount of nitrogen and calcium to below half to the end.


Likes
38
Share
@Roberts
Follow
I just did a solution change. She was put on a less concentrated solution of the Athena nutrition. I think I overdid it last week changing it. She is still making good progress under the Medic Grow Mini Sun-2. Everything is looking good. Thank you Athena, Medic Grow, and ILGM. 🤜🏻🤛🏻🌱🌱🌱
Thank you grow diaries community for the 👇likes👇, follows, comments, and subscriptions on my YouTube channel👇. ❄️🌱🍻
Happy Growing 🌱🌱🌱
https://youtube.com/channel/UCAhN7yRzWLpcaRHhMIQ7X4g

Likes
5
Share
@Fefa128
Follow
Yes! It reversed, now it's going to self and create more feminized seeds, the selfed ones probably be like clones if the strain is stable enough, if not, it'll show 1-3 phenos in my experience.

Likes
19
Share
@GrownwithLED
Follow
After germinating on a wet paper towel inside a hanging plastic baggie for 48 hours, all 6 seeds have opened up. The 3 ZHEETOS (=ZKITTLES X CHEESE) and the 3 BADAZZ-CHEESE (=BADAZZ-KUSH X CHEESE) seeds, which I received directly from Milo from BIG BUDDHA SEEDS have a 100% germination result, I love it. The seeds are then carefully (with gloves on and a tweezer) transplanted into small pots (0,25 liter) filled with PLAGRON Grow-Mix. You can see how its done in the video and pics above. I fill the pot with soil and water it a little bit. Then I make a small hole with a finger in the center of the soil. I take the seed off the wet paper towel with a tweezer and put it onto the side-wall of the small hole. I position it right at the edge with the white tap-root pointing down and the seed-shell laying on the edge of the hole. Then i push the soil from the other side-wall towards the seed, so it is enclosed with soil from all sides and the top of the seed shell still peaks out of the soil. This way the seedling does not have to fight its way to the surface, but can grow out right away. Within 24 hours I can see the small seedlings rise and push out of the soil. Some with the seed-shells still on them other without the seed-shell, depending if they were able to shed them in the soil already. The first ones to rise are ZHEETOS #1 and #2 together with BADAZZ-CHEESE #1 and #2, both #3-plants are one day later out of the soil. During week 1 I only gave them little water (0,1 liter per plant every 2nd day) and on day 7 I add BIONOVA ROOTS to the water (0,5 ml/l) to enhance the growth of the roots of the seedlings. After a few days all 6 seedlings have surfaced and then shed their seed shells and unfolded their Cotyledons (=first round leaf). They grow quick and healthy in the first week inside my GrowforLife-Coset and start to develop the first sets of real leaves. This closet is THE MOST BEAUTIFUL and MOST SILENT stealth-grow-cabinet EVER! (check them out: www.growforlife.com ) I loved my first round in it and cant wait for this one. The plants LOVE the spectrum and light-intensity of the two 50 watts SANlight-LED modules built into the closet. The 100 watts of light are plenty for the small grow-surface (45x45cm) of the closet. This round I will try the whole line of BIONOVA nutrients from the Netherlands, since I have only heard good things about them.

Likes
4
Share
@Dr_4NdY
Follow
Week 6 🌸 done
Happy to give them Overdrive, only have good experience with it
Studio 54 is perfect, Rainbow Gelato buds could be thicker, Bruce Banner just takes it time
Curious to see if any of the plants leaf will purple in the last week of flushing
S54 is said to take 8-10 weeks
RG 8-9 weeks
BB 9-10 weeks (last run was 67 days after switching light)
I intent to harvest at exactly 9 weeks but I think RG will take a lil longer / S54 a lil shorter
Lets see what overdrive does to them

