
Likes
Comments
Share


@TerpTurtle
Follow
-Set up a 4x4 with the mars hydro FC6500 and planning to do a more hands off grow style the first run with clones in auto pots
-Swapped my older model AC Infiniti T4 exhaust with the cloudline T6 equipped with the new controller 69 for complete grow automation.
-Ordered the adapter to connect my HLG 350R with the controller 69 allowing automated light control dim switches between RH & temperature and sunrise/sunset effect.
-Flipping to flower
-Heavy selective defoliation /start lollipop cleanup
-Foliar fed

Likes
5
Share


@RunWithIt
Follow
Hit these girls with a topping at the end of their 3rd week. Also started them on liquid seaweed for added support.
Update day 23: Transplant
Update day 25: Defoliation

Likes
24
Share


@Jays_Not_Here_Man
Follow
The ladies light schedule was changed to 12/12 on Oct.30!❤️
The girls were doing great about 1 week after their big defoliation and SCROG being put in, I decided to flip to flower. I had been tucking and bending and had achieved about 80-90% canopy coverage, the last bit should fill in this week as they begin to stretch.
During the 1st week of flower transition, I continued to tuck and bend where I could, trying to maintain an even canopy of tops, as well as fill in as many of the squares, as evenly as I can. It becomes a morning and night routine, I check on my humidifier, say good morning, and tuck away for about 5 minutes or so, it doesn’t take much at this point.
Once the first week of stretch is through, I stop tucking branches and allow the tops to continue to grow upwards. I find that by using a SCROG method, there isn’t really a whole lot to do…I don’t defoliate until week 3, so it’s just feeding every 3-4 days and filling my humidifier!
When I water is when I like to get under the canopy and check the stems and leaves for anything that shouldn’t be… and typically once a week after watering I’ll wipe down the tent and sanitize any surface I can. There is no reason to get lazy, that’s how you get Pests, Mold, and PM. Happy Gardening 🇨🇦👊❤️

Processing
Likes
4
Share


@Shoots3845
Follow
Heavy rain all week again due to freak storms, very limited sunlight.
Notice leaf mites and some sort of caterpillars eating away at them
Likes
Comments
Share


@Trichomedream420
Follow
I have put them through stress by constantly trimming, I have did some topping and low stress training. I tried leaf tucking but plants were so bushy that no light was able penetrate the canopy. I did everything that I was told not to just to expirement with the girls.


Likes
14
Share

@HanzzCZ
Follow
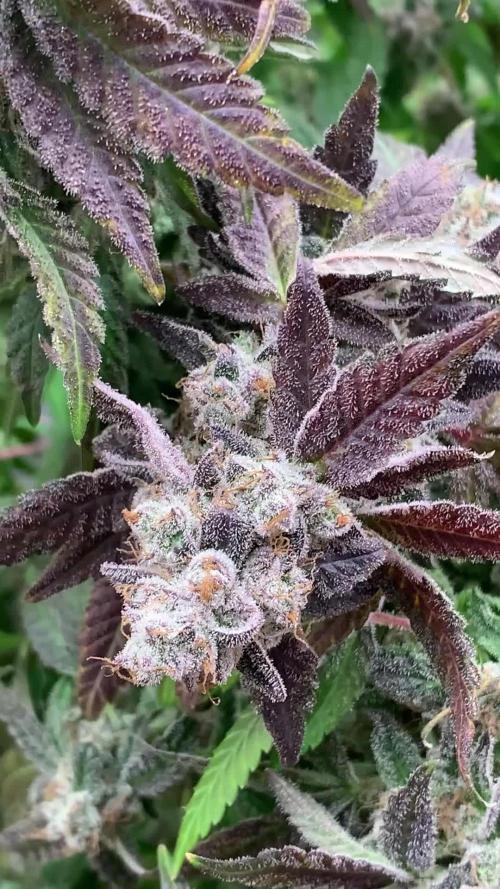
Servus, šestnáctý týden, osmý týden v květu, máme za sebou. ✌️🌼
Tento týden holka dala další boost do šišek. 👌 Jantar se už objevuje na listech, na palicích jen místy. Ještě chvilku a bude sekec mazec! ? sedmilitrový zálivka upravena na dozrání v dávce 2ml/l základu.
Uvidíme jak to bude vypadat o víkendu! 🍾🍾🌼
Ať se daří! ✌️kdyby měl někdo nějaký typy/rady uvítám váš komentář. 😂🔥
EN
____________________________________________________________________________________________________________________________________________________
What’s uppp! Week sixteenth (eight in bloom) is behind us.✌️🌼
This week the girl pushed the buds even further. 👌
Amber is already showing up on the leaves, while on the buds it’s only appearing here and there. Just a little longer and it’ll be chop chop time! ?
The 7-liter watering was adjusted for ripening with a 2 ml/L dose of base nutrients.
We’ll see how she’s looking over the weekend! 🍾🍾🌼
Good luck every one! ✌️
Any tips or advice are always welcome 😂🔥
Likes
37
Share


@BB_UK
Follow
Flowers beautiful flowers! 🌺 to start of dynomyco has really done it’s job with the purple urkle and she already in bloom and is nearly to the second scrog, the grape ape has ONLY just started her stretch as she’s right at the first scrog about to push through as she only just pushed pistols today and I’m putting that down to her healing through transitioning as I had to trim her leaves and lower stems during transition as they’d be a problem later on! But all in all a great week and on my way to a great flowering!
Likes
9
Share


Likes
18
Share


@valiotoro
Follow
Hello everyone week 2 has passed for this Vanilla Latte auto by humboldt seed😎
this plant is doing very well growing at fast pace and with a beautiful green colour on the leaves.
wish you all happy growing!👨🌾🏻

Likes
26
Share


@pifflestikkz
Follow
Day 29
29/07/24 Monday
Nice feeding today with De-chlorinated tap water pH 6.
Gave her 300 ml and she had a small run off.
Getting chunky in the stem now 💪💚
Day 31
31/07/24 Wednesday
De-chlorinated water pH 6 today with Plagron pk13-14 5ml to 5L
Plagron power buds 5ml to 5L
Used 300ml of the 5L solution.
I will be using these on water days from now on as they are advised to be used every irrigation.
We'll see how they perform 💪💚
Day 32
01/08/24 Thursday
Another feed today using de-chlorinated tap water pH 6, there now taking 300ml every evening.
Day 35
04/08/24 Sunday
END OF WEEK 😁
De-chlorinated tap water pH 6 today with Plagron products. 300ml each.
Had a issue with leaf invaders this week, I have treated and am checking every 48 hrs so far seems ok and not progressive.
All plants look great, very healthy, one of the Overdose is way behind and due to space maybe culled at flower I'll see how she gets on.


Likes
54
Share


Processing
Likes
37
Share


@MG2009
Follow
Not much to report slow steady growth cool temps are not helping.Getting warmer weather next week should help speed things up a bit👍
Likes
120
Share


@DogDoctorOfficial
Follow
The Harvest Prelude:
After a patient wait and 48 hours of darkness, the moment arrived. The Tropical Tangie Lego Ninja, standing proudly like a silent guardian, was ready for the grand harvest. The sound of each cut echoed through the grow space, reminiscent of felling a mighty tree. The compact structure of the buds was awe-inspiring, a testament to the ninja's disciplined growth.
The Lego Ninja, like a stoic warrior, was then hung upside down, beginning a two-week drying ritual. Maintaining an ambient temperature of around 21°C and a relative humidity of 60%, this slow-drying process allowed the buds to retain their essence, preserving the symphony of terpenes and cannabinoids.
The trimming phase unfolded like a fragrant masterpiece. Each bud, adorned with a glistening layer of resin, transformed the trimming process into a sensory delight. The zesty aroma of oranges enveloped the room, a tangible expression of the tropical lineage. The compact buds made every snip a careful dance, revealing an abundance of frosty trichomes.
The moment of reckoning arrived with the scale's unveiling. The Tropical Tangie Lego Ninja, from a single plant, bestowed upon me 309 grams of dried medicine. Each gram was a treasure trove of cannabinoids, a promise of euphoria and relief. The sheer compactness of the buds translated into a concentrated potency that left me in awe.
In parallel, the clones, nurtured with equal care, showcased a fascinating divergence. A twist in the tale unfolded as the intense oranges of the mother transitioned into vibrant tangerines. This unique expression, I believe, was a testament to the clones weathering a summer heatwave differently, bringing forth a distinct personality.
The clones, resilient and generous, gifted me a bountiful 549 grams of pure joy. This now my keeper of the garden, an embodiment of the Lego Ninja's legacy. The harvest dance, though familiar, carried the nuances of tangerine zest, a refreshing twist that left me eager to explore its intricacies.
Both harvests shared a common thread—their resinous abundance. The trim bin, akin to a treasure chest, gleamed with golden trichomes and fragrant joy. Sticky fingers became a badge of honor, a tangible connection to the resinous richness that filled the room.
Shout Outs:
No harvest report is complete without expressions of gratitude. A special nod to @DutchPassion_Official for crafting the genetic marvel that is the Tropical Tangie Lego Ninja. Their expertise paved the way for this epic journey, and I tip my hat in acknowledgment.
In conclusion:
As the dust settles on this epic harvest saga, my heart brims with happiness and excitement. The Tropical Tangie Lego Ninja has proven itself not just as a plant but as a living masterpiece. Stay tuned for the smoke report, where we delve into the true essence of this botanical ninja's legacy. Until then, fellow cultivators, may your gardens flourish, and your harvests be as bountiful as the joy they bring.
As always thank you all for stopping by, for the love and for it all , this journey of mine wold just not be the same without you guys, the love and support is very much appreciated and i fell honored and blessed with you all in my life<3 <3 <3
#aptus #aptusplanttech #aptusgang #aptusfamily #aptustrueplantscience #inbalancewithnature #trueplantscience
With true love comes happiness <3 <3 <3 Always believe in your self and always do things expecting nothing and with an open heart , be a giver and the universe will give back to you in ways you could not even imagine so <3 <3 <3
Friendly reminder all you see here is pure research and for educational purposes only
<3 <3 <3 Growers Love To you All <3 <3 <3
P.S- I must extend my sincerest apologies for the missing video reports. Regrettably, Grow Diaries is still facing some technical issues that are preventing me from uploading them. Rest assured, as soon as the situation is resolved, I'll share those videos to give you an even closer look at this fascinating journey. or in my case apparently GD dont let me do uploads over 100mb with is super small file if you working and editing videos , doing my best here to upload them all but GD is not making my life easy on this <3 <3 <3
Processing
Likes
20
Share


@BudXs
Follow
We have seen the sprouts breach the soil this week!!! Not all of them made it unfortunately. 3 of 4 will grow to see the sun, hoping for all females, obviously.
Drip system is working well. Nutes to be introduced in a few days once we see some fan leaves develop
Animals are leaving the cups alone on account of the chicken wire, so all is good
Thanks for looking


Likes
16
Share


@Hawkbo
Follow
The berry scent is intensifying and the buds are fattening up pretty good. Since I should be done with the harvest pics from the auto crop I can prob start taking some pictures next week. Only change this week was humidity dropping it's getting cold here. I've been defoliating a little bit here and there every time I feed but nothing too heavy.

Likes
10
Share


@Dreadnug
Follow
5/14-
Buds are getting fat - some are starting to droop. The Calcium issue is resolved and feeding pH balanced water and not switching with well seems to have helped. Hopefully we can stay stead to harvest. Noticing some light burn so will have to potentially keep an eye on dialing back the lights a bit.

Likes
12
Share


@ScrogFreak
Follow
A lot more happening this week! As shown in the pics, and as suspected, I have a manganese deficiency. I've been keeping my pH level at 6.2 in coco, manganese is taken up best by the plant below 6.0 pH. Dropping my ph level to 5.8 pH, and flushing with lower pH, hopefully it will solve the issue over the course of a few days.
I made a new frame for a SCROG, with a "custom bend" in the CPVC pipe on both ends. The bend will allow me to take advantage of the slack material in the sides of my 4x4 tent. I'd previously taken 4" out of all the upright poles to shorten the tent so it would fit in the room due to low ceilings, meaning I had extra slack in my tent walls. The bend in the net frame pushes the sides of the tent out to 5 foot wide. My first SCROG net was a 6" mesh from Amazon, immediately knew I wanted a smaller mesh. Next time around I built my own with a 4" mesh and used the 4" for several grows. This time I decided to go with an even smaller, 3" mesh, and already I like it better. I don't really see myself going much smaller than 3" mesh though. It seems to work well, and any smaller and it may be too tight trying to work the plant through the opening sometimes, which if not careful, will damage the plant.
I usually use a & gal cloth pot, grow off rules stated we 0had to use a 5 gal pot. Seeing as I only had 7 gal on hand, I was stuck picking up a Root Farm 5 gal cloth pot locally, as you can see, the roots didn't really stay contained, nor did they "air prune", i had to tear them off before installing the net above.
On the last day of week 6 I finally got my net installed, and the plant SCROGged. I should have put the net in place a week or two earlier, it would have been easier to manipulate the plant, however the plant will still have a week to recover. I tie the net in place above the plant, and slowly lower it down, as I bend and super crop the main stalk over parallel to the net, and work all the branches underneath and spread them out. As the plant grows I'll continue to push branches back down through the net and moving them out to the next hole. This will greatly increase yields by allowing light to more bud sites, keeping all buds the same height and thus the same distance from the light. small budsites on a vertical branch, will transform into their own cola once the branch is laid on its side. Instead of a Christmas tree type of plant, with one large main cola, and smaller and smaller buds as you move further down the plant, you end up with a bunch of colas that are all close to the same size, and more importantly, the same level of maturity. The SCROG method, combined with super cropping, and defoliation has greatly increased my yields.
As the plant is getting worked into the net, I'll defoliate where necessary, ie a huge fan leaf covering bud sites, however for the next several weeks I'll be defoliating so mush every night or two, systematically trimming off all fan leaves, and stripping everything below the net, and any small bud sites that wont produce well. Usually by the time I'm half way through the flower stage there are no big fan leaves left to be found. It helps with light penetration, which results in a higher quality, higher quantity yield, as well as airflow, which will help prevent White Powdery Mildew and other molds etc. Once a fan leaf is 14 days old, its ability to photosynthesize light, starts to degrade. Once it reaches a certain point, the leaf drains more energy from the plant, than it's giving the plant. My best yields have been from heavily defoliated plants, my last grow I couldn't physically defoliate quite as heavily as usual, and I ended up about 25-30% less bud than expected
