The Grow Awards 2026 🏆 


Likes
6
Share
@Cannabis4Crohns
Follow
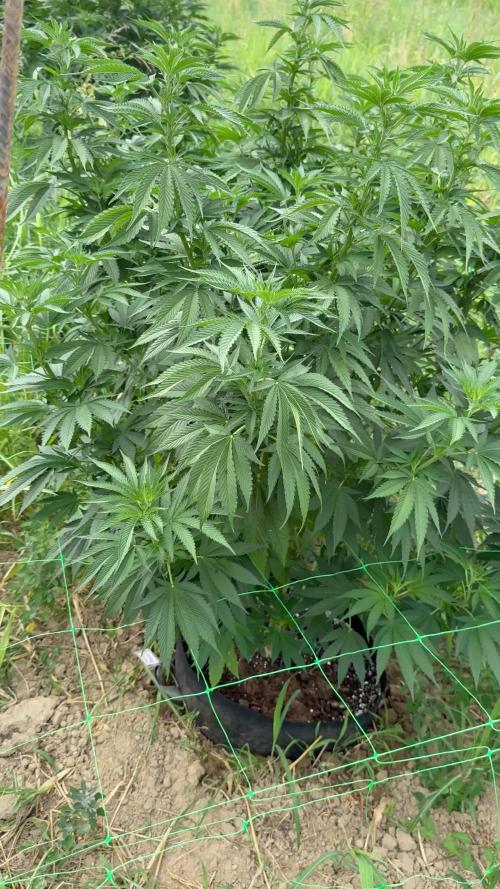
I've unshackled the plant by removing the ties I was using for LST. She continues to streach while producing new flowering sites.
I've decreased the Nitrogen and increased the Phosphorus and Potassium ratios in the feed.
Now watering 2 litres of water every 3/4 days.


Likes
12
Share
@GizaWRZ
Follow
That sick girl finish her life it was not point to keep her alife And she wasnt autoflowering that's mean i will not finish her even. I replace it by new one from another rent :) She name is Blue Dream'Matic :)

Likes
16
Share
@JohnnyBlaz3
Follow
CLOSE!!!!!! she is absolutely friggin caked with trichs!!!! just need her to plump up a little so we got some weight to her but she definelty looks potent af!!!!! only issue this run really was the stretching. I have a theory about why this happened and will test it out next crop, got the next ladies germed up already. I think removing the third fan allowed it to be to calm in there and the ladies to stretch more, this is just a theory i'll test out. If i had the space, i wouldnt mind the stretch but being in my little 5.5 x 5.5 tent i cant waste any space!!! am i going to break the tent record of just under 800 grams dried? probably not lol but lets hope for 600+

Likes
2
Share
@Chi_K24
Follow
Hey folks. Into week 5. Lots have happend. Ladies got hit with a huge wind storm and took down all 4. We had to steak them up to keep support of main branch.
Other than that. We did a heavy defoil/lollipop and topdressed at 2tbps/gal 70/30 mix of 444 to 285.
Regular watering. Each plant has been taking on about 1.2 gals every 2-3 days.
See ya on the next update.
Likes
24
Share
@DevokeOG
Follow
I got the seeds from a local dealer so I was unsure what type of strain it was but he told me it was a Gorilla Glue Auto flower so I just went with that. That is why in the first few weeks I set my lights on a 20/4 lights on and off schedule. Around 7 weeks in my grow the guy I got it from said that his flowered when he switched his light to 12/12 so I kinda doubt that it's an auto and maybe it is just a photo. I then switched the lights to 16/8 just because I heard it is better to give them more rest and is better on electric. When I thought that the plant was big enough to go into flowering I just flipped the switch to 12/12 and two weeks later it started flowering so I don't know if it was just time for the plant to start flower or the flip. But in the end I got a weight of 1500 grams wet weight with the stems on and a dry weight of 215.56 grams of just straight bud so at the end it was very good considering the light I have and ran into some problems on the way.0000
Likes
21
Share
@OGTrauma
Follow
Now it’s our POST PANDEMIC VIRGO SEASON & as Spring and ‘Fiestas Patrias’ are coming here homies!!! Have Big Gas Puff on my Behalf! 👽
Declaring on September the First, Im Setting officialy the photopheriod as 20/04 hours resting too, they start in midnight as they will help to provide an ideal temperature at night, and thats the reason why stick with covering most of the day yet respecting some time off the grid, as for both mary jane plant processes like foliar feeding or the transplant depicted below and electronics used requires a bit of resting as lifespam testing and recomendations tend to stick on ‘calm your tits homie’ even on autoflowering scenarios, last consideration is the electricity bill as can become bothersome in some countries too.
Moving on plant growth , I personally consider up to this date , a healthy growth even when i changed the substrate it has quite a possitive impact and that’s on having a number of survivors above the mínimum of plants i want to be spread each on 11 lt of ’ Organic Life Light Mix’ for the most oustanding Killer Kush FV, by using the growth vigor & not stressed AF criteria , as it’s always good to do backups in case i had a strong damping-off or like a bad germination scenario. Notice the quirk of ‘Pot on Pot’ made the transplant a bit easier, and how can make some small upgrades if added in your grow , if its on your market and fits your style as well.
Regarding to feeding, new transplant soil was watered with Hesi boost, Top candy and BAC Calmag’s 2.0 (I chose this Brand specifically as it present other useful micronutrients on its composition ), as they first ones show to have quite a stimulant and refreshing effect on the babies, considering the size of more than decent root samples took before being moved on their final containers. This experience also introduced me the carencies i must attend usually on these type of soils, who also i do consider that being this deal of too light substrate, is a deal of a trade off too , like, im saying this this Organic Life Light Mix it’s not a bad product at all but consider is way more needy unlike traditional soils or even fuck, this shit is more airy than other light soils compositions hhahah, so, final words here, like at the same time the speed gained plus not a total damping off on germination phase & good interaction with fertilizers i use as plant interaction shows quite a good evolution, specially being keen on carencies and disbalances are faster to present and faster to attend , it requires more handling specially on feeding like all shit that is making this grow go at super fast speed , as i took some pics of root mass and it’s development shows it’s quite advanced yet on the optimal point to transplant.
PS: I will stay with the non finalists , the more pansy Killer Kush aren’t totally discarded as the point of having backups to have a better coverage regarding to uncertainity of germination and the fact that still fuck up things and shit my pants in the near future, as usual, im a shitty grower if not noticed ! 😂😂😂.
HAVE A BIG DICK ENERGY SEPTEMBER MFS !!!
// i'm uploading the photos asap as possible :P
Likes
82
Share
@BigBadLion
Follow
Hey guys!
Another update! 😃 This week is going to be the last one that I feed the plants and after that I'm going to just flush them for just one week. I took photos during the middle of the week just to see how trichomes were developing and there are more ambar! I want the top colas to be about 50% ambar and 50% cloudy while the ones below 30% ambar and 70% cloudy and I think I'll be able to reach that with ease.
Besides that this week was relaxing, no big issues! And I've been removing more fan leaves so when the right moment arrive it'll be easier to clean the plant! And that way I can get some extra development in lower colas.
The smell is strong now compared to other weeks (it's been getting stronger every week!) 😲
PD: The question is still up! In case anyone knows what could've happened 😱
Thanks for reading! 👋
Likes
38
Share
@Danger90946
Follow
Day 79 11/28/2021- Welcome to week four of flower. Today fed nutrients and did a defoliation to take off the smaller buds that won’t get enough light.
Day 81 11/30/2021- Just water her today.
Day 82 12/01/2021- Trying something new.
Day 83 12/02/2021- Water day for them. Also camera needed update but made it work. IOS/ANDRIOD PAR METER APP. It is very accurate highly recommended this for everyone.
https://apps.apple.com/us/app/photone-grow-light-meter/id1450079523
Day 84 12/03/2021- Last day of the week, and Wow the grow is amazing!

Likes
26
Share
@561honda
Follow
Chimera was 🔥 I got 8oz and a 1/2 . 4oz from the more purple leafs one and the least purple leafs had 4 and 1/2oz and i broke one top main branch by accident .Had 50 grams of sugar leaves and 100 grams of regular fan leaves ! Made 100g of regular fan leaves to 1 stick of butter and was night night i didnt think it would work but it actually did !! 😆 The more purple one smells and taste fruity and sweet and the other less purple was smelling like gas and now smells and taste like straight lemon 🍋!!⛽️ 🔥 💣 Next grow will be 12 clones in 2 gallon square pots in 100% coco and automatic watering every 6hrs and switching from Fox Farm to Athena blended nutes and see what happens !!!! 😆


Likes
79
Share
@Hou_Stone
Follow
it grows so fast. The lower leaves are shaded and away from the light. So I cut them as the plant gets taller
I really don't have a good setup to be able to clean my roots. I tried this week anyway. I watered each pot with 2L (not enough I think :/) of water at 450PPM PH: 7 then after I gave 1L of water at 900PM PH: 5.5.
There was a big puddle in the room afterwards. But it wasn't that hard to clean up after all. In 5 minutes with a rag and a bucket
------------------------------------------------
-Daytime temperature: 24-29°C
-Night temperature: 22-27°C
-Humidity: 50-75% ( Too high but it's hard to lower it... I need advice please contact me if you have :) )
-Lamp: Mars Hydro FC3000. intensity 80% at 40cm from the top leaves
-Room: Mars Hydro 100x100x180cm
-Extractor: Mars hydro 402 CFM Max. power 3/10
-Substrate : 70% coco, 25% perlite, 5% vermiculite.
My instagram : https://www.instagram.com/p/CuMhQ_BsjRP/?utm_source=ig_web_copy_link&igshid=MzRlODBiNWFlZA==

Likes
10
Share
@TiRobotProds
Follow
Les colas commencent a gonflé j'ai enlevé les grosses feuilles pour une meilleure qualité lumineuse. Pas signe de surengraissage(les pointe des feuilles ne sont pas décolorés), plante petite mais compacte avec une odeur d'agrume verte laissons la dans sa course pour la coupe de DuctchPassion@ la suite au prochain épisode.

Likes
12
Share
@thonhash
Follow
Sobre esta cepa no hay que comentar mucho,bastante contento con esta regular.


Likes
8
Share
@JohnnyBarrel
Follow
Week 16
Everybody is on Flower!
End of August: daylight 13h20: 7h20/20h40.
Day temperature max: 26°C - Night temperature : 17°C
Sunny weather - 2/3 rainy days in 2 weeks
Enriched the soil with seaweed powder and bat guano.
Continue to add flowering nutrients: Grower Master
I added some Calmag one time.
Watering 2L/plant every 3 days (2 days would be better)
With humidity growing and the relatives hot temperatures: the predators are attacking plants. Everything appears so fast: Aphids, caterpillars, leaf miner flies. Did a general defoliation before spray my mixture Garlic + laurel (12cl Garlic juice + 5cl laurel infusion + 1L distilled water: beware PH!!). I sprinkled diatomaceous earth on top of soil to protect and minimize the infestation.
Brake Pad Breath: still deep green and bushy. Flowering since 4 weeks. The most advanced, pretty good flowers with long pistils are growing. Spared until now: the plant is victim of Aphids, miner leaf flies and caterpillars in a « reasonable way »….try to eradicate the problem without shocking the plant at this stage.
Flash Back#2: around 2 weeks flowering, stretched a few centimeters more, well developed plants with lot of blooming sites. Relatively spared by pests, just some aphids.
GMO X Zombie Kush: some difficulties to recover….just engaged the flowering process, not to bad if she resist to the second pest’s wave.
Royal Moby: uncertain destiny….recovering good, sativa style: 155cm, just starting the flowering stage…super late!
Harvested a pretty auto flower: White Russian by Serious Seeds. Well developed plant, a little bit long to be ready but resinous and meaty buds.

Likes
37
Share
@Radagast_
Follow
26.07.
Cherry Poppers 1# Day 92#
Cherry Poppers 2# Day 89#
Yesterday was the end of the thirteenth week for the plants.
They spread abnormally, and they don't fall behind much with growth either.
The weather will be much more normal in the next 10 days, so I expect better progress.
Stay High and Keep Growing!!!

Likes
64
Share
@SmokingTiki
Follow
I ran out of BioBloom but the harvest is really close now so I would have water with clear water anyway, cool! I harvested the Gorilla Cookies end of the week. The two other ones are almost ready, I'll probably harvest them end of next week 😎 I also rearranged the last two ones to put them right under the light.


