The Grow Awards 2026 🏆 


Likes
Comments
Share
@ButterfliesLittleFarm
Follow
Hello Diary,
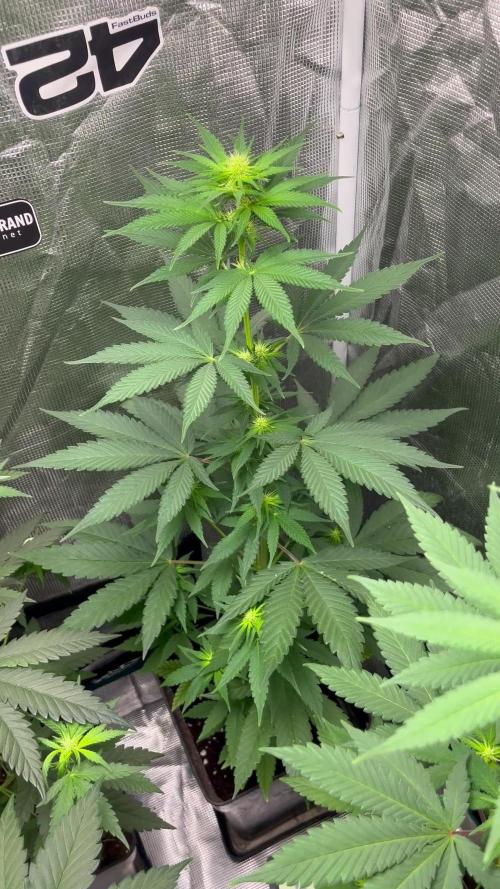
Purple Lemonade has finished the first week of flowering,
the flowers are forming nicely all over the plant and it has been 28 days since the beginning of the vegetation.
Purple Lemonade has continued its rapid growth, this week it has grown 20 cm and is now slightly taller than 50 cm.
The main cola has risen more dominantly above the other branches, it is forming nicely.
The leaves are a healthy dark green color and do not show any signs that the plant is missing anything.
Summer temperatures are slowly falling, nothing significant but every degree of lower temperature makes me happy.
This week the average was 29 degrees and rarely exceeded.
The humidity in the grow box is around 50% which is ok.
Watering is a little more frequent, every three days, and sometimes every other day.
I still add CalMg but this week I started adding BIO-BLOOM Fertilizer.
I prepare 9 liters of water, add the listed nutrients and lower the p.H. to 6.0.
I water all three plants on the Farm with this amount.
A few days before the end of the week, I cleaned the bottom of the plant to allow better air flow and to make it easier for me to water.
I also turned up the LED lights to 80% at the beginning of the week.
Here's what the past week looked like.
15/08/2024 - Day 22.
Watering.
The soil was very dry and the leaves were slightly drooping. I watered each plant with 3 liters of water. I put 1ml/liter CalMg and 1.5 ml/liter Bio-Bloom Fertilizer in the water.
18/08/2024 - Day 25.
Watering.
Again the soil is very dry and the leaves are slightly drooping. I repeated the same procedure as three days earlier.
21/08/2024 - Day 28.
Official end of the first week of flowering. After taking photos, I watered all three plants at the Farm.
Purple Lemonade - Day 28. - 52 cm
That's all I have for this week. See you soon and thank you all for your comments.

Likes
2
Share
@eldruida_lamota
Follow
Vamos familia, actualizamos la segunda semana de floración de estas Runtz Punch de Herbies.
La temperatura que estuvo entre los 24-26 grados y humedad dentro de los rangos correctos.
En cuanto a las plantas las veo verde sano, estiraron bien y ensancharon bastante también.
Se nota que los nutrientes de la marca Agrobeta hacen sus funciones.
Las flores empezaron a formarse, por el momento todo correcto, os dejé también alguna novedad y un cambio en la sala, agradecer al equipo de Mars hydro por el nuevo TSW2000. ( los últimos 5 años cultive solo con los leds de esta marca)
Llevaba 10 años trabajando en sodio y fue un salto de gigantes cambiar a los Leds, jamás me arrepentiré de ese cambio.
- os dejo por aquí un CÓDIGO: Eldruida
Descuento para la tienda de MARS HYDRO.
https://www.mars-hydro.com
Hasta aquí todo, Buenos humos 💨💨💨


Likes
71
Share
@Roberts
Follow
Blue Dream Xtreme Is doing her thing. I have been having the most issue with this plant. Curious to see how she turns out. She is in a New Level Hydro bucket, under a Spider Farmer SE5000 light. Thank you New Level Hydro, Spider Farmer, and Amsterdam Marijuana Seeds.💪❄️🌱🤜🤛
Http://amsterdammarijuanaseeds.com
Thank you grow diaries community for the 👇likes👇, follows, comments, and subscriptions on my YouTube channel👇. ❄️🌱🍻 Happy Growing 🌱🌱🌱
https://youtube.com/channel/UCAhN7yRzWLpcaRHhMIQ7X4g
SE5000
https://amzn.to/3qFpAML
Spider Farmer Official Website Links:
US&Worldwide: https://www.spider-farmer.com
UK: https://spiderfarmer.co.uk
CA: https://spiderfarmer.ca
EU: https://spiderfarmer.eu
AU: https://spiderfarmer.com.au
Coupon Code: saveurcash
Www.newlevelhydro.com
Www.hygrozyme.com

Likes
Comments
Share
@TyRun
Follow
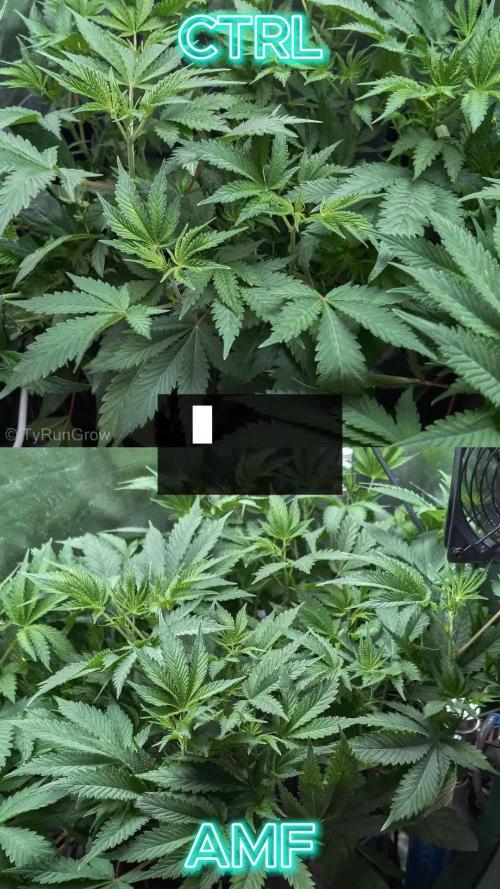
A bit too much Potassium (yellowing tips on the newer leaves), reduce the amount added. Keep stretching.
Crop steering (generative strategy for 3 weeks) help to reduce the stretch amount.

Likes
7
Share
@Nikkov
Follow
Well, another week has passed and it has been growing not exactly as I expected, but they warned me about using only base fertilizers with an inert soil and a higher ambient temperature, I could have a not so good result, well, it's one more experience and I liked it and let's see how it will be until the end of the cycle because the next one I already ordered a starter kit from the advanced nutrients line! Let's Go!
Processing
Likes
2
Share
@BigHorn
Follow
First week budding. Definitely starting showing signs of female the first 2 days you can see the hairs com in at the bot of the stocks. Looking forward to next week


Likes
35
Share
@g_slim
Follow
The plants are comming along nicely. They got some horsetail extract in the past 2 weeks, nothing else. I will top dress with a handful guano the comming days.
The sativa pheno seems to be the furthest aong in terms of trichromes. We will see, when we start looking at the trichromes with a microscope soon.
Numbers 1 and 7, the indica phenos, are similar. Only number 1 is lagging behind 7-10 days.
All plants started to receede from their bigger lower fan leaves. I keep picking them of as they turn yellow.
Happy growing everyone!


Processing
Likes
7
Share
@Chillymann
Follow
Temperatures are getting pretty extreme for a outdoor grow.The plants get carried into the house every evening but are doing really well.There is some strange leaf growth on big red from revenging but it is revenging nicely.Starting moving out of the reveg stage back into full flower
Processing
Likes
10
Share
@KcKush
Follow
*Raised the light from 15 to 18 inches.
*older leaves are looking like it’s having multiple deficiencies.
*Replaced Old Purple MarsHydro with TSL 2000

Likes
6
Share
@GuyPablo
Follow
Got some leaf taco ing, and a two of the plants have developed some yellow leaves, burnt tips, I don't think it's nute burn as amount of nutes watering every 2 to 3 days is very low, I thought possibly potassium deficiency, increased fish mix slightly, the yellowing is not effecting the top leaves only so I didn't think light burn, I've moved the light up a few inches to be on safe side and turned power down from 70 percent to 60 percent, using photone app to measure DLI/par intensity and reading about 700 so possibly too high. Gonna flush the two plants worse effected, PH testing RO filtered water to 6.5, also added a bit of cal mag, hopefully following the flush, should sort itself. Any advice greatly appreciated fellow growmies :)
Likes
12
Share
@Krissci
Follow
Most of "week 4" and this week I'll be flushing with flawless finish...
Try to ensure I get all the flavours out.

Likes
80
Share
@Roberts
Follow
FBT2307 has sprouted. She had a membrane issue binding the leaves. I got the removed right before I updated. She is growing in the Athena blended line nutrition, under the Mars Hydro FC4800 light. Everything is look good now. Thank you Mars Hydro, and Fast Buds. 🤜🏻🤛🏻🌱🌱🌱
Thank you grow diaries community for the 👇likes👇, follows, comments, and subscriptions on my YouTube channel👇. ❄️🌱🍻
Happy Growing 🌱🌱🌱
https://youtube.com/channel/UCAhN7yRzWLpcaRHhMIQ7X4g


Likes
40
Share
@Bread_n_Buds
Follow
We have reached the first harvest, I do not mark it as harvested because the other one is still going and will be harvested in 7 - 10 days.
Here we are with our Blue Cheese F1 Hybrid by Zamnesia, it was the first to be harvested in just 59 days, born in fact on September 1st, all of it was harvested on October 30th, not bad at all.
The flowers are really beautiful, excellent resin, skunky scent as we like it a little gray, as soon as we smell skunk we fly into the past, far from indie and commercial music and with generic nostalgic references. Here with a smell of skunk we teleport to the coffee shops of Amsterdam in the late 90s. It often happens to me when I smell the flavors and smells of the first super herbs I smoked. With Skunk and derivatives more than anything. And then with Cheese which is precisely a derivative and with Bubblegum I go straight back to that coffee shop.
The amount of grass is average, the plant is not very tall, about 90 cm and has been cleaned underneath, the largest is 100 cm, it will give us a lot of grass, the phenotypes are slightly different despite being f1 but at least two phenotypes seem obvious to me, we must grant them, mom and dad.
I did a big flush but the plant arrived a bit green anyway, I had exaggerated in pumping a bit and I anticipated the harvest by about a week when I saw my jars almost empty. Let's be clear, we are still at an excellent amount of mature pistils, about 75%, and as for trichomes we are a bit amber, mostly cloudy and also some transparent still. But whatever, we are ready anyway.
We really liked the easy to clean harvest with those flowers that come out well without leaves that are too difficult to remove.
// Strain Description // If you were looking for a reliable, versatile and accessible strain, here it is. Blue Cheese F1 Automatic by Zamnesia Seeds uses F1 genetics to produce uniform, rewarding and easy-to-grow plants. This strain stays small, so you will have no problem finding a place to grow it. After just 10 weeks from seed, you can enjoy tasty buds with relaxing effects.
- Strain — Get a seed of this fantastic strain - https://www.zamnesia.io/it/10673-zamnesia-seeds-blue-cheese-f1-automatic.html -l
- Fully organic soil and fertilizers
--- https://plagron.com
buy at www.zamnesia.io
- Growbox and ventilation system --- https://www.secretjardin.com/
- Light — P2000 - https://www.viparspectra.com
- Music and sound --- I made my girls listen to 432hz frequencies and black music from www.radionula.com
- Z --- You can find these seeds, much more from the world of cannabis, mushrooms and an incredible series of accessories and gadgets on the reference site not only mine but of many growers
---- https://www.zamnesia.com

Likes
2
Share
@Lovemabud
Follow
I never actually weighed this plant once dried. I would estimate around 400+ grams as I gave away so much to friends and it still lasted me well over 2 years.
Beleive it or not, my wife who disapproves of me smoking never knew I was growing. Until the end that is when she needed a screw driver and entered my shed to see what you can see in the videos.
Hahahaha, it took a while to recover from this thats for sure.
After this crop was finished, I basically rarely smoked for 4 years until I decided to go under lights this year. And now outdoors again with my latest project.


Processing
Likes
6
Share
@Jack_Greenstalk
Follow
3 Plants. 3 citrusy phenos!
#1 : First to sprout rapid rooter. TASTE: Pure Lemon front end into hashy cakey afghani. refer to this as the "lemon hashcake" phenom very dense, beautiful nug structure. Yielded 24.5 dry grams of primo smoke. Uplifting more cerebral sativa high with some punch in body as well. happy stress reliever for sure! has some "gassy" or fuel notes to it but very subtle
#2 Tangerine pheno: I orginally thought sour 76 was sour diesel x 76 Afghan til i read hso marks post on uk420 forums saying its cali sour d x 76 afghan. cali sour d is cali orange x sour d x mexican sativa. and it shows in this pheno which smell and taste pretty similar to tangie my friend grows which is cali orange x skunk 1 (mexican sativa x Colombian sativa x afghan indica) pretty similar genetics roots! Smell: Sweet tangerine 🍊
Taste: Just like tangerines 🍊
Medical Effects: Hybrid feeling effects felt both in body and mind. Stimulating mentally, relaxing in the body. Mild pain relief generally with amazing relief improving feeling in joints (reduced swelling or irritation in otherwise aching areas, loosened tension at joints)
Notes: After breaking up or grinding the sweet tangerine open jar/bud smells turns more sour tangerine with very subtle gas aroma. This one is scary strong! I am an all day regular smoker of the most potent buds I can find, and I never make it thru 1 bowl of this without long breaks after each hit. Starts off strong and creeps to EXTREME psychoactivity. Not for the faint of heart this one might not be best for "new smokers" 😎🔥🔥🔥 yielded 26.1 grams if id have taken clones this woulda been the keeper of the batch, but I got more to check out in future run :) and I got a cloner and veg chamber to start keepin the keepers now I know i like the strain!
#3 Lime Fuel pheno: Smell: Lime🍈 and gas ⛽
Taste: lime
Medical Effects: Cerebral uplift. Creeper. thought it was weakest on initial smoke but 10 minutes in it end up being strongest high of all 3. super wicked sativa, buzzy uplifting all similar to Cinderella 99 or strong jack herers this has almost a "scary high" first few times but once you get used to it or microdose, it is a super fun creative medicine. Helps my arthritis pains and gives me the clean up the house kind of high
Notes: Foxtailed, lowest yield of 3 sour 76's likely because its place directly under the light (perhaps didnt like too intense direct light) but is the most potent of the 3 as well. yielded 22.5 grams of dry
Likes
68
Share
@Hawkbo
Follow
Day 28 folks. I fuckin tripped liked a dumbass and broke a bunch of branches off the frosted apricots in the 4x8, kept an eye on it and it popped out some nanners so I had to take it down. Hoping I got it out im time before it pollinated anything but not positive. It's always somethin. Broke a head nug off the platinum silk too but havnt found any dix on her so that one might be aight. The leaf strip with the trellis is just no Bueno. Might try a different method next run where u strip everything below the first node on day 7 of flower and then a quick pluck down the line so I dont have to do matrix shit thru the nets like Neo dodgin bullets. Go use my codes for some floraflex shit 🤙

Likes
34
Share
@JohnnyBlaze
Follow
So growing this strain was very easy i first topped her and then tied down every branch that came too high and she maintained a really compact form measuring only 40 cm from stalk to top..
Bud to leaf ratio was amazing too it had really few leaves and has been really easy to wet trim..
The wet weight was around 360 grams wet trimmed and the total dry weight after 5 days of drying was around 80 grams wich of this quality its outstanding for just 11 weeks from seed to harvest!!
So in general i truly enjoying growing her looking at her wonderful colours in flower and will surely grow again..
Thanks again to everyone passing by and liking my diaries hope you have a great day and wish you all happy growing!!!