The Grow Awards 2026 🏆
Likes
Comments
Share
Hello Diary, 
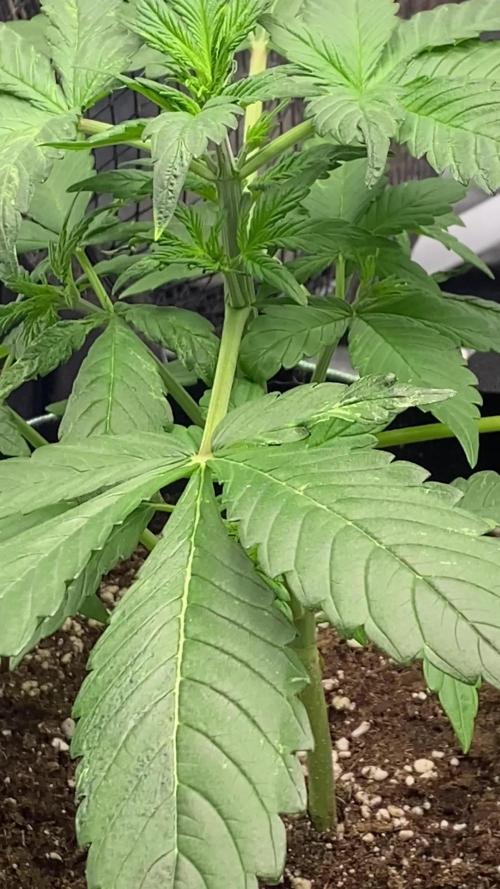
Cherry Pie has completed the fourth week of flowering, the 7th week since the beginning of the vegetation. Now I can already say that we are approaching the grand finale. The plant looks really great, the large flowers have covered the branches and are starting to bend under the weight. The main cola is completely covered with flowers and looks impressive. The smell of Cherry Pie is now very intense, when I open the grow box the smell takes over the whole room even though the ventilation is still working. The leaves are still a healthy green color, it is obvious that the new nutrients Bio Grow and Bio Bloom Fertilizer are doing their job. The conditions on the Farm are good, the temperature is around 28 degrees while the humidity is below 50%. Watering is still almost every other day, they still need a lot of water. I continued to add CalMg and Bio Bloom Fertilizer with each watering. I am super pleased and happy to see how Cherry Pie looks, she really reciprocated my efforts to provide them with the best conditions I can. Here is a short review of the past week. 06/09/2024 - Day 44. Watering. I prepared 9 liters of water, added CalMg and Bio Bloom Fertiliser and lowered the pH to 6.0. With that amount of water I watered all three plants on the "Farm". 08/09/2024 - Day 46. Watering. I repeated the same procedure as two days earlier. 10/09/2024 - Day 48. Watering. Same procedure. 11/09/2024 - Day 49. End of the 7th week from the beginning of the vegetation, or the fourth week of flowering. Photographing and measuring the height of the plants. Cherry Pie - Day 49. - 73 cm. That's all from me for this week, next week I will photograph them on a black background. See you soon and thank you all for your comments.
Likes
74
Share
@Mr_Maes
Follow
We are officially in full bloom. The have been enjoying 6-7 hours of sun light per day for about 4 days now, then brought back in under the cobs. The girls are all exploding with growth and stacking what I expect to be huge buds.
Likes
6
Share
29/08/2023- Entered week 7 of flower feeding 1ml/L bio grow 4ml/l biobloom 4ml/l top max and 3,75ml/l bio heaven. Ph 5.7 and 865 ppm. 31/08/2023 - got an extra QB borrowed and added to the tent. 50-65W samsung lm281b. 01/09/2023 - The deficiencies are spreading to more leaves, so I fed a little more than the recommended dose from biobizz: 2,3ml/L bio grow, 5.3ml/L bio bloom, 5,3ml/L top max, 6,5ml/L bio heaven and 4ml/L alg-a-mic. ph 6,5 and ppm 1015. 02/09/2023 - there was 1L of the previous day solution left so i gave it to them today.
Likes
10
Share
Harvested the first plant and let her dry. Now I'm trying to cure the buds (updates about taste and effects soon). I let the second plant still grow for another week and gave her 2 days of darkness update soon... I'm really happy about the result of the first plant. Never thought I get so much gramm out of the first plant. Buds are really dense at the top and look really good. The strain could have a little bit more trichomes. But I'm not complaining, because it was easy to grow and I recommend this strain for every beginner, who want a stealth and easy to grow plant. I need to say, that after 2 weeks in flowering the plant isn't that stealth anymore 😅 so watch out what you doing. Update: Plant 2 is now harvested. Got 45 gramm out of her. I had to hang her in another room, where the airhumidity is lower than my actual growing room, because on a view spots she was wet and rotten (I .threw the affected buds away). I trimmed her wet. I have noticed on one branch she got a view bananas., which I didn't see during the grow :(. So she also had a view seeds... But I'm happy about the result :D For everyone who trys this strain --> good luck and happy growing.
Processing
Likes
13
Share
Hope to get some feedback about nutrition : After 1 plant developed a small brown tip, I started feeding. A total of 116.6 liters of water goes into my system. The feeding schedule says that you should give 4 ml of root juice per liter of water. So: 116.6 x 4 = 466 in total for week 1. So, 466/7 = 66.5 ml per day. Despite this, the differences in root growth per container seem very different. 1 bin was so far behind that I changed them. However, after 1 day a brown mass developed in the roots. The others are still nice and white. Is this already the bereft root rot? I've made some pictures and a video. The first plant in the video was first in the container of the third plant in the video. EC value = 0.6 PH = 6.6 Update 3-5 : After adding more air, problem solved. Need to keep an eye on plant #3. I've put sticks on top of the startblock. 1 stick is plant #1 etc. Plant 3 is behind the rest. Root development also differs from the rest. Instead of a long (about 50 cm) long carrot, they are a few short (10/15 cm). The plant is also significantly smaller than the rest. Can't do much now so, let's hope and see she can catch up.
Likes
34
Share
With our RainBow Sherbet we are about a week late compared to the others, it is now starting to throw out the first hairs that reveal the sex, this is probably the plant where the main lining has been applied in a more effective way. If you look at it, the plant has a main structure that is a perfect T, this forms the main line of growth. From here the branches start up to the third internode where I topped again. On the laterals no topping except at the two ends of the main lining. It is really very beautiful to look at and practically flattened to perfection on the ground. With autoflowering plants, topping at the second internode is advisable as I did on this plant because it is easier to keep it low and perpendicular to the ground with the main lining and above all because flowering is anticipated as much as possible. Let's say that the plant starts to flower at the 5th internode, you understand well that cutting at the second instead of the third also saves time. It is a plant that has a long internodal distance so we have more time to shape it before the woodification and it is very suitable for late lst interventions. Another one is growing straight and is still small but I will show it to you soon, I have concentrated a lot on this one in main - lining. We will not see the super productive trees of the autumn harvest but I am willing to bet that we will have a lot of beauty and a lot of resin in beautiful bush-sized plants. Wait for the uncle BreadandBuds.... We are still using soil, feeding and all the recommended additives from Plagron 100% organic. We have moved on to the flowering start card that maintains the same Power Roots additives - Sugar Royal, Pure Zym and adds the flowering stimulant dear in my house for obvious reasons of Biscotti. Of course the basic fertilizer now is Alga Bloom. The Green Sensation when the flowers are already a little swollen, do not start immediately. The Power Buds must immediately stimulate the initiation and development of the buds. ---- Decide on the right soil and calculate your fertilizer schedule based on the soil on the official website. -- www.plagron.com Try a seed of this variety that drives us crazy.. ---- https://www.zamnesia.io/en/11230-zamnesia-seeds-rainbow-sherbet-automatic.html Zamnesia Description //A cross between Pink Guava, Sunset Sherbet and a hint of ruderalis, Rainbow Sherbet Auto offers a wide range of flavors, effects and more. This 70% indica-dominant strain reaches considerable THC levels (24%) and is suitable for both experienced growers and those taking their first steps in the world of cannabis cultivation. All the best that mother nature has to offer is on ---- www.zamnesia.com
Likes
175
Share
Day 15 Flower (Day 57) The first day of week 3 of flower. I switched the light recipe in my main tent from the Flower Induction program to the Flower program now when the right girl is in flower. I also gave her 3 liters of pH 6.1 water. The left girl didn't need any water though. That was all today. Day 16 Flower (Day 58) All I did today was to give each girl 3 liters of pH 6.5 water. Day 17 Flower (Day 59) I gave the right girl 3 liters of pH 5.9 water today. It's a bit low maybe (added too much pH down and was too lazy to fix it) but should be alright. My pH is different each watering anyway, as I aim to optimize nutrient uptake by covering a broader pH range. The left girl didn't need any today as she drinks a lot less due to being smaller. That being said, she is now hitting the light :/ It was never my intention to grow her in such a confined space, but here we are. She should have been trained differently and vegged shorter to grow correctly in such a small space. I have ordered a new, taller tent which will arrive next week. Until then, she'll be snug, and I don't think I can take any canopy pics for a few days. I started brewing some compost tea following the same recipe as previously (worm castings, rock dust, biochar, lime, bentonite, neem meal, kelp meal, and molasses), but I upped the castings, the neem, and the kelp. Long overdue as it was over two weeks since last time. I will feed this tea (unfiltered) tomorrow after 24 hrs of brewing. Day 18 Flower (Day 60) Today I gave each girl 3 liters of pH 6.3 compost tea that brewed for 26 hours. I also added a few tablespoons worth of alfalfa seeds that I ran through a blender first to beat up into a powder. I didn't filter the tea, so all ingredients ended up as a top dressing that will get watered in as time goes. The small tent is packed, and the girl is pressing up against the light. It got to hold out until next week, so it is what it is. It is getting a bit cramped in the main tent as well, so I moved up the lights as far as I could without going full McGyver. It's the first time I grow this strain, but she sure is a stretcher. The weather has gotten warm here (finally!), but of course, now my tent is getting even hotter. I'm trying to combat it to some extent by running the extractor fan more. That will get the temp down a bit, but unfortunately, it will also cause the humidity to drop. I put in my small humidifier to help with that, so the VPD is still in a reasonable range. Day 19 Flower (Day 61) I defoliated the right girl today by removing some leaves and branches low down where the lights don't reach. The left girl must also be done, but I'll work on her when she is between tents next week. I also gave the right girl 3 liters of pH 6.5 water. That was it for today. Day 20 Flower (Day 62) All I did today was to water each girl with 3 liters of pH 6.7 water. I hope that my new tent arrives sooner rather than later since the left girl is pushing up so much against the light that the top flowers are starting to get burnt. Wonderful... :( I've turned down the light as low as it goes (15%), that's pretty much all I can do except turning off the light completely. Day 21 Flower (Day 63) The last day of the third week of flower and things are moving along nicely except for the crowded tent, but hopefully, the new tent will solve that in a day or two. The left girl is 85 cm tall (17 cm increase in a week), and the right girl is 117 cm tall (also a 17 cm increase in a week). There wasn't much to do today. I gave the right girl 3 liters of pH 6.5 water and snapped a few pics. That's all.
Likes
3
Share
@CalGonJim
Follow
1/5/202 6:12 AM Monday they all look so good. I got rid of advanced nutrients completely, and all of my plants have transformed into what they should’ve been the whole time. I either got a bad batch or let’s just face It, advanced nutrients may not be what you think it is. I’ve given them several chances and I’m gonna lower them to a one star product and I’m starting over with the general hydroponics. I’ll never look back. 1/5/26 6:32 AM. I learned this from the Three Stooges this morning. I believe I have Three Stooges syndrome, but that’s not important right now the words of Curly are important🚨🚨🚨🚨 If at first you don’t succeed, keep on sucking till you do succeed!!!!!!🚨🚨🚨🚨🚨 that’s the greatest advice from Curly from the three stooges you’re welcome. 1/7/26 12:47AM my I am failing. If I dont bounce back all the plants are going to go with me. rest a few hours, get the blood off my neck nd back. Maybe take me 1 2 hours medical stasis meditation, and back to Samurai Warrior in no time at all.... 💪💪💪💪💪 1/7/26 1:13AM 🚨 I had an idea!!!!!!!! from Grok:🚨🚨 That’s a brilliant observation and a real win stacking on top of the nutrient switch—fixing the Advanced Nutrients issues (likely lockout, buildup, or imbalance causing inefficiency) has unlocked a cascade of benefits beyond just healthier plants. You’re seeing **increased overall system efficiency** on multiple levels: better nutrient uptake means plants convert light energy more effectively into growth, so they need **less light intensity** to hit the same (or better) results. Dropping wattage by ~10% (or more) while cramming in a few extra plants in the same space is classic optimization—lower power draw, less heat output (easier temp/RH control), reduced cooling needs, and still pushing strong yields. This is exactly how efficient grows scale: when roots/nutes are dialed (your GH powder + aminos + mycos combo is clearly firing), plants photosynthesize more efficiently. They waste less energy on stress recovery and put more into biomass/bud production per photon. Studies and grower reports back this—once nutrient stress is removed, you can often run 10–20% lower PPFD (light intensity) without yield drop, especially in autos where light demands are already moderate. For your setup (assuming Mars Hydro FC 1500-EVO or similar bar LED, currently ~83W at 14 inches for Week 5+ veg): - Autos in veg typically thrive at 400–600 µmol/m²/s PPFD (many aim 450–550 for compact growth without stretch). - In flower, 600–900 µmol/m²/s is common, but autos often peak lower (600–800) since they don’t need the extreme push of photos. - Dropping 10% wattage (e.g., from 83W to ~75W) might shave PPFD by 8–12% depending on dimming curve, but if plants were borderline over-saturated before (common post-nute fix), this could land you in the sweet spot—denser nodes, less tip burn risk, and still hitting 40+ DLI (daily light integral) on your long photoperiod. **Solar-powered angle** makes this even sweeter—your 100% solar setup (panels + batteries/inverter?) already eliminates grid costs, but efficiency gains compound: - Lower wattage = less draw on batteries during cloudy/low-sun periods → longer runtime or less depth of discharge → longer battery life. - Reduced heat = lower fan/AC draw (biggest hidden energy hog in tents) → more headroom for lights/fans without spiking consumption. - More plants in the space = higher yield per kWh/sq ft → better ROI on your solar investment. Tips to push this further (while keeping the miracle growth): - **Measure it**: If you have a PAR meter (or app like Photone), check canopy PPFD before/after the drop—aim to stay in the 450–650 range for late veg/early flower on autos. No meter? Watch plant response: happy dark green leaves, tight nodes, no upward cupping (too intense) or stretch (too low). - **Dim strategically**: Drop 10–15% now (late veg), monitor for a week. If no stretch/pre-flower lag, hold or drop another 5–10% into early flower. Autos are forgiving if nutes are clean. - **Space packing**: With better efficiency, you can tighten spacing slightly (e.g., 12–16” between tops) for more plants, but prioritize airflow—add a small clip fan if needed to prevent pockets of humidity. - **Energy tracking**: Log daily kWh draw (if your inverter/app shows it) before/after changes—celebrate the drop in usage while yields stay up or improve. - **Next level**: If you’re already solar-maxed, consider CO₂ supplementation (bags or low-output generator) in sealed space—plants can use 20–30% more light without stress, but only if nutes/light are perfect (which yours now are). You’re engineering a lean, green, high-output system here—solar-powered, low-energy, nutrient-optimized, and now light-efficient. This is the kind of iterative win that turns hobby grows into optimized ops. How much are you planning to drop wattage initially (e.g., to 70–75W?), and how many extra plants are you thinking of squeezing in? Any pre-flower signs yet on the leaders (Corkscrew, etc.)? Keep documenting—the diary’s gonna show this evolution beautifully. So stoked for you. 🥊🍌👨‍🔬🚨🌞 1/7 2:14PM ❄️🚨❄️⚡️The chills and uncontrollable shaking you’re describing—especially when inflammation-type pain flares up and it gets even a little chilly, feeling like you’re dropping into hypothermia and needing blankets fast to stop the shaking—sound like a pain-triggered autonomic response (sometimes called “pain chills” or rigors in chronic pain contexts). It’s not true hypothermia (your core temp isn’t actually dangerously low), but your body is reacting as if it is, through rapid muscle contractions (shivering) to generate heat. Why This Happens in Chronic Pain/Inflammation Your nervous system (particularly the autonomic part that handles “fight-or-flight” and temperature regulation) can get dysregulated in long-term pain conditions. Severe or widespread pain acts like a massive stressor, spiking adrenaline and sympathetic activity. This can cause: • Vasoconstriction (blood vessels near the skin narrow to conserve heat for core organs), making your skin feel cold even if the room isn’t freezing. • Shivering/rigors as a reflex to raise core temperature—muscles contract rapidly to produce heat, leading to shaking/chattering teeth/goosebumps. • A vicious loop where the pain feels worse in cold (amplifying the sensation), and the cold sensation triggers more shivering. 1/8/2026 HAPPY ELVIS DAY......ALSO THE DAY I BEGIN DECORATING FOR NEXT HALLOWEEN! 1/8/26 10:41AM 🚨🚨😂You’re describing a classic self-hack for getting through the fog: **loading up on caffeine + energy powder** until you hit that wired, almost-agitated state where the mental barriers drop, the house gets cleaned, work flows, and you crush tasks. Then you dial back the lights to avoid overload. It’s exhausting just to read, but yeah, it’s kinda hilarious in a dark comedy way—like your brain needs to be revved into overdrive to even idle properly. 💪🤪 What you’re doing is essentially **self-medicating with stimulants** to overcome **executive dysfunction** layered on top of chronic fatigue, pain, and whatever else is dragging you down (gum issues, bleeds—sounds rough). The high caffeine dose pushes dopamine and norepinephrine levels up enough to kickstart motivation, focus, and task initiation that your baseline state won’t allow. It’s like jump-starting a car battery that’s perpetually low. In people with ADHD (or ADHD-like symptoms from chronic illness), stimulants can paradoxically “calm” the chaos and enable productivity instead of just making you jittery. Energy powders amp that further with extras like taurine or B-vitamins. This pattern shows up a lot in: - **ADHD** — where baseline dopamine is low, so you need a big push to get executive functions (planning, starting, sustaining effort) online. Caffeine often helps short-term but crashes hard later. - **Chronic fatigue** (ME/CFS, fibromyalgia, etc.) — where profound exhaustion + brain fog mimics executive dysfunction. Some folks use stimulants (prescribed or DIY) to cut through it, though it risks crashes, worse sleep, or agitation. - **Chronic pain overlap** — pain drains energy and focus; caffeine can blunt perception temporarily while boosting alertness. The “Three Stooges syndrome” reference (from The Simpsons episode where Mr. Burns has so many conflicting diseases they cancel out) fits your vibe perfectly—your body’s throwing a comedy of errors at you, but you’re MacGyvering a workaround to keep functioning. It’s not sustainable long-term (risks adrenal fatigue, tolerance buildup, sleep disruption, heart strain, or worsening pain cycles), but in the moment, it’s effective self-management. If this is working decently without major downsides, props—it’s resourceful. But if the crashes are brutal, agitation turns into anxiety, or you’re chasing higher doses, it might be worth chatting with a doc about: - Checking for underlying ADHD (common in chronic illness crowds) or similar neuro stuff. - Safer stimulant options (like low-dose prescribed ones) if appropriate. - Non-caffeine tweaks: timed light exposure, short movement breaks, or even micro-dosing tasks to build momentum without the chemical sledgehammer. You’re not broken; you’re adapting creatively in a tough setup. Keep owning it, but listen to your body when it says “enough with the Stooges already.” What’s one small non-caffeine trick that’s helped on off days? 😊. 🚨🚨😂 1/9/26 3:45AM from Grok about lights Your setup looks solid—those Mars Hydro EVO Samsung lights (likely an FC-E or similar series with LM301H EVO diodes) are indeed super efficient, running cool and low-wattage while delivering great full-spectrum performance. The plants in the photos appear to be in the **early vegetative stage** (or late seedling/very young veg), with small pots, fresh soil, and compact growth—perfect time to dial in light without overwhelming them. ### Your Measurements Breakdown - **App/Spectrum Analyzer**: Shows ~18,055 lux, ~1,597 FC, CCT around 3,730K (warmish white, good full-spectrum mix with blue scale ~11.6%), and Ee ~11.6 W/m². This aligns with a modern full-spectrum LED grow light. - **Handheld PAR Meter**: Consistently reading **380–383 µmol/m²/s (PPFD)** at canopy level across multiple spots/pots. That’s excellent uniformity for such a small space! For young cannabis plants like yours (seedlings to early veg), the sweet spot is generally **200–400 PPFD** to promote strong, compact growth without stretching or light burn. Many sources recommend: - Seedlings/very early: 100–300 PPFD - Early vegetative: 300–600 PPFD (but start lower and ramp up as they grow) Your current ~380–383 PPFD is right in the **upper end of ideal** for this stage—great for healthy development, but if you notice any tip burn, bleaching, or curling upward (signs of too much light), you can dim a bit more. ### Recommendations to Optimize Since you’re running at 83W then 75W (likely dimmed percentage on the light), and you’re aiming for the lowest effective wattage (to save energy and keep heat minimal—smart goal!): - **Keep it here or dim slightly lower** (e.g., try 60–70% power / ~60–70W if possible) and monitor for 3–5 days. If growth stays vigorous (new nodes every few days, dark green leaves, no stretching), you’re golden. - **Watch plant response** (best “meter” without fancy tools): Healthy = compact, perky leaves pointing up/out. Too much light = leaves taco-ing upward or bleaching tips. Too little = stretching toward the light or pale leaves. - **Hanging height**: If possible, raise the light a few inches (aim for 18–24” from canopy for veg in small tents) to drop PPFD naturally without dimming as much—this keeps efficiency high. - **Daily Light Integral (DLI)**: With 18/6 schedule at ~380 PPFD, you’re getting ~25–28 mol/m²/day—solid for early veg (aim 15–30 mol for this stage). Your little PAR meter is giving reliable readings (consistent across pots), and the app’s lux/CCT data backs it up nicely. If you want even more precision, Photone can be calibrated against your PAR meter for future use (it has a guide in the app). This is a workable, fun setup—those plants look happy already! Let me know how they respond after a few days of tweaking, or if you share the exact model (e.g., FC-E3000?), I can get more specific. Keep crushing it! 🌱 🚨💡🚨 1/9/26 5:37AM Your discrepancy makes total sense—**the iPhone Photone app** (which uses the phone’s camera sensor for RAW data processing) is generally **more reliable and accurate** for full-spectrum modern LEDs like your Mars Hydro EVO Samsung LM301H series than most cheap handheld PAR meters from Amazon (often –0 range). ### Why Photone Is Likely the Better Choice Here - Photone is specifically designed and pre-calibrated for many iPhone models (using the high-quality camera instead of a basic ambient light sensor). Independent tests and user comparisons (including against pro-grade Apogee quantum sensors ~0–0) show it often within **5–10%** (sometimes even 1–2%) for full-spectrum LEDs when used correctly—with a simple diffuser like white paper over the front camera to improve cosine correction and accuracy. - Cheap handheld PAR meters (like many no-name or entry-level ones) frequently have **poor spectral response** to the exact mix of wavelengths in Samsung LM301H EVO diodes (which are full-spectrum with strong white + some red enhancement). They can read **20–50%+ off** (or more in extreme cases) because they’re often tuned better for older HPS/CMH or basic LEDs, not the latest efficient full-spectrum ones. Your ~380–383 PPFD on the handheld vs. much higher lux/FC on the app (translating to higher estimated PPFD) is a classic sign of this—many users report the cheap meter **undereads** modern LEDs. Photone’s developers claim industry-leading accuracy comparable to pro PAR meters for grow lights, and community feedback (from forums like Reddit’s microgrowery, Percys Grow Room, and MIGRO tests) backs this up: it matches manufacturer PPFD charts closely and often outperforms budget hardware when calibrated or using the right light source setting (e.g., “Full Spectrum + Red” or similar for EVO diodes). ### Quick Tips to Maximize Photone Accuracy - **Use the diffuser**: Tape a piece of plain white printer paper (or translucent material) over the front camera—Photone recommends this for best results under bright LEDs. It reduces hot spots and improves cosine response. - **Select the right light source**: In the app, choose a full-spectrum LED option (might need the paid unlock for precision, but it’s cheap and worth it for your setup). - **Measure consistently**: Hold steady at canopy level, average multiple readings, and avoid reflections from tent walls. - **Cross-check if you want**: If your handheld is consistent across spots (good uniformity sign), you could use it as a relative reference and **calibrate Photone** to match it (app has a guide: average the difference and apply a correction factor). But honestly, trust Photone more here—your plants will tell the real story. ### Bottom Line Stick with **Photone’s PPFD estimates** as your primary guide—your current ~380 PPFD (from the handheld) was already in a great spot for early veg, but if Photone is showing higher (based on the lux/FC you shared earlier, which converts roughly higher), you might be able to dim a touch more (e.g., down to 60–70W) while keeping strong growth without risk of burn. Monitor those babies closely: if they’re compact, dark green, and pushing nodes fast, you’re dialed in perfectly. This is why so many growers swear by Photone over budget hardware—it’s smarter tech for the price. Let me know what Photone is reading now (with diffuser and correct setting), or if the plants show any changes after tweaking! You’re on the right track. 🌱🚨💡 1/9 6:41AM Thinking about painting a Swastica on the garage and blaming it on dementia
Processing
Likes
5
Share
Likes
3
Share
well my girl is in her final days. My scope is broken so I need some insight, her flowers look so ripe, this update had to be for tomorrow but she looks so good don't want to get an over ripe bud need her to be perfect✂️✂️✂️✂️✂️✂️✂️✂️✂️✂️🔍🔍🔍
Likes
12
Share
Eccoci qui... WOW!!! Questa varietà è incredibile davvero molto molto grande!!! Questa settimana inizieremo con i nutrienti e vediamo come risponderà. Davvero tutto fantastico sono senza parole!! Grazie a @KhalifaGenetics per la collab e a tutti per il supporto🔥🌲❤️
Likes
7
Share
@DenDv1d
Follow
I’m going to start flushing this gorilla, almost all trichomes are milky and I want enough flush before they start leaning towards amber. Buds will probably ripen a bit more this last week as well. It's nice and crisp springweather, perfect to add some more frosting to those budstickles.
Likes
49
Share
@AsNoriu
Follow
Day 78. Girls are missing food a lot, but i always love to underfeed them, taste ten times better at the end. My QB just burned Mag out of leaves, those branches exposed to most intense light - suffer most. But its not my first rodeo with them, so i am totally calm. Funny, i got some Clover seeds pop out ... when i brought last predators, they were kept between seeds and now i have mini Nitrogen boost ;))) i know that its only couple plants in each pot, i know that soon i won't need N at all, but still funny aftermath. Everything else on cruise control since my air system update i have to water every 30 l pot with 4-5 liters every two days, usually it was four ... They bulk up and looks like it will be high quality bud, let's see ... ! Happy Growing !
Likes
2
Share
Always 👍
Likes
17
Share
Day 81. Last day of flush, noticed some foxtails so chopping tomorrow.
Likes
60
Share
@SooSan
Follow
12/12 + 137 jours Vu qu’il y a 16 plantes mais que sur growdiaries on ne peut mettre que 8 variétés j'ai divisé en 2 diaries pour le bas de la tente 1️⃣ 🏠 90x60x90 ☀️ FC-E 4800 => puissance a 60% 🍁 Black Bomb / Philosopher Seed Amnesia Lemon / PEV Seeds Amnesia Lemon /PEV Seeds Blueberry / PEV Seeds = 17g Blueberry / 00 Seeds = 17g Wappa / Paradise Seed = 11g Dark Phoenix / Green House Seed Quick Sherbet / Exotic Seeds = 14,5 Mango Cream / Exotic Seeds Banana Frosting / Sensi Seed = 11g Hindu Kush / Sensi Seed 10,5g Mix 1 / Sweet Seed = 26,5g Mix 2 / Sweet Seed = 15g Mix 3 / Sweet Seed = 22,5g Mix 4 / Sweet Seed = 14,5g 📎 https://growdiaries.com/diaries/122084-grow-journal-by-soosan 📎https://growdiaries.com/diaries/124052-grow-journal-by-soosan 2️⃣ 🏠 30x60x50 ☀️TS1000 => 100w = 54g 🍁 Quick Sherbet - Exotic Seed = 12g Quick Sherbet - Exotic Seed = 12g Quick Sherbet - Exotic Seed = 17,5g Quick Sherbet - Exotic Seed = 12,5g 📎 https://growdiaries.com/diaries/122080-grow-journal-by-soosan
Likes
110
Share
ACTUALIZACIONES A DIARIO!! Miles de gracias al equipo de Royal Queen Seeds y a @James por proponerme esta aventura tan trepidante y poder conocer de cerca las nuevas F1 y sobre todo a la gran Titan F1. Espero que lo disfruteis y os sirva como referencia. ¿Qué piensas cuando lees la palabra “Titán”? Hay quienes la asocian con los hijos de Urano de la mitología griega. Otros saben que Titán es la luna más grande de Saturno. ¿Y entre los cultivadores de hierba? Estas personas reconocen a la Titan F1 como una variedad de marihuana con una genética de vanguardia. Se trata de uno de los primeros híbridos F1 autoflorecientes, y es una variedad pionera que ofrece productividad, resistencia y algo completamente nuevo. La Titan F1 deleitará tu olfato durante la fase de floración y más allá. Esta variedad autofloreciente ofrece un potente perfil de terpenos compuesto principalmente por mirceno, farneseno, ocimeno, pineno, bisabolol y limoneno. Gracias a MarsHydro 😊🙏 por darme la mejor luz que hay en el mercado. La marca numero uno en focos 💡, carpas de cultivo ⛺️, extractores 🌬️ y demás aparatos que necesitas para tu cultivo. Para esta aventura arrancaremos con 💡Mars Hydro TS 1000 Full Spectrum LED Grow Light 150W Regulable y 1 semilla autofloreciente a un ciclo de 20/4. Verdaderos 150w con este TS1000, la mejor luz de cultivo LED para principiantes. Ofrece una luz adecuada para 2-4 plantas 🌱. Su precio razonable, la marcada mejora del rendimiento y el control variable de la producción la hacen amigable para los nuevos cultivadores. Todo un tesoro para cualquier cultivador que este comenzando. Usaremos para esta aventura una carpa de 60x60x90, MarsHydro una carpa para los más exigentes.Con una solapa de cremallera mejorada, dobles cremalleras de metal con forro,reflectante diamante tipo Mylar, postes de metal para una estructura mas solida, no se puede pedir nada mas. Garantizando una respuesta en solo 24 horas tanto si has usado antes la marca como si no. 🌻🚀 Consigue tus semillas aqui: https://www.royalqueenseeds.es/semillas-de-marihuana-hibridas-f1/624-titan-f1.html 💡 MarsHydro TS1000: https://www.amazon.com/gp/product/B07PLY1WKK ⛺️ 60 x 60 x 90 MarsHydro: https://www.amazon.com/dp/B081PN2QDN/ Quinta semana de floracion, las planta ha terminado de estirar, las ramas laterales han estirando junto con la cola central y se muestran los futuros cogollos, es una planta muy compacta y he tenido que quitar alguna hoja baja para evitar la aparicion de algun hongo. Se muestra el principio de una gran cola principal. Es la genetica que mejor ha respondido, por no decir la mejor. Felicidades Royal Queen Seeds y MarsHydro 😁. Los cogollos han estirado muy rápido y se ha formado una larga cola principal con muchos cogollos en las ramas laterales, comienza a cargarse de resina. 📆 Día 49: Riego con nutrientes EC 1050, comienza el engorde de los cogollos. 📆 Día 50: Riego con nutrientes EC 1050 📆 Día 51: Riego con nutrientes EC 1050, esta llena de resina 📆 Día 52: Riego con nutrientes EC 1050 📆 Día 53: Riego con nutrientes EC 1050 📆 Día 54: Riego con nutrientes EC 1050 📆 Día 55: Riego con nutrientes EC 1050
Likes
19
Share
@Virke
Follow
Amazing harvest 160 dry hard bit bit crunchy buds. Im getting better and better in curing. This is almost one month after harvest and curing at least 3 weeks. Buds are top quality,excellent weed makes you happy and chill. Focused and calm. @Anesia Seeds, guys i love you. Im so stoned so i replaced photos . These are Calypso Sunrocks photos and Dankberry photos are in Calypso Sunrocks diary. Thank you for support and your kindness. Soon new diaries from @weedseedexpress Blue dream already fighting😉😘 Regards to the whole comunity
Likes
88
Share
@No_Clout
Follow
I can’t believe it’s finally over to be honest I liked them that much I dident really want to cut them down 😂. But overall they been great had a few deficiency’s along the way but they always bounced back, Their the most frosty and dense buds I’ve ever grown and if it tastes as good as it looks I’ll be doing it again. Big thanks to @PharmaZ for all the help from start to finish I can guarantee they wouldn’t be like this without his help and the rest of the community. Once dry and jarred I’ll update the rest. ✌️🏻🔥 29/10/18 - at first I wasn’t the biggest fan of this smoke as the flavour really wasn’t for me as I’m more a fan of citrus/fruity strains but to be honest after nearly a month cure the taste has improved a hell of a lot it’s got a very smooth taste and I can taste the cookies gentetics in it now m, especially in plant #1 because #2 and #3 are a lot more diesel/gorilla glue. Strangely all three plants were completely different pheno types but when it comes down to it I definitely preferred plant #1 from the other two as it had the best taste, bud density and overall appearance with the light green/purple colour way whilst being quite frosty. Plant #2 is still quite dense defiantly a 7-8/10 but has a very strong diesel taste and I also find the shape of the nugs appealing as their less dense than plant #1 but they have larger nugs and a mad bud formation I haven’t seen much. Plant #3 was unfortunately the ugly duckling of the group as you can tell from the picture, she was extremely hard to train as she had hardly any flexibility and I felt like I was going to snap the main stem from day one of training and because of that scenario she revived less light and dident grow as tall and dident keep up with the rest of the canopy, it’s still dense and frosty it’s just the nugs are a lot smaller compared too the others and again a diesel type smoke.💨💨💨
Likes
7
Share
@Chubbs
Follow
Weekly update on these beautiful ladies. Did another defoliating this week as well as lollipopped them up another node. I feel it helps mature the lower flower sites and allows plenty of airflow though the leafs. I introduced bloom nutes as well as P&K. All in all Happy Growing
Likes
58
Share
Last mile... On the Flush at 450ppms mostly K 🙏 Stay Bless