The Grow Awards 2026 🏆 


Likes
Comments
Share
@38PLAN
Follow
Le piante iniziano a fiorire, le più piccole hanno 3 settimane mentre le più grandi 5
Non sono un novellino é solo il primo raccolto di cui faccio il diario

Likes
18
Share
@Canna96
Follow
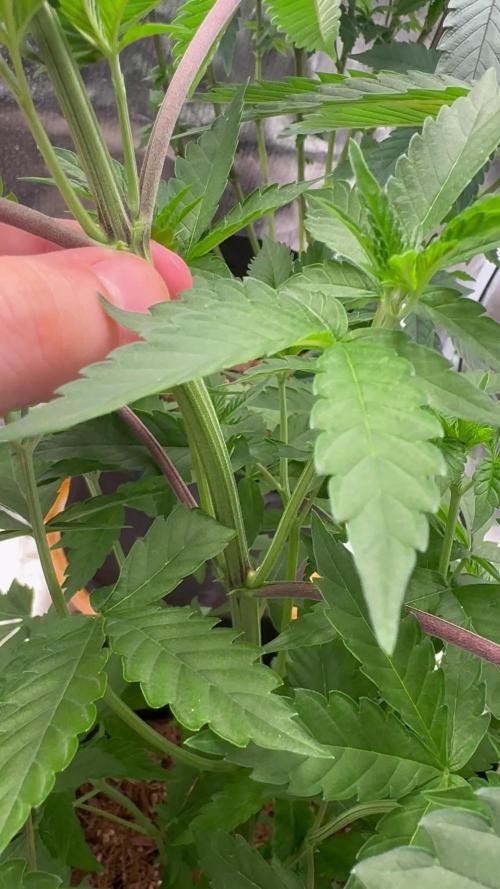
Hey now, hope everyone has been well. Super excited football season is finally here so things are about to get busy. I went out of town for 4 days and the plants struggled a little bit with the PH getting slightly too high before I returned. I also came back to see that some type of insect was munching away on the lower leaves of this little Sundae Driver, so I sprayed the plant and coco with neem oil, but hopefully they didn't do much damage before I can get them under control I have never experienced insect problems indoors, likely because I grow in Coco and not Soil. However, I left a 5 gallon airpot full of coco from a previous grow outside for a couple weeks by mistake, and pretty sure bugs got into. I won't make that rookie mistake again. Anyways the rest of the ladies are looking pretty good, They are almost getting what I consider a full dose of nutrients, even though it half of the manufacturers recommended dosage. I am feeding all Gen Hydro cal mag, Armor Si, and maxi grow. I also add some food grade hydrogen peroxide to keep the reservoir fresh for around 10 days or so but I clean it once a week. Not sure why GD website doesn't allow me to enter GHE under the old or new name. I did get all the ladies transplanted from solo cups to airpots on day 16, and it took 24 hours or so for them to recover from the transplant and start growing again. I am running 3 of the 3.4 gallon, and 2 of the 5.4 gallon just because that is what I had available. I hopefully top them all sometime this week for the first time, as soon as the roots are a little stronger. I let them grow to 7 nodes or so before I top them and make sure they're growing fast. Hopefully I can still mainline the Sundae Driver, she looks healthy other than those two leaves chomped off.
All the plants are on their 5th nodes, except for the Green Crack 2.0 which is only on her 4th node. We got another heat wave coming through my region that I am not too excited about but at least its earlly in the game and I don't need to crank this light up yet. I am only running it at 30% and its putting off plenty to keep these ladies happy. Hoping to get a topping done this week, then another one next week, and be ready to flip to flower by week 7 or so. Thanks for stopping by, Stay Safe and Blaze On!!! 💪
Website: https://medicgrow.com/
https://growdiaries.com/grower/medicgrowled


Likes
91
Share
@Greenwolvesfarmer
Follow
40 días de floración y lucen así !
Tremendamente bellas ! #lemonking @evaseeds
Ellas están estimuladas y protegidas gracias al poderoso #quitosano de @trichomemania ! Libre de hongos y patógenos , sin stress...
Además reciben 12 horas de iluminación
💡🏆480w regulables 💯 #samsungquantumboards 3500k
#epistar UV / 660 nm / iR !
Tremendo mix de luces 💥🤘🏼 lo mejor del mercado ! ...gracias madre tierra y padre sol por privilegiarnos de vivir en este bello paraiso ...
.
.
.
.
.
#seguimientomkled #cannabisfamily
#greenwolvesfarmer #weedgrower #cultivoindoor #cultivointerior #indoorgarden #ledchile #cultivoledchile #chilecultivoled #cultivamedicina #medicinanatural #chilecultiva #nomaspresosporplantar #growdiaries #growdiary #cannabisgrowers #quantumboard #chileautocultivo #trichomemania
#480w #quantumboards #comunidadcannabica #cannabiscomunity #evaseeds #mkledchile #ledpanel #mkled

Likes
30
Share
@Silverback_Guerilla
Follow
10/23:
Fed today with One, sweet & sticky, signal, beastie bloomz, silica, and a little Ca/Mg
10/27:
Fed today with one, signal, sweet & sticky, silica, beastie bloomz, kangaroots, and humic acid.
Lowered the lights to no more than a foot from any cola..most are 7-9" away.


Likes
11
Share
@Nedyah420
Follow
This is my fisrt autoflower grow with no LST and only mild defoliation..

Likes
5
Share
@GrowLegend
Follow
Bien aquí esta el día esperado la cosecha, es mi primer cultivo y considero que lo logre. En muchos medios de lectura y en especial en vídeos mencionan que no puedes esperar mucho es tu primer cultivo. En mi caso es falso y lo demuestro ya que si aprendes, investigas por cuenta y lees lo suficiente, obtendrás un alto porcentaje de que los resultados se den. Muy contento con mi plantas y sus tonos morados. Puntos a mejorar tener una carpa de cultivo y por su puesto un extractor de humedad para que baje la humedad preferiblemente a 45 grados
Vendrán mejores contenidos y cosechas mas abundantes. Gracias a todos por su vistas y comentarios. Saludos y bendiciones!

Likes
2
Share
@CeeJayy420
Follow
The plant was harvested and trimmed, yielding a total of 112 grams. Buds are notably dense, pleasantly heavy, and visually striking. Their surface exhibits a green velvet-like shimmer, which may indicate optimal trichome density and light-reflective resin coverage. This supports the hypothesis that late-stage environmental conditions—such as controlled humidity and light spectrum—contributed positively to resin production and bud structure. Further analysis during curing will help validate terpene retention and overall potency. Initial results suggest a successful harvest.
Likes
3
Share
@OldskoolHed
Follow
Good week. Just cruising along in flower. On full bloom nutrients and starting to stack up some pom poms.🤙
Likes
10
Share
@Tetiana_Riz
Follow
Hello everyone. The last week before harvest. . first time i've had a girl like this grow up. It's interesting, quite strong and tasty.
Likes
23
Share
@Piorkeed
Follow
Week 10 (18/05 - 24/05)
D64: -
D65: -
D66: -
D67: -
D68: added 0.5 ml of Calmag, 1.5 ml of Bio-grow, 3 ml of Bio-bloom and 1ml of Top-Max to 1 liter of tap water @ pH 6.4
D69: -
D70: -
Likes
8
Share
@legolas40
Follow
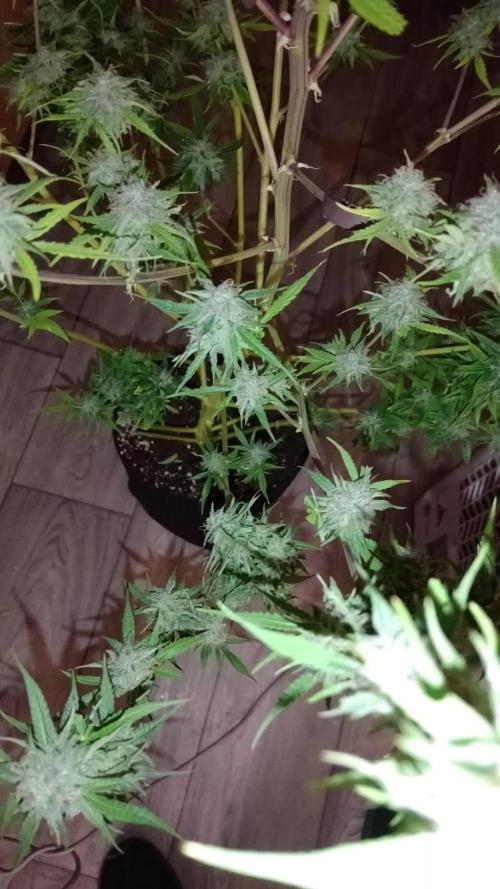
The plants are maturing extremly fast, the amber thricomes are apearing so fast and the flushing started to prevent to get much CBN. The BIG DAY is soon!

Likes
7
Share
@nectarinepasta
Follow
Flowering continues, not seeing trichomes darken or get cloudy yet. Bought a small dehumidifier and fit it inside the tent which helped manage the RH. Started removing some fan leaves every other day to give maximum light exposure to the buds. Also changed the watering schedule from to every other day instead of every two days.

Likes
31
Share
@Pedrojuan
Follow
En esta semana se ven que crecen mucho, se empiezan a ver los tricomas y el desarrollo de los cogollos. Las temperaturas están un poco altas y todavía faltan al menos 2 semanas más… tuve que poner deshumidificadorpara bajar la humedad que estaba sobre el 70%, eso hace que consuma más agua de lo normal. Esperemos todo siga bien.

Likes
79
Share
@DudeGrowsWeed
Follow
Today is 3 weeks since Mexican Airlines broke out of the soil to become a seedling. She has really done a lot of cool growth in the time👍. I'm going to try changing up my training methods with this girl. First, I'm only doing one HST bend near the base of the stem (did this on Tuesday). Next, I'm going to try FIM'ing this time, instead of topping. GWE seemed to recommend a FIM pinch one a FIM cut, so that's what I did on Thursday. Last, I'm going to try LST again. If everything goes according to my evil plans, she should be my largest yield to date. 💪
Mexican Airlines is front-center in the group pics.
Likes
7
Share
@Mokorelsare1
Follow
Hello this is week 8, week 4 of flower
4-5-6 weeks of flower are the most important because it's bulking phase, i have already see trichomes on sugar leaves are forming, which is a good sign! Wish me luck.
Day 51 i did a small defoliation to open up the canopy for better light penetration and airflow
Day 52 slightly lime green leaves on the top can be caused by low nitrogen in my water soo i decided to ise more Pro Organic Bloom nutrient, or it may can be just because of flowering stage, who knows😁
Day 55 plant is still yellow at the top, i don't know why, it can be either low PH in roots or nutrient deficiency, but PH is 6.8 at roots, so it must be PK lockout, i will stop using full disagree of Big Bud, for a few waterings. It also can be from genetics because i have seen many Wedding Cheesecake with the same issue, so i don't worry too much.
Likes
10
Share
@barlobruz
Follow
6/29/2021
- New mains for quadlining growing out nicely since topping.
- Watered with un-PH'd de-chlorinated tap water.
- Foliar fed with DIY kelp extract.
- She's jumping out the gym, very excited.
- It's been 5 weeks of alternating DIY nutrient teas (coconut water + kelp extract + neem & karanja extract + water) and un-PH'd Toronto tap water, and I've seen no signs of deficiencies or lockouts.
- She's taking well to the various DIY foliar sprays as well, no burning.
7/1/2021
- I think one of my bottle sprayers is infected with butyric acid, 'cause it stinks in here, loll.
- SHE WANTS TO GROOOWWW!
7/4/2021
- Growth a week after topping is strong. Hoping the auxins in the kelp foliar, and nutrients in coconut water are responsible.
- I barely need to train her right now, it's as if she wanted to be topped. Besides some periodic light bending, she seems to be leveling out her branches herself.

Likes
46
Share
@420DeepGrow
Follow
Increíble resultado con esta genética de Anesia Seeds.
La combinación del FC6500 de Mars Hydro con los nutrientes XpertNutrients ha dado un resultado impresionante.
El aroma es una mezcla dulce y afrutada con notas terrosas, y los cogollos están bien compactos. En cuanto al efecto, es potente y relajante, ideal para las noches
