The Grow Awards 2026 🏆 


Likes
Comments
Share
@PatriciaGant
Follow
all nutrients are in ger section, if not other mentiond all by manufactures instrucktions. awesome plant she desent mind all the stress to mutch still grows fast and steady.

Likes
3
Share
@macrocefalo
Follow
Now that the plant has started flowering, I defoliated the excess leaf, focusing on apical buds. But unfortunately after defoliation and pressing the lst unfortunately plant b5 breaks the stem in its main apical bud. I was very sad but in life we have to learn from mistakes and stop complaining since the other 4 plants show good growth and vigor we will move on trying to minimize the errors.
Likes
18
Share
@Grower_Of_Persia
Follow
week intel:
we getting close to end of ripening , this week i raised drought , Nitrogen and E.C stress by feeding them 2 times per week and raised e.c to 3 to cause real stress that will help increase terpenes production
stresses :
Nitrogen deficiency Stress by removing the fertilizers that has N in them
Drought stress via removing one meal in week
high E.C stress around 1.7 and the other feeding day 3.0 , 2 times a week
feeding:
no more Nitrogen
i feed them 2 times this week with this order :
day 1 : i feed them high with Bio-Bizz Top-Max + Feeding Booster about 850 ppm - 1.7 e.c to cause a medium e.c stress.
day 3 : no more feeding this day
day 5 : i feed them very high dose of Bio-Bizz Top-Max + Feeding Booster around 1500 ppm - 3 e.c to cause high e.c stress
guide of the week :
be patient in the last weeks, never hurry for harvest because its the time of ripening in last 2 weeks you should let plants to do their work
last weeks of ripening is the time to break the limits we should cause 3 stresses as i said above Nitrogen stress , Drought Stress , E.C Stress

Likes
26
Share
@Hawkbo
Follow
They're settling in to the pots nicely and the flower tent is about to be cleared out. Need to do some work around the tent before I can move them should be a week or 2.
Likes
43
Share
@deFharo
Follow
Bienvenidos cultivadores de marihuana clandestinos, y también, a los que tienen la fortuna de no serlo!🖐️👨🌾
16 semanas de vida para esta planta hija de una Reina, nacida en casa y ahora cultivada al calor del hogar, siete semanas en horario de floración 12/12h y todavía tiene mucho que decir, su madre tuvo un periodo de 11 semanas de floración y si esta princesa sigue sus pasos los cogollos vana a ser majestuosos... a jugar
He estado fuera unos días y al llegar todas las plantas gozaban de buena salud, las flores crecen y esta planta apesta, mis dedos se quedan pegados a las flores si las toco!
Hoy al llegar he preparado una comilona para todas mis plantas, ahora, todos reunidos con música de fondo, hemos bebido felices y comido con placer y en abundancia... que siga el juego!
Hasta la próxima...
SALUDOS Y SALUD A TODOS!!
================================
Semilla obtenida el año pasado de la planta original, probablemente un retro cruce S1, un paso más hacia la auto suficiencia total en cultivos de marihuana! Mira el diario original: https://growdiaries.com/diaries/146971-grow-journal-by-defharo
Info de la cepa original: https://en.seedfinder.eu/strain-info/Queen_Mother/Delicatessen/
Floración: 8 semanas
Queen Mother es una cepa sativa estabilizada, gracias al minucioso y sistemático trabajo de selección y mantenimiento de la cepa, que el breeder Mario Bellandi, afincado en España desde hace más de 30 años, desarrolla sin descanso y con la máxima coherencia.
El cruce inicial de esta cepa, y que hoy permanece intacto, surgió a finales de los 90 entre una sativa desconocida, cultivada en los altos de Tarragona (España) por la misma persona desde los años 60, unas semillas de la isla de Reunión y semillas de un cruce estabilizado de dos landrace congoleñas...
==============
Likes
25
Share
@Kakui
Follow
Flower4, día 4 desde que comenzó la floración, se regaron con 1.8 EC y pH 6.2, con los nutrientes puestos en la descripción, no me tienen muy convencido pero creo que van mejorando.
Flower9, defoliación y riego, está vez se agregó al riego Bud Candy, el cual seguirá siendo usado en toda la fase de floración.
Flower13, riego 2.0 EC y pH 6.2, se agregó Voodoo Juice, Tarantula y Piranha al agua de riego.


Likes
10
Share
@barlobruz
Follow
08/18/2021
- NOTICING TRICHOMES!!!
- Not much else to note, literally looking for things to do to her at this point, maybe a light defoliation.
08/20/2021
- Watered with AAEWCIFT

Likes
7
Share
@Lucyfer
Follow
Whats up?
sorry for no post last week, I had dengue. feeling much better now but plants sure suffered a bit trought the week, ran out from nutrients and did not have the strength to care for them. Gladly, I had some assistance with my own health issues, so the little energy i had i spent on training the girls and watering them, as you can see there was a deficiency that led to some bleaching and discoloration of new growth and old, water levels started to change and it stabilized in 145 PPM and 6.1 pH.
I was worried about not giving them anything to eat, but when i spoke to Howweedgrow about it, he recommended me to only water them without nutes, although i think he did not read my message properly as he answered with a "its better to water them than not at all", when my original question was in regards of making some food without FloraMicro (the ONE nutrient i ran out of), luckily i was able to get some and in 5 days time it arrived.
Firls looked like this for the week
Lvls in bucket where as follows:
EC 283 uS/cm
TDS: 141 ppm
pH 6.02
Temps 23.3 C 73.9 F


Likes
3
Share
@Budz420
Follow
They loving life so far, bushy and short, topped her and removed some of the big fan leaves.
Love this strain👌🏼, didn't face any issues so far since it's my first grow.
Last week before sending them to flowering, trying to give them some shape, making sure all leaves getting enough light, looking so healthy.


Likes
4
Share
@Growstopher
Follow
Fastbuds seeds
Gorilla zkittles auto
Only using spring water for first week and spraying with foop mist. Going to use foop nutrients with Humboldts secret cal/mag and nectar for the gods ph up and down!
Planted right into substrate. I’m using Mother Earth coco coir/perlite mix with hydroton at bottom of pot

Likes
28
Share
@TeamQuality420
Follow
As you can see the white powdery mold is starting to lose my thoughts were getting a HEPA filter into the room .
2) because this mold mostly lives on leaves what I did is I locked out the soil. This was a technique passed on by a legacy grower in my area.The way it was explained is by making the pH higher than seven the plant would no longer be able to receive nutrients through the soil and it would have to eat whatever nutrients are left in the leaves. This woukd change the pH of the leaves aswell to help kill the mold .
Lastly I greatly increased my wind movement so that air would be continuously moving no matter what it was a little bit hard on the leave tips that burnt a little bit but at this point windburn on leaves is pretty irrelevant when you're looking at the whole picture.
I don't think this would have worked with any other genetics but exotic seeds mostly because from what I've seen with them is a very high resistance to mold and I think that played a huge part of the process.
Also having diablo nutrients monster wash, without that I do not think I would have won this battle

Likes
33
Share
@Growbody
Follow
Day 103: It was a great pleasure growing the Kitsune Kush Automatic from Zamnesia Seeds. Only the main stem was bent and very few leaves were removed. The amount of work, if you can even call it work, is very minimal.
Tag 103: Es war ein großes Vergnügen, die Kitsune Kush Automatic von Zamnesia Seeds anzubauen. Nur der Hauptstamm wurde gebogen und nur sehr wenige Blätter entfernt. Der Arbeitsaufwand, wenn man überhaupt von Arbeit sprechen kann, ist hier sehr gering.
Likes
12
Share
@Xpie77
Follow
GrowDiary Verslag: The Bird × Red Wine – Feminized F1 Pheno-Hunt (Week 6 Bloei)
Kweker: Xpie77
Datum: 11 januari 2026
Strain: The Bird (Sensi Seeds) × Red Wine (Seeds Genetics) – zelfgemaakte feminized F1-zaadjes
Aantal planten: 16 stuks
Huidige fase: Week 6 bloei
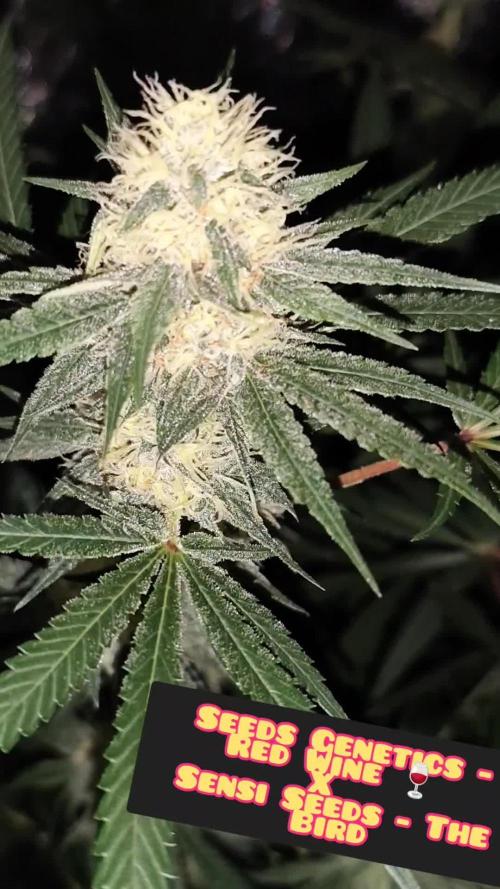
Foto-update (Week 6)
Hier een close-up van één van de buds in week 6 – kijk die insane trichome-laag! De hele top is bedekt met een dikke laag frost, alles glinstert onder het licht. Nog steeds voornamelijk groen, maar de pistillen worden dikker en donkerder, en er zit al een lichte paarse gloed in de calyxen bij sommige pheno’s. De echte paarse/blackout kleuren laten nog even op zich wachten, maar de resin-productie is nu al next level.
De bud ziet er super gezond en harsachtig uit – precies wat je wilt zien in week 6 van een indica-dominante kruising zoals deze.
Stand van zaken in Week 6
De 16 planten zijn in volle ontwikkeling en de bloei versnelt echt:
Bud-ontwikkeling: Buds zwellen flink op, calyxen worden groter en dikker. De toppen beginnen compact te worden.
Trichome-productie: Mega frost overal! Sugar leaves en buds zitten onder de hars – veel pheno’s lijken nu al harvest-ready qua trichomes (maar nog niet qua kleur/rijpheid).
Kleur: Nog grotendeels groen, met lichte paarse hints bij een paar planten. Ik hou de nachttemperatuur laag om de anthocyaninen te boosten – verwacht meer paars in week 7-8.
Aroma: Wordt steeds intenser in de tent: zoete druiven/bessen (Red Wine) met een gassy/funky punch (The Bird). Ruikt nu al als een premium strain.
Gezondheid: Topconditie. Bladeren donkergroen, geen tekorten, goede stretch voorbij, alles gelijkmatig.
Wat te verwachten de komende weken
Nog 2-4 weken bloei (afhankelijk per pheno: 8-10 weken totaal).
Buds harden verder op en trichomes gaan van helder → milky → amber (tijd om te checken met loep!).
Hopelijk meer kleurverkleuring bij de Red Wine-dominante pheno’s.
Beginnen met lichte flush richting het einde.
Conclusie
Week 6 is waar het echt spannend wordt – de frost is insane en de potentie schreeuwt eruit. Deze The Bird × Red Wine F1’s ontwikkelen zich prachtig, en met zoveel variatie in de 16 planten ga ik zeker een paar absolute killers vinden. Nog geen paars spektakel, maar de resin-laag maakt het al de moeite waard!
Stay tuned voor week 7/8 – dan komt de echte magie. 🍇✈️🐦
#TheBird #RedWine #F1PhenoHunt #FeminizedSeeds #ColloidalSilver #Week6Bloom #GrowDiaries #CannabisBreeding #Xpie77
Wat denken jullie: hoeveel weken nog tot harvest, en gaat het paars nog komen? Drop je voorspelling! 🔥


Likes
45
Share
@tresplantes
Follow
Transplanted on day 6 from the jiffys into redcups with some biobizz Lightmix and COCO.
Mixed a 1/4 teaspoon grennhouse bio grow in the down Part of the cup
A Bit dynomyco With direct contact to the roots for the lil extra boost.
Zake isnt the biggest drinker but everything Looking good so far.


Likes
18
Share
@valiotoro
Follow
Hello everyone 😎
Week 6 of flower for the Amnesia Zkittlez🍭
Only 1 plant left then finito✔️
Very nice smell super sweet🤤
The buds are super sticky🔥