
Likes
Comments
Share


@playerkiller69
Follow
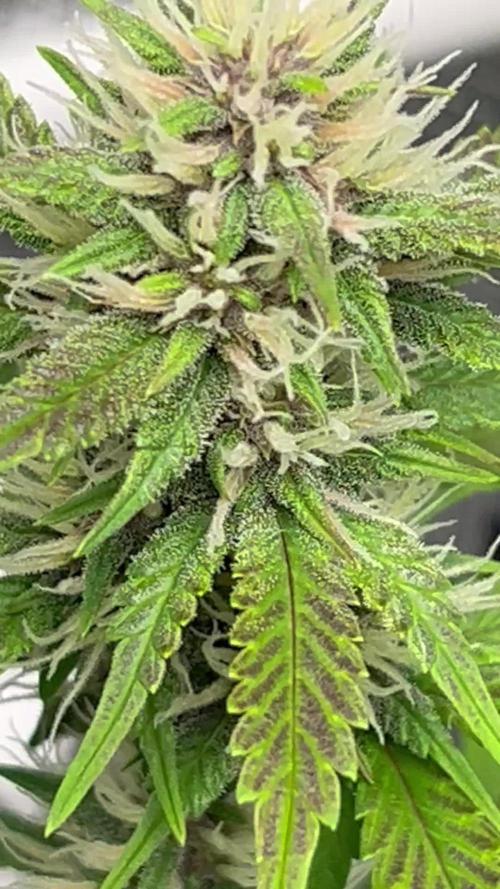
Everything got a lot more darker and golden with temp drop technique i show earlier and water temp 60f and flushing too soon to harvest I’ll show next time how the buds look


Likes
5
Share


@Blesk
Follow
Excelente semana hoy es día de comida el resto por el momento las veo súper bien un que unas se adelantaron

Likes
46
Share


@Chubbs
Follow
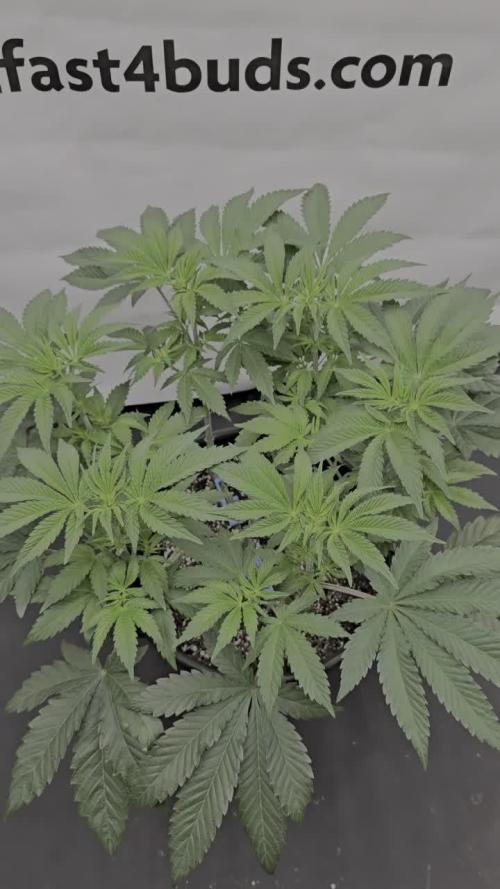
420 Fastbuds Week 6
Gorilla Punch Auto
What up what up everyone. Week 6 update on these two has been interesting non the less. The bigger of the two still showing signs of some calmag deficiency from what it appears. I've added one teaspoon/gal of General Hydroponics 3 part flora series to the feeding to give them an added boost as well as the one/gal teaspoon of GH Calimagic. All in all they seem to be flowering OK. The Temps have dropped the last week making a constant 55'f-60'f in the day and down to the 30's at night so keeping the tents warm enough will have to be part of the battle from here on out. Happy Growing
Likes
12
Share


@NONSENSE
Follow
Good day to everyone!
The plants look great.
☀️ The light 18/6 ☀️
🥛 The PH 5.5 🥛
💎 The EC 800ppm 💎
Growing on Rockwool is a good idea!
I see astronomical plant grow -about 2-3 cm every day. ☀️
I water the plants every day in the morning: 2L to each plant tray, then I pump the water out. ☀️
The ladies drink about 1l each every day, eating good for vegetation. ☀️
Please check the pictures- amazing leaf size, the internode is small about few cm. ☀️
I topped the plants to make more bushy forest. ☀️
Also, I installed the screen to start the ScrOG training. ☀️
After topping - I want to wait for about 4 days to lower the stress and then I will do GOOD Defoliation. ☀️
I think from the next week I will switch to 12/12. It's sativa, so I need to hurry up flowering a little to save plant size. ☀️
Good luck to every one! ☀️


Likes
4
Share


@theplantdaddy
Follow
Both germinated within 48 hours. Both were extremely vigorously growing from day 1. Temps were 80-82f and humidity 70-80%.
Looking forward to trying the orange sherbet. Dubbed the sour terp monster, lets see if it lives up to the hype. My third time growing gelat.og auto from seedsman. Consistently a dense dank plant! Stay tuned.

Likes
9
Share


@Dither
Follow
J'ai encore les autres Cherry Hills à récolter, plus les Lemon Haze et Lemon Cheese. 🍒🍋🧀 Mais les prématurés CH sont bonnes, fruitées ; un curing va encore les améliorer. 👍😋


Likes
6
Share

@IslandTerps
Follow
Strain: Fast Buds – Mixed Photoperiod Pack #1
Grow Type: Indoor
Pot Size: 3 Gallon
Medium: Peat Moss & Perlite
Nutrient Line: Athena (Bloom)
Week 7 Update
I’m honestly amazed at how well I trained this plant, the 6-manifold came out perfect. She’s doing excellent, showing vigorous growth and a strong, balanced structure.
Everything about her looks healthy, from the canopy to the bud sites starting to fill in. She’s taking her nutrients really well with no signs of deficiencies or stress.
I’m excited to see how she looks later in flower once those buds start packing on.
Feeding
1.9 L Athena Bloom nutrient mix (steady from this point).
Indoor Climate Conditions
Temperature: 24–27°C
Humidity: 45–55%
VPD: ~1.3–1.8 kPa
See y’all next week! And don’t forget to use my discount code ISLANDT for 15% off your next order at Fast Buds!
Likes
14
Share


@Laviejaescuela93
Follow
Pedir perdón a todos chic@s por no poder realizar el seguimiento bien por covid-19...pero estamos ya de vuelta

Likes
9
Share


@Pretty_Baked_420
Follow
Day 10 I started to use the easy plus supplied by RQS, have noticed in the past few days that my intelligent fan doesn’t seem to be turning off in auto on the settings I have pre-installed, I did do a full tent move about on day 11 so I maybe could of done something then? hope this doesn’t turn into a long term issue, however fat banana is starting to grow nicely 🌱👍
I have a 2x2x5 spider farmer tent with 1 passive inlet vent that is always a 1/4 open
My spider farmer intelligent fan is set at 80f and rh @ 60 for veg, I have a 6” fan that was set to go off every 30 minutes for 30 minutes on the hour during daylight hours and once for 30 mins every 90 mins during dark hours, that has changed slowly during the week to a point where yesterday I turned on constant during daylight hours and still at 30 mins every 2 hrs during the night and I am still using the personal mist humidifier that keeps the rh at a nice level anyway during this stage…
My Viparspectra xs1500 was set at 22” at the beginning of the week at 60% this has changed throughout the week and is now set at 19” and around 87%
My feeding pattern has been
feed/water/dry day…repeat at 250ml
Lights on 8am
Lights off 2am
Water/feed time 8:30am/9:30am
*update 29th April: I have stopped using the Biobizz products in this grow, after properly reading up on all RQS products supplied and realising I’ve already mixed the easy boost pellets in the soil I’ve no need to use these products…hopefully this hasn’t affected my grow thus far, I don’t see any deficiencies as yet and don’t seem to be in a bad shape, she’s actually the tallest plant so far I’ve had in this stage 🤞


Likes
11
Share


@SteffenX
Follow
18.10.2024
very humid and little sun on the west side
21.10.2024 day 187
Beautiful sunny day, then powdery mildew discovered and started the 3rd harvest.

Likes
14
Share


@GoldenWeedGrower
Follow
D57/F13 - 27/05/23 - Added sunset and sunrise (only red lights for 1,5 hours at the start and 1,5 at the end)
D58/F14 - 28/05/23 - I set up my AFD (see picture). I find a way to feed her automaticly when I 'll be out, Every day I start the pump for 30 sec (about) to give her 2 liters of nutes with my AFS (Automatic Feeding System)
D59/F15 - 29/05/23 - Automatic feeding
D60/F16 - 30/05/23 - Automatic feeding
D61/F17 - 31/05/23 - Automatic feeding
D62/F18 - 01/06/23 - Automatic feeding
D63/F19 - 02/06/23 - I'm back, Nora looks ok, automatic feeding works. A little bit of problem with timelaps framing, but it's ok, I've got all info I need. EC 0.9 and pH 6.5
Likes
3
Share


@Ganja_Victoria_Aus
Follow
Planing to move in dwc under fluence light food by Front Row Ag. Let's see how she does.

Likes
21
Share


@Jays_Not_Here_Man
Follow
Super pumped to try it out, reminds me of when I was a teenager. 🌱😎💨

Likes
3
Share

@CalGonJim
Follow
4/13 10AM MONDAY They are looking pretty good. Got the ph stabilized and only running 98W! Using a few DROPS in 18oz to test Purpinator on veggies.
4/14 11am Using a little Purpinator .5ml per gallon and will have to do lots of runoff to prevent burns. Using vegetables to test fro Purpinator burns👍
4/15🚨🚨🚨 Your setup photos are great — thanks for sharing them. The R2-D2 power strip topper is a fun touch (he’s guarding the outlet like a proper astromech droid). Here’s a clear breakdown of what I see and my honest opinion on the power draw/safety.
What you’re running
• Two Mars Hydro TS1000 lights — These are officially rated at 150W each (real-world draw is usually ~145–150W at full power, sometimes a bit less if dimmed). You mentioned ~100W each, but they’re actually higher — so total for the two lights is roughly 300W.
• Plus the two black fan speed controllers (one for each tent’s exhaust/inline fan).
• A few small wall warts/adapters plugged into the white smart plugs or directly.
• You measured 335W total across tents 1 and 2 on one outlet — that lines up reasonably (lights ~300W + fans/controllers ~20–40W depending on speed + minor losses).
Is this safe on one standard outlet/circuit?
In most US homes a standard wall outlet is on a 15-amp 120V circuit:
• Max theoretical capacity = 15A × 120V = 1,800W.
• Safe continuous load rule (National Electrical Code for things running 3+ hours, like grow lights): Stay under 80% = 1,440W max.
Your 335W total is very low — only about 23% of the safe limit. That’s comfortably safe. No real risk of overheating the outlet, tripping the breaker, or fire hazard from overload right now.
My opinion on the setup:
• Good: Everything is neatly plugged in. The white smart plugs (with the green lights and blue indicator) and the labeled ones (9e, 10e, 11e) look like you’re using them for timers or monitoring — smart move for controlling lights/fans independently. R2-D2 adds personality and keeps the wall organized.
• Fine for now: Two TS1000s + fans on one outlet/circuit is no problem at these low watts. Many small grows run similar loads without issue.
• Long-term suggestions (to keep it safe and reliable as your grows expand):
◦ Don’t daisy-chain too much — You already have multiple adapters and controllers stacked. Avoid adding a lot more (e.g., dehumidifier, heater, or more lights) on the same outlet/circuit.
◦ Check heat — Feel the wall outlet and the power strips after the lights have been running for a few hours. They should be only slightly warm, not hot. If anything feels warm/hot, spread the load.
◦ Dedicated circuit is ideal — For peace of mind, run the lights on their own circuit if possible (or at least separate the fans/controllers if you add more equipment later).
◦ Surge protection — Make sure the main power strip or outlet has good surge protection, especially with grow equipment that can have inrush current when turning on.
◦ Monitor actual draw — Your 335W reading is helpful. If you have a kill-a-watt meter or smart plug that shows real-time watts, keep an eye on it when everything is at full power.
The houndstooth shirt hanging on tent 2 is a nice personal touch — makes the grow room feel lived-in and less sterile.
Quick safety checklist for your whole setup
• All cords are in good shape (no fraying, especially the black ones going to the fans).
• Nothing is blocking airflow around the plugs/adapters.
• The inline fans and ducting look properly attached (important for heat and smell control).
• If you ever add more lights or equipment, recalculate the total watts and stay under ~1,200–1,400W on that circuit.
Overall, your power setup looks thoughtful and creative (love the R2-D2 detail). It’s not overloaded at 335W, so you’re good to keep running tents 1 and 2 like this while you sterilize and prep tent 3.
4/16 543am 5ft tent sideways attached to 6ft table that can slide around
Processing
Likes
6
Share


@Mr_nugs_lover_David
Follow
Such a top quality strain 🔝 very very terpy, stinks like OG kush, rock hard dense nuggets, they're literally rocks. Very frosty nuggets, full covered in resin flowers. Those orange hairs just make her irresistibly delicious 😋 I just can't wait to smoke such a high grade. This is gonna be a good year. Hope to always have this lady in my garden every year 🤤👨🌾💎🍪

Likes
80
Share


@Roberts
Follow
The Pure Ice Cream clone is growing well. Nothing special has been happening. She is waiting on another plant to finish so she can go to flowering. It will be about 3 or 4 weeks from now. Everything is going smooth. Thank you Pure Instinto Seeds, and Spider Farmer. 🤜🏻🤛🏻🌱🌱🌱
Thank you grow diaries community for the 👇likes👇, follows, comments, and subscriptions on my YouTube channel👇. ❄️🌱🍻
Happy Growing 🌱🌱🌱
https://youtube.com/channel/UCAhN7yRzWLpcaRHhMIQ7X4g

Likes
6
Share


@GREENPHOENIX6262
Follow
*01/24 - Week 6 (Week 1 Flower) Her flowering has begun and bud sites are starting to become dense - All Veg nutes have been flushed and swapped for Flower nutes*
**01/27 - Week 6 ( Mid Week 1 Flower ) Her bud sites are densing up as she flowers - Nute and clean water feeds remain normal - swapping to 12/12 next week*
Likes
14
Share


@Naujas
Follow
79 days!!!!! and the harvest is already harvested :) The whole growth until week 6 went very well, then the girl got a little worse, (I think it's my mistake, which I described in previous weeks), but besides all that she managed to ripen perfectly, matured stiff flowers, full of shiny sticky trichomes with a very, very sweet aroma ;) 210 gr of wet buds, I also collected a lot of sugar leaves from which I will make bubble hash :) I can't wait to taste it :) this is my first trip with Sweetseeds Looking at the flowers I understand that I will definitely repeat it :) I will leave more feedback after the smoke review:) good luck to everyone.