The Grow Awards 2026 🏆 


Likes
Comments
Share
@cannasaxx
Follow
DIY system zum Anwurzeln gebaut aus den Teilen meines Mars Hydro DWC System. Was auch noch umgebaut werden muss 😄
#ichmachsmirselbst

Likes
10
Share
@Chubbs
Follow
420Fastbuds
Cinderella Auto
Week 1 of Veg
These 2 have sprouted and are off to the races. Both sprouted amazing after 48hrs of being in the soil. Still misting the top soil to keep moist with my hand sprayer but will start to manual water of 500ml every other day this coming week. All in all Happy Growing
Likes
2
Share


Likes
13
Share
@Canna96
Follow
Hey now, I hope everyone is having a relaxing weekend. The ladies are getting close, all trichomes are white and milky with very little amber, so I decided to start the flush today, and I will harvest the Apple Fritter and Durban Thai X C99 next Saturday. I did harvest the Donuts and Cherry Gar-See-Ya and I will post some pics and a smoke report once cured. Thanks for stopping by and Blaze On....


Likes
28
Share
@CrystalMeph
Follow
Great week for Mephy...other than winter being on the doorstep. 😒
Keeping her to 4 main cobs, slow and steady till she's ready for some LST. I've been adding DO (dissolved oxygen) into the water in an attempt to keep the roots happy in this tight space. So far she's loving it. If you have an aquarium pump and some airstones you can add DO to your irrigation. Worth a try if you haven't.
Anyway, hope everyone had a great tiny pot week! Back to work for me. ✌️🌱
Happy Halloween everyone! Be safe. 👻


Likes
11
Share
@GrowWithFlow
Follow
Flower week 3 successful. Feeding every watering with nutrients and once a week calmag. Next week I start with Aptus K Boost in a lower dose and then let's see how they react. Till now I am super super happy with Aptus 🌱.
Big big thanks that I can use the good Stuff💚💛❤️.
But we know all the good Stuff comes from Holland 🇳🇱


Likes
5
Share
@NicoCordoba97
Follow
Obvesvacion por Maceta.
Maceta 1: Mucha altura y poca expancion laterales, los cobollos se ven con ojitas muy chicas y definidas, no son tan gordos y comprimidos. Satisfecho. 😃
Maceta 2: Creo que tuvo un desarrollo como espere, con cobollos lindos por el medio y una punta imponente, ¿puede que podia ser mejor? no lo se. MUY satisfecho. 😄
Maceta 3: Fue Historia.
Maceta 4: Petiza, con su unica punta que es igual al cobollo a mediana altura de la maceta 2, puede que haya sido el sustrato ya que tanto la maceta 3 como esta 4 crecieron de igual manera, poco desarroyo, mismos cuidados que las demas. Por ovias razones la regaba menos ya que no consumia tanto y deje de darle productos ya que no lo veia necesario. Decepcionado. 😑
Ahora voy a Cosechar. 😎

Likes
9
Share
@Sauce_XL
Follow
1.20.2024: Time to gives this a go. 2.3x2.3 tent, XS1500 light, 2 gal fabric pots. Pots filled with FFOF(90%) & Perlite(10%.) Don't ask me why I chose 90/10. Nutrents are the FF Trio. Also growing a freebee seed from Humboldt Seed Co(Emerald Fire OG Auto.) Decided to germinate directly into the medium. Light is at 50% power at 2.5ft from the top of the pot(s). I'll have the light running 24hrs until it sprouts(fingers crossed it does.) I sprayed the top soil with pH 6.5 water when i stuck the seeds in then placed clear plastic cups over the seed location. My 4inch fan is on the way and it comes with a monitor for temp and humidity....no idea what current stats are. Just hope the damn thing spouts. Fingers crossed. More to come.
1.23.2024: 3 days and still no sprout. Going to give it another day or two before i go fishing for them. Off to a fantastic start!
1.24.2024: They've finally popped....aaaaannnddd we're off!
1.25.2024: Took the lil domes off, opened 2/3 vents for some circulation. Been misting the top soil just to keep it moist with 6.5ph water. I also "bottom fed" 12oz of water just to keep things lubricated. On the fence about when to give the plants a proper watering. Might keep things going "as is" for the next two days. Inline fan and associated hygrometer comes tomorrow(1.26) so i'll finally have an idea on what the current stats are in the tent. Will make adjustments at that point in time. Light is 2.5 ft from soil at 50%.
1.26.2024: Inline fan came yesterday. Only set up the probe just to understand temp and humidity. With the light at 50%, 2 ft from the soil, all vents closed except one(1) port at the top, my current temp hovers around 79 and the RH is 50%. After setting up a humidifier, i'm now running 75 degrees, 64% RH and VPD .58. All within tolerance. I can already tell it will be a delicate dance managing heat, exhaust fan speed and humidity. Still haven't given the plant more than 2 cups of water and i'm only watering when the soil is dry. Tomorrow(1.27) marks 1 week since the seed was dropped. Plan is to lightly water the entire pot when dry for the next week or until growth really kicks in.
Likes
93
Share
@MrJones
Follow
Mr-Jones Shockwave F2
🔹🔹🔹🔹🔹🔹WEEKLY GOALS🔹🔹🔹🔹🔹🔹
🌞Environment - 75/80℉ and 45/50% Humidity
💧 Feeding - Using "Super Coco" amended soil. compost teas, Dechlorinated H20 PH/6.5 Fish Fertilizer, Started feeding the plants because they are only in 1-gallon pots.
🍃Training / towards the end of the week will be Schwazzing the plants, along with cleaning out the bottoms,.
🕷️ IPM - Will be using Green Cleaner" 1 OZ per Gallon, and CannControl from Mammoth alternating between product each month for Integrated Pest Management.
💡Mars Hydro FC 4800 / 480W Led Grow Light - "Instagram: MarsHydro_Aliexpress"💡
🔹🔹🔹🔹🔹🔹🔹🔹🔹🔹🔹🔹🔹🔹🔹🔹🔹🔹
Rambling - These ladies are going great, maybe second-guessing myself but only using 1-gallon pots not sure the nutrients in the Super Coco will carry the plants, going to be Top Dressing with Roots Organics Bloom.
🔹🔹🔹🔹🔹🔹🔹🔹🔹🔹🔹🔹🔹🔹🔹🔹🔹🔹
▶️Sunday 11.29.20 / Top Dressed with Roots Organics Bloom, continuing to water with Dechlorinated H20 PH/6.5, going to be making a super tea after I finish Schwazzing the plants, normally I grow photos in 5 to 7-gallon pots. The New Mars Hydro light is kicking ass!
▶️Monday 11.30.20 / Normal feeding tonight, the ladies are just doing great!
▶️Tuesday 12.01.20 / Normal feeding tonight, the ladies are just doing great!
▶️Wednesday 12.02.20 / Conducted heavy defoliation, Schwazzing tonight, they look great, top dressed with roots organic uprising bloom, and decided to move along with light BioBiz nutrient regiment, growing these gals in 1-gallon pots, the soil nutrients will be depleted.
▶️Thursday 12.03.20 / The ladies have responded well to the defoliation and the started nutrient regiment. I set the 💡Mars Hydro FC 4800 / 480W Led Grow Light to 75% time to watch these ladies just blow up! Will be doing an IPM treatment Saturday morning before lights out.
▶️Friday 12.04.20 / Continuing feeding light BioBiz daily with Weekly top dressing of Roots Organics, the ladies are just thriving!
▶️Saturday 12.05.20 / Plants are doing great after the heavy defoliation, continuing to feed with Bio-Biz daily.
🔹🔹🔹🔹🔹🔹🔹🔹🔹🔹🔹🔹🔹🔹🔹🔹🔹🔹

Likes
5
Share
@Unnamed
Follow
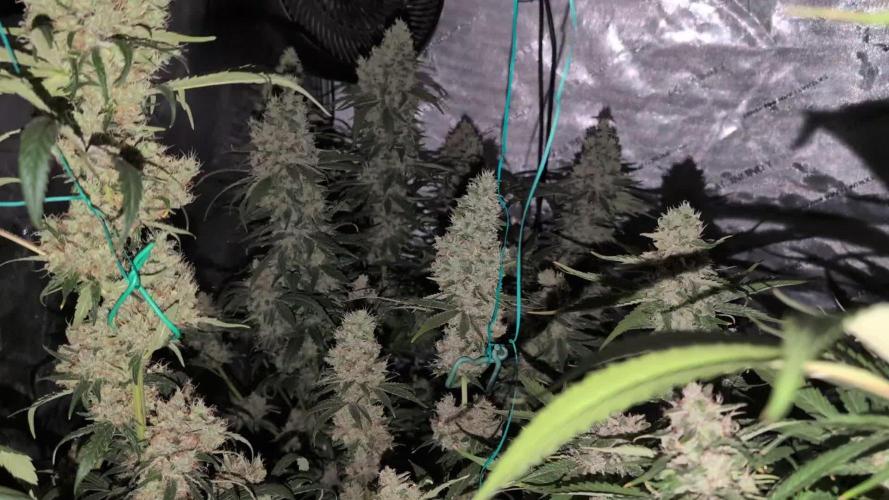
Added a photo to show where I take RH/Temp measurements from in the tent, pretty much inside the canopy.
Went lower on EC this week to give the plant a little time to regenerate and pack some more before harvest.
The dehumidifier is pulling less and less moisture out of the air every day, this is a additional sign to me that the plant is nearing its end.
Not quite sure when to harvest, maybe next week or the week after, the plant isn't really stacking, it is frosty but I am missing the quantity, the pictures are kinda deceiving.
Values are average of the day.
DATE - °C - RH% (Tent Temp/RH)
20241216 23.6 61.7
20241217 24.2 62.2
20241218 23.3 61.5
20241219 22.9 61.7
20241220 22.1 60.7
20241221 23.1 61.5
20241222 22.6 60.9
DATE - PH
20241216 6.09
20241217 6.03
20241218 6.14
20241219 6.16
20241220 5.99
20241221 5.97
20241222 5.87
DATE - ORP (mV)
20241216 74
20241217 63
20241218 30
20241219 11
20241220 50
20241221 24
20241222 82
DATE - EC(us/cm)
20241216 2097
20241217 2004
20241218 1692
20241219 1749
20241220 1636
20241221 1688
20241222 1695
DATE - CF
20241216 20.97
20241217 20.05
20241218 16.92
20241219 17.49
20241220 16.36
20241221 16.88
20241222 16.95
DATE - °C (Reservoir)
20241216 22.1
20241217 22.1
20241218 21.8
20241219 22.2
20241220 20.9
20241221 21.6
20241222 21.4
Processing
Likes
33
Share
@Ferenc
Follow
Day 72: 600W LED, 18 hours on 6 hours off the same with ventilation. Ferilization is the same except BlackBerry Kush and LSD-25 they are being flushed. Water intake also remains the same 200ml per day. Humidity approx 35 percent.
Day 74: BlackBerry Kush and LSD-25 have to be harvested this week Friday so no more water. Colorado Cookies and Northern Light next week so started flushing them. Glueberry OG needs a bit more time.

Likes
62
Share
@ButterfliesLittleFarm
Follow
Hello Diary,
Another week is behind me, Medusa F1 is incredibly fast, as you can see in the photos, already after the third week of flowering it looks quite mature.
The smell is incredible, an extremely strong fruity aroma overwhelms me as soon as I open the grow box.
The first Medusa (on the left in the grow box) is a little smaller and more mature than the second one, so I will probably harvest it first.
But he certainly has another ten days if she continues like this.
The flowers have filled in nicely, they are hard and very very sticky to the touch.
After any work with plants, I need some time to wash my hands and remove the smell.
Watering is more frequent, they become thirstier, but I no longer add any nutrients to them, only clean drained water to which I adjust the pH. on 6.0.
The conditions at the Farm are excellent, the temperature is around 25 degrees, while the humidity is around 40%.
Here's how it looked last week.
02/03/2023. - Day 37.
Watering. I prepared 8 liters of water, let it sit for 24 hours to evaporate as much chlorine as possible, added Plagron's Lemon Kick to bring the p.H down to 6.0.
I watered both plants evenly with that amount.
06/03/2023. - Day 41.
Watering. I repeated the same procedure as four days earlier.
07/03/2023. - Day 42.
Photography for the end of the third week of flowering.
That's all I think for this week, I'm looking forward to next week. See you soon and thank you all for your support.


Likes
7
Share
@herbcrusted
Follow
As usual Moscow Blueberry is growing fast and hardy, and the Strawberry Cheesecake is happy in her early flowering stage. She’s starting to smell a good bit, and her terp profile so far smells like sweetened coffee! French Macaron’s growth is speeding up now that it’s gotten the chance to grow into its pot. I’m concerned with Northern Lights, as the new growth is twisted and weird. Hopefully I’ll figure out the cause by the end of the week or it may solve itself once the twisted leaves grow out more.


Likes
422
Share
@Crashoverite
Follow
Hi all,
Welcome to my 🍌💜👊 week update.
Thank you so much for your all support on this bananas journey 💜💚💜💚
Week 12
Jan 1 - Jan 7
I am so happy seeing how my girls are developing. All it's going great. 2 waterings of 8ltr on 03/01 no runoff and second on 06/01 9.5ltr! Runoffs PH at 6.2. Purchased larger dehumidifier and installed on 03/01 instantly humidity decreaseed from 55-59 to 50-55 on avg. and at night from 62-69 to 54-60. Light from 01/01 on max power output 110 watts. Nutes slightly adjusted. Buds on both girls gaining size, weight. Trichomes on Athena mostly milky and clear with only very few ambers. Xena mostly 50/50 clear and milky,
They are smelling gorgeously, not sure if I should smoke or eat them first.
Next week will still feed with nutes and keep an eye on trichomes development but it seems that girls are not in a hurry at all. That's okay me neither 😁
Stay tuned for next week entry very soon!
Peace and love brothers and sisters ✌️💚
Links
https://2fast4buds.com/seeds/banana-purple-punch-auto
https://plagron.com
https://www.biobizz.com/
https://fishheadfarms.com/
Likes
Comments
Share
@MakFaso2022
Follow
Buenos días, esta semana a la Moby 1 le realicé poda en ramas laterales ya que están creciendo muy bien igual que las apicales se ven muy bien sus hojitas en los apicales y como crecen la verdad pienso seguir con las podas,para en pocos días empezar a realizar esquejes en hidroponia de esta genética los cuales pondría a florar en exterior ya que estamos en otoño con días más cortos y se presta para que floren las plantas qué estén afuera...
La Moby 2 von su poda Fim ya puede verse en el video que se están formando más de tres puntas siendo exitosa la técnica ya que le hice otras veces y va bien si bien necesita más sustrato se lo cambiaré en una semana o más ya que es un gasto que quiero retrasar pero va bien y esta con top veg y en estos días aparte agrego top underground para las raíces vienen muy bien...


Likes
25
Share
@Brebzzz
Follow
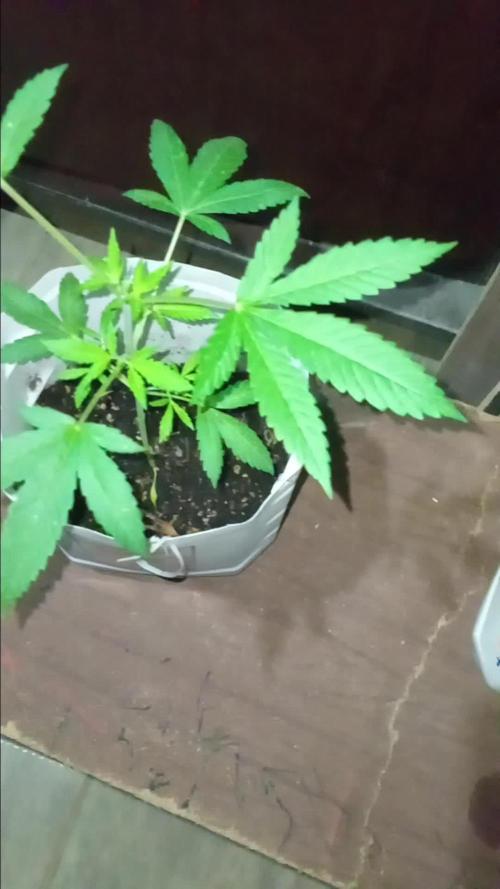
I top one to see What happened, i gave her 8 liter per week to respect the cycle dry/wet hôpe all its good
4/12 end of the 4 week
Begin of a good and weak smel