The Grow Awards 2026 🏆
Likes
Comments
Share
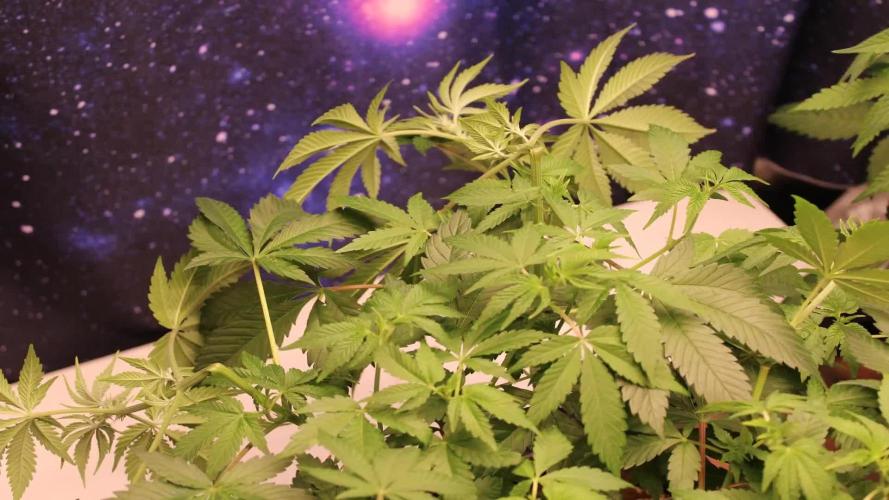
As we round the corner on this week the finish line is starting to come into sight! Ending the week on Day 68 from seed and these girls are really starting to shine! Front left is just a crystal packed beast with golf ball sized buds (or bigger) well spaced out along the stem, more like blueberry tends to grow. Front right is showing very similar traits, while back left and right are larger more connected buds, more like Slimer tends to grow. Cool to see the two different bud structures in the same grow, fun thing with autos you know they will be close but always some differences! Buds are just plumping and firming, getting ready for their big day on another few weeks. Water intake has slowed as expected for this stage in life, 32L every four days instead of every three. Was an easy week work wise, just a light defoliation of mainly the back two plants, probably 20 or so leaves each. Back two are still seeming to be maybe a week behind front two, but they seem to be catching up fast. May have to get the second reservoir set up at the end of need to ween first two off the feed earlier than last two. Good thing is I have three full sets of AutoPots so not a problem, although I may have a problem with collecting grow gear hahaha. Can't help myself, I see stuff selling for super cheap used or clearance from stores closing and think "sure I could use another set of those". Got my last set of 15L pots in upgrade packs on clearance. Each pack came with the pot, the tray, and the 5.0 valve with all the fixings for just !!! Honestly how do you say no to that I don't know. Lights 90% @ 16" @ 750-800umol/s Water 32L every four days UV lights one hour per day mid cycle 6" Exhaust 30% 4" Intake 50% 6" oscillating fan x2 50%
Likes
3
Share
@Elemental
Follow
0.1) Observação Geral Todo o cultivo foi conduzido com monitoramento constante e ajustes precisos de intensidade luminosa (DLI e PPFD), temperatura e umidade, garantindo condições ideais em cada estágio do desenvolvimento. 1) Substrato e Nutrientes O cultivo foi realizado utilizando água mineral com pH balanceado durante todo o ciclo. Fase vegetativa: fertilização com BioGrow. Floração: alimentação com Flowermind. A mistura do solo foi composta por 50% de substrato reutilizado, rico em nutrientes do cultivo anterior, e 50% de novo solo (proporção 70/15/15), resultando em uma base equilibrada e fértil. 2) Germinação – 19 de agosto As sementes foram germinadas utilizando água mineral + peróxido de hidrogênio em copinhos de gelatina individuais. Permaneceram por 24 horas na solução líquida, seguidas de 24 horas no escuro total sobre papel toalha umedecido com a mesma água, dentro do mesmo recipiente. Os copos foram abertos apenas a cada 12 horas, em ambiente de baixa luminosidade. Todas as sementes germinaram com sucesso. As sementes com raízes de aproximadamente 2 cm foram transferidas para vasos de 1 litro, com adição gradual de substrato conforme o crescimento das plântulas, prevenindo o tombamento dos caules. 3) Fase de Plântula a) Conduzida sob lâmpadas de 35W e 50W dentro de uma caixa de papelão personalizada, equipada com coolers e exaustor para controle de temperatura. b) Aplicação de FORT (enraizador) em uma rega, após o aparecimento do primeiro conjunto de folhas com cinco pontas. 4) Topping – 10 de setembro Foi realizado o primeiro corte apical para incentivar maior ramificação e uma distribuição mais equilibrada de energia. 5) LST (Low Stress Training) – iniciado em 13 de setembro O treinamento começou três dias após o topping, com amarrações graduais dos ramos para promover a abertura do dossel e melhor penetração de luz. 6) Transplante – 27 de setembro Transplante realizado para vasos de 4 litros, com rega leve e adaptação gradual à nova base de substrato. 7) Início da Floração (Troca para 12/12) – 6 de outubro O fotoperíodo foi ajustado para 12 horas de luz e 12 horas de escuridão, marcando o início oficial da fase de floração. 8) Defoliação – 10 de outubro Remoção estratégica das folhas grandes de ventilador (fan leaves) para melhorar a circulação de ar, otimizar a distribuição de luz e estimular o desenvolvimento dos buds.
Likes
Comments
Share
Transferred to a 5 gallon. She acclimated really fast and you can see her spreading out. No complaints thus far.
Processing
Likes
20
Share
12/31: They are both coming along nicely.👍 Today was the first day in which I fed them some Big Bloom and Boomerang along with humic acid, pH'd to 6.1. 1/3: I've been letting them dry out a bit for the last two days. They've got roots coming out the bottoms now...I'll probably transplant them into 5 gallon fabric pots tomorrow or the next day. I ordered a 4' 180w tube light with 578 LEDs..it has a 360 degree beam with 3000k and a bunch of 660nm. It's waterproof, so no worries about keeping it beneath my canopy to illuminate the lower branches and hopefully increase the density of those buds that never get much top-lighting. Today, I mounted my two new 24w UVA LED lights (395-405nm) to my frame. I'll run them 6 hours a day from the time I put the plants into my closet, until harvest. It is my understanding that exposure to UVA, particularly during the vegetative stage, triggers many different plant defense hormones, which speed growth and can increase heartiness to withstand constant exposure to UVB without suffering as much cellular damage as usual. I'm also ordering a 2' Solacure FlowerPower UVB (285nm-310nm) next week to use during flowering to stress the plants and increase trichome production. 1/4: I did a few foliar feedings with big bloom and fulvic acid today. 1/5: Transplanting day. I dusted their roots with magic dust and transplanted them into 5 gallon pots today. I had some excellent compost with biochar and myco that I mixed into their soil, too. I watered them in with about 2 quarts of their first taste of full strength veg nutes, plus mycorrhizal fungi, trichoderma, beneficial bacteria, and humic acid, then I sprayed them with biotabs boomboom spray when finished. The were moved into the closet under the quantum boards, UVA's, and a pair of MiracleLED blue bulbs. I'll start adding far-red spectra to the equation in the next few days.
Likes
102
Share
@Roberts
Follow
Ztrawberriez auto is growing great in her 1 gal perlite tub. She is starting to form some colas and stacking. She was lollipopped today, and a selective defoliation throughout. She is looking great, and ready for another week of growing. Thank you Fast buds. 🤜🏻🤛🏻🌱🌱🌱 Thank you grow diaries community for the 👇likes👇, follows, comments, and subscriptions on my YouTube channel👇. ❄️🌱🍻 Happy Growing 🌱🌱🌱 https://youtube.com/channel/UCAhN7yRzWLpcaRHhMIQ7X4g If anyone needs to purchase fastbuds here is a link for my affiliate program https://myfastbuds.com/?a_aid=60910eaff2419
Likes
37
Share
Hello Growers and Tokers! 👋 👩‍🌾 🧑‍🌾.🔥💨 Pretty good week. She's grown a full 10cm this week, new growth is coming up. She's mainly still filling in space but still stretching. I'm impressed how fat her stalk is getting and her stems are quite strong, no need for support yet. 💪 I noticed that she is drinking really fast and was a bit limp some days. So I increased the amount of water a lot this week total of 600ml. So far I'm constantly adding a little bit more every feed. Currently feeding 1,5L each, every other day. Will be increasing as they ask for more. How do they ask for more? When feeding if the soil is drier than normal I give a 150-200ml increment of water. I do that until they stop feeding so much then i just maintain that amount. I start reducing if it takes longer to dry. That works good for me. The old finger in the dirt trick. 👍 Nothing like knowing exactly what your ladies need first hand. No particular smell yet. Buds are just starting to form. Stay tuned for next week's update. Take care and stay safe! One love!
Likes
165
Share
💩Holy Crap Growmies We Are Back💩 Well after another short break we are back at it 😁 So what do you say we have some fun 👈 We got some EXOTIC SEEDS 👉 👻👻👻MONSTERMASH👻👻👻 😛 Seed soaked for 24 then placed in a tub with paper towels , once it cracked and rooted , placed into its main pot 👌 Lights being readjusted and chart updated .........👍rain water to be used entire growth👈 👉I used NutriNPK for nutrients for my grows and welcome anyone to give them a try .👈 👉 www.nutrinpk.com 👈 NutriNPK Cal MAG 14-0-14 NutriNPK Grow 28-14-14 NutriNPK Bloom 8-20-30 NutriNPK Bloom Booster 0-52-34 I GOT MULTIPLE DIARIES ON THE GO 😱 please check them out 😎 👉THANKS FOR TAKING THE TIME TO GO OVER MY DIARIES 👈
Likes
2
Share
Muy satisfecho con la genética ya que el olor era lo que estaba buscando, el efecto es bastante relajante y me pareció muy agradable para pasar con amigos y trabajar.
Likes
2
Share
@Hontsa
Follow
Tropical temperatures and occasional thunderstorms... Still growing nicely and getting stronger...☀️⛈️💪🌱🍀
Likes
38
Share
Utopia Haze is a rare heavily sativa dominant hybrid (90% sativa/10% indica) strain created through back crossing Brazilian Sativa strains. This tasty little bud took home 1st Place for Best Sativa in the 2008 High Times’ Cannabis Cup and for good reason – with its potent 18-22% average THC level and long lasting cerebral effects, Utopia Haze is one powerhouse smoke. The Utopia Haze high comes on soon after you finish your first toke, hitting you with a strong cerebral lift that infuses you with a sense of hazy relaxation. Type: Feminised/Photoperiod Cultivation: Indoor/Outdoor Flowering Time (days): 70-75 Indoor Yield (g): Up to 650 Feminised Outdoor Harvest Month: October Feminised Outdoor Harvest Month Week: 3rd-4th week Aroma: Citrus, Woody, Pungent, Mint Effect: Cerebral Lift, Hazy Relaxation, Sleepy Welcome Everyone to the Final Entry of my Utopia Haze Grow ! There is so much to discuss ! I have been extremely busy as of late trying to get this Harvest together, but i am happy to have it here for you now ! I Seriously under estimated the amount of time, help from others, and my own necessary skills to pull this off.. and i still kind of screwed it up lol ! But its worth noting i have never actually done this before and trying to document it during....was extremely hard. It is next to impossible to work an iPhone with rubber gloves on ! First I want to discuss everything step by step so before you jump straight into the comments on how the end product is so small in "quantity" Rest assured i am happy with its"quality"...and thats all that matters to me because Life is a journey not a destination! and i have learned so much from this grow that I couldn't be any happy even if i messed some things up :) But at the very least I hope you read through this entry in its entirety with an open mind and focus more on the process, rather than just the outcome! I ran out of Ice & i was only able to wash three times..(normally I've heard you should go sometimes 5-6 washes) Preparation is Key & things will be much better next round :) Photos 1-22 These are pretty self explanatory but for those of you just tuning in now.. this is what happens to a very happy plant when you don't have the necessary tools to monitor key components of growing cannabis.. Ph, as well as EC levels play a very key role in the outcome of your grow lol that being said I was just able to save this plant by purchasing both tools but that doesn't mean the plant didn't suffer because of the prior events.. This was a Huge reason behind me choosing to turn this harvest into what i would consider "Solventless Hash Rosin" from "Ice water extracted Bubble hash". Pictures 23 The idea here is the process of using "fresh Frozen Cannabis" this has been discussed many a time online on such sites as instagram and here on grow diaries as well.. I personally have Never tried the process so i decided to try it out and make a judgement for myself.. Video 24 The Cannabis has now been in the freezer for 72 hours making it very well frozen.. as you can tell i struggled getting it all into the 25u Screen Wash Bag. One thing of note i would do differently is i will de-stem my next batch as i also believe this played a part in the amount of plant matter that escaped through the sieves. Photo/Video's 25-28 The idea here is "ice water Seiving" & especially with the bags that I am using here that are only have screen material on the bottom portion of the bag it is very important to have spaces in-between the screens to allow the water to pass directly through the screens into the bottom bucket with the least amount of resistance.. because the hash is so extremely temperature dependant if it gets warm on the side of the bag.. it will stick there and not make it to the bottom to become use able product.. 29 You do not need to use as much Ice as i used here lol... the idea is to keep everything very cold..i certainly achieved that but at the sacrifice of using so much that i ended up grinding product and producing "contaminants" but in the end they are just plant matter that i would be smoking when i rolled up my joint either way so.. I'm not super disappointed.. But it should be noted that what you want to achieve here is a Layering effect where you have the wash bag between two small layers of ice while the "water current" washes the Trichomes away allowing them to be separated by the screens setup below :) Before Starting the machine you should allow some time (i.e.;10-12minutes pre soak to allow the product to become saturated) before the first cycle. By video 32 I have just ran out of ice lol.. Video 33-34 Here I have a tip for you.. to separate the screens that you sieve through.. cut 5 gallon buckets to stretch them across nice and tight.. it'll make scooping your Bubble that much easier ! i learned this from the many "Frenchy" videos I have watched :) Picture 35 Here in lays the problem for most people.. drying your hash without loosing vast amounts of "Terpenes" whilst also stay ever vigilant against mold ! Thanks to all those videos I've watched on youtube.. id like to think this was one of my most successful parts of this process.. Things to Note; Terpenes start to seriously evaporate at temperatures 68F or 20C you need to stay as cold as possible whilst bringing the Relative Humidity in the space down into the 40-30% to stay away from that nasty mold ! I used my cold storage room in the basement.. with a dehumidifier running to keep the space at 45% RH & staying at a constant 15c. All while spreading the hash as thin as possible across parchment paper, on top of the white screens with a fan moving air across both sides of the paper. Pictures 36-38 These are some macros i took in the middle of my drying session I fell in love with the colour. Yes i know the black spots are plant material but they will get caught when i bag the hash & squish the oil out. Thing to Note; at this stage it is important to ensure you 'micro plane" the hash down as fine as you can whilst staying weary of the temperature... any "chunks" will hold pockets of moisture.. that lead to potential problems..ie; mold ... Picture/Video 39-41 Successfully planed bubble hash ready to be bagged and Squished ! Picture 42 Ive decided to follow Pedro.. from Pedros Grow Room and double bag to be on the safe side so i don't have any blow outs. So thats One 25u bag inside one 160u bag ! :) Pictures 43 This is almost 3 grams of the bubble hash from above, already melting in the bag.. this is where i ran into trouble again lol things started getting to warm in the house and i was only able to get one of the three squish's i did on video :( things started getting sticky. Picture 44 This is basically just a photo of the equipment I'm using; 3x5 LowTemp Cage in the frame I built myself, with a 20Ton bottle jack. Something to note here is this is an older Lowtemp model with only a single heating zone which is which i have it closed here heating Both sides of the press :) As well as the importance of having adequate pressure on your plates.. my rig is very overkill for the size of hash bags..lol Video 45 Here is the lovely press video.. its didn't quite work the way i wanted either lol my directional folding wasn't quite tight enough for a big "drip" :) &the Press was set to 65°c Photo's 46-50 are pretty self explanatory :) I had a blow out.. but still managed to pull an 80% return from the hash once squished...& yes it tasted amazing :) Was it worth it in the end... that could be debated.. for some..i understand..its not your thing, but for those of us that are interested in making our own concentrates.. free from Solvents... I wouldn't make it any other way :) If even ONE of you reading this diary finds it helpful to reference for ANYTHING.....even if its "what not to do" ill consider it a success ! Thanks again for tagging along on this garden adventure.. its been one heck of a journey ! Much Love from B.C. Canada, Until Next time, Cariboo
Likes
3
Share
This week it was time to transplant the plant into a 50L pot. On Sunday, I prepared the soil while listening to Peter Tosh and then transplanted the little one. It didn't even feel the effects of the transplant and is now looking beautiful in the sun. I plan to mainline this plant, so I'll do the apical pruning later this week to make the process as quick as possible.
Likes
11
Share
I see the 12 hr light schedule made things pretty small!
Likes
8
Share
@Chupus
Follow
I put it in a glass of water , later I will transfer it to paper towels . as practice shows , the method is working . It's not the first time I've used it. the main thing is to squeeze a towel well, so that the seeds do not rot. 20.06 watered usually with tap water PH 6.4 ppm 30.
Likes
148
Share
@BioBuds
Follow
Gorilla, gorilla, my problem child. The only one popping out of 5 but she is weaker than her roommates. She stays behind compared to them. But what can I do other than TLC, she has the best conditions, which are optimal in this grow room, also judging by the other two plants. Until I have a bigger operation, which in the current political climate, is not soon, where I can make mothers and clone them, breed my own strains, and root out runts like this, we do it like life. We play the hand as it is dealt to us and we love all our children the same... although this one is special. So not a genderfluid Silverback yet, but it ain't over till the voluptuous lady sings. We shall nurse this little runt until adulthood, who knows she might surprise us, she should have the mighty Gorilla Glue Number Fouh genes in there somewhere. Now come on out here and show daddy what you're made of... This week we spread out the leaves and branches, some leaf tucking and gentle LST, to prepare for some higher stress and super cropping today. Two days back we made the switch and set the lights to 12/12. Now the flowering stretch will begin, thus we bend the branches further outward in preparation for the canopy. When I do this I notice the branches are thick and sturdy, with no breakage at all unlike my previous grow, the gelato 33. I snapped some branches applying the super cropping and just normal bending with those. It seems like the fan (I didn't have a good option previous grow, hence the flimsier branches there) but also this lighting and soil regime are topnotch, asides from outdoor I haven't seen such lush bushiness yet, even on a more runt-like plant. This MarsHydro SP3000 is still performing great, such controlled temperatures, such an ocean of light. I only wish I started growing with this earlier. Thanks again @MarsHydroLED for trusting us to test your mighty flagship light. It is so well made, it oozes quality, I just want to touch it every time (also to check if it stays cool) and it is just sexy, slender, and compared to my other 300 watt light, a completely different spectrum and clarity. If you are looking for new lights, look no further. At www.mars-hydro.com they have excellent and unbeatable deals on tent and light combinations where you practically get a tent for free, it is ridiculous. I was afraid the light wouldn't cover the sides of my tent with my 4.5-foot space. Penny at MarsHydro had to laugh at this a bit, said not to worry. What an understatement. This light could signal to other galaxies. I sincerely recommend good sunglasses with this light. Only thing I'm adding is an infrared light Sunshine found. With this I'm going to simulate sunrise and sunset and try to prevent stress by easing the light in and out, like in nature. We are in flowering now, very excited to see what she will do here. What can she perform? Will she cover the net? Will she deliver gorgeous buds, like she is known to do? On these cliffhangers I hope you will tune in next week for more gorilla-related plantporn... go on... you know you want it. Hug Bud!!
Likes
33
Share
@Oyziphar
Follow
DAY 63 / 9 weeks of flowering. Last pictures. Ready to harvest 😛 Last week the buds have swollen enormously. And with cold nights; temperature between 5° - 10°, the pink colors darkened, rather than turning purple. 👌 All plants are fairly even in ripeness. The buds are hard and sticky. 😍 The fragrance is mainly that of Gelato. The legendary Gorilla genes express themselves rather in the color and appearance. 😻 A beautiful main Indica that is easy to grow, full of trichomes, great pleasant scent, perfect maturation and good yield. Highly recommended ! 👍 Only water till the end. 😨 Plant size and description : #1 96cm Falling in love with this beauty is easy. Beautiful buds. Nice colours. #2 95cm Beautiful plant. Looks a bit like #1, a bit later ripe but thicker buds. #3 100cm Beautiful large plant without side branches. A lust for the eye. Spectacular dark green-purple buds. Perfection. 😍 #4 89cm Another beautiful medium-sized plant. Like # 2 ripe a little slower, but even thicker buds. #5 106cm The largest of all plants. She looks different from the others. She has the most of her parents Gorilla genes. She has slightly longer side branches. Beautiful beautiful light pink color. 😘 #6 78cm Short thick pheno. Gelato style. Beautiful color. Thick round top. #7 69cm Again a thick short pheno. Fantastic colors with a thick slightly more pointed top. #8 96cm Beautiful medium-sized plant. Short side branches with thick main top. Brilliant colors. Very Frosty #9 75cm Small plant with weak, somewhat longer side branches. Semi-thick top. #10 53cm Very small plant. Beautiful big fat bud. Green Gelato type. #11 50cm Very small plant like #10, solid mainbud. Stunning purple-pink colors. #12 85cm Medium sized plant with side branches. Perfect buds. Stiff of trichomes. #13 73cm Super short plant. Enjoy the green color of the leaves, with a tasty purple complexion deep and high in the buds. #14 89cm Medium-sized plant with a lovely thick top, but also with short side branches that are built up with thick buds. #15 85cm Medium sized plant with weak side branches but a nice head bud. #16 99cm Absolute winner. Large plant with thick, fat buds. Super harvest. Top shelf. 😛
Likes
1
Share
@Dabcik
Follow
I profumi iniziano a sentirsi forti e ben definiti! Le cime delle happy ending sembrano le più grosse e compatte e resinose al momento. Anche le pink poochie promettono bene. Le zerberry stanno mutando colore sul violaceo
Likes
Comments
Share
@youdan
Follow
una coltivazione che mi ha dato molte soddisfazioni, chimera e una pianta formidabile ed ha dei terpeni difficili da descriverli, dovreste coltivarla per capire a pieno la sua potenzialita
Likes
30
Share
Will definitely update this as I finish trimming and curing!
Likes
12
Share
Early flowering happened earlier than I expected. Is that because of some sort of stress or something? I think, they aren’t mature enough.