
Likes
Comments
Share


@Diips
Follow
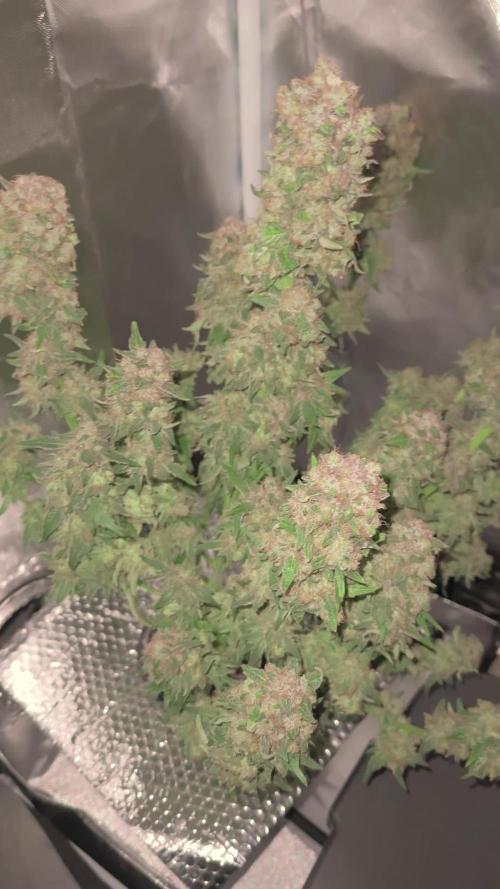
d.85 really fading hard, and buds are growing in size. just letting her do her thing, we are taking this to the end. also got my humidity down.
d.87 buds are fattening up 😍
all i have to say about that is, bigger boots, bigger roots = bigger fruits.
mainlining is possible with auto, as long as you choose a big enough pot size and time the topping and lst. after that part is done, then the auto just needs time to do its thing.

Likes
58
Share


@MadeInGermany
Follow
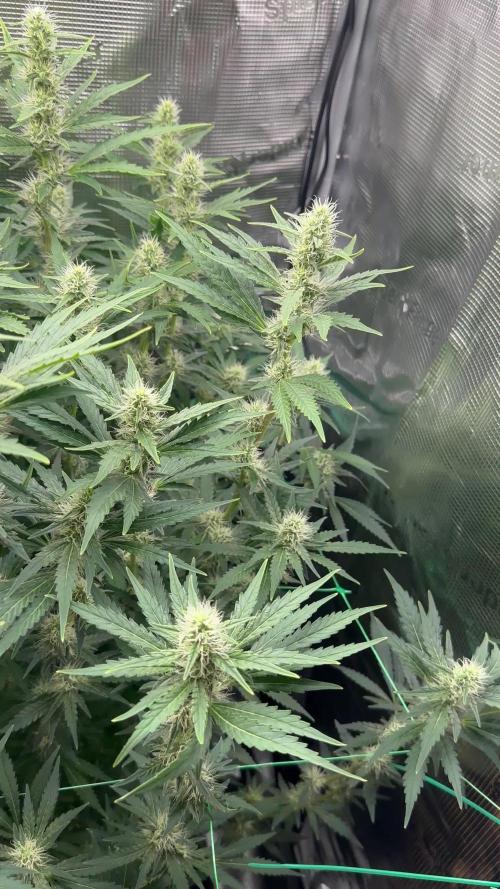
Flowering day 37
since time change
to 12/12 h.
Hey everyone ☺️.
It gets more beautiful from week to week 😍👍.
As usual from this phenotype, everything is black / purple again on this beautiful Pheno 😊.
The buds are getting thicker and thicker and already smell extremely tasty 😍.
Next week I'll go up a bit with the Ec and add some Pk 13/14.
Like every 12-15 days, the water was completely replaced and all electronic devices checked for safety 👍.
The Ph / Ec measuring device was also recalibrated.
Otherwise there is nothing to report for this week and we'll see you again with the next update ☺️👍.
I wish you and your families a Merry Christmas 😊.
Stay healthy and let it grow 🍀
You can buy this Strain at :
www.Zamnesia.com
☝️🏼☝️🏼☝️🏼☝️🏼☝️🏼☝️🏼
Strain
Gelato clone from mother (Zamnesia )
☝️
Genetics: Wedding Cake x Gelato x Gelato 33
👍
Vega lamp: 2 x Todogrow LED CXB3590 COB 55 W
1 x Sanlight S2W 62 W
💡
Flower lamp : 2 x Todogrow LED CXB3590 COB 55 W
1 x Sanlight S2W 62 W
💡 ☝️
Grow Aero System : Growtool 0.8
☝️
Fertilizer:
Canna Aqua Vega A + B , Canna Aqua Flores A + B , Rizotonic, Cannazym, CANNA Boost, Pk 13/14, Canna Cal / Mag, Canna Ph - Grow, Canna Ph-Bloom
☝️🌱
Water:
Osmosis water mixed with normal water (24 hours stale that the chlorine evaporates) to 0.2 EG. Add Cal / Mag to 0.4 Ec Ph with ph- to 5.2 - 5.8
💦 💧

Likes
26
Share


@CannaBuds
Follow
Haven't updated in a while as I haven't had much time to do so will update this all soon when I can ✌️❤️

Likes
19
Share


@GoldenWeedGrower
Follow
Legend
Timestamp: 📅
EC - pH: ⚗️
Temp - Hum: 🌡️
Water: 🌊
Food: 🍗
pH Correction: 💧
Actions: 💼
Thoughts: 🧠
Events: 🚀
Media: 🎬
D: DAY, G: GERMINATION, V: VEGETATIVE, B: BLOOMING, R: RIPENING, D: DRYING, C: CURING
________________________________
📅 D98/B36 - 21/02/24
⚗️ EC: 0.8 pH: 5.3
🌡️ T: 21-23 °C H: 45-75 %
🌊
🍗
💧
💼 Some defolation
🧠
🚀
🎬 Added timelapse video and screenshots
________________________________
📅 D99/B37 - 22/02/24
⚗️ EC: 0.8 pH: 5.3
🌡️ T: 19-24 °C H: 50-75 %
🌊 14 L
🍗 Calmag - Bloom A-B
💧
💼 I've prepared all the stuff for 3 days out. I'm going to leave today and get back on Sunday (25/02). Humidifier filled up
🧠
🚀
🎬
________________________________
📅 D100/B38 - 23/02/24 💯💯💯
⚗️
🌡️ T: 19-23 °C H: 45-65 %
🌊
🍗
💧
💼
🧠
🚀 First Day Out
🎬
________________________________
📅 D101/B39 - 24/02/24
⚗️
🌡️ T: 21-24 °C H: 50-65 %
🌊
🍗
💧
💼
🧠
🚀 Second Day Out
🎬
________________________________
📅 D102/B40 - 25/02/24
⚗️ EC: 1.0 pH: 6.0
🌡️ T: 20-24 °C H: 55-70 %
🌊 RES Changed 💦💦💦
🍗 Calmag - Bloom A-B - Bud Candy - B52 - Overdrive
💧
💼 I changed the res for last 10-15 days of blooming until ripening and flush
🧠
🚀 I'm back
🎬 Big job on media. I edited the cumulated time lapse videos and splitted day by day. Also uploaded the screenshots from the TrolMaster App for each day out. Great job !
________________________________
📅 D103/B41 - 26/02/24
⚗️ EC: 0.8 pH: 5.2
🌡️ T: 20-24 °C H: 50-70 %
🌊 1L
🍗
💧
💼 Some defolation
🧠 She's not yet ready, I think a couple of week more
🚀
🎬 8 pics added + 4 pics macro. Timelapse and screenshots
________________________________
📅 D104/B42 - 27/02/24
⚗️ EC: 1 pH: 5.9
🌡️ T: 20-24 °C H: 50-65 %
🌊 6L
🍗 Calmag - Bloom A-B - Bud Candy - B52 - Overdrive
💧 some pH+
💼
🧠
🚀 End of the 6 weeks of flowering
🎬 Added timelapse and screenshots. I also prepared a timelapse of the entire week with some music 🎵🎵🎵 and weekly rate of T-H and VPD 📈📈📈


Likes
23
Share


@420DeepGrow
Follow
Gracias al equipo de Sweet Seeds, XpertNutrients y Marshydro sin ellos esto no seria posible.
💐🍁 Red Hot Cookies:
Excelente genética resultado del cruce entre un clon seleccionado de una variedad “Super Strong” americana de la familia Cookies, la Tropicanna Cookies (Girl Scout Cookies x Tangie), y un clon seleccionado de una potente variedad también americana de excelente aroma a mandarinas, la Tangie.
Para el cruce se han elegido exóticos parentales con fenotipo de flor roja. El color rojo en las flores se presenta en un 60% de la descendencia y suele aparecer en las últimas semanas del periodo de floración, comenzando desde las ramas y flores inferiores hacia las superiores.
Variedad de marihuana “Super Strong”, muy productiva y resinosa, que alcanza niveles de THC de hasta el 25%. Excelente aroma y sabor, dulce, profundo y denso, con marcados tonos de mandarina y mango, y pinceladas de frutos del bosque.
🚀 Consigue aqui tus semillas:
https://sweetseeds.com/es/the-red-family/3066-red-hot-cookies.html
💡FC6500: Eficiencia líder en el mercado: la lámpara de cultivo LED FC-E6500, que ostenta un estatus líder en el mercado, es una solución rentable con un PPE de 2,8 µmol/J y un rendimiento máximo de 2,5 g/vatio. Ofrece un PPF alto de 2026 umol/S y es adecuada para una cobertura de vegetación de 1,50 m x 1,50 m y una cobertura de flores de 1,20 m x 1,20 m.
Iluminación versátil y uniforme.
https://marshydro.eu/products/mars-hydro-fc-e-6500-730w-commercial-led-grow-light/?gad_source=1&gclid=Cj0KCQjw1qO0BhDwARIsANfnkv9IIrYSbmJqz8PqpJOIyWwJfp5bc3SGJgUV68USLQ4tjmXDYwoBuAsaAue3EALw_wcB
🚥 MarsHydro ADLITE UV/IR/RED:
Para lograr un crecimiento óptimo de las plantas y maximizar los rendimientos es un arte simple que depende en gran medida de las condiciones ambientales adecuadas. Reconociendo las limitaciones de la iluminación natural y las soluciones de iluminación tradicionales para satisfacer estas necesidades únicas, lanzamos ADLITE. Estas luces especiales UV, IR y roja están diseñadas para llenar áreas del espectro, proporcionando las altas longitudes de onda que las plantas necesitan para un crecimiento y desarrollo óptimos.
🚀 Consigue aqui tu Adlite:
https://marshydro.eu/collections/adlite-supplemental-lights/
🏠 : Marshydro 1.50 x 1.50 x 1.80, carpa 100% estanca con ventanas laterales para llegar a todos los lugares durante el grow
https://marshydro.eu/products/diy-150x150x200cm-grow-tent-kit
🌬️💨 Marshydro 6inch + filtro carbon para evitar olores indeseables.
https://marshydro.eu/products/ifresh-smart-6inch-filter-kits/
🍣🍦🌴 Xpert Nutrients es una empresa especializada en la producción y comercialización de fertilizantes líquidos y tierras, que garantizan excelentes cosechas y un crecimiento activo para sus plantas durante todas las fases de cultivo.
Consigue aqui tus Nutrientes:
https://xpertnutrients.com/es/shop/

Likes
12
Share


@yd_grows
Follow
Plantas voltaram a crescer após transplante e topping.
Apenas regando com água a pH 6.8.
Likes
55
Share

@MadeInGermany
Follow
Info:
Unfortunately, I had to find out that my account is used for fake pages in social media.
I am only active here on growdiaries.
I am not on facebook instagram twitter etc All accounts except this one are fake.
Flowering day 44
since time change
to 12/12 h.
Hey guys :-) .
The lady is developing very well.
The buds keep getting thicker and smell better and better :-).
This week it was poured twice with 1.2 l each (sewing materials, see table above).
The tent was cleaned and everything checked.
Stay healthy 🙏🏻
You can buy this Nutrients at :
https://greenbuzzliquids.com/en/shop/
With the discount code: Made_in_Germany you get a discount of 15% on all products from an order value of 100 euros.
You can buy This Strain at :
www.Zamnesia.com
☝️🏼☝️🏼☝️🏼☝️🏼☝️🏼☝️🏼
Strain
Gelato clone from mother (Zamnesia )
☝️
Genetics: Wedding Cake x Gelato x Gelato 33
Vega lamp:
2 x Todogrow Led
Quantum Board 100 W
💡
Bloom Lamp :
2 x Todogrow Led
Cxb 3590 COB 3500 K 205W
💡💡☝️🏼
Soil :
Canna Coco Professional +
☝️🏼
Nutrients :
Green Buzz Liquids :
Organic Grow Liquid
Organic Bloom Liquid
Organic more PK
More Roots
Fast Buds
Humic Acid Plus
Growzyme Big Fruits
Clean Fruits
Cal / Mag
Organic Ph - Pulver
☝️🏼🌱
Water: Osmosis water mixed with normal water (24 hours stale that the chlorine evaporates) to 0.2 EC. Add Cal / Mag to 0.4 Ec Ph with Organic Ph - to 5.8 - 6.4
Processing
Likes
2
Share


@eldruida_lamota
Follow
Esa familia, nuevo LST con misty gorilla autofloreciente, empezaremos de momento con 2/3 misty gorillas con este método de cultivo. Uno de los ejemplares me parece algo pequeño aun como para andar atando nada.
Añadi BETA SHARK , quite el producto de crecimiento, y aporte el producto de floración de la gama BLACK LINE de AgroBeta.
También quite el enraizante, ya que fácilmente consigo buenos cepellón es y con varias semanas de dosis son suficientes.
Ph controlado en 5.8 humedad entorno al 45%, la temperatura no sube nunca a los 27 grados , se queda siempre en 26 poco.
Se las ve con buen color , un tallo bastante manejable, fueron atados entre 2 y 3 nudos por planta con alambre forrado.
Espero que os gusten las fotos e imágenes ya que gracias a Zambezaseeds, marshydro y AgroBeta es posible este cultivo, un saludo fumetillas 💨💨💨💨.

Processing
Likes
2
Share


@OGxGxMoney
Follow
Cant believe how fast these grew!! 48-72 hours from germ and four to five days later, these were sitting above ground!!😁😁

Likes
5
Share


@alex1515
Follow
Привет всем, сори за задержку, не было времени. эта неделя прошла не плохо, появился приятный аромат лесных ягод и цитруса. изменились удобрения и так же добавленная патока для улучшения цветов.
Likes
21
Share


@JuicyFruit
Follow
Week 9 - Day 63 - 26/11/19
Im so grateful to be a part of this community and to be at this milestone so to speak :) had an amazing time growing this plant, thanks to everyone who had a look or contributed to my diary!
Harvest was fun but that little 16cm tall plant stunk my whole house out of cheese when i started trimming her :)
Added a few photos and videos of the harvesting, i got a little ball of hash off the scissors which i smoked in a bong and it was nice! very hashy!
its taken about 2 hours to finish trimming but ive stored all the trim in the freezer along with the dwarf trim from my last diary :) im making cannabutter and edibles this week. really excited for that.
So i hung my drying rack outside the tent beside the passive intake. temps are between 20-22c in the room so it should dry fine and im hoping the passive intake will drag the smell in and keep it sort of fresh in the room :)
This diary has got me excited for my Quick One plant as its much taller and has colas like arms :D.
Il update in 3-7 days when buds are dried and then il be updating a lot throughout curing :)
Day 65 - 28/11/19
Still drying these buds :) they look much smaller now, i smoked a small bud and although its much drier than harvest its still spongy/sticky and stretchy when breaking apart so 2-3 more days drying i think.
Smell is wonderful especially if you get it on your hands, its like tropical fruit cheese and the effects of thc are not as pronounced with this strain but i felt very relaxed, no muscle pain etc and no paranoia or anxiety. i havent had a clear relaxed headspace before bed in a very long time. Any 1:1 THC/CBD is a must grow, give it a try if you havent already, i couldnt have picked a better starter medical plant as i love a good old cheese strain :)
And i made some cannabutter out of the 59g of sugar leaves i got from this diary and my first diary. il have to upload a few pictures of the process later and let you all know if the cannabutter worked in my brownies :)
Day 66 - 29/11/19
Started curing and added a photo to show :) buds were at 59-60% when left in the jar alone for a few hours so i threw in my boveda 58% pack and started burping 5-6 times per day :) i could have cured for a week before adding the boveda pack but i had barely any bud in the huge jar so i thought it would be wise to add the boveda to prevent mold and to keep it curing perfectly!
Day 67 - 30/11/19
Posted a picture of a handful of buds :) i smoked a few in a bong and had a joint and it left me nice and medicated! no anxiety no paranoia nicely locked to the couch and sleepy. perfect nightime smoke as it wont trip you out or mess with your head, just a nice happy little mellow buzz!
Flavour hasnt really came through yet, not sure what to expect as im a newbie but its slightly like cheese/flowery/herbs.
Curing is definitely helping every day! the smell is getting better, buds are getting really smooth and they look amazing also! really excited for the next few weeks curing :)
Final Update - Day 69 - 02/12/19
Finally here at the end of this diary and i have to say i loved growing this plant. it was a dark green colour throughout growing and took whatever i threw at it.
Buds are nice and dry and curing well. i saved the best buds until last and added a couple of photos of them and a video also! they are covered in trichomes and feel great.
Not much of a smell from the buds and it tastes like a sweet floral cheese mixture.
Im pretty couchlocked from a bong of this strain so im gonna end this diary here and go relax but many thanks for following along folks and take a look at my other diaries if you get a chance :)
Peace!
Likes
27
Share

@GrowX420
Follow
So heute wird geerntet, nach knapp 10 Wochen geht ein wunderbarer Grow zu Ende. Ich stelle die Kleine erstmal für 72 std abgedunkelt ins Zelt. Danach werde ich sie von überflüssigen Blätter befreien, die Sugarleafs werden separat entfernt, da sie eingefroren werden fürs Bubblehash. Daraufhin werde ich diesmal die Pink Rozay nur unten kappen und als Ganzes ins Zelt hängen, ansonsten hatte ich im ein trockennetz benutzt.
Updates folgen :)
Happy Growing und euch allen alles gut und viel Glück bei euren Projekten
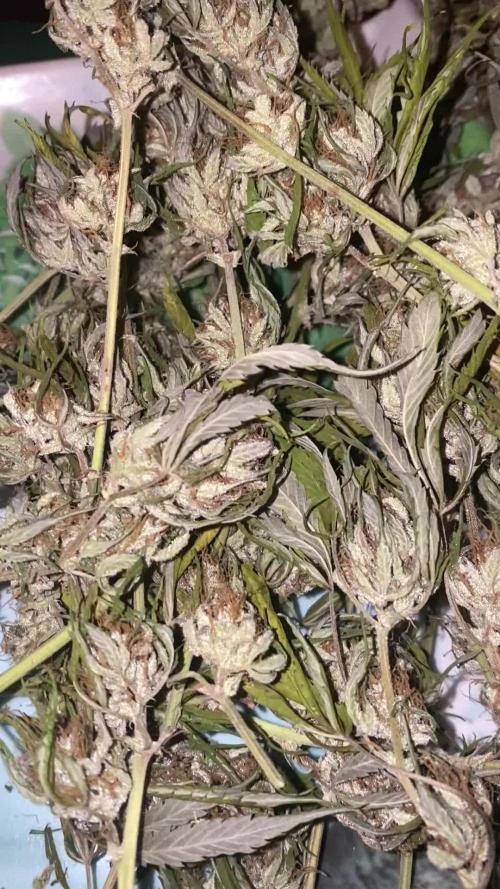
Harvest Update
Nach knapp 8 Tagen war sie soweit, die Pink Zozay Auto war endlich trocken und bereit für die Terplock Bags, ich hab alle Buds von den Stielen getrennt und die Spitzen der Sugar Leafs beschnitten und die letzten größeren Blätter enfernt. Sie riecht ziemlich streng nach Orange, einfach lecker und hat ein dry Gewicht von 76 Gramm
So jetzt erstmal für mindestens ne Woche fermentieren und dann kommt das schönste, der Smoke Bericht :)
Lets Go
Likes
65
Share


@Roberts
Follow
Gold Sativa is growing good. Her roots just got out of the basket. Everything is going good. I am growing her under a Spider Farmer SE5000. I am growing her in a New Level Hydro 5 gallon bucket links below. Thank you Quebec Seeds, New Level Hydro, and Spider Farmer
SE5000
https://amzn.to/3qFpAML
Spider Farmer Official Website Links:
US&Worldwide: https://www.spider-farmer.com
UK: https://spiderfarmer.co.uk
CA: https://spiderfarmer.ca
EU: https://spiderfarmer.eu
AU: https://spiderfarmer.com.au
Coupon Code: saveurcash
Thank you grow diaries community for the 👇likes👇, follows, comments, and subscriptions on my YouTube channel👇. ❄️🌱🍻 Happy Growing 🌱🌱🌱
https://youtube.com/channel/UCAhN7yRzWLpcaRHhMIQ7X4g
www.newlevelhydro.com
www.hygrozyme.com

Processing
Likes
7
Share


@x_grower
Follow
Last week the plants grew looking very healthy although I still have a feeling the low humidity is slowing their growth, by the end of the first week I started raising the EC to make the increasing for this week smoother, run-off EC is substantially increasing so I will start to fertigate them twice a day for this week.
Likes
6
Share

@El-Ecko
Follow
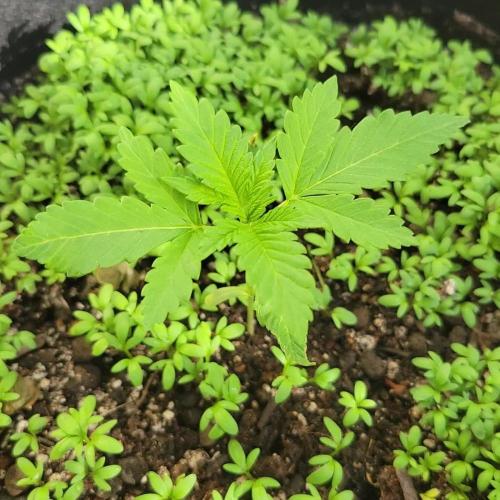
3 Weeks of VEGETATION
I’m absolutely thrilled with how things are going.
It has a rich, lush green color.🌱🌿
The cress I used as a mulch layer has grown beautifully and still looks really nice.😍
It handles full sun more than just fine... and the little Frostbanger seems to have adapted very well to the nutrient content of the Living Soil.
Likes
93
Share


@DreamIT
Follow
Purple Berry Kush by Spliff Seeds
🏜️22.8 Today a small video, tomorrow I start with the new fertilizers
🏜️23.8 I hope to see an enlargement of the flowers soon, I'm tired of seeing it like this
🏜️24.8 💪💪💪💪💪💪💪💪🤘🤘🤘🦄🦄🦄
🏜️25.8 🤘🤘🤘🦄supeeeer
🏜️26.8 it is starting to grow again
🏜️27.8 here we are! Soon I'll start with trichome macros, yuppyyy
🏜️28.8
__________________________________________
❓ Are you new to the world of the cultivation and don't know where to safely buy your seeds?
🦄Fast and anonymous shipping. Take a look at their very nice graphics
✅https://www.spliffseeds.nl
______________________________________________
👀 Are you looking for a good lamp to start with? 👀
🌞Viparspectra has something more than the others, take a look at their site.
⏩ Use "GDVIP" for an extra discount or "ViparDreamIT" for an extra 5 %% discount
👀 Search for it on Amazon
✅Amazon US: https://amzn.to/30xSTVq
✅Amazon Canada: https://amzn.to/38udUVe
✅Viparspectra UE: bit.ly/ViparspectraUE
👀 Watch my ViparSpectra XS1000 unboxing on YouTube, leave a like and write to the channel 🦄
✅http://bit.ly/UnboxingViparSpectraDreamIT
______________________________________________
📷🥇 Follow the best photos on Instagram 🥇📷
https://www.instagram.com/dreamit420/
🔻🔻Leave a comment with your opinion if you pass by here🔻🔻
🤟🦄💚 Thank you and enjoy the growth 💚🦄🤟

Likes
47
Share


@GanjaReaper
Follow
Day 56:
Nothing special this week other then I found out another reason for the stretching of the plants.
They did not stretch that much as the Gorilla's but they still did some.
I don't know where i was of what i was doing but suddenly it came into my mind.
Well normaly i use seperate veg and flower basic nutrients. This time, I used a new basic nutrient i never used before.
This basic nutrient has veg and flower nutrients for the whole cycle. So the growth of the plants where stimulated to longer.
This is fun when you grow huge plants for a long time, not if you plan to only veg for 3-4 weeks, 1-2 weeks preflower with maybe 6 to 9 weeks of flowering.
Likes
86
Share


@AsNoriu
Follow
Day 85. Girls are happy , but small ;))) development for such time is like two weeks minimum behind. Loads of leaves shadowing buds, will do new defoliation session next week.
Checked light spread and intensity with mobile and simple lux meter app. Results are weak, but better than cheap red/blue generation. Still get like 25k max feet away.
I will grow those strains in main tent , really want to see why are they so slow in development...
But smell after touch ... Now Kush is my fav ;)))
Girls on water-feed-water-feed schedule.
Bio Grow is out. Next week Cal Mag out.
Day 88. Lucky day for screw ups ?!?!?!?? ;)))
Made first time defoliation when in last round you take all shadowing leaves away, hopefully it won't stress them much ..
Usually i was leaving top two fan leaves, now everything shading something and has stem to cut - is out !!! :)))
Happy Growing !

Likes
2
Share

@nastyy
Follow
Last day of week 5 flower today. Like I said earlier, the cookies haze is a bit behind in flower. So counting that as last day of week 2
Just a little update for you guys

