The Grow Awards 2026 🏆 


Likes
Comments
Share
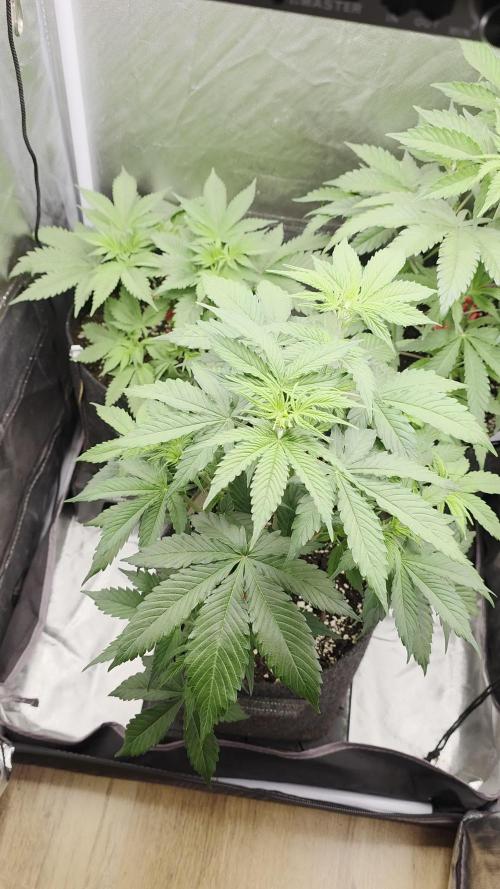
@gottagrowsometime
Follow
Weeks 7-9 Days 42-63-5
Both phenos got defoliation done to them and opened them up for fattening. They've stopped putting upwards hight and on day 42 I done their only heavy defol and put them back under my P1000 (100W led) which did this plant from start to finish. Kept steady feeds. The last 4 days or so it was put on water. After 6hrs dark rest both were chopped and hung upside down.
(More indepth 3 week review)
Phenos at the end of week 6 here, finished preflower both are around 62-65cm. Been the general hight for my other 2 pheno pot grow . Then on day 42 I done a hard defoliation and just put them back under the light for 3 weeks. Steadily kept feeding Xpert Nutrients but not in the way I should have. But, for the short time (9 weeks) and just making sure that the substrate never ran dry. I got some decent results. Again these were more tests. As I like to see how breeders phenos react in similar environments and you can't get closer than being in the same pot, got 2 small but more or less twins of Auto Fractal, giving me around 45-50 dry grams
Nutrients were given sparcely but always made sure NPK feeds were no longer than 3 days apart. Had I given everyday and focused more on flushing etc. Id of gotten bigger phenos. But, it was a test. And I got to try their autos and now know that I'm most cases you won't get 7-10g plants. Just give enough space and don't stress and you'll get big autos. Put on good bud mass just under a 100w in a crowded tent. Got really fruity bud and overall very happy with my 2 small lush phenos
1st 2pheno (separate strains, autos kabul/opium also showed how steady the genrics are I've got a 5 pheno SCROG of Euphoria fem by Divine coming along nicely.
I also have a white widow auto by divine in an 11L pot and its really big its still weeks out from being done. Proving to me. Their gentics are 🔥 and give good results if you put in the right effort.
Thanks to my sponsors & all who stop by.
Discount code from Xpert nutrients
20% off code:GGST


Likes
20
Share
@eldruida_lamota
Follow
Esa familia, buenas de nuevo, siento la tardanza, asuntos propios ya me entendéis... pero ya actualizo y es que esta farm cheese de genofarm esta ya apunto de caramelo. Se espera el corte muy pronto y la verdad que promete , se ve increíble y huele que flipais.
Ph controlado temperatura por debajo de 27 grados y humedad por debajo de 40%.
Estoy muy contento porque el genotipo cheese es de mis preferidos y está en concreto tiene ese olor tan peculiar.
Un saludo y nos vemos fumetillas.

Likes
10
Share
@Eldorado_ed
Follow
Transplanted these ladies to there new pots and on to there new home everything looking good on to the next week see y’all then 🌱😬✌️🏻

Processing
Likes
17
Share
@jamjam887766
Follow
First ever harvest! Plant #2 has been covered in trichomes for the last two weeks and with a jeweler's magnifying glass and my camera phone zooming 7x it's clear that many of trichomes have turned amber. I chopped her down last night and have been hanging the branches upside down in a cardboard box with a fan and dehumidifier. I've read I should keep the temperature in the 70s F and the humidity around 50%. I'm doing my best but the garage isn't well insulated so I'm at the mercy of the weather. I'll keep an eye on them and when the branches snap easily I'll get them in jars for curing.
Plant #1 still has some time to go. The branches are filling out but to the naked eye there are no trichomes. When I look with the magnifying glass I can see them but I'm concerned that #2 had been coated in them for about two weeks now. Should I just wait? I think I'll just wait

Likes
64
Share
@MadeInGermany
Follow
Hey everyone 😎.
This week she was completely defoliated around the bottom 😃.
Everything turned out exactly as hoped 🤗.
She looks great and is just beginning to develop her buds.
I am very curious how it goes this week 😃.
I wish you all a lot of fun with the update, stay healthy 🙏🏻 and let it grow 🌱
You can buy this Strain at :
https://www.barneysfarm.com
Strain :
Blue gelato 41 clone from mother (Barney's Farm)
☝️
Genetics:
Blueberry x Thin Mint Girl Scout Cookies x Sunset Sherbert
👍
Vega lamp:
2 x
Todogrow LED HLG Quantum Board 100 W ( 200 W )
💡
Flower lamp:
2x Todogrow LED CXB3590 205 W = ( 410 W )
💡 ☝️
Soil : Canna Terra Professional +
☝️
Fertilizer:
Canna Terra Vega , Canna Terra Flores , Rizotonic, Cannazym, CANNA Boost, Pk 13/14, Canna Cal / Mag, Canna Ph - Grow, Canna Ph-Bloom
☝️🌱
Water:
Osmosis water mixed with normal water (24 hours stale that the chlorine evaporates) to 0.2 EG. Add Cal / Mag to 0.4 Ec Ph with Ph - to 6.0 - 6.3
💦 💧

Likes
65
Share
@Hologram
Follow
Goodday growmies
as i already told you, i could not log in for 11 days (mayb 10 but i like the number 11..😎)
Luckily GD finally let me in today..(finally ..sigh)
so i can show off my sweet Candy girl!
she is so awesome
dont tell the other girls but she is the most beautifull RN.. Hedge hogs are multiplying and getting fat in a fast speed!
looks like she is leaving then all behind ..
😇👌
it was cold and rainy but Candy still kept showing off her potential anywayz
she is not the tallest in my garden but iam feeling this is gonna be a FAT lady 👊 (LOVE BIG BUDS I CANNOT LIE ;))
she has a lotof Arphids too but i try to catch them in their tracks and i let loose some ladybugs, i have kidnapped from my garden..
they are the best @ hunting invaders. and clean up the whole plant👏
this week weather is gonna be much better so good times🙌
there is a lot of wind so lets hope the ladybugs hold on...
happy growing for all ✊
***KISS! growing technique: KeepIt Simple, Stupid!

Likes
20
Share
@Northern_Ent
Follow
Sep 5: still going strong. This has been the most hassle free plant.
Sep 7: late season hailstorm did some minor damage to other plants but this one is fine. Lost some trichomes but no major damage overall.

Likes
10
Share
@TiRobotProds
Follow
J'ai pratiquer sur elles la défoliation extrême qui consiste a enlevé les grosse feuilles nourricière pour permettre une meilleure penétration de la lumière et de la circulation de l'air voyons ce que cela va donner au prochain épisode growers.


Likes
4
Share
@Alejangrow
Follow
Have been overfeeding this girl. Shes still going strong tho. Flushing her for 1 week then returning to the feed schedule I should've been using for my set up. 🤷♂️🏽🌿

Likes
36
Share
@GYOweed
Follow
Defoliated. Smelling sweet moss. Fat stems and leaves on this one. Very crunchy too so will need supports and being careful lol. Yes i did give it Silica.


Likes
15
Share
@Dunk_Junk
Follow
Had stuff to deal with IRL this week. Only timelapse available.
She is growing VERY well.


Likes
9
Share
@MistaOC
Follow
06.08. Tag 60
Die kleinen machen sich gut und die Blüten schwellen an. Der Duft ist einmalig. Die Tangie riecht so fruchtig süß. Ich bin gespannt wie sie schmecken wird.
Drei Pflanzen habe ich aktuell super im Griff, eine mangelt etwas und verbraucht aktuell viel mehr als sie bekommt. Man erkennt es ganz leicht an der unterschiedlichen Blattfarbe. Bei dieser werde ich die Dosis etwas erhöhen ehe es Richtung Endspurt geht.
Am Wochenende habe ich endlich meinen mittlerweile 13 Jahre alten PrimaKlima Lüfter ausrangiert und bin auf die 6“ Variante von AC Infinity umgestiegen. Ich bin begeistert.
Gegossen wird aktuell mit 2,5L Osmose Wasser. Zzgl. calmag (1ml/1L) und canna bioflores (4ml/1L).
Calmag bei jedem giesen und bioflores bei jedem zweiten giesen.
Alle zwei Wochen kommt noch bio enhancer (1g/1L) von greenhouse dazu.
———————————————-
Likes
3
Share
@CheeeRz
Follow
The ladies have almost reached 40 cm in height, so we are switching to the flowering stage. For the next two weeks, they will receive fish mix before I switch to Biobizz Bio Grow. 💚💚


Likes
12
Share
@Willy_Balls
Follow
16.02
First day of the fourth week of flower.
Defoliated a little bit again. This time around I’m picking smaller amounts of leaves every day in comparison to one major defoliation on one day.
Also I ve added pk booster at 100 ppm.( 0.2 ec) will gradually raise it over the next weeks. Lowering the base nutrients.
I think they finally stopped the stretch and they are barely fitting in the tent.
I ve added some swirski ulti mite . Predatory mites as prophylactic measure for thrips. I’ve noticed some tiny damage on a couple of leaves. And a couple of larvae.

Likes
4
Share
@DatGuyGrows
Follow
Clip is from my YouTube channel. Didn’t have many pics of this week, was only filming clips for my grow channel.


