
Likes
Comments
Share


@PolezGardn
Follow
week three flower everything looks fine so far :D
eight days after defoliation
I water them with 1.5l every 48h
the light I use was set to 80% and it hangs 80cm away from the tops

Likes
5
Share


@Audacissimus
Follow
Hey all
On the 4th week, they are starting to show signs of flowering, next week will go full on bloom nut.
Didn't increase ppm this week because some yellow spots appeared on a few leafes and didn't want to risk overfert.
Thay are still adapting good to my low skill training 😂
Also added some wannabe artistic pictures, just because I love to spend time just watching them 😍


Likes
6
Share

@Daz_Method
Follow
Week 5 of veg: repotted into the final 12L pots using a 100% organic soil mix I made myself with dry organic amendments only — no bottled organic products. Watered with compost tea, and bent/trained the plants to shape the canopy for a SOG setup. Everything is going smoothly; we’ll give them another 7–8 days of veg, then flip to flower.

Likes
62
Share


@SimpleGrow
Follow
Hello grow friends,
Today is the start of Week 7 and it‘s day 40 of groth for the plants. It‘s safe to say, they transitioned nicely into flower and spread evenly throughout the tent. It was pretty time consuming to get enough light to the lower branches but it seemes to be paying off. At the start of next week, I have a heavy defolition planed so at day 21 of flower most of the fanleaves will be cut off. This will help tremendously with the high humidity i‘m dealing with. Somehow I still manage to get it down but I still have a job to go to and not much time to devote. Anyways, c you soon guys and have a great start to the week. 🤟🏼

Likes
290
Share


@Ferenc
Follow
It has been raining and raining since whatever... 2 weeks....checked the trichomes nice milky white.
Based on the fact the the weather won't be better and also the temperature is lower day by the now usually 6 Celsius degrees in the evening and 13-16 during the day or less, I decided to harvest next week.
I was thinking to let her out 3 more weeks just to have more amber trichomes but she is OK, ready but this weather is not ...
She is sativa dominant as I saw in the breeder's description so totally cool.
So she ain't gonna be maturing that much she reached the point.... especially because no sun....
... but compare to that she has som nice colas so I am excited let's see soo guys. Thanks all of you checking this progress out.
Beautiful lady, large LST made her really nice literally she looks like more plant but yes ONLY ONE PLANT IN THE PICTURE AND THE GARDEN :)
Have a lovely day :)


Likes
7
Share


@gablmo
Follow
It was a busy week full of events. I got them a 600 watts HPS light and microbes to help them grow faster. I finally started the trellis netting to even the canopy and get more from the lights and I also spray the plants again for bugs. I found out that I've been using powder nutrients on my reservoir and that's probably why I've been getting floods two or tree times a week and now the valve is open only when I'm there, because I'm sick of cleaning and I took that little sick plant out. My cats have her now.

Likes
4
Share


@Phatlad187
Follow
Week 2 of flower plants are growing perfect with no problems small buds starting to form struggled with heat abit but they still going strong nice and green one of them at streched more than others
@growerchoice @SHOGUN COCO A 4ml/L
160ml
@SHOGUN COCO B 4ml/L. 160ml
@SHOGUN ACTIVE BOOST 2ml/L. 40ml
@SHOGUN CAL MAG 1ml/L 20ml
@SHOGUN ZENZYM 2.5ml/L. 100ml
@SHOGUN KATANA ROOTS 0.2ML/ 8ML

Likes
8
Share

@Chubbs
Follow
What up Fam, weekly update for these ladies. This week's pretty quite, nothing crazy happening. They getting 16oz of feed about every two days. Still just calmag and ph'd water. I will be giving them there first defoliation this coming week as well as add some bloom nutrients as I think this will be the last week of veg. All in all Happy Growing.
Likes
42
Share


@JohnDee
Follow
Hello all! This plant looks mature and I have a microscope but the thing is I thing it has over ripened and, some trichomes fell off? Or let me tell you my trichomes never turned MILKY OR WHITE. Some of them are amber tho. Anyways, on growweedeasy.com there is a guide that says : Harvest even if your trichomes are not ready. I guess it will be more a gut feeling to chop or not chop. Any input greatly appreciated.
And yes, I have chopped down the main cola and dried and smoked it. I guess it gets me high but I smoke all the time so it's hard to evaluate because I have also bought quality weed to smoke
So guys, only from the photos, what do you think?
My trichomes looks like half clear %10 amber. Do you think it could go to amber without stopping at milky? Or milky trichomes fell of but there was new growth and I could never see clear trichomes?
INPUT ? :)

Likes
164
Share


@Hologram
Follow
Not much to say than to sing:
I am the god of hell fire and i bring you: FIRE!!❤️🔥
♫⋆。♪ ₊˚♬ ゚.
happy growing for all✊
***KISS!growingtechnique: KeepItSimple, Stupid!
(think 2weex she is ready to BURN!😋)

Likes
15
Share


@Ronin716
Follow
So at the start of week 3 I began to LST CM#3 to just experiment basically and topped CM#2 I believe. Again, just to experiment. This is my first grow and I was stunned with the reactions to both! The new growth after topping was about 1/4” in about 12hrs.. Crazy to me and the lst is proving to expose these bud sites and encourage amazing growth QUICK!! I’ll continue to train daily. One of the videos show the topped CM just yesterday. In 4 days, it’s grown soo much! Also, a video mentions the gender reveal but since then, all 4 have officially revealed themselves as female at the 22 day mark.

Likes
48
Share


@DreamIT
Follow
💐🌟HESI contest🌟💐
💮 8.2
💮 9.2 ...
💮 10.2...
💮 11.2...
💮 12.2...
💮 13.2 all right for now, yeah
💮 14.2 Happy Valentine's Day
____________________________________________________________________________________
❕❗❕ Do you already know HESI products?
Take a look at the details You will be fully satisfied 😉
👀 https://www.hesi.nl/en/products
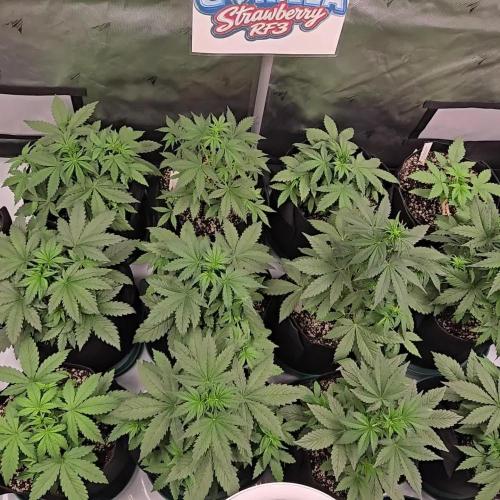
📜 A look at the details of what I'm growing 📜
🍓🍌🍇Strawberry Banana Grape by Seedsman🍇🍌🍓
⚧ Gender
▪️ Feminised
➰ Genes
mS
🎄 Genetics
▪️ Strawberry x Grape x Banana OG
🚜Harvest
▪️ 400 - 500 g / m²
🌷Flowering
▪️ 60 - 65 days
✨THC
▪️ 15.0-20.0%
✅CBD
▪️ 1.0%
🏡Room Type
▪️ Indoor
🌄Room Type
▪️ Outdoor
🕋Room Type
▪️ N/D
🎂Release Year
▪️ 2019
__________________________________________________________________________
📷🥇 Follow the best photos on instagram 🥇📷
https://www.instagram.com/dreamit420/
🔻🔻Leave a comment with your opinions if you pass by here🔻🔻
🤟🤗💚Thanks and Enjoy growth 💚🤗🤟

Likes
40
Share


@Ganjagrandaddy
Follow
Day 56 from seed( 16 in flower): Merry Christmas Groomies , Sponsors and Grow Diaries Crew.
Another amazing week of growing and developing has given me some of the most beautiful bud colours I have seen in a long time. Their singular structure on us is amazing and they look very psychedelic!!!. The smell coming off them at a touch is a very potent varnish and sweetness. They leave my hands tacky too now. Seeing their quick bud growth against my usual photoperiods is a shock too. I forgot how young they were and had my worries over their close finish time and current size. This was very short lived as from talking to other auto guys , it seems that Autos usually flower for as long as they are in veg period for before their actual flowering buds start , i.e 4 weeks veg-4 weeks flowering. These girls showed real flowers at day 38 from seed which would mean Day 76 for the finish potentially.That means another 20 days to get fatter and more frosty for a Jan 20, 8-9th finish.
I expect from seed is a good start point but can add a week if seeds take their time to wake up ect.. I know it isnt an exact science so let's see.
#1 This girl is stunning up close. she is covered with buds and her Los has been feeding her plenty with just water added. The pot is mulching all her old leaves too now so she will be helping feed the next plant in this pot ( fast buds fast flowering tester!!). She is very bushy but I love her look and am resisting the urge to defoliate her at the moment. I will do some at flowering day 21.
#2 Is doing well next to her huge sister and certainly looks as many sites too. The coco and Mc are brilliant. her vibrant green will be pulling all that light in and working wonders towards her bud building too.
# Is an oddity and looks like a cuckoo baby in a nest of blackbirds!!! She had none of the colours or psychedelic look at all but some of the smell . She is a good size and was a pale girl initially so I didnt train her much.
Have a great holiday with people you love. till next time
Merry Christmas
UPDATE :DAY 22 flowering. now feeding them with an addition of shigun warrior pk 9/18 and Simon boost too. hoping it is still in range with the npk. I think another 2 weeks on these ladies so will be giving them Dragon force for the last week at least , might switch it next feed if they look ready for it. hoping to keep them happy alongside the Mc so rabbit of an experiment.


Likes
6
Share


@Krissci
Follow
Day 1 ....add additional soil, water and 1st topping
Day 3 - checked for 2nd topping
Day 5- watering....strong stems already
Likes
2
Share


@Olduffybastard88
Follow
Done under mars hydro fc 3000 to start then finished in sun light as I got such good weather and had tent full


Likes
21
Share

@MrGrowDiarie
Follow
Day 56
This plant looks fairly healthy overall, with a dense and compact structure. The canopy has filled out well, showing tight node spacing and several potential tops developing. Leaves are mostly a solid green, though some lower foliage is beginning to fade and yellow slightly, which may point to early nutrient demand or reduced light penetration.
The plant’s posture isn’t fully upright – leaves show a bit of droop, which could indicate mild watering stress. Growth appears steady but not particularly vigorous; the plant seems stable, though not pushing out rapid new shoots at this stage.
Main focus going forward will be on watering rhythm and nutrient balance. Allowing the medium to dry back a little more between irrigations should help with root health. A small nutritional adjustment might also support deeper green color and stronger new growth.
Processing
Likes
2
Share


@XoticGROW666
Follow
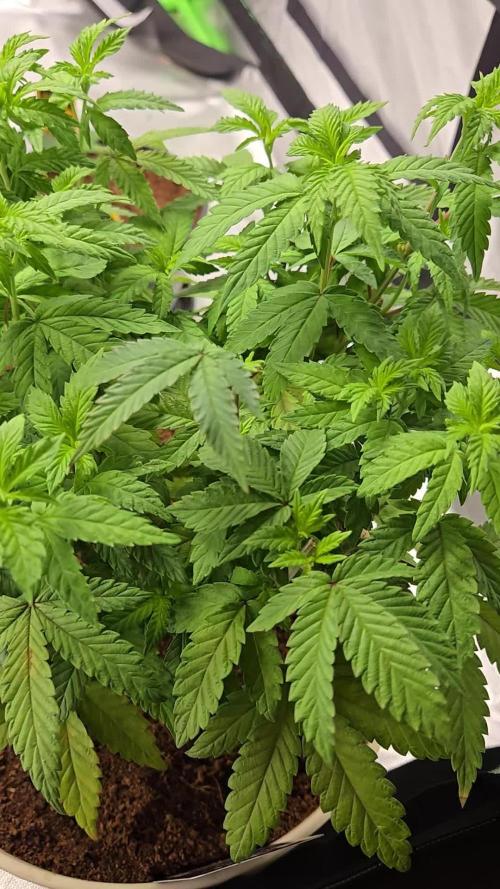
GSC 4/5wk in flower
COVERED IN CRYSTALS
LOOK AT THE CRYSTAL DANCIN
NO BOTTLES NO NUTES
ALL ORGANIC COMPOST TEA N SST TEA

Processing
Likes
18
Share


@eldruida_lamota
Follow
QUE gran variedad, buen porte, bien frondosa, pide a gritos trasplante y esta sera la última semana en esta semana macetas, pronto trasplantamos a 7L
