
Likes
Comments
Share


@tangie
Follow
Chopped her two days into week 14.
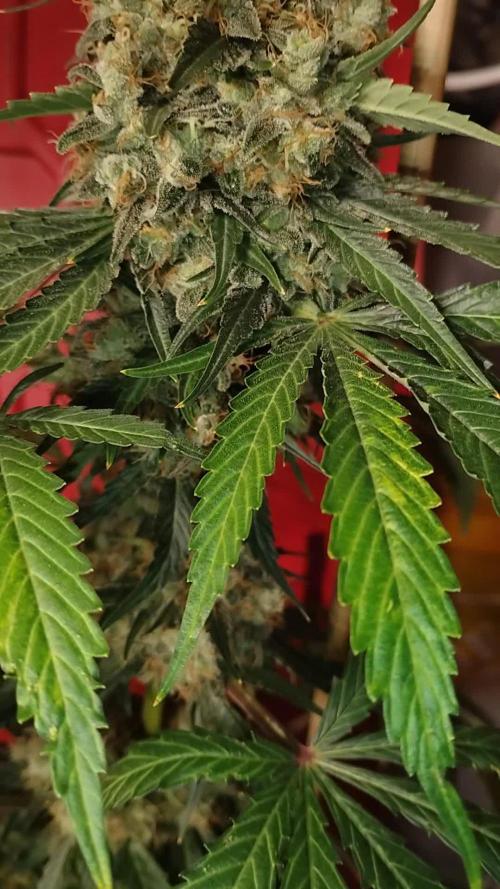
What else. Buds. There are a lot of them. And they are quite large. And they look like they will require little effort to trim.
What more can I wish for? I am a very happy man.
Upd 1: Trimming is SO SIMPLE! Not much sticking out to begin with, because of the amazing bud structure and me plucking most bud node fans. Solid nugs which are not bothered by anything, so pulling smaller sub-bud fans is very simple too, while the buds are what I would call moist. I'll call this Moist Trim 😄
✂️✂️✂️ Went for the best trimming tools available on the market (well at least my research concluded so) and LOVING every minute of trimming with the B-500SRF. Why would I or anyone else use something less suitable or less comfortable for such a delicate and long job is beyond me, except if you cannot afford one right now, in which case I wish you to experience it one day.
Fiskars are also very good in therms of the blades, coating and cutting ability and precision, but the spring is just too stiff, like way, way to stiff for something that is to be used for hours on end. One might argue that such spring force helps overcome resin buildup, but please just rinse your instrument regularly in an appropriate solvent (ethy, iso, whatever — consider you instrument materials as well) and wipe it after. Why would you let significant amounts of resin to accumulate on such a gentle and precise tool? Kinda defeats the purpose?

Likes
15
Share

@AestheticGenetix
Follow
Harvested #2, #3, and #6 at day 75
Plants #7, #8 and #11 are still flowering
Plants 5 and 9 are just about drying. I was able to try some of 9 yesterday which had nice pleasant effects but I do believe it'll need some time to cure though. I heard sour and skunky strains have phenols or something that evaporate with a cure so I tried tasting her early on. Still green but that could be because she's still drying pretty
Likes
6
Share


@colla69
Follow
Coming to the finish line.
Not sure if the plant really got better after the lockout, it is running without nitrogen so yellowing/losing leafs is to be expected anyway.
Planning to chop in exactly 10 days.
Likes
10
Share


@AsNoriu
Follow
Day 29. Best from all but very sensitive to nitrogen, pot is still full and as she takes over all of it , she constantly have few overdose issues. Very responsive to leaf tucking , stem twisting, forms nice canopy, will be biggest producer no doubts in this run. Will try to bend main stem with some LST in few days.
Mars TS1000 - Light is solid and does job. For last week output is on max . Still rotate a lot, but am happy with development. I miss more good wind inside, but i live in shared house ;)))))))))))) even really silent air system is still loud on desired speeds ...
Hope next week ill send her to flower. Will top up with Worm Castings and Mycorrhizae during training in few days, when girls will be watered next time. Rhythm is good, every 3 days pots are light. 1.5 liters to each went straight in after photo shoot.
Day 31. Applied BioBizz Leaf Coat when lights went off. Loads of training was made today too.
Day 33. Now girls are trained daily. Top shoot twisting, leaf tucking, rotation around axis , changing positions inside of tent and so on. Always wash hands before any training, it is a must.
Still havent made mind, scrog or lst ... Think tomorrow will be watering day and i have to decide which way to go , i am fliping them at next watering 100%, otherwise again rush to harvest before late spring holidays ...
Happy Growing !!!

Likes
3
Share


@Ctrellis90
Follow
I loved growing this girl. So much so that I had to double her life and re veg her lol. Well yeah that's story pretty much, it was a long ass grow but I only documented the last 9 weeks out of 8 months! Literally. But now she's gone and that's the last of the zkittz. She grew like a champ and I can't wait to see how this grape pheno taste.

Likes
4
Share


@Crusty_Juggler
Follow
60x60 cm tent in a 1920's peek-in-closet
Oversized vent for silence
High power DIY LED
True SoG 12/12 from seed with 15 plants in 2L pots
Watering all plants in bottom tray with 30% of total pot size (10L)
WEEK 1
DAY 1 - Germinated in paper towel
DAY 3 - Planted into pots + Lights ON at 125w
DAY 5 - All plants have broken soil
DAY 7 - Slight stretch - Light at 185w
WEEK 2
Two of the Iced Out are lagging behind, others are on point - I'm trying to push light and nutes to the max.
Extraction fan (AC infinity Cloudline T6) on level 2.
DAY 13 - First full watering (10L) with 20 ml Canna Terra Vega
DAY 14 - Circulation fan turned on (low) during lights on
WEEK 3
Good growth, two Iced Out still lagging
DAY 18 - Light at 225w, Extraction fan on level 3 during lights on
DAY 20 - 2nd watering, 8L with 30ml Vega + Light at 250w
DAY 21 - On point, mostly :) Could've pushed nutes a bit more from the go
WEEK 4
DAY 24 - So far this week I'm just kicking back and watching them do their thing. The two lagging Iced Outs are trying to catch up.
DAY 26 - Watering 10L with 50 ml Vega (one day too late...) + light on 300w (max)
DAY 28 - 4 weeks from popping the seeds, looking good except for the two Iced Outs, one of them is trying to get with the program, the other... Well, some plants are just pricks.
WEEK 5
I think this is the week we'll see them take off :)
DAY 29 - Plants are starting to show sex, removed 2 Urkle Mints males, the other two are females, the rest are fems so we're down to 13 female plants total with only a single weakling
DAY 29 - Watering 8L with 50ml Vega (shouldn't have been later than today!)
DAY 33 - plants exploded over the last 4 days and most are stretching and starting to flower
DAY 33 - Watering 10L with 60ml Vega (feeding Vega once or twice more then we switch to Flora)
DAY 35 - Just cruisin' 😎

Likes
122
Share


@DogDoctorOfficial
Follow
The Harvest Prelude:
After a patient wait and 48 hours of darkness, the moment arrived. The Tropical Tangie Lego Ninja, standing proudly like a silent guardian, was ready for the grand harvest. The sound of each cut echoed through the grow space, reminiscent of felling a mighty tree. The compact structure of the buds was awe-inspiring, a testament to the ninja's disciplined growth.
The Lego Ninja, like a stoic warrior, was then hung upside down, beginning a two-week drying ritual. Maintaining an ambient temperature of around 21°C and a relative humidity of 60%, this slow-drying process allowed the buds to retain their essence, preserving the symphony of terpenes and cannabinoids.
The trimming phase unfolded like a fragrant masterpiece. Each bud, adorned with a glistening layer of resin, transformed the trimming process into a sensory delight. The zesty aroma of oranges enveloped the room, a tangible expression of the tropical lineage. The compact buds made every snip a careful dance, revealing an abundance of frosty trichomes.
The moment of reckoning arrived with the scale's unveiling. The Tropical Tangie Lego Ninja, from a single plant, bestowed upon me 309 grams of dried medicine. Each gram was a treasure trove of cannabinoids, a promise of euphoria and relief. The sheer compactness of the buds translated into a concentrated potency that left me in awe.
In parallel, the clones, nurtured with equal care, showcased a fascinating divergence. A twist in the tale unfolded as the intense oranges of the mother transitioned into vibrant tangerines. This unique expression, I believe, was a testament to the clones weathering a summer heatwave differently, bringing forth a distinct personality.
The clones, resilient and generous, gifted me a bountiful 549 grams of pure joy. This now my keeper of the garden, an embodiment of the Lego Ninja's legacy. The harvest dance, though familiar, carried the nuances of tangerine zest, a refreshing twist that left me eager to explore its intricacies.
Both harvests shared a common thread—their resinous abundance. The trim bin, akin to a treasure chest, gleamed with golden trichomes and fragrant joy. Sticky fingers became a badge of honor, a tangible connection to the resinous richness that filled the room.
Shout Outs:
No harvest report is complete without expressions of gratitude. A special nod to @DutchPassion_Official for crafting the genetic marvel that is the Tropical Tangie Lego Ninja. Their expertise paved the way for this epic journey, and I tip my hat in acknowledgment.
In conclusion:
As the dust settles on this epic harvest saga, my heart brims with happiness and excitement. The Tropical Tangie Lego Ninja has proven itself not just as a plant but as a living masterpiece. Stay tuned for the smoke report, where we delve into the true essence of this botanical ninja's legacy. Until then, fellow cultivators, may your gardens flourish, and your harvests be as bountiful as the joy they bring.
As always thank you all for stopping by, for the love and for it all , this journey of mine wold just not be the same without you guys, the love and support is very much appreciated and i fell honored and blessed with you all in my life<3 <3 <3
#aptus #aptusplanttech #aptusgang #aptusfamily #aptustrueplantscience #inbalancewithnature #trueplantscience
With true love comes happiness <3 <3 <3 Always believe in your self and always do things expecting nothing and with an open heart , be a giver and the universe will give back to you in ways you could not even imagine so <3 <3 <3
Friendly reminder all you see here is pure research and for educational purposes only
<3 <3 <3 Growers Love To you All <3 <3 <3
P.S- I must extend my sincerest apologies for the missing video reports. Regrettably, Grow Diaries is still facing some technical issues that are preventing me from uploading them. Rest assured, as soon as the situation is resolved, I'll share those videos to give you an even closer look at this fascinating journey. or in my case apparently GD dont let me do uploads over 100mb with is super small file if you working and editing videos , doing my best here to upload them all but GD is not making my life easy on this <3 <3 <3

Likes
2
Share


@Captensmokey
Follow
Lekker plantje met veel thc wat ze erover zeggen klopt snel klaar en bomvol geurende toppen😎🦍...

Likes
24
Share


@SooSan
Follow
90x60x140 (Mars Hydro)
FC-E4800 (Mars Hydro)
Easy2go Aquavalve5 (Autopot)
Living Soil (Demetearth)
Bruce Banner (PEV Seed)
Gorilla GG4 (Ganja Farmer)
Cream Caramel (Sweet Seed)
Gorilla Gelato (Ganja Farmer)
Blueberry (00 Seed)
Kalini Asia (Zamnezia)
Biscotti Mintz (Barney's Farm)
Blackberry Cake (Sensi Seed)
Amsterdam Amnesia (Dutch Passion)
Gelato Cookie (Ganja Farmer)
Purple OG Punch (Ganja Farmer)
Sweet ZZ (RQS)
Rainbow Road (Paradise Seed)
Substrat ~50L:
30L Super Light Mix Biotechnologie
18L coco
2L perlite
1,7kg lombricompost
350g guano de chauve-souris
350g Zéolithe
350g Basalte
170g guano vers de farine
170g biochar
0,7g Endomychorise glomus intraradices
0,7g Bacillus Amyloliquefaciens
Paillage de luzerne alfalfa
Arrosage avec 2ml/L de mélasse de canne 1x par semaine
Pulvérisation avec 1% d’huile de neem jusqu'à la 2eme semaine de floraison


Likes
10
Share


@ScottShelby
Follow
I watered my girl in day 10 with merely 250 ppm and 5.8 pH. Hope it wont cause any nutrient burn !
Update: watering every 1-2 day with 300ppm and 5.8pH.

Likes
Comments
Share


@Aussiegreenthumb82
Follow
Really starting to frost up and beautiful smells ranging from sweet earth to danky dank. Struggling 2 keep humidity down and had 2 cut a small amount of mold from Finnish frost:( added trays of moisture crystals 2 combat but need a dehumidifier.

Likes
11
Share


@kcartel
Follow
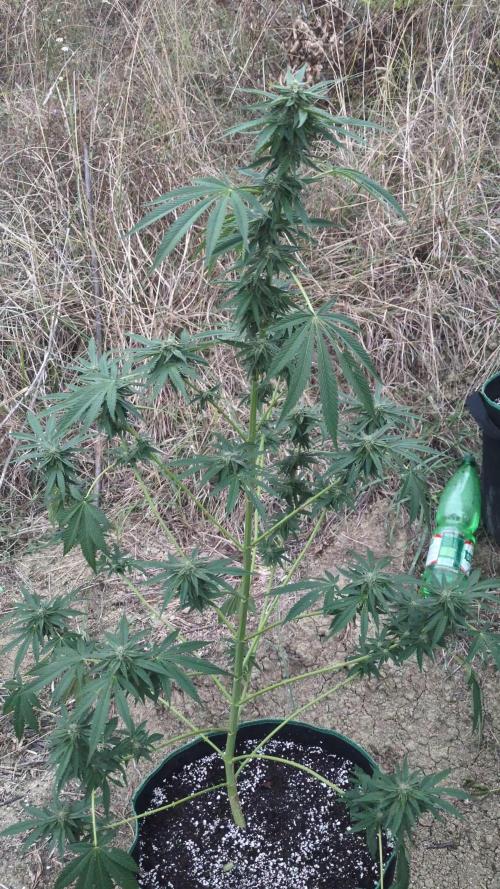
there is a significant increase in growth after bending the upper cola, as compared with the sativa, the WB grows and blooms much faster, very grateful to your advice, everything is clearly illuminated, on the next allotment I think to add some ice and shed everything with cold water, the flavor is very strong, for three days I made leaf clippings on the lower part of the plant, fertilized 2-3 times a week, I try to add less than the specified norm, I don’t feel like leaves, I feel as you can see it’s not very bad, I feel this variety will be closer to the harvest than the neighboring sativa, it pleases, and I feel the harvest will not be bad) Well, we are waiting for 7 weeks, wish me luck)
Likes
28
Share


@Basementganja
Follow
Cleaned up the #10 mother, with some defoliation, and LST! She's getting ready for her adventure outside this summer!
Took more clones from the #4 mother, and cleaned her up.
Happy growing! :)
Likes
4
Share

@Guerrilla_grower777
Follow
29/09/2025 18:50
Finally here after 10 full cloudy and rainy days,found out that the two Coco needs more water,the pots were dry like never even with rain almost every day
18.6 °C and 53%RH means only one thing,autumn is here and officially summer ended
Video #1 apricot auto 68 days from seed
Harvest Is near for this little auto,smell is the best by far Just like an apricot juice
Checked all the plant and didn't found any mold sign so i cut a little sample to have a better look at the trichomes
Video #2 Coco fresh 60 days from seed
This one is really focusing on the buds you can see the difference from the last time
Noticed that the buds below the apical are pretty dense i don't know if it's normal or if it's because of underwatering
Video #3 Coco Milk 72 days from seed
I think last time defoliation was a bit hard as i see not much difference on the buds as i think should be in 10 days
Smell of this Is like buttery really strange if you think It comes from a plant
At the end there are the first four branches of the gorilla z, these flowers are 94 days old and keeps going wtf
2nd of october now and Is raining again after a full day of heavy rain,maybe i will be back after a full week


Processing
Likes
9
Share


@High_Grade_Dadli
Follow
This week was good, trying to give transiting plant as much light expo. as possible......also removed most of the smaller bud site........the one that is in full flower mood is super healthy n green gonna start packing size from next week on a (k) diet
Likes
18
Share


@Hempface86
Follow
This girl is looking grey and she is gaining some good size considering she is only in a one gallon pot... i keep thinking she's flipping a flower, but she hasn't. So I don't know if we have a photo on our hands, because like I said she's only in one gallon of dirt, I figured she would be flipped by now... I'm going to give her another week.And if she is not in flower and showing sex i'm going to put her in my other ten and put her on a twelve and twelve cycle ... either way she has 9 finger leaves showing some good haze traits ... Thank you to Herbies Seeds for making this grow possible and so far so good... I really hope everyone is doing well out there, and so are there ladies... God bless and happy growing ✌️
Likes
21
Share


@Herbman420
Follow
The wedding cake is ok for this week I'm curious to see how it comes out . This week I started to feed again because on my auto I have noticed that it started to get what looks like a calmag issue. And it's in the same soil to. She has very tight internode spacing also a indica look to her will grow her out for a while yet before switching to flower .I like to have 1 big photo period and a main crop of autos .thank you for looking at the diary and will be updating every week 👍
Likes
3
Share


@CommanderCannabis
Follow
Another good week of growth. Yesterday I did some small pruning on lower growth and today I cut two fan leaves which were covering lower tops. I will switch to 12/12 light cycle tomorrow. Looking forward to the stretch. Julie is already giving off a great aroma when you touch her. May also buy a net to help with the canopy.

Likes
5
Share


@BudBrewerz
Follow
Thick, smelly dense buds ... They are still drying, some off them allready wet trimmed, some of them still attached to the stem, hanging to dry slower ... So can't come up with any numbers. It's a very nice harvest though 🤠
Likes
19
Share


@proud_to_grow_loud
Follow
i switched to a worm casting and kelp extract from Fox Farm big bloom and took out the Morbloom. I was getting enough from the open sesame that didnt require it. I would find that I didnt even need the open sesame and ran a flush half way into the week. The plants didnt show signs of burn but I checked the soil and it was getting salty. I ran a flush with sledgehammer about 5 gallons per plant. run off turned 6.8 and the ppm turned back to 300 like in early to mid veg. I then went back to a tea about 4 days after letting the soil dry out again. Keep an eye on the soil at this point. I will be flushing everyt plant like this before flower from here on out unless KNF decides to be the way to go.
I defoliated and lollipopped the plants this week too. The flush and the stretch bushed these suckers out. The soil I used through out is a custom home made recipe that I perfected. if you want details to the sources dm me on IG @ Proud_to_Grow_loud I am showing the last 5 weeks now of these strains and pheno hunt.


