
Likes
Comments
Share


@CheeRz
Follow
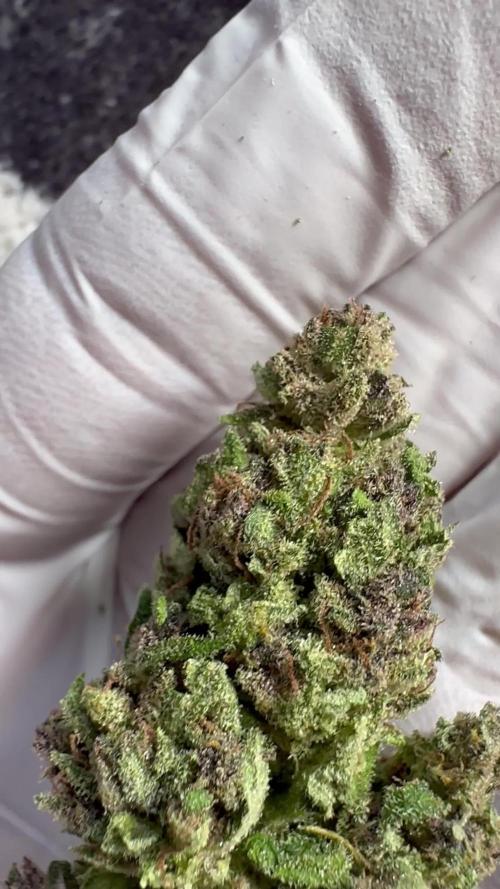
Damn we r gettin' close to the end 💚. Week 6 of flower and the buds lookin' pretty frosty ❄️ and feel dense, too. The smell is very strong and kinda sweet 🤤.

Processing
Likes
4
Share


@GaliforniaWeeds
Follow
Día 21/9/20 día 15 de floración
Buenas hermanos, hoy añadimos un nuevo producto de la gama Cyco. Cyco kleanse que se encargará de eliminar exceso de sales en el sustrato si los hubiera. Una nueva ayuda para lograr una gran floración en estas nenas.
Día 23 /9/20 día 17 de floración
Buenas. Todo avanza correctamente, las temperaturas siguen bajando y ya están entre 22 y 24 grados,casi lo ideal. Por otro lado seguíos manteniendo la ec a 1,3 aprox aunque en breve la aumentaremos y el ph sigue entre 6 y 6,2. Las nenas se están portando como campeonas y afrontan muy bien la floración aunque tb ayuda tener las luminarias trabajando al 100%, 1030w en total.deja tu like y síguenos si te gusta el diario!!
Día 25/9/20 día 19 de floración
Amanece un nuevo día y las peques estas radiantes. Las hojas se multiplican día a día por lo que en breve habré que hacer una nueva defoliación. Sus pequeñas flores crecen día a día a un ritmo muy rápido y al mismo tiempo su aroma se multiplica. Es cuanto a la alimentación seguimos sin cambios y la temperatura y humedad se mantienen como en los días anteriores.
Día 27/9/20 día 21 de floración
Hoy nos ha tocado hacer una nueva defoliación para permitir El Paso de la luz. También aprovechamos para vaciar el tanque de nutrientes y hacer una limpieza, después volvemos a preparar la solución con 1.45 de ec y 6 de ph. Las temperaturas se mantienen entre 22 y 24 grados. Si todo sigue así en breve veremos un buen engorde de nuestras flores, no te lo pierdas!

Likes
19
Share


@cam0538154
Follow
Slight trimming then hanging to dry. Will weigh up and comment once died and edit this diary once I have the numbers.


Likes
3
Share

@SidekickGrowie
Follow
Im Großen und Ganzen bin ich sehr zufrieden mit dem Grow. Ist die erste erfolgreiche (ohne Schimmel) Outdoor Ernte. Für mal so nebenbei echt gut geworden! Ich freue mich schon auf das nächste Jahr!


Likes
16
Share


@Kayotic
Follow
*Day 107
*Week 8 of flower
* Smells great, like citrus
* Buds are fattening up

Likes
9
Share


@FrostyCloudzz
Follow
Final steps for harvest , trichoms are awesome and the smell incredible, only few days left and everything is prepared for a perfect cure


Likes
28
Share


Likes
13
Share


@ButterfliesLittleFarm
Follow
Hello Diary,
We start with a new round. I am continuing with F1 strains since I am delighted with Medusa F1.
This time I will have three different strains on the "Farm" Apollo, Milky Way and Titan.
I will keep separate diary for each strain, and this one is intended for the Titan F1.
First, here is some information about the strain itself.
TITAN F1
As one of the first true F1 autoflowering hybrids, this pioneering cultivar offers something productive, resilient, and brand new.
Although not born from celestial bodies, Titan F1 still has an impressive ancestry!
Talented breeders created this F1 by crossing inbred lines that share a heritage with Blue Dream, Sugar Magnolia, and Amnesia.
This autoflowering variety unleashes a powerful terpene profile consisting mostly of myrcene, farnesene, ocimene, pinene, bisabolol, and limonene.
Combined, these aromatic compounds offer notes of fruit, candy, and lemongrass.
With the highest THC concentration within our F1 hybrid range, Titan F1 exerts a powerful and fast-acting effect that melts the muscles and clears the mind.
Perfect for enjoying after a long day at work.
Flowering time - 30-45 days
SET-UP ON MY LITTLE FARM:
Box - Secret Jardin DS120W 120x60x178
Lights - MIGRO 200+
Ventilation - TT Silent-M 100
Filter - Primaklima filter PK 100/125
Fan - Oscillating Koala Fan X 2
Humidifier - Beurer LB 45
Soil - BioBizz Light - Mix
Pot - 11L Air pots
Seed - Royal Queen Seeds
Nutrition - RQS Organic nutrition
I can now officially start the journal.
20/04/2023
Planting plants. As usual, I prepare everything I need for planting in advance.
I still use Air-pots because they are really great.
For the soil, I used BioBizz - Light Mix, which I filled 2/3 of the container and then added the Organic booster in pellets, Mycorrhiza and Rhizobacter.
I mixed everything together well with the soil and filled the container to the top.
I soaked the earth well with 2 liters of water, made a small hole, put the seed and lightly covered it with earth.
The conditions on the Farm are satisfactory, the temperature is around 25 degrees while the humidity is around 50%.
I think that after sprouting I will put a humidifier to increase the humidity.
23/04/2023
I sprinkled some water on the surface of the earth to let them know where they should go.
24/04/2023
Titan F1 has sprouted like her other two roommates.
26/04/2023
First watering. I regulated the p.H. of water at 6.0 and watered the plant with maybe 0.5 liters of water.
That's all for this week, see you soon.
Likes
19
Share


@Paultemp
Follow
Hi all! 👊😊
Another week started ohh yeaahhh
I do foliar 3 times this week and i see pistil white change in orange
Smell very good pine and citrus :)

Likes
154
Share


@Tropicannibis_Todd
Follow
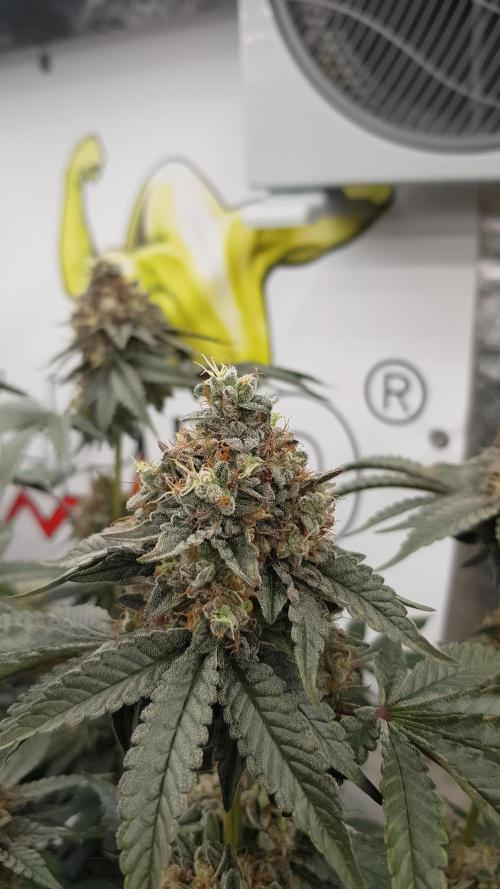
💩Holy Crap Growmies We Are Back💩
Code Name FBT2311
Well growmies we are at 56 days in and everything is going as good as it can 👌
👉Shes been doing really good , lots of buds and some nice colors and smells 👌💪she's the top of of the lot 💪
Lights being readjusted and chart updated .........👍Even with early major issues due to the soil/medium she's come a long way 👈
👉I used NutriNPK for nutrients for my grows and welcome anyone to give them a try .👈
👉 www.nutrinpk.com 👈
NutriNPK Cal MAG 14-0-14
NutriNPK Grow 28-14-14
NutriNPK Bloom 8-20-30
NutriNPK Bloom Booster 0-52-34
I GOT MULTIPLE DIARIES ON THE GO 😱 please check them out 😎
👉THANKS FOR TAKING THE TIME TO GO OVER MY DIARIES 👈
Likes
50
Share


@CapitanKush
Follow
flushed the girls out for a week and a half then cut them down yesterday, all done now just wait for them to dry and cure ill update with weights and review.
Been a easy grow with few issues thanks for checking it out. Happy Growing till next time 👍👍👍

Likes
17
Share


@Dunk_Junk
Follow
Wow she tripled her height this week! From 20cm to 60cm!!
She has very long internodal spacing.
I note a VERY short veg period in this strain.


Likes
16
Share


@Mo_Powers
Follow
we have the first week of flowering behind us. the plant looks healthy, but is growing very slowly. unfortunately the german summer is a long time coming. we sometimes only have 8 degrees at night and not much sunshine.

Processing
Likes
6
Share


@ganjaman24
Follow
Week 5 I believe and they’re doing great..topped them lil over a week ago. Thinking another week or two then flip to flower! 😎

Likes
12
Share


@Kirsten
Follow
16.2.25:
I decided to check out the lower canopies of all plants to see if I need to get rid of any foliage.
I did get rid of a few small branches and leaves.
However, whilst I was doing this, I saw more garden pegs from my LST remaining.
There were about 6 or more in Pink Mist alone. Additionally, on Watermelon, there were some left in, too.
I'm so annoyed to see that because the plants are really stretching, and I could've potentially disrupted this by leaving the pegs in for all this time without realising it.
🤞 that I haven't compromised things too much. We'll see.
I watered today with 2ltrs of dechlorinated water PH'd to 6.3 containing the following nutrients;
♡ .8g Green Leaf Nutrients PK booster
♡ .5g Ecothrive Biosys
I ordered quite a few things for the garden. I got Greenleaf Nutrients Sea K(elp) and Mega Crop Parts A+B. To go with their PK Booster I got last month. I'm excited to try it all together. Next run, maybe just using these. We'll see how it goes.
18.2.25:
The plants are going crazy for water! Everything is getting used right up so fast!
Today, I decided to add some more Black Strap Molasses to add some carbs and other micronutrients. I'll add the jar with the label in the photos section above.
I watered a very small amount to each plant.
What I put in:
♡ Black strap molasses 150g
♡ 2g Sea K(elp) Greenleaf nutrients.
I dissolved everything in 4ltrs of dechlorinated water PH'd to 6.4.
19.2.25:
I received the majority of the garden purchases that I made. I'm still waiting for the Ecothrive Life Cycle. I wanted to top dress, but it's been delayed unfortunately.
I am using my Greenleaf nutrients products which I bought on Amazon. I got the Mega Crop 2 part system Part A and Part B. I have the Sea K(elp), and the bud explosion PK booster.
I really wanted to get some of their sweet candy asking read many positive reviews. Unfortunately, for me, this is unavailable to buy currently. So that's a little disappointing.
I needed to do a good watering so when my nutes were delivered today, I got excited 🤗
I watered 2ltrs of dechlorinated water per plant, PH'd to 6.4, containing the following nutrients:
♡ 1g Mega Crop Part A
♡ 1g Mega Crop Part B
♡ .5g Sea K(elp).
The plants drank this up within a few hours.
I'm going to try and hold off on watering in hopes that my Ecothrive Life Cycle will arrive so I can top dress and water it in then.
20.2.25:
My Ecothrive Life Cycle arrived yesterday, and the plants are ready for their top dress and a good watering in.
I have some Biobizz Light Mix, Canna Coco,and perlite. I'm going to use this as a base to mix my amendments in.
I'm going to fill my 5 gallon bucket with about 4.5 gallons of my top dress mix. I will distribute this across 6, 4-5 gallon pots. Then I will water in well with Greenleaf nutrients Mega Crop Parts A+B and Sea K(elp).
I've made a crude attempt to video mixing my top dress. Don't listen to the audio. lol, my YouTube didn't stop playing whilst I recorded this 😂
So anyway, I added the following amendments to the above base mix of 4.5 gallons;
♡ 3 TBSP Ecothrive Life Cycle
♡ 3 TBSP Vitalink Bat Guano
♡ 3 TBSP Ecothrive Charge
♡ 1 TBSP RHS Mycorrhizal Fungi granules
♡ 6 TBSP Ground Cinnamon.
Likes
25
Share

@GERGrowDesigns
Follow
Welcome to Flower Week 7 of Kannabia Zoap Rosé
I'm excited to share my grow journey with you from my
Kannabia Seeds Project . It's going to be an incredible ride, full of learning, growing, and connecting with fellow growers from all around the world!
Check out Kannabia Seeds with my link [https://www.kannabia.com/de?ref=61966] and grab the germination device or the strains I used . Trust me – it’s worth it for sure !
Get another 20% Discount at all products using the code [GGD] at the checkout.
For this Project , I’ve chosen the Feminized Photo Strain Zoap Rosé :
Here’s what I’m working with:
• 🌱 Tent: 225x150x150
• 🧑🌾 Breeder Company: Kannabia Seeds
• 💧 Humidity Range: 45
• ⏳ Flowering Time: 56-63 Days
• Strain Info: 22%THC
• 🌡️ Temperature: 26
• 🍵 Pot Size: 20
• Nutrient Brand: Hy-Pro
• ⚡ Lights : 600W x 2
A huge thank you to Kannabia Seeds for allowing me to try my Best with this amazing collection from Photo Strains they managed to Sponsore . Big thanks for supporting the grower community worldwide! Your genetics and passion speak for themselves!
Let’s grow together – and don’t forget to stop by again to see the latest updates!
Happy growing!
Stay lifted and stay curious!
Peace & Buds!


Likes
30
Share


@Silverback_Guerilla
Follow
10/23:
Fed today with One, sweet & sticky, signal, beastie bloomz, silica, and a little Ca/Mg
10/27:
Fed today with one, signal, sweet & sticky, silica, beastie bloomz, kangaroots, and humic acid.
Lowered the lights to no more than a foot from any cola..most are 7-9" away.
