
Likes
Comments
Share


@TheObserver
Follow
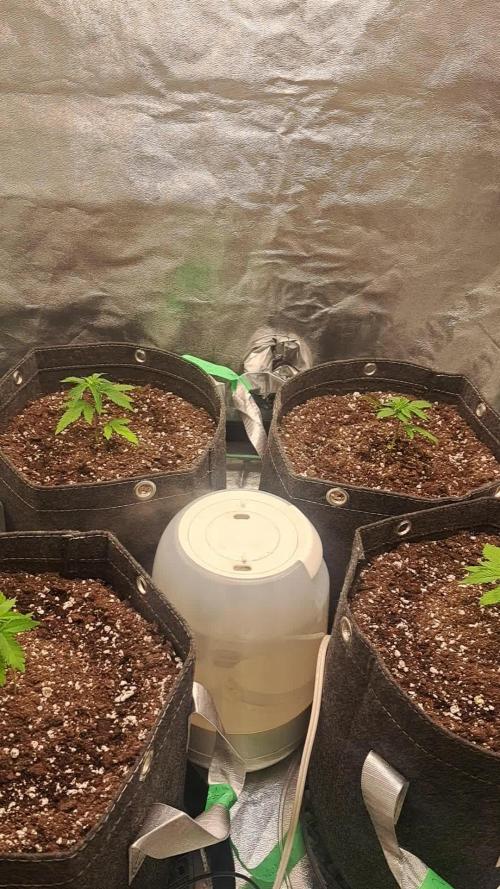
Recovering from 5 days of holidays, defoliated a bit. All good. A bit of struggle raising the temperature.
Jan 9th: I finally watered again, It took 10 days the dirt to dry out
PS: 12/12 scheduled but still recovering, not flowering yet,


Likes
8
Share


@Bryankush
Follow
Il fumo è liscio e abbastanza dolce e fruttato con aromi che ricordano uno sherbet di arancia, anche piuttosto denso.

Likes
14
Share


@PREPPYPUNK
Follow
24 hrs of darkness begins. amber trichomes are hard to see under certain lights and through glasses, i dumped the glasses and moved each one to a different room and sure as shit "amber trichomes!". I just realized a jewelers lupe with a light works better without looking through reading glasses. 3 yrs of crap harvests and it aint over yet but if i get these dried at 60rh @ 70 deg F for 6-10 days APPPROX! CAREFUL FOR MOULD, and i got the 32 oz jars, belvidas and humidity guages for cure. as long as i can do that right, man things are really looking good. PRINCETON CAN USE A GUY LIKE JOEL! We'll see. I am starting another diary for the 2 gorilla glues that are growing really slow. I was going to dump them but i kept putting it off and slowly the buds started stacking up. I would love to know if this is common with all seed vendors and not just mine and why its happening like this. More important, I GREW BIG POTENT BUDS BY MYSELF!!!!!!! PRETTY HAPPY ABOUT THAT. HOURS AND HOURS OF VIDEO LESSONS, GROW DIARY QUESTIONS AND LOOKING AT OTHER PEOPLES GROWS, CONDITIONS PRODUCTS, EQUIPMENT AND RESULTS. FOR ME, GROWING WEED INDOORS IS A BIG FREAKING JOB AND I REALLY LOVE DOING IT FOR SOME REASON. IM HOOKED.

Likes
5
Share


@Skey149
Follow
I tried not watering for 2 1/2day, and it turned yellow quick. I use dry organics and chompost tea for neutriens. I will try to recover it


Likes
77
Share


@Ukfarmer420
Follow
So this week the little gelatocake is on week 8 and is really starting to eat herself now, full of trichomes and smells like tutti fruity chewie sweets.
Last week of nutes for her then mollases only. Week 7 for the othere gelatocake and shes starting to fatten up now as well as fade also.
Babys have got big since re potting I will.bend them over later.
Sherbert mimosa are still taking there time I think they are starting to get bigger 🤔🤣 I Will keep you updated lol.
Happy growing guys 👌💪💚


Likes
23
Share


@Kakui
Follow
V15, riego con pH 6.1 y EC 1.2, las plantas ya se han recuperado del stress de hace unos días atrás, desde el próximo riego el agua tendrá sus nutrientes completos. Se ajustó el LST en algunas plantas.
V17, definitivamente ya se recuperaron del stress por sobre fertilización, están creciendo al ritmo esperado, con bien color y hojas "felices".
V18, y bueno, de nuevo surge un imprevisto, intentando hacer LST a un tallo acabo de romperlo, le hice una especie de entablillado esperando que se recupere.
Hoy toco riego con pH 6.2 y EC 1.5, las plantas crecen bien.

Likes
5
Share


@DrGanj
Follow
Another round of topping. Tied her all back to spread out for LST. Going to flip to flower next week. Used the Kushman technique and Supercropped all her stems every inch on the way up, without bending. Gives her muscles to flex <3


Processing
Likes
13
Share


@Cheesefarmer420
Follow
This plant has a solid stench of pure ripe lemons. So much aroma and color in every bud, purples, to dark green, to lime green, to solid frost. This one definitely a fun strain to watch grow and tend too for the last few months. She’s definitely a hungry girl, seemed to be the only strain out of the three that accepted and thrived with full feed nutrients. Would definitely recommend this Strain to someone For a nice uplifting day smoke, also seems to do me good for some pain and stress relief.
Likes
15
Share


@HurlinghCultiveta
Follow
Buenas cultivetas!
Esta semana el clima tampoco ayudó mucho 😞 A pesar de que no llovio, se esperan lluvias los proximos dias y las temperaturas aun no son las adecuadas. Solo tuve 2 o 3 dias a pleno sol. De todas formas seguimos con los nutrientes de vegetacion el preventivo de plagas una vez por semana con jabon potasico, aceite de neem y canela en una solucion liquida. A pesar del preventivo sigo encontrando algunos bichos que muestro en un video.
La tecnica deLST parece estar saliendo bien. Espero no estresarla mucho y que de buenos resultados.
Buen cultivo para todos y gracias por leer mi diario!
Actualización 5/10:
Tengo algunos vecinos gatos que les encanta sacar el sustrato de mis macetas... Por suerte no han desprendido la planta pero casi... Las acomode de nuevo y parecen estar bien. No tuve mucha suerte con este cultivo sumado a mi falta de experiencia.
Likes
60
Share


@Roberts
Follow
Alaskan Purple is growing great. She is in mid bulking under the Medic Grow Mini Sun-2. She is developing some big colas. She has a fruity smell as well. She is eating and drinking a lot daily. Looking good beside some minor ph rises.
I have addressed it and added more bloom booster to help stabilize the ph daily. Hopefully everything stays on track, and might get a awesome finish. Bonus for a spot in the contest. 🤞🏻Nothing else to report at this time. Thank you Medic Grow, and seedsman. 🤜🏻🤛🏻💪🏻❄️🌱
Thank you grow diaries community for the 👇likes👇, follows, comments, and subscriptions on my YouTube channel👇. ❄️🌱🍻
Happy Growing 🌱🌱🌱
https://youtube.com/channel/UCAhN7yRzWLpcaRHhMIQ7X4g

Likes
Comments
Share


@Ctrellis90
Follow
Alright so we're moving along as best we can with some weird looking growth but it's still growth lol.
We started the Athena blended line this week but it's still early so we'll see how they look after this week.
I'm hoping they grow out of this weird looking foliage. I believe it's from too much Alfalfa Ferment so I dropped it when we switched over to synthetic.
Other than that we're doing great and in a couple more weeks we'll transplant the photos and put them in flower.

Likes
1
Share

@420Junglist
Follow
Got everything transplanted into their forever home 5 gal vivosin fabric pots with lst holes. Gave the outside ring a little water before a large water in the next few days. Temps humidity is set to 70%
Likes
13
Share


@Robeeriegenetics
Follow
Well, there’s no ghost the VIVO sun pumps that come with the kits they just suck that’s OK. I replaced them with the upgraded version. I refilled the reservoirs
Likes
36
Share

@Roberts
Follow
The big Potter of Gorilla Glue is doing well under the Spider Farmer G3000 light. She is starting to flower, and looking pretty healthy. Everything is looking good at thr moment. Thank you Spider Farmer, and Amsterdam Marijuana Seeds. 🤜🏻🤛🏻🌱🌱🌱
Www.amsterdammarijuanaseeds.com
Thank you grow diaries community for the 👇likes👇, follows, comments, and subscriptions on my YouTube channel👇. ❄️🌱🍻
Happy Growing 🌱🌱🌱
https://youtube.com/channel/UCAhN7yRzWLpcaRHhMIQ7X4g
Spider Farmer G300w: https://amzn.to/3S2zvsd
Spider Farmer 10X20 Heat Mat Kit - https://amz.fun/lsa0J
Spider Farmer Amazon Store: https://www.amazon.com/spiderfarmer
Spider Farmer Official Site: https://spider-farmer.com
Discount code: saveurcash

Likes
Comments
Share


Likes
14
Share


@LokalGrenz
Follow
Got a dehumidifier it’s reading different from what mine controller 69 is saying but I have it set at 40% it’s the lowest so it’s going pull humidity regardless right now it’s about 53% which is okay would like it to get down to the 40’s I also changed the light schedule today to 20/4 the humidity raises at in my tent when lights are out so I figured change it to 20/4 instead of the 18/6 I’ve been running so if humidity does go over it won’t be for as long as before hopefully this works just trying to avoid any mold situation
So far the Amneisa Haze 2 is at stretching she’s going be big I can but the haze 2 is done seems to just be flowering the sour diesel is looking good as well so far I’m happy with its looking like left town for two days and the auto watering pots worked!
