


Likes
13
Share


@Lfuego22
Follow
This is the last few days. I added flawless finish yesterday and will harvest in 2 days. Gotta run outta town so taking it down one week earlier than I wanted. This gives me the week to make sure they dry process is going well and hopefully start the cure the night before I leave 🤞🏾
Likes
103
Share


@Hou_Stone
Follow
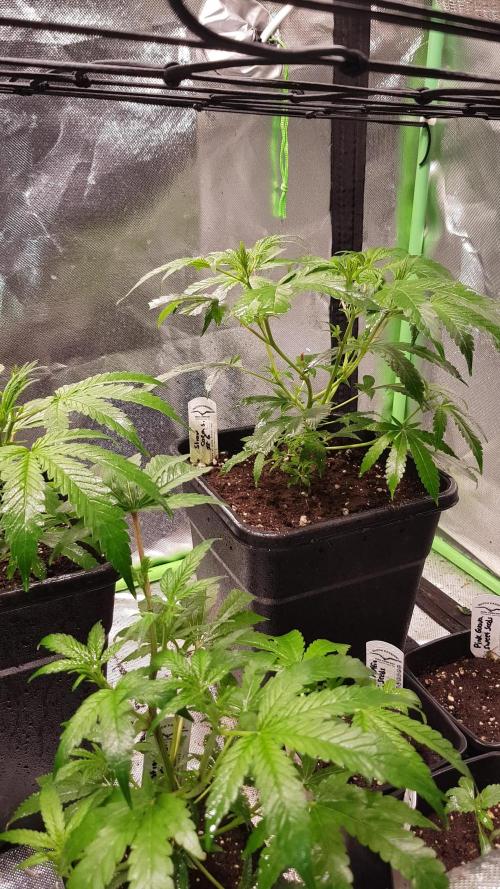
One of the tarte tatins is getting too big, really. This requires me to raise all the other pots to try to keep the same height. That's the game...👌 I tell myself that I should have cut the apex of it, but I think it's too late now , what do you think? 🤔 ( currently on the 17th day of flowering)
This week I'm adding my carbon filter to my extractor, to remove the smell of plants outside the tent
I try to raise the plants to the same height with upside down plastic pots.
I'm also trying to place a fan under the canopy this week but I'm going to remove it quickly, it takes up too much space
Busy week in defoliation✂️
------------------------------------------------------------
💧Watering
I water all my pots the same day but with more or less water.
Simply by lifting them;
A light pot is a dry pot and will need more water,
A heavy pot is a wet pot and will need less water.
On average I water each pot with:
Day 36 : 0.75 Liters
Day 40 : 0.75 L
I use tap water, adjust the ph to around 6 and water
💧Spraying
I mix a little black soap and neem oil in 1L of water and spray everything in the tent just before my lights go out, keeping any electrical appliances away while I spray. I try to soak all the plants. and I repeat this 2 times this week and the next before the buds appear.
I do this to keep pests away and reduce the risk of mold.
------------------------------------------------------------
🔥❄️Temperature of the week :
Day : 19-23°C (Humidity : 60-75%)
Night : 15-18°C
Outside the tent it is around 17°C with 70% humidity
The humidity is a little too high, I hope it will drop a little and I won't have a problem with mold during flowering🤞
------------------------------------------------------------
🚀Equipment of the week ⭐️ :
Light FC3000 Mars hydro. power 95% at 45cm
Extractor 6 inch Mars Hydro + carbon filter . power 3/10. ON 24/24h
1 oscillating fan, on 45 minutes / off 15 minutes in loop (I reduce its use at night)
------------------------------------------------------------
📜Links :
Tarte Tatin seeds 🌱:
https://shop.greenhouseseeds.nl/feminised-cannabis-seeds/tarte-tatin/
Mars Hydro : 5% off with my discount code "houstone5" 💪
https://www.mars-hydro.com/?acc=hou-stone
👨🚀My Instagram 🌱❤️️:
https://www.instagram.com/hou_stone420/
------------------------------------------------------------
☮️Peace and love👊
Likes
6
Share

@MadeInGermany
Follow
Flowering days 27
since time change
to 12 / 12 h
Hey guys :-)
The ladies look beautiful and are growing very well.
The sweet smell starts to blow through the whole tent :-) .
This week it was watered 3 times with 1l each (nutrients see table above)
Nothing else happened this week. Everything has been checked and verified.
A lot fun and stay healthy 💚🙏🏻
👇🏼👇🏼👇🏼👇🏼👇🏼👇🏼👇🏼👇🏼👇🏼👇🏼👇🏼👇🏼
You can buy this Nutrients at :
https://greenbuzzliquids.com/en/shop/
With the discount code: Made_in_Germany you get a discount of 15% on all products from an order value of 100 euros.
👇🏼👇🏼👇🏼👇🏼👇🏼👇🏼👇🏼👇🏼👇🏼👇🏼👇🏼👇🏼
You can buy this strain at :
Clearwater Seeds
Water 💧 💧💧
Osmosis water mixed with normal water (24 hours stale that the chlorine evaporates) to 0.2 EC. Add Cal / Mag to 0.4 Ec Ph with Organic Ph - to 5.8 - 6.5
MadeInGermany
Likes
14
Share


Likes
20
Share


@TiRobotProds
Follow
- Diminution bloom connoisseurA&B à 1ml/L, diminution Méga pk à 0,1g/L.
- Augmentation Terra Flores à 4ml/L , augmentation resin boom à 4ml/L. Bientôt le Bloombastic pour durcissement des Colas et augmentation des sucres.
Je pousserait les phéno Sativa a 14semaines + ou - et les indica a 11semaines.
Haga clic y siga a mis amigos cultivadores.
🌱🌱🌱🌱🌲🌲🌱🌱🌱🌱🌲🌲🌱🌱🌱🌱🌲🌲
Click and follow my producer friends leave your comments or opinions
#LoveUnityAndPeace

Likes
2
Share


@KurtThePlantGuru
Follow
Explosive growth compared to last week. I topped again, which might be the last time before I allow for some more growth before flipping. Super Impressed, this would be much bigger if I did not delay transplanting for a week and a half, because I had my grow space full! I just started 2 others, unfortunately bad timing as this one's almost to flower, so either I will stretch the veg out for much longer so all plants can flower at same time, or work out other arrangements.
So far I'm beyond impressed with Homegrown Genetics and cannot wait to see these beauties flower 😁

Likes
13
Share


@Robeeriegenetics
Follow
Well, I had a speed bump nothing major but I forgot to refill my mothers reservoirs no big deal I did it one of them got a really droopy, but that’s OK. She should recover well soon I’m gonna be throwing the
Processing
Likes
52
Share


@CBD_Sweden
Follow
2017-09-11. Kl 12.00. Week 3 starts. I have cleaned the whole room for the new week and gave the girls water and nutes. Added videos and pics. Girl is 10 cm high.
--------------------------------------------------------------------------------------------------------------------
2017-09-12. Kl 10.00. New pic and video.
---------------------------------------------------------------------------
2017-09-13. Kl 22.00. Added new video.
---------------------------------------------------------------------------------------
2017-09-15. KL 10.00. New pics and video. The girl is 14 cm high.
---------------------------------------------------------------------------
2017-09-16. Kl 10.00. The girl is starting to grow little better now and i hope she is picking up the pace. Added new videos.

Likes
6
Share


@Barcelona_Farmers710
Follow
Esta semana apesar de tener temp Máxima de 28... se va recuperando bien de las podas, el led de TodoGrowled funciona perfectamente para sus 55w farmers!🍯

Likes
80
Share


@Roberts
Follow
Clone #1 has rooted and started getting a thinker base to her. My ph dropped pretty low from feed boungvtoo heavy. She has been flushed, and fed again. Will likely repeat again tomorrow to ensure her ph doesn't rebound. She should start showing revegging signs soon. It was kinda a craopy time to take a clone. Looks like it will work out though, just gonna take time. Thank you Pure Instinto seeds. 🤜🏻🤛🏻🌱🌱🌱
Thank you grow diaries community for the 👇likes👇, follows, comments, and subscriptions on my YouTube channel👇. ❄️🌱🍻
Happy Growing 🌱🌱🌱
https://youtube.com/channel/UCAhN7yRzWLpcaRHhMIQ7X4g

Processing
Likes
7
Share


@x_grower
Follow
Last week plants were looking super healthy and responded very well to the second topping so I decided to flip the light schedule few days later. They already started stretching and the smell is noticeably enhanced.
Likes
9
Share


@ironf1st
Follow
Another week is over.
Got an upgrade on my ventilation.
Bought a scrog net, decided to scrog for the first time.
Noticed deficiencies starting to show up.
Gave all the the ladies 2L distilled water
Mixed 10L distilled water with
20ml connoisseur grow
10 ml calmag
7 grams of great white powder
20ml of tarantula
PPM 748
PH 5.6
They got the distilled water first
2 hours later they got 0.8L of tapwater.
The white haze only got 2L of the distilled water with the nutrient mix.
With the next watering I will give them 4ml/L fertiliser, I think they are starting to get hungry, because they have now used up all the fertiliser in the soil, I used plagron lightmix.

Likes
1
Share


@Green_Peace
Follow
Reaching peak flower now so added PK into the mix for extra Potassium and Phosphorous over the next 10 days or so. Never had plants soak up this much nutrients without any burn (touch wod) so I'm really impressed with the Vitalink range. These 2 clones are at the back of the tent, and to the bottom and right of the screen in the timelapse.

Likes
61
Share


@Dunk_Junk
Follow
Wow look at her flowers!!!!!!!
She is bushy as hell!!!!
I do not know what phenotype this is but there is absolutely no purple either 😞
Still, she is she bushiest plant I've grown in a long long time.
Quite impressive!!! 😎💪

Processing
Likes
30
Share


@Organic_LarF
Follow
High GD community,
Week 13,
Both girls looking good, but when it get a closer look, there some browning tips on the pistils. Im not pleased with it, bcs im sure its no sign of maturation. There has to be a shoc or drought, lights? I dont know, ive dropt the output a tiny bit. But im not that sure thats the real issue. Ive measured the soil and it seems pretty cold. Like 17.2 and 18.2 celcius for the 1 with infrared heatingmat 5w.
Im using less nutrients now 2, so could this be a reaction. I diddnt go cold turkey on them. But its a changer.
They also start to drink more, and there was 1 day it felt all a bit lighter then normal. But deffenitly not bonedry.
So I got a lot of questions to get some answer to.
This weeks watering💦 was at the usual ph 6.2 and only 1 feeding a week. 4 waterings this week.
Thats it for this week
Grow safe buds and feel free to check out my other ladies.🌿🌿🌿👍
🙏🍀🍀🍀🙏

Likes
16
Share


@ZzTooRightOGzZ
Follow
Started just for fun not sure if it's mail or female but it's going well so far .

Likes
1
Share


@Marmotaaaas
Follow
Esqueje de gorilas glue y de blue berrys
Me las dieron en flora crecieron arto ya van super bonitas las flores bien olorosas y pegajosas se les iso el scrog y an abierto los brazos a todos lados
Likes
54
Share


@Benzels
Follow
Back again for another update from down under. Well Its been a week of unusual weather here-actually most of Australia is having bizarre weather ATM with flooding rains mixed in with high 30's heat and damaging winds. This is in part why I now grow more smaller and better trained plants rather than a couple of larger tree's. One bad storm can literally snap a tree in half so unless your ladies are protected from the wind you WILL have issues outside. Train them, keep them low to the ground and stake them just to be safe ok. Mine are just greening up and bushing out nicely this week, not much more to report other than wondering how much longer before they show me those lil white hairs-cmon ladies its nearly feb and your not flowering yet? Any day now im sure.
Hash plant is growing a 1-2cms a day easily, ZkittleZ is bulking up now while Caramelo just seems to be growing more and more shoots-Not used to sativias grown like this-do I cut some off to improve quality or leave em alone to improve quantity? I cant even count how many heads there are now. But the big news is my lemon haze variegated X sour Diesel hybrid seems to be staying female so far- no leaf color at all but the first 3rd gen hybrid that doesnt look like either parents but more of a middle ground of the two, its stayed female so far!! Normally only the ones that looked really sour D like stayed female but this one has a lighter leaf color than normal Sour Ds, but also more the leaf shape of the lemon haze side. Please stay female lil miss. See ya all next week.
Likes
20
Share


@Naujas
Follow
Well, I managed to do something that I really didn't expect :) the yield is small, just like the pot :) it was a wonderful trip ;) but from now on I will only grow it in big pots :) good luck to everyone :) I will add weight when it is ready :)

Likes
1
Share


@GaliforniaWeeds
Follow
7/9/29 día 1 de floración
Esto arranca amigos, por desgracia lo hace con unas temperaturas altísimas, con maximas de incluso 32 grados debido a la ola de calor que estamos sufriendo. Ya hemos montado el sistema de riego y lo hemos preogramado para regar durante 1min cada 4h durante el día. La solución la hemos preparado con los productos Cyco arriba descritos, con una ec de 1 y un ph de 6,1. Por otro lado nuestro jardín. Esta iluminado por 4 barras led 100w de solux, y un lec solux de 630w aunque por el momento está a 315w debido a las altas temperaturas. Para empezar la floración lo hacemos con una defoliación y una poda de ramas bajas. Estaremos atentos a cambios en las pequeñas para intentar mantener en cada momento la alimentación adecuada, sin carencia y sin excesos. No te lo pierdas!!
9/9/20 día 3 de floración
Buenas, nuestras pequeñas se aclimatan bien a la nueva alimentación y a su nuevo medio. Aumentamos la ec del tanke a 1,1ec y seguimos manteniendo el ph a 6,1. Por otro lado las temperaturas parece que disminuyen por lo que pasamos el lec de 315w a 415w, manteniendo así unas temperaturas diurnas de entre 26 y 27 grados. Esperemos que continúen descendiendo hasta poder mantener las temperaturas a 23 grados durante todo el día. La humedad ronda el 40% y estaremos atentos para que no suba de ahí. Deja tu like y síguenos para no perderte nada. Buenos humos!!
11/9/20 día 5 de floración
Nuestro cultivo avanza sin demasiados cambios, durante estos días se aprecia que las nenas aumentan su altura más rápidamente y los brotes se multiplican.seguiremos atentos para que todo siga su curso. Buenos humos.