
Likes
Comments
Share


@dubby_m
Follow
D101: harvested the plant! Very happy with the grow :) Wettrimmed all the buds and hung them for drying. i will report after drying and curing!

Likes
5
Share

@eldruida_lamota
Follow
Vamos familia, actualizamos la septima semana de floración de estas Lemon Mandarin de Fastbuds.
La temperatura que estuvo entre los 24-26 grados y humedad dentro de los rangos correctos.
En cuanto a las plantas pues estas últimas semanas cogimos un poco de trips y pues ahí ando combatiendo con planchas pegajosas de color azul, estiraron bien y ensancharon bastante también.
Las flores se están llenando de tricomas y van hinchando, aún con la plaga, por el momento todo correcto, aportamos mega pk y thor de Agrobeta.
Hasta aquí todo lo de esta semana , ya quedan pocas semanas iremos viendo como maduran, buenos humos.
- os dejo por aquí un CÓDIGO: Eldruida
Descuento para la tienda de MARS HYDRO.
https://www.mars-hydro.com
Hasta aquí todo, Buenos humos 💨💨💨

Likes
4
Share


@Ageddd
Follow
ULH_1
Starting to flower, it is 3 weeks old. This morning, spotted the new hairs, so my thoughts were clear: This plant needs a final transplant before Flowering ^^ .
25 litres tex-pot, with Canna-Terra Pro.
First nutrients feeding, after rooting period. Dose is 2 ml/l TopVeg.
Planning to give her Veg nutes for 3 weeks at least.
ULH_2 is still growing and rooting, its like 2 weeks old since germination.

Likes
151
Share


@CANNASIM
Follow
------GENERAL COMMENT------
Exploding! Girls are amazing, super healthy, and growing very well.
------SM.BB COMMENT------
Less bud spots than the AK47, showing new branch attempts in the stem length. Liking a lot this strain, she is drinking around 1l everyday. Root mass is feeling very dense.

Likes
226
Share


@Kitties_and_Colas
Follow
~_~_~_~_~_~_~_~_~_~_~_~_~_~_~_~_~_~_~_~_~_~_~_~_~_~_~_~_~_~_~_~_~_~_~_~_~_~_~_~_~_~_~_~_~_~_~_~_~_~_~_~_~_~_~_~_~_~_~_~_~_~_~_~_~_~_~_~_~_~_~_~_~_~_~_~_~_~_~_~_~_~_~_
8/28/21
😺 We decided to flower these a little earlier than we originally intended to make room for some new strains...I will never mainline a plant this wide again indoors lol, it seemed cool at the time but as you can see it just takes up more space 😑 👎🏻
...we gave them their first shot of bloom nutrients yesterday (we typically do this 1 week before flower but things came up and we learned we'll need the tent available)...the calcium def spots seemed to have cleared up naturally on the mainline, the other plants are fairly uniform in color (not too dark anymore), and lower growth has been removed...all systems go for flower! 💪😺, I'm hoping for a significant flowering stretch, the new growth after the last mainline topping is approx. 6inches, if this stretches to 12-14inches it should build 8 really good sized colas per side.. thanks for reading! We'll update midweek..happy growing everyone!!
~_~_~_~_~_~_~_~_~_~_~_~_~_~_~_~_~_~_~_~_~_~_~_~_~_~_~_~_~_~_~_~_~_~_~_~_~_~_~_~_~_~_~_~_~_~_~_~_~_~_~_~_~_~_~_~_~_~_~_~_~_~_~_~_~_~_~_~_~_~_~_~_~_~_~_~_~_~_~_~_~_~_~_
9/2/21
🐱 be careful what you wish for folks..we asked for stretch and we got it..too much in fact, the node spacing isn't good, far too wide with this strain..we lowered both lights in the tent to get this to stop and turned up the fans to really beat on these for a few days..hopefully this will strengthen them, I really would hate to have to steak these later...
~_~_~_~_~_~_~_~_~_~_~_~_~_~_~_~_~_~_~_~_~_~_~_~_~_~_~_~_~_~_~_~_~_~_~_~_~_~_~_~_~_~_~_~_~_~_~_~_~_~_~_~_~_~_~_~_~_~_~_~_~_~_~_~_~_~_~_~_~_~_~_~_~_~_~_~_~_~_~_~_~_~_~

Likes
1
Share


@walterwhiteee
Follow
Aug 13th transplant day
Using Gai Greens Organics 4-4-4 with worm castings and mykos for root structure
Aug 15th Start of LST


Likes
1
Share


@NewOfficialDrillInvaders
Follow
Easy strain hungry girl yield very good buds kick well buds was looking perfect golf ball shape but i was expecting more zkittelz terps

Likes
39
Share


@DogDoctorOfficial
Follow
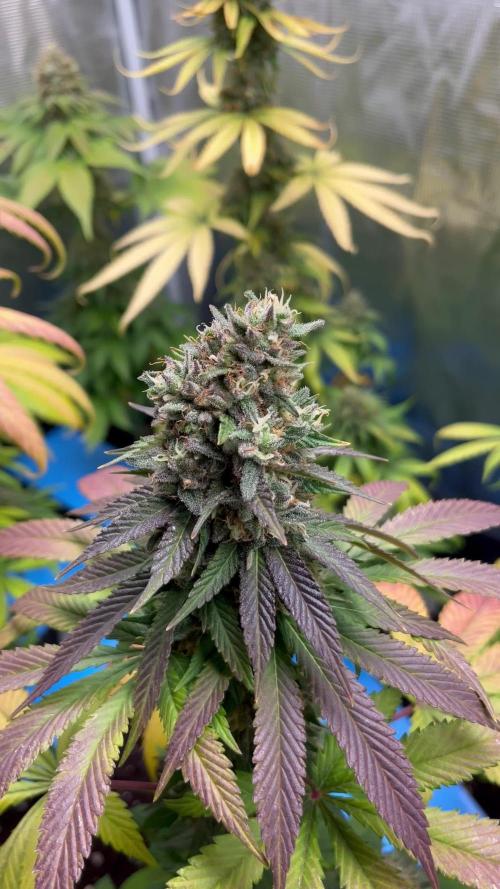
Time to clean up this 2309, she still is my fav hope she enjoys her haircut hihihi
Man she love it , next day she was back on to her praying mode <3<3<3
Tester 2309 is by far my favorite from day one, not only because i like the number but because from a early age she spoke to me like non of the others did, and now, man i mean now she is by far the one showing bigger trichomes production and her smell, i mean is so strong for the time being, she is an herbal mix with flowers and some spicy notes, this for now she is evolving day by day, just amazing, she took the defoliation like a big girl and with the week coming to an end her resin production levels and it all i mean ... <3 <3 <3
added defoliation edited video , hope you guys have fun <3 <3 <3
As always thank you all for stopping by, for the love and time you guys spend on my stuff, i fell blessed and humble, many thanks to you all <3<3<3
Genetics - Fast Buds Tester 2309
Ligth - LUMATEK ZEUS 465 COMPACT PRO
Food - APTUS HOLLAND
#aptus #aptusplanttech #aptusgang #aptusfamily #aptustrueplantscience #inbalancewithnature #trueplantscience #fastbuds #dogdoctorofficial #growerslove
With true love comes happiness <3 <3 <3 Always believe in your self and always do things expecting nothing and with an open heart , be a giver and the universe will give back to you in ways you could not even imagine so <3 <3 <3
All info and full product details can be find in can find @
https://2fast4buds.com/ wen released
https://aptus-holland.com/
https://autopot.co.uk/
https://lumatek-lighting.com/
Have a bunch more diaries going on, fell free to drop by and say hi dont be shy <3 <3 <3
<3 <3 <3 Growers love to you all <3 <3 <3


Likes
8
Share


@madlangs
Follow
All going well. No problems.
Smoothie and strawberry nuggets have about another week left


Likes
87
Share


@Mrs_Larimar
Follow
2022-01-31
Little Puddin starts into Week 5 of Bloom
now the Things happen very fast
You can see how the Flowers Budding up every Day
I only take away some Leaves sometimes, to keep her Energetic and happy
Drinking 5l every 3rd day
With this Event, we want to be there for Woman in Need of Help.
And Support those ,who are less Fortunate than us.
We feel like, we are so Blessed for what we have, that we feel Obliged to give a bit back to the Community that we so dearly Love...
During the „GROW OFF FOR CHARITY“, @Weedseedsexpress will Donate 100 Euro per Month to our Charity Goal and an additional 500 euro's by the End of he Contest, if we reach at least 2000 Likes on our weekly Posts
on Instagram.
The other Companies who are Sponsoring our „ GROWOFF FOR CHARITY“
are giving us Products and Merchandise from their Companies. And they help Promote our „ Growoff“
There are coming some AUCTIONS and GIVEAWAYS fort Horticultists
The „GROW OFF FOR CHARITY“ is Sponsored by:
( Named in Order of Appearance)
@weedseedsexpress
@urban_chili
@greenbuzzliquids
@Herbiesheadshop_com
@genoneeleven_nutrients
@zamnesiaxseeds
@spilffseeds
@Inseediousseeds
@sgreenlab
@viparspectraled
@cannabonsai_¬manny
· PLS FOLLOW OUR SPONSORS!
· LIKE AND SHARE This Posting!
· To Reach the 2000 Likes per Week!
….


Likes
422
Share


@Crashoverite
Follow
Hi all,
Welcome to my🍌💜👊 week update
Thank you so much for all support on this bananas journey. Much appreciate all your likes, follows and comments. 🙏💚❤️💜
Week 14
Jan 15- Jan 21
Flushing and preparation for harvest 😁 on Jan 15 feed girls for the last time with nutrients. It was reduced dose by 60% 5ltr no runoff. Following morning topped up with 6ltr of ph down and only fish shit. Runoffs PH 6.2. Second watering Jan 18 6tr and 7ltr on Jan 21. It was last watering. Week went very well. No white pistils hairs on Athena for a good while and barely few left on Xena. Many buds have different shapes and colours but all of them are equally hard as rocks, sticky and smelling so deliciously. This week trichomes development was just like I wish for. Just milky and amber in play Status on Jan 22. Mostly of buds 20-50% amber. It's just perfect for my needs🤤 On Jan 21 lights were on for the last time and girls will be harvested after 48 or 72h of darkness.
Stay tuned for the final week update!
Peace and love brothers and sisters ✌️💚👨🌾
Links
https://2fast4buds.com/seeds/banana-purple-punch-auto
https://plagron.com
https://www.biobizz.com/
https://fishheadfarms.com/
Likes
4
Share


@TheGrowNovice
Follow
This is my second grow. Started from seeds. 2 in big pots (I don't know the exact volume, around 30l-40l) and 4 in smaller 18l pots. I assumed that not all plants would grow nice so I thought it would be a good idea to start with 6 plants, and if they all grew I could give three away so that I have enough space (3 plants for 1 square meter).
Problem was that the people that wanted the plants, could only take them in like week 14, and then they should already be in flower. Remember the word "should".
So I sticked with 6 plants in a very confined space..
As described in the Video, this was before heavy defoliation. A few days later I flipped the light schedule from 18/6 to 12/12. At this point I had already done LST and a combination of FIMing and Topping. The two big ones and one small are Mandarin jam and the other 3 in the small pots are Super Skunk.
I think it would have been a better idea to put them in flower earlier.


Likes
4
Share


@Based_Buds
Follow
I had a good week. Been cutting back on the nutrients and I’ve been adding some unsulphured black strap molasses into my mix. Hoping it helps the microorganisms in the soil.


Likes
13
Share


@All_our_small_plants
Follow
Bewässerung: 500 ml jeden 3 Tag in der Fünften Woche
pH-Wert: 5,8
EC-Wert: 0,4 mS/cm
Temperatur: 30ºC
Luftfeuchtigkeit: 50%
Schädlingsbekämpfung: im Moment haben wir keine Anzeichen von befall wir haben nur mal zur Prävention etwas Sand gegen die Schnecken um die Pflanze gemacht, dies verhindert das diese sich nähern. Wir haben aber auch Raubmilben ins spiel gebracht zur vorsorge gegen Spinnmilben und andere Schädlinge 😷
PPFD: Direktes Sonnenlicht
DLI: Direktes Sonnenlicht
Besonderheiten: Sind in kleinen Töpfe gepflanzt und werden diese Woche in den Boden gesetzt.
-Tag 29 Heute wurde die Space Cookies #2 in den Boden Gesetzt und wurde mit Sand umrandet. Das dient dazu das sich keine Schnecken nähern, zusätzlich haben wir sie mit einem kleinen Zaun umrandet damit sie unser Tiger nicht gleich entlaubt😾, sonst sieht sie gesund aus. Ihre Schwester die Space Cookies #1 hat es leider nicht so weit geschafft und ist nun im Kompost bei der CBD Purple Kush.
Da wir ja noch eine Weitere eingepflanzt haben die Space Cookies #3 gibt es vielleicht doch noch Hoffnung für den Contest 😉😜
-Tag 31 die Space Cookies #2 hat die Transplantation in den Boden gut überstanden.
-Tag 32 jetzt scheint sie schnell an höhe zu gewinnen, es wurde auch langsam zeit. Sie hat heute auch wieder Wasser mit Jauche bekommen.
-Tag 33 Mann sieht ein deutlich das die Trainierten Pflanzen besser wachsen und mehr Triebe Bilden auch wenn viele das Gegenteil behaupten. Sie wurde Heute wieder gegossen und mit LST Trainiert.
-Tag 34 sie sieht soweit gut aus.


