


Likes
12
Share


@GREENPHOENIX6262
Follow
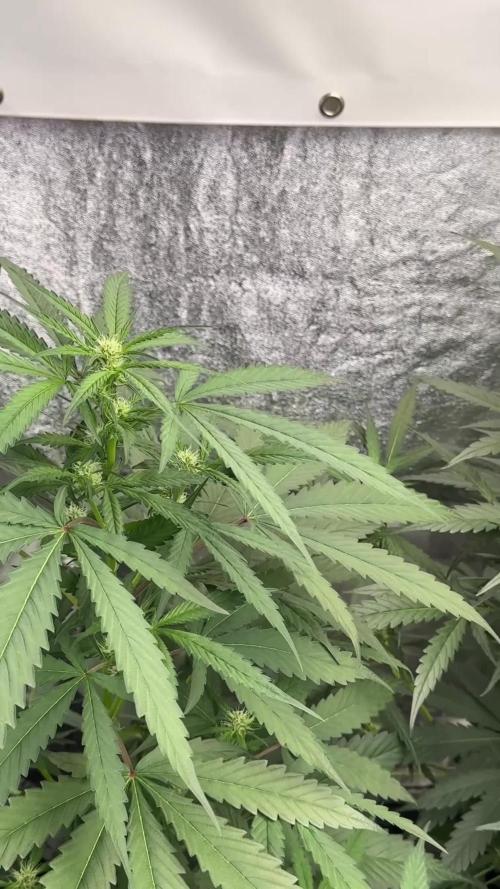
Fastbuds - Mimosa (2x) 08/27
Coming into week 4 Veg, User error stunted them lightly but things seem back on track.
Exhale 365 C02 bag introduced last week to setup for early flower.
No signs of concern or any deficiencies.
Early flowering has begun
*Mid-Week Update* *08/30*
Both plants have recovered nicely, and placed under trellis net.
Introduced NPK Phosphate
Purged Pure Blend Pro Grow
*End of week recap*
Flowering has begun
Stopped veg nute feed
Introduced Raw NPK Phosphorus and Potassium

Likes
31
Share


@KushReloaded
Follow
Start of week 6 of flower and the smell is incredible the buds are really starting to fatten up I had to tie a couple side branches to the main stem to keep from snapping can’t wait to see how big they get this week going to let them go for another week or 2 before I start the flush still shooting out white hairs
(Update) One of the plants is starting to put out some purple colors same environment and strain different appearance
(Update) the two biggest plants are maturing faster then the others trichromes are milky a little amber was going to start flush week 9 but I started these two already
If you like leave a like 👍

Likes
14
Share


@LokalGrenz
Follow
Jan 13th ordered a Dehumidifier today should be here Monday need to get the humidity down for flower I can only get it down to 57% so Hopefully it will work
One of the amnesia haze plants have some type of deficiency not sure have brown spots on leaves
Got humidity some decent control but I’m sure amnesia haze 1 is dealing with PH issues the PH meter is cheap and I’m sure it’s been off a bit so I’m going to look for new one this week


Likes
7
Share


@brapzky
Follow
Weeks 6-7-8 should probably have been better controlled. I'll definitely control the heights better for the next grow.
I didn't defoliate, top nor supercrop. I'll do that for the next grow.
Likes
5
Share


@Kempy
Follow
We’ve been hit with more stormy weather she’s still going well smells amazing
Likes
92
Share


@biggreens420
Follow
purple queen is still putting on weight might get net in to support her as she's going to need it buds are that frosty it's hard to take a good picture lol she just shines with all the thc some under sides of some leaves are changing to a purple colour hoping she will get some nice colours . dropped nutes down instead of mixing 6ml of each a and b and 2ml of green sensation into 2l I mixed it into 3l and e.c came in at 1.1 1.2 she's slowed on the drinking she's back to 3l a day loving this girl so far very impressed by her she's huge put a few pics of a royal cookies on not much else to say thanks for reading happy growing guys
Processing
Likes
45
Share


@Nordicislandgrower
Follow
Hello growers! Week 13 is here, a little cal mag issue but i’m On it 👌🏻
I had some issues with the night temperatures, but I have fixed that with a heater in my grow room. Thanks to the people that pointed out that would slow the growth of the girls.
But yeah other than that the buds are mad frosty and smelling super dank, i’m Just waiting for them to fatten up now 👌🏻
Good growing everyone!


Likes
7
Share


@Naujas
Follow
well, it's exactly 12 weeks :) and my house is full of lemon aroma :) the girl endured really difficult growth, but she coped with everything perfectly :) who followed the growth, you saw that she grew on the balcony for 10 weeks, and she spent the last 2 in the grow tent :) 500 gr wet weight !!!!:) , before putting it in the ground I expected less than 10 g dry yield :D then this growth turned out super well, if it wasn't for my vacation I would have let it grow for about 2 weeks I think. but everything is still very good, I'll go home, fix it and do a smoke review :).

Likes
4
Share


@Facocero
Follow
È iniziata da poco la 4°settima, sembra stiano crescendo bene le piccole😍 in questi giorni mi sono dedicato a un po' di defogliazione e di giorno in giorno cerco di migliorare LST per favorire la penetrazione della luce.
Alzato il dimmer al 75% e ho allontanato un po' la lampada dalle piante e sembra stia o reagendo bene! Spero tanto di fare un buon lavoro! 💪 Ai prossimi aggiornamenti!
AGGIORNAMENTO: Sono passati 2 giorni dalle ultime foto pubblicate, si stanno infoltendo per bene le piccole😍 aspetterò ancora un altro po' per mandarle in fioritura,vorrei riuscire ad occupare più spazio superficiale possibile.
Sto alternando con le annaffiature fertilizzando moderatamente una volta si e una no.. per il momento sembra tutto ok!😎


Likes
51
Share


@420DeepGrow
Follow
Gracias al equipo de Anesia Seeds, XpertNutrients y Marshydro sin ellos esto no seria posible.
💐🍁 Smashberry Fumez:
Adéntrate en la humeante bruma de nuestra nueva Smashberry Fumez, donde la dulzura de las calles se encuentra con el octanaje del oráculo. Esta iniciadora de incendios feminizada es una mezcla de Candy Fumez y nuestro éxito de ventas Oracle Octane, que logra una armonía increíble con un 60% de Indica que te permitirá relajarte profundamente mientras mantienes la cabeza en las nubes.
🚀 Consigue aqui tus semillas:
💡FC6500: Eficiencia líder en el mercado: la lámpara de cultivo LED FC-E6500, que ostenta un estatus líder en el mercado, es una solución rentable con un PPE de 2,8 µmol/J y un rendimiento máximo de 2,5 g/vatio. Ofrece un PPF alto de 2026 umol/S y es adecuada para una cobertura de vegetación de 1,50 m x 1,50 m y una cobertura de flores de 1,20 m x 1,20 m.
Iluminación versátil y uniforme.
https://marshydro.eu/products/mars-hydro-fc-e-6500-730w-commercial-led-grow-light/?gad_source=1&gclid=Cj0KCQjw1qO0BhDwARIsANfnkv9IIrYSbmJqz8PqpJOIyWwJfp5bc3SGJgUV68USLQ4tjmXDYwoBuAsaAue3EALw_wcB
🚥 MarsHydro ADLITE UV/IR/RED:
Para lograr un crecimiento óptimo de las plantas y maximizar los rendimientos es un arte simple que depende en gran medida de las condiciones ambientales adecuadas. Reconociendo las limitaciones de la iluminación natural y las soluciones de iluminación tradicionales para satisfacer estas necesidades únicas, lanzamos ADLITE. Estas luces especiales UV, IR y roja están diseñadas para llenar áreas del espectro, proporcionando las altas longitudes de onda que las plantas necesitan para un crecimiento y desarrollo óptimos.
🚀 Consigue aqui tu Adlite:
https://marshydro.eu/collections/adlite-supplemental-lights/
🏠 : Marshydro 1.50 x 1.50 x 1.80, carpa 100% estanca con ventanas laterales para llegar a todos los lugares durante el grow
https://marshydro.eu/products/diy-150x150x200cm-grow-tent-kit
🌬️💨 Marshydro 6inch + filtro carbon para evitar olores indeseables.
https://marshydro.eu/products/ifresh-smart-6inch-filter-kits/
🍣🍦🌴 Xpert Nutrients es una empresa especializada en la producción y comercialización de fertilizantes líquidos y tierras, que garantizan excelentes cosechas y un crecimiento activo para sus plantas durante todas las fases de cultivo.
Consigue aqui tus Nutrientes:
https://xpertnutrients.com/es/shop/
📆 Semana 12:
Última semana de lavado de raíces y cosecha la siguiente semana, ha quedado una planta muy compacta y totalmente cargada de resina.

Processing
Likes
40
Share


@Peeman
Follow
Aug.24 and another round of thunderstorms overnight produced more rain and heavy winds but luckily no damage this time around. 👍
Most girls have past the pre-flowering stage and are showing little buds coming in. Still stretching and growing like crazy tho. Gonna have some big momma's to deal with. 😲😥
Last week plants were given a good flush with r/o water @ 6.3 pH to get them ready for the flowering stage.👌
This week started Bloom nutrients by Future Harvest cycle/schedule week #1
August 27 wind storm came through snapping another lower branch from Blue Fire #1. 😢 I hope the stress doesn’t cause her to herm.
Aug.29 winds are supposed to reach over 60 km/h today and into Sunday. Let’s hope mother nature isn’t too pissed off 💨
Trainwreck #1 with her 10 big colas👆 are getting very heavy and smells of sweet citrus and pine oh ya💪
Trainwreck #2 is a sativa dominant girl that looks nothing like her sister #1 even tho they came in a 5 pack from Canuk Seeds. Gotta love variety 😋
Aug.30th Super Skunk auto #2 got chopped today after noticing a teeny area of bud rot. 🤔 Main cola is as thick as my fist and weighs just over a pound. 🤘😝🤘


Likes
97
Share


@AsNoriu
Follow
Day 30. Girls are starting to look very good !!!
No preflowers yet, but think transition will start this week.
Leaves are a bit too green, but I still will feed them this week.
Changed light cycle to 18/6
Day 33. Girls are happy and all looks very promising !!! Applied BioBizz Leaf Coat before this morning and girls finally loved the stuff !!! You get most with this product when plant is bigger and have loads of foliage, so perfect for last few weeks of veg period.
Happy Growing !!!

Likes
39
Share


Likes
3
Share

@DogDoctorOfficial
Follow
🌸 Pink Rosay Auto by Zamnesia | Pheno A | Week 6 (Flowering)
🌱 Elegance Never Needs to Be Loud
Some plants impress with sheer size.
Others with explosive growth.
Pink Rosay has chosen a different path.
She impresses through elegance.
Growing under the same 12/12 From Seed experiment as the rest of the 8×8 Adventure, she continues to prove that a plant doesn't need to be the tallest or widest to command attention. Standing at 96 cm, she has developed into a beautifully proportioned autoflower with a naturally balanced structure, excellent symmetry, and a calm confidence that becomes more obvious every week.
There isn't a single branch that feels out of place.
Everything seems perfectly positioned, as though nature designed her with precision from the very beginning.
Sometimes beauty isn't about being dramatic.
Sometimes it's simply about getting everything right.
⸻
🌸 Week 6 – Flowers Taking the Lead
This week marks a noticeable change in the plant's priorities.
The vertical stretch has begun slowing, allowing more energy to be invested where it matters most—building flowers.
Every branch is now crowned with bright white pistils, and the individual flower sites that appeared last week have already started connecting together, giving each branch the first hints of what will eventually become full colas.
The canopy feels alive.
Every day brings a little more volume, a little more stacking, and a little more character.
This is the stage where the plant quietly shifts from growing upward to growing outward, filling every flowering site with new life.
And Pink Rosay seems perfectly comfortable making that transition.
⸻
🌿 Structure & Natural Balance
One of my favorite qualities about this phenotype is just how naturally balanced she has become.
The gentle Low Stress Training performed during the previous weeks continues paying dividends, creating an open canopy where every branch receives excellent light without feeling overcrowded.
Her internodal spacing remains ideal, allowing light and airflow to reach deep into the plant while giving each future cola plenty of room to develop.
The central leader remains dominant, but the secondary branches are doing an excellent job keeping pace, creating a wonderfully uniform canopy that should translate into a very satisfying harvest later on.
She doesn't need correcting.
She simply needs time.
⸻
? The Language of White Pistils
One of the most beautiful sights in any flowering room is the explosion of fresh white pistils.
They're delicate.
They're bright.
And they're the plant's first true declaration that flower production is fully underway.
This week, Pink Rosay is absolutely covered in them.
Every flowering site seems to wear its own little crown of brilliant white hairs, reaching outward as the calyxes slowly begin stacking beneath them.
It's one of those moments every grower enjoys because those tiny white pistils are much more than beautiful—they're the blueprint of the harvest to come.
Today they're soft, fresh, and full of energy.
Over the coming weeks they'll guide the formation of every cola as the flowers swell, mature, and gradually begin revealing the frosty character hidden inside these genetics.
Watching that transformation never gets old.
⸻
🍃 Plant Health
Health continues to be outstanding throughout the entire plant.
The foliage maintains a rich, healthy green without excess or deficiency, while the leaves display excellent posture and remain perfectly relaxed under the current environmental conditions.
The stems have thickened nicely during the stretch and now provide a solid framework for the flowers that continue developing across the canopy.
There are no signs of stress.
No unnecessary stretching.
No wasted energy.
Just a healthy autoflower confidently following her own schedule.
⸻
💧 Hand Watering & Nutrition
Pink Rosay continues to be hand-watered, allowing close observation of both substrate moisture and daily plant response.
Current feeding:
• Terra Grow — 1.9 ml/L
• Terra Bloom — 1.9 ml/L
• Pure Zym — 1 ml/L
• Sugar Royal — 1 ml/L
• Power Buds — 1 ml/L
• Green Sensation — 1 ml/L
Maintaining:
• EC: 1.78 mS/cm
• pH: 6.0
The nutrient balance remains right where the plant wants it, supporting the transition from vigorous growth into full flower production while keeping the foliage healthy and vibrant.
⸻
🌡️ Environment
The environment continues providing exactly the consistency these genetics deserve.
Current conditions:
• Day temperature: 29°C
• Night temperature: 25°C
• Relative humidity: 60%
• Solution temperature: 21°C
• Root zone temperature: 21°C
• CO₂: approximately 529 ppm
Maintaining a stable environment allows each phenotype to express its genetics naturally, and Pink Rosay is taking full advantage of those conditions.
Healthy roots.
Stable climate.
Happy plants.
⸻
👀 Looking Ahead
The coming week should be where the flowers truly begin to gain substance.
The framework has been built.
Now it's time for the calyxes to start swelling, for the pistils to multiply even further, and for each flowering site to slowly merge into the colas that have been quietly preparing since the stretch began.
If she continues on this path, I expect a canopy filled with beautifully shaped, evenly developed flowers from top to bottom.
Everything about her suggests she's only just beginning to reveal what she's capable of.
⸻
🙏 Final Thoughts
Pink Rosay continues to remind me that perfection isn't always measured in size.
Sometimes it's found in balance.
In symmetry.
In healthy growth.
In the quiet confidence of a plant that simply does everything well.
Week after week, she has developed without drama, without setbacks, and with a grace that's difficult to ignore.
Watching those brilliant white pistils multiply across such a beautifully structured canopy has easily been one of this week's highlights, and I'm incredibly excited to see how these early flowers transform over the coming weeks.
A huge thank you to Zamnesia for these fantastic genetics, Plagron for providing the nutrition that keeps this project thriving, Future of Grow for the incredible lighting, TrolMaster for maintaining such a stable environment, and to everyone following this journey here on GrowDiaries.
Your encouragement, questions, and shared passion for growing make this 8×8 Adventure even more rewarding.
Until next week...
Growers Love and happy growing! 🌱💚

Likes
22
Share


@PitteJasKorels
Follow
Girls are growing and showing really nicely for 3 weeks of flower.
Smells now starting to eminate from both. The Sugarcane smells like passion fruit punch and the orange Velvet is still to complex to call but amazing nonetheless.
Defoliated more. Didn't have a choice since the canopy was still so dense.

Likes
Comments
Share


@922Grow
Follow
Un breve resumen de esta planta sería "La Green Gelato de RQS ha sido todo un descubrimiento".
Empezamos el cultivo a mediados/finales de mayo. Se plantó directamente en la maceta final de 17l. Desde ese momento hasta la fecha de corte solo se regó con agua, durante toda la vida de la planta no se aplicó ningún tipo de fertilizante ni en crecimiento ni en floración. No tuvo ningún apoyo por parte de focos, se utilizó únicamente la luz del sol. Cuando llovía se ponían bajo techo para evitar la aparición de hongos o moho.
No hay mucho mas que destacar ya que para el cuidado que se le dio, las fotos hablan por si solas. No hay duda de la calidad de este banco y de sus genéticas.
Nota;
Al final de la floración hubo aparición de hongos, se retiraron y no hubo mas problemas.

