The Grow Awards 2026 🏆 


Likes
Comments
Share
@PatriciaGant
Follow
Dane, We all should help one another.
Human beings are like that.
We should live by each other’s happiness - not by each other’s misery.
We don’t want to hate and despise one another, share the Joint.
And mother earth is rich and can provide for everyone.
We can Grow enough Happiness, In this paradise, there is room for everyone.
We only exist to bring joy into the world and The way of life can be free and beautiful,
but we have lost the way.
Grow High and Give the world A smile.
At the end we own nothing more then all our memories, lets make them amazing for everyone,
nothing to loose only everything to win.
A last kiss goodby, a second one, softer and long as a sign, that you are woth it.
That Everyone worth who loved and give.
Enought Hippie Talk, now have a nice day and an even better grow, thx for watching by.
((From Clone 🌿
week report:
(21 cut her down a litte bit.

Likes
4
Share
@OranGoodAng
Follow
Наконец примудрил обдув для растихи. На днях придет изолонтейп для шумоизоляции. Немного переделаю выдув и поменяю уголь в фильтре
6й день от перевода на 12/12. Растет активно, но я ее загибаю в ковёр, так как неоднократно были проблемы с недостаточностью высоты бокса. Так что пусть лучше будет поменьше))
По опыту могу сказать, что до зацветания ещё больше 10ти дней. За это время успеет несколько раз ещё порвать бокс.
Лью сейчас удобрения Simplex Coco в минимальной дозе на вегу. Растению хорошо, и в дренаже ппм не растёт. Так что едем дальше)))
Из проблем, только отсутствие нормального обдува для расты. Со дня на день придется что-то решать с этим.
Processing
Likes
4
Share
@Ferenc
Follow
7th week is here. They are good looking girls! Some weeks left to be finished ! Water 100 ml 2x a day per plant. Fertilization on Monday, Wednesday, Friday and Saturday with the same amount of water. Light schedule 20/4 with 600 W and ventilation goes on when the lamp works. Day 52: All good, some yellow leaves can be seen at the bottom of the biggest plant it matures quicker than the others I think it started using the energy out of the lower leaves to produce more buds. I will remove it later. Day 55: I couldn't come yesterday so my friend did water them. I am here now in the morning ing. Flowers developing nicely among the stamps. The bigges one start getting yellow it matures quicker than the other ones. Day 56: I removed unwanted yellow and dead leaves and also tied the plant from different angles to get more light. They look good now, they are spread. Plants are really nice and the flowers keep coming! Now it is gonna be better air flowing and the light also reach deeper parts at the bottom and all over the plants!

Likes
10
Share


Likes
21
Share
@JohnnyBlaz3
Follow
Flower time! Cant wait to see how she comes out. I have bent the main stem over a couple squares to keep her a little lower and spread out to be part of the scrog without topping her. Seems to have worked great and all the main colas are above the canopy but not too tall the are gonna block the surrounding ladies. She nice and snug in there making herself at home. I am expecting some nice and plump flowers from her as she looks very healthy. The root supplement and the folair feeding does seem to have helped a bit but i'm always cautious for placebo. The weights at the end will tell the tale. I already have quality down so I'm looking to raise the weight without sacrificing quality. I would also like to improve on my smell and flavors, have been steadily improving crop to crop and hopefully will keep that trend going for a long long time. Just a little better each crop with small techniques that add up to fat flowers!! She kinda blends in this week but the next week or two she will stand out again with her unique flowers

Likes
7
Share
@Danger90946
Follow
Day 43 12/06/2021- Beginning of week five of flower. She should be done soon, she will also get her final feeding soon.
Day 45 12/08/2021- She got her final top dress today from here on out she is on her own all I will do is water with pain water PH to 6.2-6.8 when dry.
Day 47 12/10/2021- She is coming along nicely. Very frosty wish she wasn't a auto so I could of clone her for sure. Today she got a nice treat as it rain in my hometown and that's the water she got. Hoping she is ready by the end of the year. I know she looks funny but she was never topped either.
Day 49 12/12/2021- End of the week, nothing new.
Likes
17
Share
@nico54
Follow
I just saw what you said about moisture the plant too much and I will remember that thanks.
Please Keep coming with advises thanks

Likes
18
Share
@Greenfox89
Follow
Hello people week # 8 at the start. I fertilize 3 more times this week with a liter of water (6.5ph). Hope this week she finally develops the colas a bit.
I had a little mildew problem last week, but defoliation resolved the issue. It fits perfectly into the season from the look hope dan to get good gifts.
Therefore I will start my flush in week 9. I'm curious what will happen in the next few weeks.
Thank you for your time.
A fox does what a fuschs has to do.
🦊🦊💚💛❤️
Likes
5
Share
@Stretch448
Follow
Not sure why the other seeds didn’t germinate. One of the other Bananacane’s started to but died off upon sprouting


Likes
10
Share
@Archieballs
Follow
Harvested Banana #1 she had stopped growing and her trichomes were ready her wet weight was 184 grams and dry weight 53 grams.
Banana #2 and Skywalker are still going they are on water only from here on. They both got 5 liters of ph water on day 80.

Likes
Comments
Share
@soil2bud
Follow
These ladies have just taken off and doing what they must... I started the BioBloom feeding today and did a very light defoliation


Processing
Likes
14
Share
@AthanasGrow
Follow
So we are in the middle of week 10 and I feel pretty comfortable feeding them now, pretty much the same until next week when I give more Top Max. I've seen much more explosive growth on other diaries but I have to say I'm pretty proud so far for my first attempt. Staring at those fresh furry little balls of life is surreal, getting to this point is great, but it's far from over.
So I kept the same feeding this week, still adding the Great White with mycorrhizae (and like 40+ other microbes) once a week as it says per directions. The BioBizz products are easy to use and hold up well, so I'm feeling better about going with them even though I had some issues at the beginning (all my fault most likely). I can dial in the feeding mixture PPM now first try to where I want it, so far 700ppm of a gallon every 2 days has been working out. I feel like at the start I was over watering because people say water everyday in coco, well that seems to be for the coco bricks. I am using FoxFarm Bush Doctor Coco Loco (long ass title just for some coco coir) with additional perlite and it has a lot more holding capacity than just normal bricked coco coir. For checking on when it needs water I still use the method of digging into the topsoil an inch and weighing the pots by hand. Also I've noticed if they are pretty tired looking after lights on then I'll water. Like everyone said, consistent fertigation has been the hardest part as a beginner.
First week I'm posting a video, the fan can't oscillate so I turn it to the right, left, and keep it center as well as raise and lower it so there is decent airflow. I wouldn't say it's optimal but it works for now.
I've raised the lights about 3 inches just so the top colas don't get burnt, I've also found the sweet spot on the potentiometer (power knob) where I can get maximum power without raising the temperature above 77f, which it quickly goes above 80f if I exceed it.
I've done minor defoliation before each feeding (so like every 2 or 3 days), mostly just clearing the leaves from above while keeping the important sugar leaves and some fan leaves, even though most the large fan leaves have long died/turned. If you watch the first video I've posted you'll notice an injury on her, unfortunately I didn'
I feel like I've failed on the C99 X Blueberry Auto, in fact I took it out of the title. I definitely kept it in nutrient lock even after repeated flushings, it seems to have grown a little and even looks like it's accepted its new life as a stunted sideshow geek never thinking of being the in the spotlight under my grow tent. On the plus side, the two normal Desert Lemon photo's look great, even if one is starting to look leggy. They haven't shown their sexes but it looks like they soon will, because frankly I don't have enough room and would like the leggy one to be gone. The two other shortest plants looks nice and green, shortest being the Black Sugar photo that I did some minor LST with tent stakes - and the very beautiful Gelat.OG photo that is so symmetrical it makes me want to put her in the spotlight (aka position 1 which I give most room/light priority too).
Okay so that's it for this week folks, thanks for checking in and please comment or critique on my first grow! Any questions also welcome.
-AthanasGrow

Processing
Likes
5
Share
@jtgrow
Follow
Thursday, August 13, 2020
12:45pm: Watered: 1.25C PH 6.9
Friday, August 14, 2020
9:40pm: Main-lined: Topped at the 3rd node. removed everything below 3rd node.
Saturday, August 15, 2020
1:20pm: Watered: 1.25C PH 6.1

Likes
15
Share
@CK-OrgGrow
Follow
Woche 9
Die Mimosa Fast von 00 Seeds Bank ist in der reife Phase angekommen.
Letzte Woche hate ich ja den EC erhöht um einen kleinen Boost zu geben.
In dieser Woche habe ich von alle Düngekomponenten die Dosis halbiert.
Mit dieser Nährlösung werden die Mimosa jetzt eine bis ein halb Wochen bekommen.
Nach und nach sieht man auch das die Mimosa immer weiter an den Erntezeitpunkt kommt.
Likes
6
Share
@MG2009
Follow
10/03/2020
Flowering has commenced!
And I like how she is stretching, More than my cookie cake did and right at start of flower.
I have decided not to top again, but I am going to take clones 2(SOIL) latter in the week, and 1 for DWC.
More pics when I take clones
(before and after)
Likes
92
Share
@DogDoctorOfficial
Follow
Week 4 Veg Report - TrolMaster Chronicles 🌱
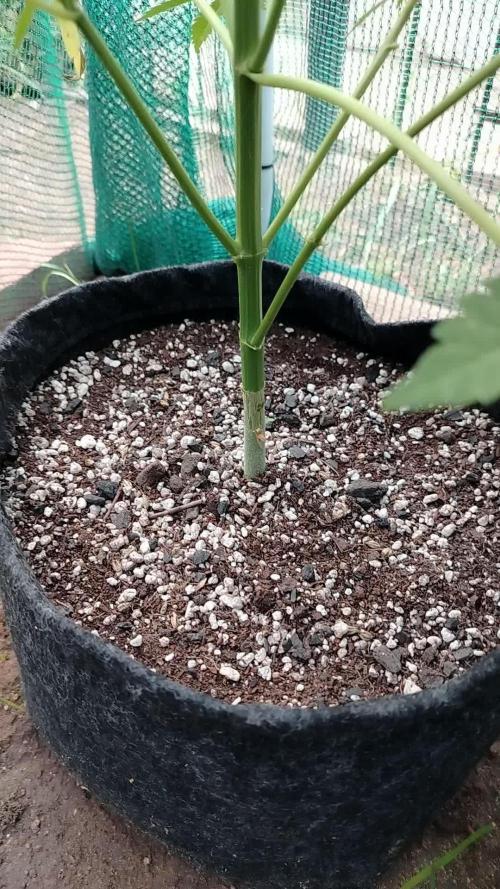
What a week it’s been in the garden! We finally transplanted the Papaya Zoap into its final Autopot, and let me tell you, this plant is something special. Though her roots weren’t quite where I wanted them to be yet, the move was needed to help her catch up with the rest of the crew. She’s already looking fantastic in her new home, and I have no doubt she’s about to explode with growth in the coming days. Sometimes, you just have to trust the process, and I’m feeling like this is one of those moments. It’s almost as if the room itself is taking on a life of its own. 🌿
In fact, I’m starting to believe that what we’re building here is something greater than ourselves—there’s this energy in the room, a feeling of everything coming together perfectly. I can’t wait to see how this journey unfolds!
Dialing in the VPD with TrolMaster’s Tech
Now, let’s talk VPD (Vapor Pressure Deficit) and how I’ve been keeping everything in check with the Tend-X and the incredible (DSH-2U) Humidity Station. VPD is crucial to plant health—it’s all about finding that perfect balance between humidity and temperature to optimize transpiration and nutrient uptake. The (DSH-2U) Humidity Station, connected directly to my humidifier, has been an absolute game-changer in this regard. With its real-time data and automation, it allows me to monitor and adjust the RH with pinpoint accuracy.
Simple yet brilliant, the (DSH-2U) Humidity Station is keeping my room at the sweet spot I need. Whether I’m tweaking the settings from my phone while I’m out and about or just fine-tuning things while relaxing at home, this machine does it all. It’s like having an extra pair of hands in the grow room—and when you’re managing something as complex as VPD, that’s invaluable!
And yes, the TM+ Pro App—let’s not forget how awesome it is. I’m adjusting my grow room from the couch, the car, or even the bathroom 😜. I’ve said it before, but this app is making growing easier than ever.
Feeding the Girls: The Perfect Blend 🌱
We’ve upped the game by adding CaMg-Boost at 0.25 ml/L to the feeding schedule. Along with the 1 ml/L of the all-in-one liquid, this brings the TDS up to 320 ppm, with a pH of 5.99 and solution temperature of 24.8°C. In the soil, readings are around 415 ppm, with temperatures hovering around 25°C The plants are absolutely thriving, and I can already see the difference this new feed is making.
I can’t help but have a bit of fun with this process—it feels like I’m spoiling them with the best of the best. And they’re rewarding me with beautiful growth and vibrant green color. You know how it is, with the right care and attention, these plants are truly becoming a masterpiece in the making. 🌱
Shoutouts 💚
Big shoutout to TrolMaster and ThinkGrow LED for the phenomenal gear that’s making this grow smoother than ever. Also, massive thanks to Aptus Holland for their top-notch nutrition, and of course, to the community here on GrowDiaries—you guys keep the energy alive! 🌱
Last but definitely not least, shoutout to all the seed banks supporting this journey. You’ve been a huge part of this process, and I couldn’t do it without you!
Remember, for exclusive behind-the-scenes content and updates in real time, head over to my Instagram and YouTube channels @DogDoctorOfficial. We’ve got tons of epic content lined up, and you won’t want to miss it!
P.S.
Let’s talk about the new Model One LED Bars—these beauties are not only powerful but super efficient. I’ve been able to dim them down, save on electricity costs, and still maintain an incredible PAR and spectrum. It’s all about fine-tuning the balance of power and performance, and these lights make it easy to get the best results while being eco-friendly. Whether you’re running them full throttle or dialing it back, you’re still getting optimal growth conditions for your plants. That’s the kind of innovation that takes your grow to the next level. 💡
Growers Love to all 🌿💚


Likes
189
Share
@Legendaryseedthumb
Follow
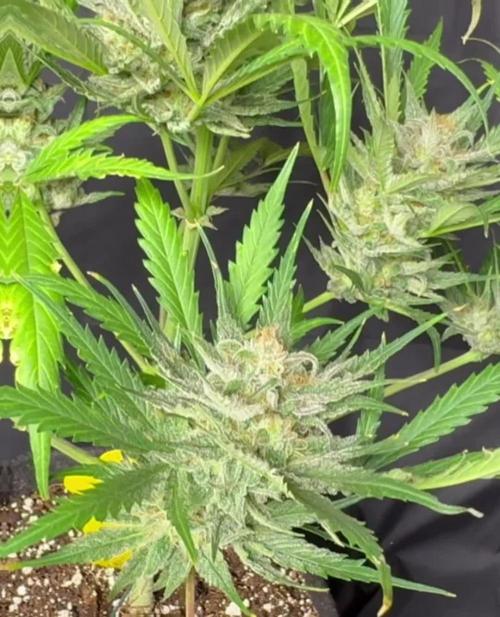
They could be in pot for 1 more week but I really need my weed right now 😂 100% cloudy but no amber

Likes
65
Share
@Dendegrow
Follow
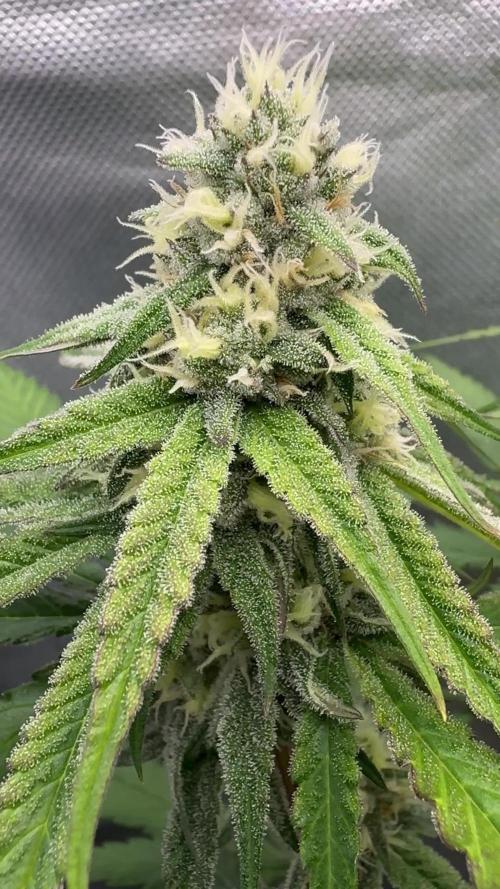
The harvest is in! 🌿✨ The buds have turned out absolutely stunning – dense, frosty, and bursting with trichomes. The aroma and flavor are something truly special: a delicate blend of cherries with a refreshing hint of mint 🍒🍃.
The high is incredibly potent, deeply relaxing, and body-focused – the perfect companion for unwinding in the evening 🌌💤. These cuttings have truly delivered, and despite the challenges along the way, the results are impressive. I harvested them at the perfect moment, with fully milky trichomes, ensuring peak potency and a balanced effect 💎✨.
Thanks to everyone who followed this journey – stay tuned for more updates and new adventures. Until then, enjoy the vibes and happy growing! 🌺📸
---
Die Ernte ist da! 🌿✨ Die Buds sind einfach wunderschön geworden – dicht, frostig und voller Trichome. Das Aroma und der Geschmack sind etwas ganz Besonderes: ein leichter Hauch von Kirschen, kombiniert mit einer erfrischenden Minznote 🍒🍃.
Das High ist unglaublich stark, tief entspannend und vor allem körperbetont – perfekt, um den Abend ausklingen zu lassen 🌌💤. Diese Stecklinge haben wirklich abgeliefert, und trotz der Herausforderungen unterwegs bin ich mit dem Ergebnis sehr zufrieden. Ich habe sie genau zum richtigen Zeitpunkt geerntet, bei vollständig milchigen Trichomen, um maximale Potenz und eine ausgewogene Wirkung zu gewährleisten 💎✨.
Vielen Dank an alle, die diesen Grow begleitet haben – bleibt dran für weitere Updates und neue Abenteuer. Bis dahin, genießt die Vibes und happy growing! 🌺📸
Likes
Comments
Share
@MonsieurDeLaRuche
Follow
this strain is amazing!! I loved growing it, despite very slow growth and very small internodal spaces, it is very resistant to stress and topping!! it revealed itself in flowering with pretty compact buds, a smell of bugs (yes, bugs!!), with strong notes of grapefruit, gasoline... no waste in the taste!! I recommend, I will grow it again
