
Likes
Comments
Share


@Kirsten
Follow
26.1.25:
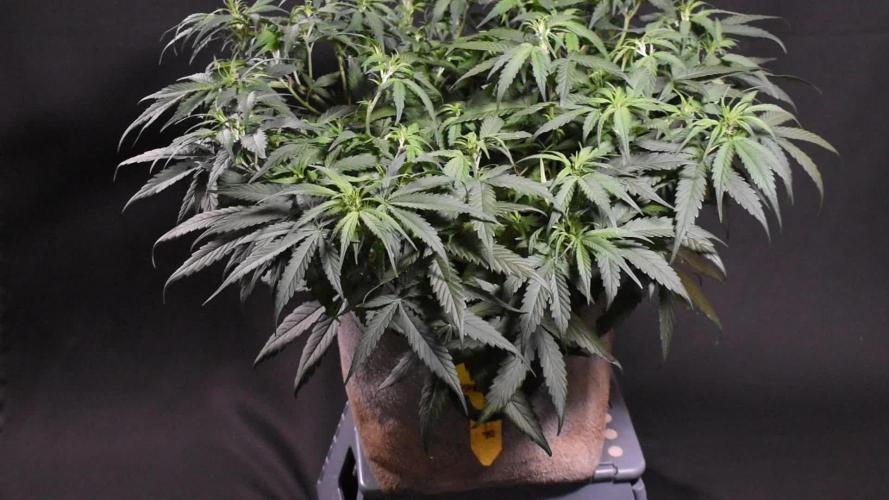
I have had a mistake 😕 I spilt some Fish Mix as I was experimenting with a syphon from some aquarium tubing I have. Unfortunately, I forgot to take the syphon out! Ugh 😣
However, it is fish emulsion and very thick consistency. Therefore, I was able to scrape it up with 2 of my business cards up off the counter. So added this extra into the next 2 ltr solution I mixed.
All plants were watered with at least 1ltr of dechlorinated water PH'd to 6.3.
Containing the following nutrients;-
♡ 3ml Seachem Seaweed
♡ 4ml Biobizz Fish Mix
♡ 4ml Biobizz Bio-Grow
♡ 3ml Biobizz Bloom
♡ 2ml Xpert Nutrients Bloom Booster
♡ 2ml Xpert Nutrients Cal-Mag
♡ .25g Ecothrive Biosys.
♡ 2.5g of Bicarbonate of Soda as PH UP.
Unfortunately I have broken my PH pen too. Accidentally submerged it under water, then the readings went crazy.
I'm leaving it to dry by standing it up but I'm most likely going to need a new one, which is extremely annoying 😑
I'm going start implementing the Scrog net probably some point next week if I let the plants that are in flower to just grow up now, as I do believe that I stunted Watermelon 🍉 by using too strenuous LST.
Hopefully the plants still are able to grow upwards at this stage during flower for all the Purple Punch P1, P2 and P3.
We will soon see!
28.1.25:
My PH pen has packed up 😣
I've got to wait to get another.
It's super annoying 😑 so I'm just judging by memory how to regulate it.
Unfortunately, that's my only choice! I'm also out of the dechlorinator 😕 things are not going very well this week so far 😅
I guess we will have to make do, until I can get replenished.
29.1.25:
I removed all the plants, hoovered, and disinfected the tent.
There were several accidents when watering, causing some debris and splashes.
I decided to just go ahead and get a few other things done. It's crazy how quickly things can become neglected! 😣
So I defoliated moderately on all plants except Gorilla Cookies seedling.
I have absolutely dropped the ball on my lighting situation!
My light was much further away than I thought!
I turned it up to 100% and dropped it down to just under 2 feet away.
After I reset the tent, I set up my scrog net. I removed 80% of all LST pegs. I am planning on letting the scrog net take over the training from here.
I really want to minimise the risk of mould, so I decided to start using my dehumidifier. It has raised up to 73% RH this week, so it's necessary.
Hopefully, I will be able to get my dechlorinator and PH pen soon! That's kind of essential to me.
It's been a little bit of a stressful day in the garden, to be honest 😅
30.1.25:
So I am expecting the arrival of my new PH pen today, as well as my new bottle of Ecothrive neutralise.
It is supposed to measure the TDS and EC in addition to the standard TEMP and PH, which I had previously. Obviously, time will tell if it's any good or not.
I realise, much too late now, that my lighting is very insufficient for this many plants. I need double the watts at least, and coverage is very poor.
I remembered I had an old LED floor lamp, which was in a corner being unused.
I decided to take the stand off, and Zip tied the pole onto the tent pole at the back left corner.
I have no idea what the wattage is, and it's quite pathetic 😅 but I mean, I might as well use it, being as I definitely cannot afford more lights! 😣
Next grow, I will probably only grow 2 plants, max 4, and just use larger 7-10 Gallon pots.
Being as I ran out of dechlorinator, I only watered some plants properly because I only had enough to make 6 litres. When my pen arrives, I will get everything properly watered.
31.1.25:
The leaves of several plants are showing signs of iron deficiency. This is likely due to my PH pen packing up earlier. I now have a new pen.
Due to this, I decided to use my Seachem Prime, which I use for my aquariums. As I wanted to get them watered properly, and my Ecothrive Neutralise hasn't arrived yet.
I watered each plant with 1ltr of dechlorinated water PH'd to 6.0. I added .25g Ecothrive Biosys to the water.
May give them a breather on the nutes and just use the Cal-Mag and Biosys.
Being as I've just topped dressed with rich fertilisers, I'm sure that will be OK for the next several waterings.
Bubble Kush

Likes
15
Share


@Professor_Daank
Follow
Google doc for nute schedule: https://docs.google.com/spreadsheets/d/1HtHnZOxMHtBK5DFQjpBun2lbhDxYVhI7lJaq4W6xbyk/edit?usp=sharing (Choose Sweet Seeds at the Bottom)
Week 2 of Veg - Week 2 Total
EC Target: 1100-1400
pH: 6.0 - 6.46
Sensi Grow A - 8ml
Sensi Grow B - 8ml
B-52 - 8ml
Voodoo Juice - 8ml
Rapid Start - 1ml
Great White Myco - 1tsp
This grow is just beginning and still going very well. Sweet Seeds genetics are crazy. Like... fuckin' amazing. I had a 3.5inch root starting on my Red Poison. This grow is going to be great!
Advanced has a tendency to give VERY high EC levels if you follow their guideline. I use what they recommend and then I tone it down to the EC levels I want. Just a heads up if you are using Advanced and not checking - you are WASTING nutes.


Likes
9
Share


@uktomatogrows
Follow
Starting to get there, week10 of flower will start flushing out on Monday till PPM clears

Likes
101
Share


@morganfreeman420
Follow
Esta semana la temperatura subio un poco. Las flores empiezan a engordar y se empieza a inundar todo de olor

Likes
35
Share


@XperencdGmanXG
Follow
another sucessfull week of just sitting here not growing much but still staying alive just waiting on a place to grow. I have some that will be finished next week, so harvest, clean and reset for the pot patch 2023 and grow this baby out for the contest.

Likes
50
Share


@Terra_Farma
Follow
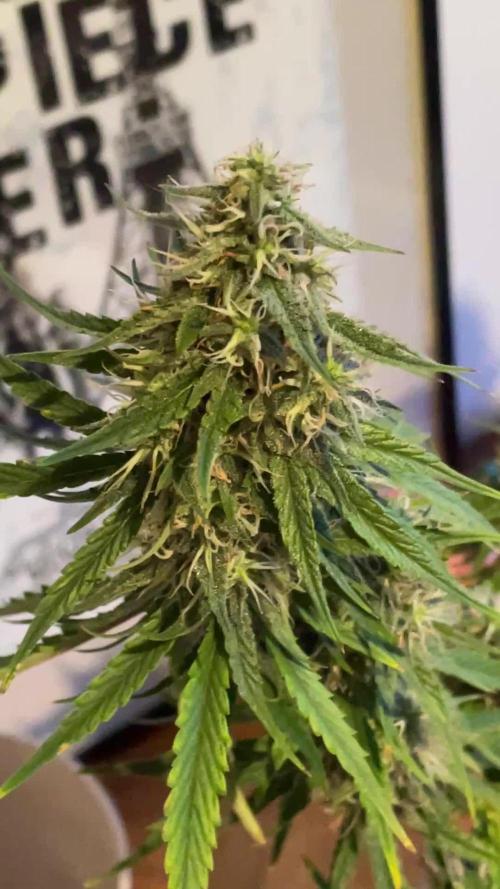
First week of the flowering phase and things are already looking promising. Pistils appearing already as you can see in the photos, and all 5 plants stretching out nicely.
I’ve now defoliated all of the fan leaves that were on the main stem, they were huge and had done their job of providing energy to the side branches and were now probably just taking up too much water and nutrients and were too low to absorb much light.
So now all growth is concentrated on the side branches, all of which are nice and uniform and giving several tops on each plant.
I’ve moved the light to 18inches/45cm away from the tops for the flowering phase. Temperatures have been a lot more ideal this week.
Applied the BioBloom powder as a top dressing, using the lower dose of 3g per litre of substrate, so 36g top dressed onto each pot.
Love how easy these nutrients are to use. Very simple to weigh and top dress rather than mixing up liquid nutes into water every time. Much less effort and much less time consuming.
And the plants look the some of healthiest I’ve ever grown. No sign of any deficiencies so far!


Likes
5
Share


@Falcon123
Follow
Gelly Cream Cake & Slurricane #7 S1 from seeds
Platinum S1 & King Sherbet are clones
Gelly Cream Cake & Slurricane #7 S1 techniques were used: Topping + LST + Defoliation
Platinum S1 & King Sherbet techniques were used: LST + Defoliation

Likes
3
Share


@Miketama
Follow
Quick update on Fractal #2!
This week:
• Stretching phase almost complete!
• Reached 1 meter in height - impressive growth! 📏
• Flowers starting to bulk up
• Fed with Thicker & Bigger Flowers at 1/3 dose

Likes
1
Share

@Nickeluring
Follow
There have been some serious training this week. LCC is flowering quickly and hasn't needed anymore training. She has had some leaves removed. Guava and Apricot are a bit behind LCC in flowering. They have been trained heavily this week. They now both have an insane amount of top bud sites. These babies will get very interesting in a few weeks...
Their heights:
Guava: 28 cm
Apricot: 36 cm
Lemon Cherry Cookies: 50 cm
Likes
58
Share


@AsNoriu
Follow
Day 40. Was away for 2 weeks and girls missed me a lot !!! No TLC - NO RESULT !!!
Worst grow I think, girls are small or weak and stretched ....
Gave first feed ...
SuperCroped highest girls ...
Sad harvest upfront ...
Think auto way is not for me ...
Happy Growing !!!
Likes
3
Share


@CannaGods
Follow
I am just going to add some pictures of the reveg. If you're interested in me expanding the diary make some comments and if I have time I will.
Likes
50
Share


@CapitanKush
Follow
been a slow week i think. had a problem with my power going out for 8-9 hours sunday (rcd tripped)
before i opened the tent to 98% rh and water covering the leaves but turned all my fans up and it dried quick so all is good now
UPDATE: done some defoliation to get more light through, lets see how that goes

Likes
5
Share
@Smev1337
Follow
This is it guys! the end is here with an amazing harvest! i am so stoked to smoke it and taste the terps maybe some rosin also? hehe, i honestly wish this strain was available in photo version and not auto flower but what can you do haha, i give this strain a 10/10 just more than Autoflower would be nice on such a nice strain 😁 happy growing all! 😎✌️💚
Likes
23
Share


@adam_pawloski87
Follow
This grow was pretty simple ! They went a total of 103 days from seed! Very trichomy dense buds with the smell of Berries vanilla and skunk ! This is a must try for you all Fastbuds has the greats!!!
Likes
11
Share

@Bud_vista
Follow
Welcome to week 8!
My little apple fritter doing great! The buds getting bigger from day to day and she’s handling the small distance to the light fantastic.
I think I have another 1,5weeks to go and I’m Herz curious about the harvest!
Processing
Likes
6
Share


@Mr_nugs_lover_David
Follow
She's loving the mix just like all the other babies in the garden,she's in a soil full of organic nutrients,bat guano,veg pearls kelp powder all by guanokalong,florians living organics

Likes
22
Share


@Spliffi
Follow
Week 13👍🤙👍🌱
And it's Chop time. I made some bubble hash from the wet trim. First time and did not expect anything yet is was a success. Got a few drops. Will do one more bubble hash cycle with the dry trip. Overall the contest was nice. Still waiting on all the details.
Jon Dabs
Check them out here:
https://jondabs.com
@jondabs Instagram
The Sponsors
Check them out here:
Dutch Passion
https://dutch-passion.com/en/
Hydroponic.co.za
https://hydroponic.co.za/hydroponic/harvesting-and-growing-accessories/
Bud Juice
https://www.gohydro.co.za
The Best Grow
https://thebestgrow.co.za
Dynomyco
https://www.dynomyco.com
Nuclear Roots
https://www.nuclearroots.co.za
Photronic
https://shop.photronic.net
Special Thanks to Hydroponic.co.za. I buy all my products from them. Best service.
Daily updates coming...

Likes
16
Share


@cherokee
Follow
Привет 🖖
С новым годом 🎅
2022 самый ужасный год в моей жизни! Он был сложным во всем, экономический кризис, война.......
Я добавил видео, это 2 ракеты 31 декабря упали рядом с моим домом, русские нацисты обстреляли жилой район, умерла девушка 22 года ей было..... 4 человека получили ранения..... Так страшно ещё не было! Мы встречали новый год под обстрелы ракет и звук сирен тревоги в полной темноте...... Россия государство террорист убийца 😣
Это мой блог и я хочу здесь делиться своими чувствами и эмоциями, что бы больше людей знали что происходит.
А теперь дневник.
На этой неделе растения стабильно получали 20 часов света, это очень помогло им стать больше и сильнее.
Я продолжаю тренировки LST.
На этой неделе была обрезка веерных листьев, я часто практикую дефолиацию автоцветов. Надеюсь проблем со светом не будет, растения уже показали "усы" свой пол, значит стадия предцвета будет примерно через неделю, хочу что бы они стали ещё больше и набрали "мяса" массу.
Ещё раз поздравляю всех с новым годом. Мира вам и вашим семьям, и мирного неба, что бы в ваш дом не прилетали ракеты.
🇺🇦 🇺🇦 🇺🇦


Likes
29
Share


@SOGMASTER
Follow
Looks like the Gorilla Zkittles is pretty much ready the colours are amazing definitely keeping this pheno.
Nothing changed this week apart from a change to water, calmag & canna flush @pH 6.2
I have noticed thee THC glands are brown already you can visibly see them absolutely insane cant wait to smoke it.
