The Grow Awards 2026 🏆 


Likes
Comments
Share
@Aleks555
Follow
Gorilla Zkittlez Auto is a true work of art among autoflowers. With its powerful, dense buds literally dotted with 'sugar', each stage of growth of this plant is pure eye pleasure. The scent she exudes is as delicious as her taste-sweet, with fruity notes, promising an unforgettable delight. This beauty not only looks great, but also gives a strong, powerful effect that both relaxes and cheers up. Special thanks for this outstanding variety of 42Fast Buds, and, of course, Xpert Nutrients-your fertilizers made such impressive results possible. Each stage of growth was perfect thanks to this tandem. This variety is a real miracle for any grower!
Xpert Nutrients is the fertilizer that truly makes a difference! 🌱
From the very start of our grow, Xpert Nutrients has proven itself to be exceptional. Every plant receiving this nourishment flourishes—from strong roots to dense, trichome-covered buds. With its balanced formula and ease of use, our beauties get everything they need for optimal growth and flowering. It’s a joy to see how the plants respond to this fertilizer!
A huge thank you to Xpert Nutrients for your high-quality product and continuous support. Without your nutrients, our results wouldn't be as impressive! 🙌

Likes
8
Share
@CanabisLoverHobbyGrower
Follow
Both look OK,.. one had quit abit of yellowing, going to add calmag on this week's feed, still seem happy enough, smell lovely, the one closest to the door has got a lovely purple hue setting in,.. roll on next week 👌
Likes
16
Share
@Comfrey
Follow
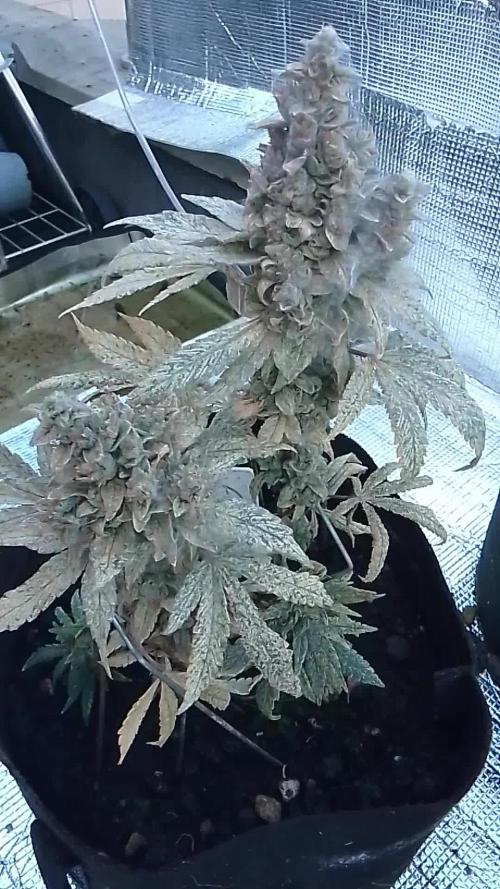
The week was partly sunny and partly rainy and our plants had to be canopied on the balcony nearly every day. Rare sunny hours. Humidity is mostly ok, but I‘m checking now very regular if the plant need to be harvested. The flowers are covered in trichomes, pistils got brown on the upper flowers, the larger fan leaves loose their color and I could spot first amber. But I want to wait as long as possible.
Pure rainwater in the morning and in the evening. Flushing first time with a good drainage.
Trichome fotos at the end :)

Likes
10
Share
@StoneJackson
Follow
The outdoors are going great at the moment other than a few yellowing lower leaves. I corrected with a nitrogen booster (mainly blood and bone meal I think) and also hit them with some rock phosphate, manure, compost, earth worm castings, bio-char, and epsom salts for a magnesium kick, the yellowing should fade in the next week and I’m thinking they’ll have everything they need for flower.
I mixed all that, top dressed the ground around the bottom of the pots (they’re well and truly rooted in the ground) and topped up the pots with the rest.
Looking forward to a good yield out there it has been raining lately, humidity is up but I’m sure the week of sunshine coming up will correct any issues trouble is they’ve gotten so think at the top it’s hard to splay everything out in an optimal way, I’m slowly working through the branches bringing heads down and airing the more bushy sections out.
Other than that I’m a little concerned about insects I’m seeing lots of fungus gnats but i have been using eco-neem so I’ll continue to foliar spray thoroughly, soil drench and hope for the best 🤞🏽
Likes
10
Share
@Miketama
Follow
Fractal #2 - Final Review 🌿⭐
What an incredible journey with Fractal #2 from Divine Seeds! This girl went on quite the adventure - indoor start, outdoor middle, indoor finish!
Harvest Results:
• 100g trimmed large buds (wet weight)
• 60g roughly trimmed - straight to freezer for bubble hash production
• Abundant trim production - loaded with trichomes for hash!
The Good:
• Incredibly adaptable: Handled indoor → outdoor → indoor transitions like a champion
• Indoor finish boost: Buds bulked up significantly during final indoor phase
• Resin production: Excellent trichome coverage on buds AND trim - perfect for hash
• Generous trim yield: Tons of sugar leaves packed with resin
• Resilience: Thrived through multiple environment changes
• Hash potential: Quality material for bubble production
The Challenges:
• Cold outdoor temperatures required bringing back inside
• Multiple environment transitions (but she handled them!)
A huge thank you to Divine Seed for letting me take part in the contest — my very first one! 🙏
It’s been an amazing growing experience, and I wish the best of luck to all the other participants! 🍀💚

Likes
19
Share
@nonick123
Follow
Día 27 (20/05) Riego con 250 ml de Té de Compost
Día 28 (21/05) Vuelven a tener sed! Las riego con 250 ml sólo H20 pH 6.2
Día 29 (22/05) Riego con 750 ml H2O+ Regulator 0,15 ml/l + CaMg-Boost 0,25 ml/l + Startbooster 0,25 ml/l + TopBooster 0,2 ml/l- pH 6.2
Día 30 (23/05) Banana Purple Punch Auto está sedienta de nuevo!
500 ml de sólo H2O con el pH 6.3
Día 31 (24/05) Banana Purple Punch Auto está sedienta de nuevo!
Riego con 750 ml H2O + Regulator 0,15 ml/l + TopBooster 0,2 ml/l- pH 6.2
Día 32 (25/05) Las plantas no paran de crecer! 😍
Día 33 (26/05) Riego con 750 ml H2O + Regulator 0,15 ml/l + CaMg-Boost 0,25 ml/l + TopBooster 0,2 ml/l- pH 6.2
Banana Purple Punch Auto está creciendo unas ramas laterales impresionantes 😍😍😍
💦Nutrients by Aptus Holland - www.aptus-holland.com
🌱Substrate PRO-MIX HP BACILLUS + MYCORRHIZAE - www.pthorticulture.com/en/products/pro-mix-hp-biostimulant-plus-mycorrhizae
Likes
9
Share
@NightsAssassian
Follow
Day 90: Buds are foxtailing like crazy and they are starting to get more tri's really nothing else that i can tell at least. Girls went through hell and back but we still here lol. Thanks for looking and happy growing. 😁


Likes
49
Share
@masterofsmeagol
Follow
8/29 Knowing I was going to have to yo to the hospital er again this morning with my wife I got up early and watered. We are supposed to get an inch of rain tomorrow but the bags were totally light. If I was going to be around I might've held off watering. Instead I watered everything one gallon and figured the rain will make up for the other 10 percent hopfully that will do it.
8/30 Rained overnight. Plants were soaked. Flowers are swelling. I defoliated a shit ton of yellow leaves the other day. I still don't think I have anything fungal but I'm keeping an eye u e out and am considering doing an application of plant doctor. We are suppised to get an inch of rain tonight and tomorrow I guess. My biddy said i shouod cover my plants because next week is going to be "great growing weather" but with the rain and then the sun it could be a recipe for disaster since I have some large flowers. I got my father's leaf blower running but it was leaking gas. Brought it to the repair shop and a buddy let me borrow his for thus storm. I and hit the plants with it this morning. It is super strong though. I need to be careful not to blow it right out of the bag!!! Or break branches. Of course after u left it started raining lightly. A nice rain that plants like but it's stopped. I'm wondering if I should go over and blast them again to keep them dry but I know it's going to rain off and on and it'd going to rain tonight. I'll check the weather and decide from there. So far things are going good. Still have some yellowing leaves and a few normal pests but that is to be expected.
UPDATE: Stopped raining so I went over
and shook off the plants then put the leaf blower to them. I made sure to get the interiors before I went and had shook things again by hand. Storage us low bur i took a video. Cant upload toll tomorrow. Buds are growing at an insane rate but im losing some fan leaves that just yellow and die. Im sure its senescence but its still wortisome. We are supposed to have a real good week of growing weather coming so I hope that doesn't change. I'll update tomorrow. That leafblower works awesome though.
8/31 Went over to an extremely sunny windy morning. I didn't even need to shake plants or use the leaf blower since I did it after it Rained last night. I'm worried the wind night dry my bags out today so I'll be sure to keep an eye on them. I defoliated a shit ton of leaves but apparently it's just senescence. I need to check the last time I fed. Trich development is going good. The smell was incredible this morning! Each strain has its own unique smell to it. We are supposed to have a real good week for growing so I'm looking forward to it. May do a preventative plant doctor app but I think it will be alright. I'll keep this updated.
UPDATE: Went over around one and plants were bone dry. The wind was RIDICULOUS! I added a few individual stakes and tied a couple loose branches. I got my tarp out and considered covering the cagecto protect from the wind. However I didn't have time to sanitize if and they had already been through it all night and day alwuth no breakages. Plants are strong and supported well. At least I hope. Plus the tarp would block the rest of the direct sun the plants are getting right now. The wind looked like it dud its worst and the trellis and supports held. I did add extra supports higher up the plant to prevent breakages. Found a moth larvae (yellow) and squished him. Also found some aphids but a few lady bugs and three lady bugs larvae so I think I'll be OK. I am really excited for this year. Flowers are really exploding! FORGOT TO PUT THE MOST IMPORTANT THING. WATERED EVERYTHING TWO GALLONS EXCEPT THE 10. WHICH GOT ONE.
9/1 Forgot my phone on the daY I really needed it. It rained last night. The wind was the strongest i've seen in years. I would've tarped the cage but i couldn't find any of the bungee cords or zip ties. Probably good I didn't. No breaks. One plant had dark brown splotches ALL over the leaves! I picked them all off and took pictures and will consult my commercial buddy. I researched and asked a question on here. If it's septoria or something that could ruin my gorgeous garden I'd rather just junk the plant. It's big but it's the furthest behind flowering and I would not be heart broken if I had to get rid of that for the others. This week is supposed to be the best week we've had all summer so I'm expecting major growth. I'll update after conferring with other growers and making a decision. Looking online it seems like it could just be lack of nutes with the co dictionary we've been having. It IS time to feed and I haven't been feeding much. We'll see what he says.
UPDATE: AFTER RESEARCH AND CONSULTING WITH OTHER CONMERCIAL GROWERS I BELIEVE THAT THIS IS A NUTRIENT DEFICIENCY. I READ THAT RAPID TEMP FLUCTUATIONS AND HIGH WINDS CAN EFFECT THINGS LIKE THIS. IT DOES NOT APPEAR TO BE SEPTORIA (WHICH I'M EXPERIENCED WITH). I WAS THINKING ABOUT DOING AN APPLICATION OF PLANT DOCTOR BUT SINCE IT WAS SO FEW DAYS DURING THESE CONDITIONS IM GOING TO WAIT AND MONITOR THE PLANT. I DEFOLIATED ANY LEAF THAT WAS SUSPECT. FOUND AND KILLED A BUD WORM. I THINK THEY ARE STILL DIEING FROM THE BT. IT WAS LIKE STRETCHING UP FROM THE TOG OF A BIG NUG LIKE, "HERE I AM COME OUT ME OUT OF MY AGONY." ALSO FOUND LADY BUGS AND BEETLES AND THEIR LARVAE. IVE SEEN TGE VERY LOWER SECONDARY BRANCHES GET STRIPPED ON A COUPLE PLANTS BUT THATS WHY I LEFT THEM THERE. IF THEIR ARE EARWIGS THEY CAN HAVECTHE SHIT THAT I WAS GOING TO LOLLIPOP ANYWAY BECAUSE THATS WHAT THEY USUALLY GO FOR. THEY ARE DEFINATELY STRAIB DEPENDANT TOO. THEY LOVE ANYTHING BLUEBERRY BUT DONT TOUCH THE REST. MAYBE THERE IS JUST A COUPLE IN "THAT BAG". ILL HAVE TO GO AT NIGHT AND CHECK. IM EXCITED. MY FLOWERS ARE EXPLODING IN SIZE AND TRICHOME PRODUCTION. SEEIMG THAT I THINK THIS IS A NUTRIENT ISSUE AND MY FEEDING DAY WAS TODAY I FED EVERYTHING 1.75 PINTS OF NUTRIENT MIX TO EVERYTHING BUT THE 10 GALLON WHICH GOT LIKE 3/4 OF THE POWERADE BOTTLE. PLANTS SEEM HAPPY AFTER I FEED SO MAYBE I SHOULD UP THE FEEDING SCHEDULE. SINCE THE SOIL WAS ALREADY MOIST AND IT RAINED YESTERDAY I FED WITHOUT WATERING. HOPFULLY THAT WILL BE OKAY. I'VE DONE IT BEFORE.
Went back over at six and WOW! After this nice sunny day buds have swollen. Plants seemed to love the nutes. I think the nutes in my soil are fairly depleted so I just needed to adjust my feeding schedule. I didn't notice anymore calcium deficiency looking spots and I had defoliated a lot of leaves. Super excited moving forward. Pistols are changing color on one 10th p phenome and retracting into buds. This is is the fun time. As long as I can avoid the rot.
9/2 Says it didn't rain last night but my plants are dripping wet. If course the leafblower kept dying so I had to shake everything by hand. Hope that's good enough. Gonna be real sunny. Bags still had some heft to them. I'll check them later. Found a few leaves with what looks like the calcium deficiency on the sane plant and I just removed them. I really don't think it's anything to worry about. I'll update later.
UPDATE: Went back around 10 and everything looked good and was dry. Brought the leaf blower to be fixed. Should have it by the end of the day. Found and killed another pillar and some ants. Took a picture of a lady bug/beetle. This sunshine is making my buds explode!! I was thinking about checking again tonight but I think I can wait and water tomorrow. Bags are still fairly heavy. I did take another couple leaves off the plant that lopks like it might have a deficiency or something. The stalks are bigger than the bottom of a baseball bat. A couple almost like the fat end. Some 9f the best plants I've grown. I also took three short videos of a plant of each strain. Maybe if it's short it will upload quicker. Happy growing! UPDATE: I was back and forth today. I did some pruning and defoliation and then I noticed that my canary was light as hell. I waited until night and went back and had a couple starting to droop so i watered everything 2 gallons except the 10 and tub got 1. Everytime I see them it seems like they are bigger
9/3 Used the leaf blower this morning to get the dew off the buds. I shook them by hand before that. I'm noticing like a little army of lady bug larvae so any aphids I have are not going to be a problem. I have adults as well but is the babies that eat 10x what the adults do. I'm hoping they'll wipe put any bud worms. The weather is great this week all sunny. Making the buds explode in size and increasing terp production. This is the strongest smelling cannabis I've grown. Each strain. Has its own unique "funk" to it. Purple punch is really sweet and floral smelling. 10th planet is more gassy. I need to get some yellow sticky traps. I saw a couple fungus gnats on my canary. A late blooming blueberrycheese. It's the one that dries out the fastest but is more sativa leaning and drinks TONS of water. I have two that are that phenome. Losing yellow leaves but exploding with flowers. Noticed a couple more leaves with that calcium deficiency looking leaf. I just defoliated it. I'm really happy where I'm at right now.
9/4 Plants were covered in water this morning and the leaf blower wouldn't start. I shook everything off by hand. Each strain hasits own STRONG unique scent. One tenth planet phenome smells like bubble gum. I think I've got like two weeks and some of the flowers on ONE plant should be done. I'm planning to take the top half and then letting the bottom mature longer of its not whete I want it to be. The weather has been gorgeous. Sunny today. I'll need to water tonight I'm sure. UPDATE: WENT OVER AT 3PM AND PLANTS WERE DRY. WATERED EVERYTHING 2 GALLONS BIT THE 10 AND THE TUB. THEY GOT ONE. FLOWER DEVELOPMENT IS VISIBLE FROM MORNING TO NIGHT. I HAVE A TENTH PLANET THAT I BELIEVE WILL BE READY FOR HARVEST (AT LEAST THE TOPS) WITHIN A COUPLE WEEKS. PISTOLS ARE RETRACTING AND TURNING ORANGE ON THIS PHENOME AND RED ON THE OTHERS. I AM LOVING HOW THIS STRAIN LOOKS GROWING. I HAVE REAL HIGH HOPES FOR IT. I FAILED TOO MANY TIMES UPLOADING THE VIDEO AND PICTURES I TOOK SO ILL DO THAT TOMORROW. I CANT BELIEVE THE SWELKING GOING ON AND THE AROMA! THIS IS SUCH A WONDETFUL YLTIME OF YEAR. STILL FIND8NY SMALL SPOTS OF WHAT LOOKS LIKE CAL DEFICIENCY IN THAT ONE PLANT. IM STILL UNCERYAIN WHWT TO DO WITH THAT ONE.


Likes
9
Share
@MG2009
Follow
04/28/2020
Week #8 of flowering begins will post more pics latter.
04/29/2020
Did some leaf removal had some powdery mildew on some leaves took infected leaves off, plus some for good measure. Drying out every day or two today she took one liter before run off. You can see in the video the colors? And sparkling buds?
04/30/2020
Day 50
I decided to take the top buds in pics , 47 grams wet.
It is a 9-12 week strain but I think she need a week or two? But we will see.
Likes
15
Share
@jayizrollin
Follow
FBTF was amazing. I tested topping with this plant, and while I do think that topping and root issues were the reason this plant did not grow so big. However, I did harvest dense colas that were all even in size and equally dense with loads of orange hairs everywhere, I am definitely growing again next grow.


Likes
6
Share
@Crazy_Doofus
Follow
16/01 Spider mites since 2 days, already start getting black spots on the leaves, she's very close to ready, so cut half way, will keep a close eye on the bottom... For another couple of days...
21/01 not much movement
24/01 cut lower part and cut the clones
Likes
19
Share
@UKLEEDSGROWER
Follow
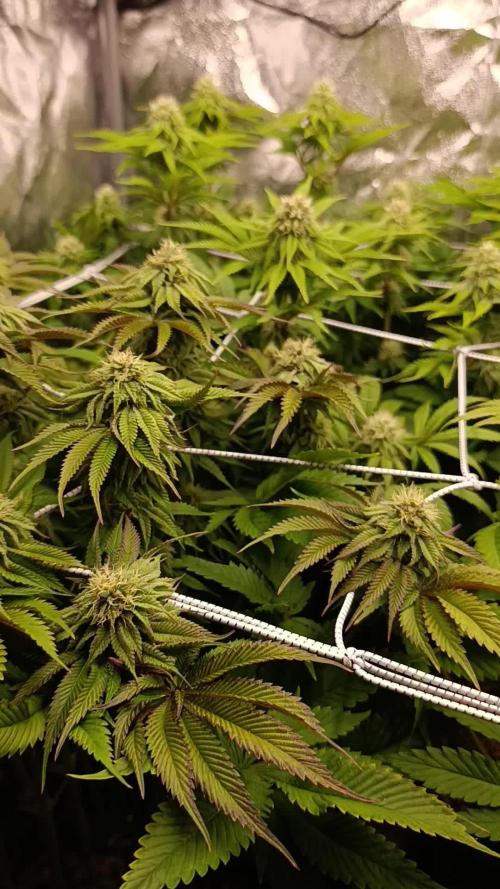
4th day in flower here, plants have doubled in size since a week or so ago. Once again very nice healthy colour to the girls really impressed so far, not a hint of stress shown from the plants at all, very hungry the soil is becoming dry everyday they just take everything I give them.
Likes
13
Share
@Drawer
Follow
Removed some buds that weren't getting any light, I ran into some issues regarding mold and that is most likely due to the fact that the RH % of my tent goes up to 70/80% at night.
I've removed all mold I could see (2 branches) and I am keeping a close eye on them, I've placed a new tower fan and another small adjustable fan in the tent for more airflow, my dehumidifier is coming in 2 weeks (around the time this grow is finished..)

Likes
14
Share
@Joutu
Follow
Me encanta la estructura conseguida en estas plantas.
Ramas robustas y nudos cortos.
Se viene una buena prefloración.
Un saludo GanjahFamily.💚

Likes
34
Share
@Basementganja
Follow
Stretched vigorously once she started to transition to flower. Developed potency early in flower!
She was LST'd weekly, starting week 2. She was also gently lolipopped a few times, to maintain growth towards 5-6 nodes only.
Likes
3
Share
@Catawbiense
Follow
Die fünfte Blütewoche hat begonnen. Bei der letzten Bewässerung gestern habe ich 1 ml/l pk1314 verwendet. Bei der nächsten Bewässerung werde ich wieder pk 13/14 verwenden. Nächste Woche werde ich die Topmax-Dosis auf 3 ml/l erhöhen.
Die Pflanzen sehen etwas gelb aus, weil ich zu früh aufgehört habe, Biogrow zu verwenden. Aber das ist mir lieber als blättrige Blüten. Es gibt viel Harz, insbesondere ein Phänotyp ist stark verzuckert. Die Blüten werden nicht die dicksten sein, aber ich bin bisher zufrieden.

Likes
9
Share
@Love2Bud_UK
Follow
Have not been disappointed by this strain, from start to finish! Blown away by her resilience. Very smelly girl, literally has my mouth watering 🤤 Nugs are really solid and dense, they have been the best I've grown so far. RQS have done an excellent job 🤯🤯
Likes
13
Share
@HeavyHead
Follow
Great week :) getting heavier by the day ;p put them onto flushing with straight ph’d water from here out.
Keeping the pots on the dryer side from here out. Lowered the temp of my room and my water as well.
Likes
37
Share
@nerdz
Follow
36 to 42 Tuesday
Day 36
Been seeing pistils about 4 days now. Going to let the autopots drain out and start quarter bloom nutes.
D37
Started 1/4 nutes @ 680ppm (see above)
D38
Lights from 450w to 475w at 16-20".
VPD on point.
Just keeping canopy even right now. Supercroping the main stem for the third time. Feels like plant abuse now.
D39
They are thirsty. Will start filling the res more with more water.
Lowered GROW from 100% to 50%
Increased BLOOM from 25% to 50%
Increased mix from 680ppm to 720ppm mid week.
All other ratios remain the same as above.
Solo Cup seeing slight burn @ 680ppm. I was expecting it. Dropping down to ~550 for a bit.
D40
Lights increased from 475w to 500w. Will most likely move the fixture closer and drop the wattage back down with that uniform coverage!!! #geekbeast
D42
Res is empty again.
Decreased GROW from 50% to 25% strength
Increased BLOOM, ASTRO and N.CANDY from 25% to 50%
720ppm
Happy Halloween!!