The Grow Awards 2026 🏆 


Likes
Comments
Share
@High_Grade_Dadli
Follow
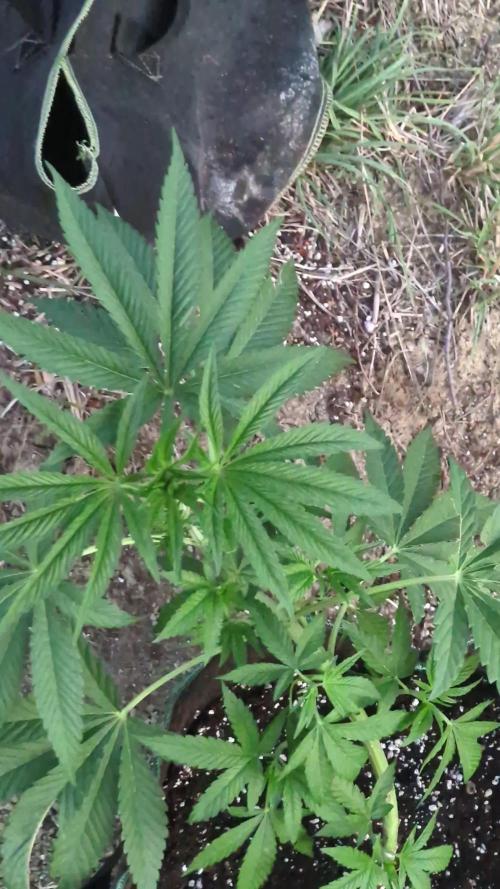
Girls are doing well....seed looking like she earning her name..have some cutting off her n am please with the first week of flower....one got super stress n she dont even look like it jus watchin to see how things look later

Likes
167
Share
@DeepWaterGrower
Follow
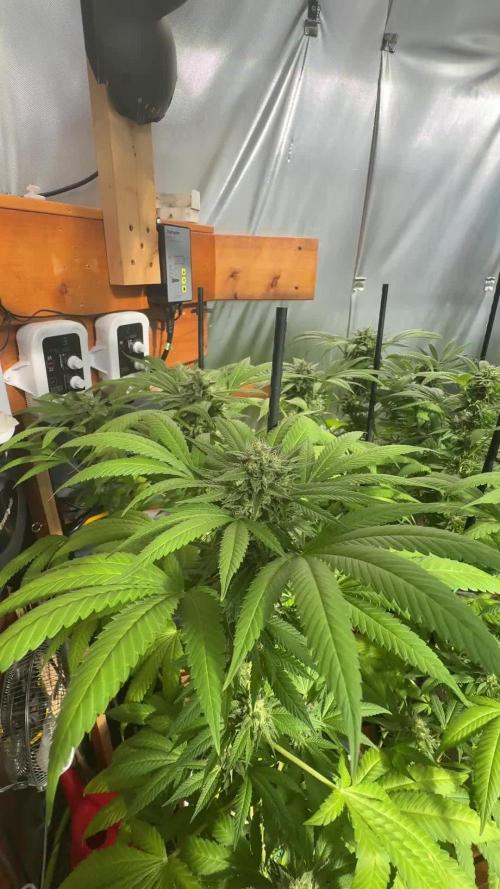
🗓️ 6° WEEK FLO // DAY 36-42 (from switch) // DAY 113-119 (from dry seed)
⚡- Light: 30 cm / 250 watt;
⌛- Schedule: 12/12;
🌡️- 22° C - 65% RH average;
📑- PH 5.9 - EC 2.3. PH is dropping on the #2. I'll change the DWCs next week, meanwhile I'm trying to keep the PH in the right range;
💧- 7° DWC change;
🍔- Flowering blend: tap water EC 0.4 + Silic 0.5 ml/l + CalMag 1 ml/l + Hydro A-B 1.8 ml/l + Oligo Spectrum 2 ml/l + Green Sensation 1 ml/l;
🌱- Things are moving forward, both are gaining weight.
🆕- Last week I got the TrolMaster TCS-1 (@TrolMaster_Europe) and I started to track my grow box data. I will add these info once I harvest!


Likes
37
Share
@Levi_Grows
Follow
Start of week 8 of flower..... Lights are only on for 11 hours of the day now..... Only water in my res now until i think its the right time to havest... i made a lil video i hope you like it.... enjoy and happy growing


Likes
15
Share
@Fibro_Witch
Follow
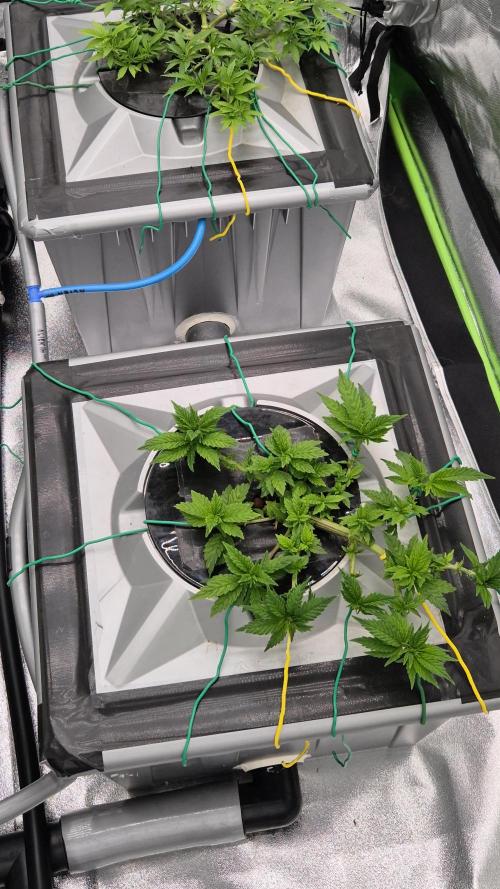
Really great week for these girls!
I'm very happy with the amount of early flower stretch I got out of the 2 larger girls. While the 'Little One' won't amount to much, the other 2 I'm really excited for the finish.
I made a short video this morning to give ya'll a closer look.
They got one feeding consisting of the Hydrolyzed Fish/Rose&Flowering/Molasses and then another feeding of just the Fish/Flowering this week.

Likes
9
Share
@Whoopstick
Follow
I tried Scrog but I took it off it seem to make my fruit salad unhappy much taller than other plants too .many leaves getting smooshed I should have done a few weeks earlier plus needed good defile and lollipop its my first grow I thought I would slow down. on yhe techniques till next round


Likes
43
Share
@Indica_Jones
Follow
Gorilla Zkittlez 😃 Hunrig Gesund, und stressfrei 😃 endlich läuft es und der anfängliche Kopffick ist etwas in vergessenheiteraten wenn ich täglich meine Babys so sehe :slight_smile: habe diese Woche mit der Halbenration gestarte. DOch musste bemerken dass sie etwas mehr gebraucht haben eine der vier hatte ein kleinen Tick verdrehtes Blätterwerk was nun aber am ende der Woche so gut wie verflogen ist es wurde 2 mal gegossen 1 mal mit der Halben Portion des Hesi chemas und in der Mitte der Woche nochmal mit voller Dosis :slight_smile: die blätter Wachsen nun wieder gleichmäßig ohne wellen zu schlagen :slight_smile: getopt habe ich diese Woche noch nicht da ich das gefühl hatte ein wenig schonzeit würde Ihnen noch gut tun

Likes
26
Share
@Nistnov
Follow
I left the honey cream outside in a dark place, which turned out to be a big mistake.
None of the branches that I trimmed and dried directly had bud rot but around 6 buds that were left outside had bud rot.
The mass of this plant really put me to the test took a whole lot of time to trim every branch. In fact I still have a bunch of branches that I'm too lazy to trim right now so I'll do a dry trim someday.
Although this grow had some problems it was an absolute pleasure to watch these plants grow and to now having this harvest is absolutely beautiful, a perfect strain mix.
I won't ever let them grow this big again since I really don't need that much weed and I think I'll going to have more fun with some extreme LST or something like it and I guess I'll look for strains that will flower earlier and not for ones that flower fast.

Likes
17
Share
@cultivars
Follow
OCTOBER 11th to OCTOBER 17th
Sunrise: 08:20| Sunset: 19:03 | Total Daylight: 10:43
This was another pretty good week for weather, however the last couple of days have been cloudy with rain, causing some spikes in greenhouse humidity. Temperatures for the most part have been good, with one overnight low in the greenhouse of 13C.
Both Lemon Orange specimens are doing well, with Lemon Orange #1 nearing full ripeness for harvest, and Lemon Orange #2 slightly behind.
Greenhouse is emitting very strong smells now, mostly a sweet skunk scent.
Weather forecast appears as though it will be adequate and manageable temperature wise for the next week.
DAY 155
Greenhouse 13C in the morning, with outdoor temperatures down around 3C (frost evident on rooftops in area). 500mL drip of plain rainwater to all specimens.
DAY156
1L hand water BTI treated rainwater (no additives); Lemon Orange #1 showing some signs of purpling. Lemon Orange #2 fading nicely; Greenhouse held to 18C overnight, humidity a little high (51%) but dropped as sun rose; Overcast day;
DAY 157
Beautiful sunny day, with warm temps; Greenhouse was 18C in the morning.
DAY 158
-1C in the morning outside, 13C in the greenhouse, which is fine. Nice sunny day, drip watered 500mL of plain rainwater (cold) at 12:00 to Lemon Orange #2.
DAY 159
Overnight low outside 5C, 17.5C in greenhouse, which is ideal. Humidity in check, at 41%. Cloudy, overcast day, with greenhouse heater working to maintain day-time temps of 21C (no solar energy to drive heating).
DAY 160
Greenhouse 14C in the morning, 3C outside. Humidity at 41%; Clear morning, with some sun, turning cloudy with light rain in the afternoon, resulting in a humidity spike in greenhouse to 50%.
DAY 161
Lots of rain overnight, causing spike in greenhouse humidity to over 60%; Will require monitoring; Temps in the morning 18C in the greenhouse, mild outdoors.

Processing
Likes
5
Share


Likes
285
Share
@Tropicannibis_Todd
Follow
👉Alrighty Then👈
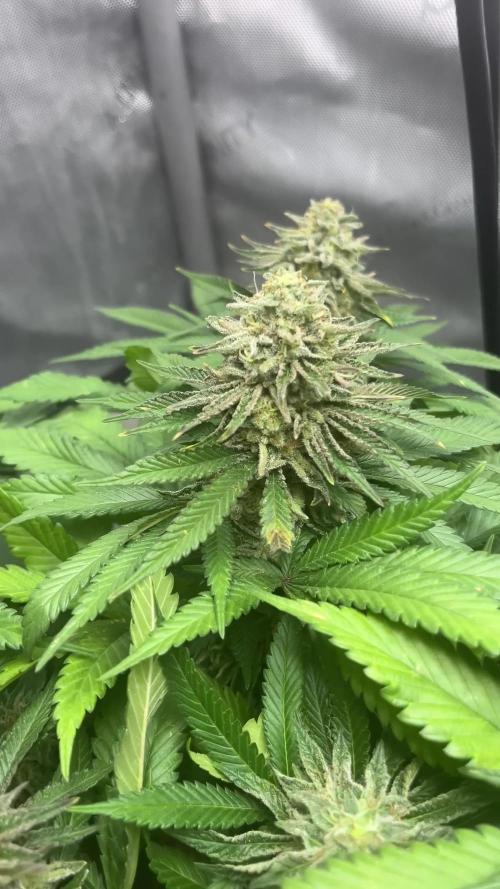
So we are at DAY 42 with the Sugar Larry 👈 And she's doing fantastic 👍 It's now stretching alot 7 inches last week alone 👌
😀 decided to showcase pheno #2 , definitely has different traits then #1 very interesting 😀 thoe both are killing it 👈
Hedgehogs incoming 👈
Except for some slight watering , ive been doing some defolation as well as some LST manipulation to pull branches to the side 👌
👉I had to Top her during the middle of 4th week 👍 she gonna be a tall girl with long legs 😛
👉WeeklyRoundup Video is finally posted 😕 😒 😪 😢 Happy Growing
👉Soil Provided by ProMix.ca
👉Nutrients Provided by Agrogardens
👉Lighting Provided by MarsHydro.ca
Thanks my friends for the great support over the years 🙏 Happy Growing


Likes
61
Share
@PEAKYPLANTERS
Follow
hey grow friends .... finally my time seems to come .... these beautiful little girls seem to tell me, every day that passes "smoke us" "smoke us" .... bitch bitch guys .. it doesn't seem true .. the dream of a lifetime ...
MY FIRST SEED
MY FIRST GERMINATION
MY FIRST GROW
MY FIRST LAMP
MY FIRST VEGETATION
MY FIRST FLOWERING
WHAT A CHILD SATISFACTION
9 out of 9 .... AND EVEN IF I DON'T HAVE ABUNDANT COLLECTIONS FROM A SINGLE PLANT FOR ME ALREADY AND A SUCCESS TO COMPLETE 9 OF 9
I cultivated it very sparingly and in the end I was repaid quite well ... this and the second week of flush .... fuck how long they take to dry with the led :(
Likes
8
Share
@RBG
Follow
So far Cherry Bellini was a stressful little lady early on during veg, showing signs to anything from a slight e.c change early or ph change or even temps. You name it she would she her displeasure towards you even if you did everything correctly. Later during veg she straighten herself up and became less stressed out towards lst, topping, and everything in between. She's now the biggest one out of the bunch.
Light went from 60% to 90% over Week 5 to Week 6, next 2 days she'll be at 100% ready for flowering.
2 set AC infinity bar lights will go in over this week as well as my scrogg net.
Nutrients this round
Floramax veg1
Floramax organabud
Floramax flowering enhancer ( 1/4 ) dose
Flairforms roots
Sleepz with the fishes ( pythoff )
Cyco platinum series silica
Floramax calmag
E.c 2.2
Ph 5.9-6
Week 6 let's go 🚀🚀🚀


Likes
49
Share
@Xquisit
Follow
Today is 12/7/18, day 20 in flower. Today is 12/8.18, day 21 in flower, watered with nutes, picture day. Today is 12/9/18, day 22 in flower, just video of the girls.

Likes
14
Share
@MG2009
Follow
04/14/2022
Getting rid of a grape skunk she just isn't doing anything
Biscotti Skunk looking good but lemon OG is coming along nicely
Been watering by pot weight
(by feel)
No feeding just water they should all be finished soon

Likes
2
Share
@Guerrilla_grower777
Follow
03/09/2025 19:45
Only 2 days after the last time i'm here because i wanted to add some epsom salt and honey trough the watering,pot were pretty dry but not fully
The hunting season started here 1st of September so i didn't ear or see any boar,all i ear Is rifle shots every five to ten minutes no joke
#1 gorilla zkittlez auto
Defoliate a bit,the buds are now in full rippening stage as you can see the bottom branches are falling slowly with the buds getting heavier and the smell too
#2 frostbanger auto
Defoliate a lot,buds getting heavy on this one too,the odour Is so noticeable that It can be smelt from 40 mt
I'm getting worried,checked the trichomes and there Is some amber but a lot less than 5%,maybe i have to cut this one early but i don't want to
#3 Coco Milk
Pretty heavy defoliation on her ,finally starting to show Is a girl with some pistils here and there
This one drinks a lot as she's getting really big,over any expectation for her age i can't wait to see the buds forming
#4 Coco fresh and apricot auto
Coco fresh handling all the misfortune on her life,as It curved naturally i defoliated a lot and took away every "shadow branch"
Even her starting the flowering stage i can't believe that!
Apricot auto did suffer more maybe because is an auto,her will stay small the buds forming not the greatest too
Finally i think harvesting time Is near i'm planning to take away gorilla z and frostbanger a day from 10 to 15 of september max
I smoked both the samples,the gorilla z smokes so well even if It was small buds dried quickly
Sweet candy aftertaste with super compact white ash
Frostbanger smoked well too,not so white ash but dense and strong puffs,heavy indica effect and citrus sherbet like taste
Both are just so good i'm thinking about how good the big buds fully cured could be
That's not the first time i do guerrilla grow It all started on 2019 ,but it's the first time i grow this level of weed
That's because of the living soil i prepared this time,this thing is the future trust me
If someone want to know the exact proportions and ingredients in my living soil recipe feel free to ask

Likes
153
Share
@StarLorr
Follow
Welcome to my Banana Purple Punch diary.
🍌💜🤪💥🥊
In this Diary:
Seeds: [420 Fast Buds]from my growmie Tropicannibis_Todd 👊🏻😎
Media: Pro~Mix HP Open Top Grow Bag, Connect.
Nutrients: Green Planet Nutrients,
2 Part Dual Fuel starter kit.
RealGrowers: Recharge.
Diablo nutrients: Supplements.
Feeding :
Wed 06Mar: 3 1/3L Nuts/Recharge pH'd 6.5
Sat 09Mar: 2L Monster Flower,Blaster pH'd 6.5
Mon 11Mar: 3 1/3L Nuts/Recharge pH'd 6.5
___________________________
D-Fol: 10Mar keeping up with the fan leaves😄
__________________________
She's getting smelly and sticky😋
Buds are getting bigger😁
Smooth sailing⛵️week.
___________________________
Thanks for stopping by, likes and comments are appreciated.👊🏻😎
Keep on growin!
Keep on tokin!!!
😙💨💨💨💨💨
Likes
25
Share
@Hawkbo
Follow
Lookin good, no more herms so far as I’ve tightened things up hopefully that’s the last of them for good. I installed a 4Inch AC infinity fan and filter as an intake so I have been able to close all of the vents. At this point the leaf strip has proven to be a solid method, I have nothing to compare bud size at this point but just the extra space it opened up is a plus. I’m sure the lowers will be a little more firm and the plants obviously haven’t had to be fed as often as usual so its saving time, water and nutrients. The added microbes have also allowed me to keep my ppm around 1000 instead of 1080ish without any sign of deficiencies. The Mandarin cookies x Dionysus has a little cal-mag issue but that was a trait from the mother which out of 10+ grows all had a cal-mag deficency. I gave everything a little flush last watering and took measurements then a good feed today
REMEMBER , IF YOUR SHOPPING FOR GEAR YOU CAN USE THE CODE “BANGDANG” FOR 10% OFF YOUR ENTIRE PURCHASE FROM ANY OF THE FOLLOWING COMPANIES.
@greenbuzzliquids
@rainscience_growbags
@gorilla_grow_tent
@growlightscience.led
*****Gorilla grow tent discounts extend to all companies affiliated with grow strong industries which include..*****
@super.closet
Lotus Nutrients
Kind LED grow lights