The Grow Awards 2026 🏆 


Likes
Comments
Share
@Autower
Follow
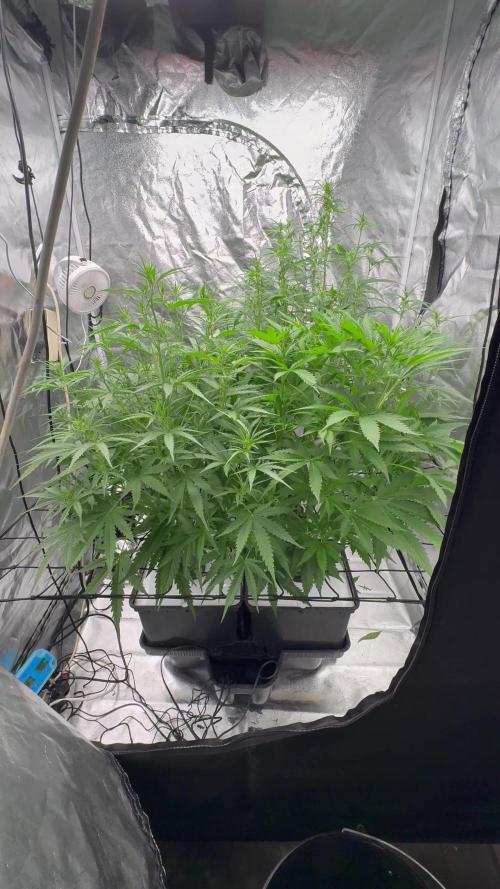
Week 10 not long now these smell amazing like sweet blueberry and there's definitely something I've had before when I've bought some personal but can't quite get my head round the smell. started introducing overdrive now as they start to finish fattening and ripening up can definitely see swelling going on over the last 3 days thanks for viewing and happy

Likes
5
Share
@Ensign420
Follow
Greetings fellow growers 🖖 and welcome to my first grow ever. This adventure actually started several months ago when I decided to stop buying flower from dispensaries and just grow my own bud. How hard can it be!?
This is actually my second seed of this strain. The first bean sadly died due to over watering (sorry girl, RIP). I was literally watering the cube to the point where water was dripping from the bottom, then heavily sprayed the humidity dome and tray with the vents completely closed. Everyday. Multiple times. I never let the dome or try dry out. So after about 8 days of not sprouting, there was a funky smell of rot. So that was that.
Later I learned that rockwool retains a lot of water and can easily drown seeds. So a wet/dry cycle is best for rockwool germination.
So even after hours of researching and digging through forums and tutorial videos, I was still under prepared for this journey. Did not consider how delicate the germination phase is. Oh well. Lesson learned. Reset and try again!
I hope everyone is safe and stoned during this corona crisis. Just like everyone else in the world, I want this pandemic to be over with. But in the meantime, let's grow some weed! 🖖
[START OF WEEK 01]
Day 01 - Monday - 08/03/20 - Total Days: 001
-----------------------------------
- [0830]: Light Schedule: 24Hrs/0
--- Soaked cube in 5.5 PH water for 10 min. Did not shake water out.
--- NO NUTES! Only PH'd down to control the PH levels.
--- Did not use the default hole (way too deep).
--- Flipped cube upside down and made a shallow hole for the seed (less than 0.25" deep).
--- Placed seed in and pinched hole close. No additional water added.
--- Sprayed the tray and dome with straight water (5.5 PH).
--- Vents are cracked opened a for ventilation (about 1/4 opened each).
--- Distance between the light and tray was 53"
--- AC was set to 80 °F
--- Exhaust fan was set to 86 °F
--- Room average temp was at 85 °F
--- Dome humidity was at 85-99% when sprayed.
--- Allowing to completely dry before respraying.
- [2200]: Dome and tray were completely dry! Sprayed only tray and dome with more water.
Day 02 - Tuesday - 08/04/20 - Total Days: 002
-----------------------------------
- [0845]: Sprayed dome and tray in the morning. Everything was dry.
--- Hoping for the best!
- [2130]: Everything was dry again, so sprayed dome and tray at night along with a light spray on the cube.
Day 03 - Wednesday - 08/05/20 - Total Days: 003
-----------------------------------
- [0830]: Everything was dry again. Resprayed dome and tray. Slightly sprayed cube.
- [2125]: Hooo damn!! She popped! Am little stub is visible! Resprayed dome and tray again.
--- Still going 24/0 for lights.
- [+0033]: Just checked up on her and I swear she grew a bit taller! Getting excited!
Day 04 - Thursday - 08/06/20 - Total Days: 004
-----------------------------------
- [0845]: Wow! Went from a little stub to fully sprouted overnight! Everything was pretty dry again so resprayed dome and tray.
- [2200]: Tap root is visible! Over 1" long too! Just resprayed dome and tray again.
-- Going to prep for hydroton transplant tomorrow!
Day 05 - Friday - 08/07/20 - Total Days: 005
-----------------------------------
- [0930]: She keeps growing!
-- Added a bit of CalMag to the spray bottle (8 drops to 650ml of distilled water). Resprayed dome and tray. Water was at a 5.4 PH with 141 PPM.
- [1045]: Prepped the bubble bucket with 4.5gal of water. Water is high enough to reach about 0.25" above the bottom of the net pot.
--- Added 3 drops of Superthrive
--- Added 3.5ml of CaliMagic
--- Added 2ml Hydroguard
--- Then PH'd down to 5.6
--- Solution Strengh: 120 PPM
--- Water chiller is set to 20 °C
- [1100]: Transplant time!
--- Filled the net basket 1/3 with hydroton. When placed in the bucket, air bubbles are not visible, but are slightly below the surface (slight digging will reveal the water/bubbles below).
--- Removed plastic on rockwool cube and placed in basket, then filled around and covered with hydroton. Making sure to block any light from passing through the net pot and into the nutrient solution.
--- Covered with a half-bottle dome sprayed with the CalMag water from earlier.
--- Hoping for the best!
- [1300]: Raised Bucket 5" higher. Now light distance is 48" to top of bucket.
- [1820]: Lowered tent exhaust temp to 76 °F
--- Lowered AC to 75 °F
--- Raised bucket even higher so light distance is 30" to top of bucket.
- [2300]: Looking good!
--- Sprayed dome and surrounding hydroton with more CalMag water.
--- Attached timer to light! So new 18 Hrs On/6 Hrs Off light schedule.
--- Lights On: [1600] (4pm)
--- Lights Off: [+1000] (10am the next day)
--- Decided to go with lights on during the evening/night and off during the later mornings/afternoon (the hottest part of the day) to see if temps can be controlled better.
--- Please survive girl!
Day 06 - Saturday - 08/08/20 - Total Days: 006
-----------------------------------
- [0800]: Everything was dry. Resprayed hydroton and dome.
- [2000]: Here first night cycle seemed to go well! Get'n taller!
--- Dry again. Removed the dome.
--- PH went up to 6.5 so PH'd down to 5.7
--- Ran the top feed drip ring for a bout a minute to wet the hydroton and rockwool with the nutient solution.
---Too scared to leave the top feed on 24hrs (I don't want over water her and cause dampening-off). Will let dry before re-watering.
- [2100]: After closer inspection, I think she's looking a bit yellow.
--- Decided to add a bit of grow nutes to the bubbler solution.
--- Added 2ml of Sensi Grow A
--- Added 2ml of Sensi Grow B
--- Solution strength after adding more nutes: 176 PPM
--- PH went up to 6
--- I hope that the extra chelating properties of the 'PH Perfect' solution is enough of a buffer for proper nutrient uptake.
Day 07 - Sunday - 08/09/20 - Total Days: 007
-----------------------------------
- [0800]: Water dropped a bit (mostly due to evaporation) so solution strength was at 190.
--- Checked PH again. Was still at 6, so PH'd down to 5.4
--- Ran the top feed for a minute to wet the hydroton a bit.
- [0915]: Since she's looking perky but still a bit yellow. So decided to up the nutrient concentration even more before lights out.
--- Added 2ml more of Sensi Grow A
--- Added 2ml more of Sensi Grow B
--- Solution strength after adding more nutes: 199 PPM
--- PH went up to 5.8
- [1700]: Checked nutrients.
--- PH: 5.9
--- Solution strength: 202 PPM
--- Added 4ml of Voodoo Juice
--- Added 4ml of B-52
--- PH after adding more nutes: 5.9
--- Solution strength after adding more nutes: 238 PPM
- [2130]: Decided to make a new foliar spray to address the continued yellowing.
--- Started with 500ml of distilled water.
--- Added 3 drops of CaliMagic
--- Added 3 drops of Sensi Grow A
--- Added 3 drops of Sensi Grow B
--- Added 3 drops of B-52
--- Added 1 drop of Superthrive
--- Solution strength: 164 PPM
--- PH was at 5.9 and did not adjust.
--- Gave her one spray.
--- Also sprayed the surrounding hydroton.
[END OF WEEK 01]

Likes
45
Share
@SherbGrows
Follow
Here we are at week 7!
During Week 6
Noticed earlier on in the week that 1 of the 5 White widows has a slight magnesium deficiency. Amended that with tsp of Epsom salt per 1 gal. PH'd water at 6.7. Noticed new growth looks okay! I think I should have added nutrients a week prior.
Light defoliation on the bottom leaves under the canopy
Added other 1/2 dose of down to earth 4-4-4 (I decided to half dose on the dry amendments to see how the plants respond)
Added 1/2 dose of GEO Bloom 3-12.5-9
Watered dry fertilizer with compost tea brewed for 24hrs
Started PH testing the soil. Reads around 6
Week 7 plans
Going to try using white distilled vinegar as an organic PH down option. I have been using phosphoric acid and read that it is an inorganic. Hoping to not kill any good microbes with future watering. Tap water in my town reads at 7.6-7.8
Keeping an eye out for light stress and adjusted the light accordingly
Light LST on bud sites
Going to PH test run off to make sure soil is at okay PH level.
New clip on fan is on its way to help lower RH in upcoming weeks. Aiming for consistent 40-45%
So happy with how well this grow is going so far. Hoping it continues this way! (try not to jinx myself, yikes!)
Let me know what you all think :)
Processing
Likes
Comments
Share
@Greenbean15
Follow
This plant is going to be the heaviest yielding other of my purple trainwreck plants. Super excited to see what this plant will do. I was able to get the second PT clone to turn semi-purple on the bud, trich’s were better and smoke seemed to be about 2x as potent as the first grow.
I’m not sure what kind of potency this third plant will have but I’m hooping for good things. She flowered early on me instead of during 12/12(started throwing pistils) so I may have her flowering date off by a week or two. I think I stressed her into flowering by drying her out too much in veg.
Regardless, I’m excited to see what she does. So far seems to be the healthiest PT I’ve been able to grow.
Thanks for reading and happy growing! 👩🌾🏼🌱


Likes
91
Share
@Greenwolvesfarmer
Follow
Me encantó la cepa y su facilidad de cultivo ! Aun que tuve muchos problemas ambientales y climáticos . Me atrasé unas 3 a 5 semanas con estas nenas , pero nos recuperamos bien ! Usamos malla scrog chilena #kanovicultivo , lo mejor que he usado en malla scrog , no se le comparan , su espacio preciso! .
Las 4 comenzaron en pequeños vasos , luego de 1 a 2 semanas , trasplanté a macetero de 5.8lts , finalizaron 3 en maceteros textil 19lts y 1 en macetero de 20lts AirPot !
Comencé a brindarle 20hrs de luz / 4 hrs oscuridad , a la 3era semana 19hrs de luz y a la 5ta semana bajé hasta el 18 / 6 .
Usé un panel QB de 480w regulables , chips marca Samsung de 3500k , chips epistar UV 660nm iR , el mix completo gracias a mi bro MKleds chile ! Se pasó ! De todas maneras recomiendo una potencia mínima de 600w ( QB LED ) para espacio de 120x ..
Usé un bio estimulante chileno , que a mi parecer fue uno de los mejores que he visto y usado ! El grande #trichomemania , te cuento que este producto activa un mecanismo de defensa en la planta (SAR) , haciendo que reaccione y se trate de defender con mayor producción de resina , terpenos y tricomas ! Es increíble ! A los 24hrs tienes resultados , un saludo grande a los hermanos ! El mejor producto 10000000%....
Grande eva seed , buenisima esta cepa , me dí cuenta que si se deja madurar un poco más , su sabor es más frutal candy , exquisita cepa !....
Estamos probando con un papel de blunt organico 100% libre de tabaco marca *jamaican buzz*...al fumarla su efecto es notorio , enseguida viene el efecto psicoactivo y cerebral , se viene a la vista un tanto distorsionado el entorno ...la vision un poco más brillante , y a la vez relajado ..
Hoy 18 de agosto estamos probando con un papel de celulosa organico marca lion rolling circus ( foto al final del album ) , quema bastante bien , al parecer ya está casi en su totalidad secado , combustión lenta , buen sabor afrutado citrico con toques candy diesel ...uuff efecto despues de 3 quemadas ya por los cielos , totalmente cerebral y estimulante , un gusto charlar con amigos !
Al manipular su fruto , la planta expele un olor afrutado con limon maduro y skunk , con finales de candy terra , una delicia , muy buena cepa , ahora mientras escribo me siento un tanto "mareado" con esa mitad de blunt ! Buenisinaaa!...
____
La verdad cuando comencé a cortar cada planta era como llenar "infinitamente" el armario donde dejaría secandola , se llenó casi la mitad y un poco más sólo con 1 planta cortada ! Increíble producción , yo estimo unos 90g por planta aprox , ya he consumido un buen peso además ...veremos en estos días que esté por completo su secado ! Esta riquísima , sus efectos fuertísimos ...100% ...
___
Una cosecha buenísima, muy parecido como obtengo resultados en comparación con el sodio , todo bien me gustó la experiencia !....
Además tuve la oportunidad de hacer extracción en seco de su materia vegetal . Obtuvimos entre un 18 a 20% de retorno ! Para mi primera vez , geniaaaal ! Su utilizó prensa de 12 toneladas , de apretó a 80°C por 4 minutos .
.
.
Usen lemon king ! Una delicia .


Likes
2
Share
@Satax
Follow
I had an amazing stretch on the plants this week, do also some defo below the net. Otherwise, I’m keeping interventions to a minimum since everything is running smoothly. The one at the top left (GB) is growing more slowly, but it’s starting to catch up.


Likes
37
Share
@GrownwithLED
Follow
After germinating the seeds are transplanted into small pots with soil (see tutorial in VIDEO above). The soil is prepared with water mixed with a little bit of BIO NOVA Roots (0,5 ml/l), which aids the development of the seedling. Transplanting is very easy now, because they have grown a STRAIGHT tap-root while hanging during the SERIOUS' WAY of germination. This straight root allows for easy potting of the seeds. Simply make a little hole in the center of the soil with your pinky finger and carefully place the germinated seed with the white root pointing DOWNWARDS into the hole. Best is to lay it onto one side-wall of the hole with the seed shell right at the surface. Then I push the other side inwards and enclose the whole root with soil. At the end only the top of the seed-shell peeks out of the soil. IT IS VERY IMPORTANT to plant the seeds NOT TO DEEP into the soil. The seedling only needs extra strength to work itself upwards thru the soil and you run the risk of the soil drying out and the seed dying off. When you PLANT THE SEED VERY SHALLOW into the soil (=with the top of the seed-shell still peeking out) your seedling can grow out right away and you have a small plant already 24 hours after putting the seed into the soil.
The small seedling sometimes still has the seed-shell on its 'head', it normally falls off by itself, but sometimes you have to carefully help and take it off with your finger nails. Be careful to NOT clip of the seedling accidentally when you do this!
The seed-shall has an inner lining, which feeds the small seedling when it germinates. This inner lining sometimes gets tangled around the stem of the small seedling after the shell has fallen off. This little skin MUST be taken off the stem right away! Once it dries up, it gets hard and can strangulate the seedling around the stem. In order to avoid this, the skin must be taken off as soon as possible! I show it in the pics above and also made a video about taking off the inner lining of the seed.


Likes
3
Share
@Jebbwardo
Follow
Cut down today definatly needed few more days as fan leaves where still green but i had to do it today. Smells amazing like peppery skittles. Let me know what you think will and i will update when dry and cured.

Likes
8
Share
@Elpicor
Follow
Ho montato una growbox 100×100×200 cm per consentire una migliore areazione e crescita, le piante sentono lo spazio disponibile attorno a sé, quindi questo era il momento giusto, ora si viaggia con una mars hydro fc3000 con dimmer al 45 % a 50 cm, un ottimale 350 ppfd , ppfd aumenteranno a 550 gradualmente in 15/20 giorni, aggiunto il supplento di spettro blu di marshydro, non sembra male per ora stanno benissimo😇
Likes
2
Share
@CannaIGrow
Follow
Plant is growing good. Still really pretty to me. Hoping to flip around day 60
Likes
13
Share
@Growyourownathome2x2
Follow
Sunday the 14th of May Day 18 of 12/12 defoliation done still need to clean up the lower part of the plant a bit more I just hadn’t got the time to do them I will get back in on day 21 to clean up the bottom of the plants any branches that haven’t made up past the first trellis will definitely be removed and see how it’s looking all feeding same as previous week looks like the stretch is almost done and buds starting to form front left plant doesn’t look great but the other 3 are looking good nice bud sites for day 18 of 12/12

Likes
14
Share
@BLAZED
Follow
Week 14 (17-10 to 23-10)
17-10
Temperature: 23.4 degrees (lights on) 17.5 degrees (lights off)
Humidity: 70% (highest) 55% (lowest)
Watering: 400 ml. PH 6.5 EC: 0.6 (without Hybrids & PK+)
18-10
Temperature: 23.6 degrees (lights on) 17.1 degrees (lights off)
Humidity: 70% (highest) 54% (lowest)
Watering: 900 ml. PH 6.5 EC: 0.6 (without Hybrids & PK+)
19-10
Temperature: 24.3 degrees (lights on) 17.8 degrees (lights off)
Humidity: 81% (highest) 59% (lowest)
Watering: 1210 ml. PH 6.5 EC: 1.7 (with Hybrids & PK+)
20-10
Temperature: 25.1 degrees (lights on) 18.2 degrees (lights off)
Humidity: 84% (highest) 62% (lowest)
Watering: None.
21-10
Temperature: 25.6 degrees (lights on) 18.6 degrees (lights off)
Humidity: 99% (highest) 64% (lowest)
Watering: 1200 ml. PH 6.5 EC: 0.6 (without Hybrids & PK+)
22-10
Temperature: 25.8 degrees (lights on) 19.3 degrees (lights off)
Humidity: 89% (highest) 63% (lowest)
Watering: None.
23-10
Temperature: 25.7 degrees (lights on) 19.1 degrees (lights off)
Humidity: 89% (highest) 60% (lowest)
Watering: 1000 ml. PH 6.5 EC: 1.7 (with Hybrids & PK+)

Likes
2
Share
@Delta9tetrahidro
Follow
Nuevamente repito siempre el mismo proceso en el cuidado de la planta en cada etapa. Siempre cuido el ph que para mí es lo más importante en este trabajo. Despúes todo lo demas se puede mejorar.
Likes
Comments
Share
@eldruida_lamota
Follow
Vamos familia, actualizamos la sexta semana de floración de esta Amaretto Tarmac de Seedstockers.
Empezamos abonando ya con varios productos de la gama Agrobeta para la floración.
Temperatura y humedad dentro de los rangos correctos, 12 horas luz, 12 oscuridad.
Una lástima que de todas solo aguanto una, y en concreto tiene un color espectacular aún así seguiremos con el diario hasta el final.
Agrobeta:
https://www.agrobeta.com/agrobetatiendaonline/36-abonos-canamo
Hasta aquí todo, Buenos humos 💨💨💨

Likes
14
Share
@Bigbombbudz
Follow
Another week closer....
These girls have been a pleasure to grow so far they love everything you can give them ...no deficiencies no problems.....earlier in the week a slight tip burn but after 2 days they adjusted and ask for more.....as they are eating up the nutrients I am replacing and upping it each time...pushing these girls and they are showing there love....17 days since I switched the light and they are filling in nicely.
Until next week, smoke a fatty, help out you're fellow grower

Processing
Likes
6
Share
@Mr_nugs_lover_David
Follow
She looks extremely healthy and happy let's see how she performs at the end,she's 100% organic grown without any chemicals from bottles. Starting to show the first pistils on August 24th
Likes
18
Share
@valiotoro
Follow
Hello everyone 😎
Week 7 of flower for the Amnesia Zkittlez🍭
Only 1 plant left then finito✔️
Very nice smell super sweet🤤
The buds are super sticky🔥
Likes
10
Share
@AS420
Follow
Dernière semaine d'engraissage
-Vaporisation foliaire à l'eau déminéralisée en début de semaine
-Arrosage a l'eau clair en début de semaine
-Arrosage en fin de semaine avec engrais
