


Likes
4
Share


@benzos_n_milk
Follow
Day 57: Flowers forming, everything good so far :)
Day 61-62: Light LST, plant seems to be chill. Noticed a couple of ants, I hope they don't bring aphids ._.
Day 63: Buds growing, we'll see...

Likes
22
Share


@Lazuli
Follow
Hello this is day 21 of 2 blue dream’s
Still 0.8ec and fluorescent light that runs 24h/day its still cold so thats how i keep them warm with a blanket over the light, theres still a few more weeks before they really gonna need strong light.


Likes
82
Share


@MrHightimes
Follow
These plants are getting huge!!! I supercropped em down tonight and gave em a full blast of feed! I'm trying to keep leaves on but i did give them a small trim.
they seem to be catching up to each other, I hope they will level out! They are gonna be big plants tho fo sho!
Going to transfer tents this week probably.
____________________________________________________________________________
Moved them into the big tent! its snug, but they should be happy! Getting HUGE!
______________________________________________
I felt like they were in all their glory tonight! I got in there and gave em a big ol haircut and pulled out all the lower garbage.
With the use of several spacers I really feel like I opened em up nicely and primed em up for some big buds to form.
Two plants are def gonna be purple. We'll see about the other 2.
Likes
12
Share


@2Stones1Bird
Follow
Checkout my Instagram @smallbudz to see the Small budget grow setup for indoor use, low watt, low heat, low noise, step by step.
17/11/2019 - Pot feels light and the is bottom dry to the touch time to water, gave her 1,5l of water PH 6.2 with 0.5ml Grow, 1ml, Bloom and 0.5ml Max Biobizz reduced the dosage from last time, watered util some runoff appeared.
18/11/2019 - Mixed another batch of Alg-a-Mic 2ml per liter to spray on lights off PH 6.2

Likes
44
Share


@RakonGrow
Follow
Note : Jegliches Equipment aufgelistet welches ich nutze findet Ihr in der Germinations Woche !!!
Day 15 :
ich weiss noch nicht ob der mineralische dünger wirklich sofort etwas gebracht hat . schauen wir was die zeitraffer so vermitteln. ist es seit gestern schneller am wachsen ?
Day 16 :
PPFD 275 * 20h = DLI 19.8
Day 17:
+ 0.5L Flaschenwasser (EC 0.26)
+ + Canna Rizothonic
+ + Canna Terrar Vega
+ = Total EC 0.68 (PH 7.2)
+ Final PH 6.15
Day 18:
es wächst
Day 19:
es wächst immer noch
ventilation übern blätterdach angemacht. ich glaub daher kommt das ruckeln im video
Day 20:
+ 0.5L Flaschenwasser (EC 0.26)
+ + Canna Rizothonic
+ + Canna Terrar Vega
+ = Total EC 0.68 (PH 7.2)
+ Final PH 6.15
+ 0.5L Leitungswasser (PH 8.0)
Der Stamm hat sich in den letzten 3 Tagen verdreifacht vom Volumen. Jetzt hat er so Bleistift dicke erreicht.
Day 21:
die temps und relative luftfeuchte sind hier zwischen 58%-68% und 23.5°-25.5°C . reguliert sich aber immer zu den höheren werten . ist hier halt so :))
Likes
9
Share


@CannabisRelated
Follow
Time sure goes by quick, It is already week 6. I sure hope they chunk up near the end :P
Plant "2" has a really strong creamy/doughy smell, plant "1" has like no smell so far.
Moved a clip on fan to blow on the ballast of the LED, and have a oscillating fan down below, which got the temps down a few degrees,
and the plants seem to be enjoying it.
Gave it a top dressing of nutrients last week, so I should not need to add any more, and just keep watering as normal, with a little bit of epsom salt like every 3rd watering.

Likes
14
Share


@PatriciaGant
Follow
Dane, We all should help one another.
Human beings are like that.
We should live by each other’s happiness - not by each other’s misery.
We don’t want to hate and despise one another, share the Joint.
And mother earth is rich and can provide for everyone.
We can Grow enough Happiness, In this paradise, there is room for everyone.
We only exist to bring joy into the world and The way of life can be free and beautiful,
but we have lost the way.
Grow High and Give the world A smile.
At the end we own nothing more then all our memories, lets make them amazing for everyone,
nothing to loose only everything to win.
A last kiss goodby, a second one, softer and long as a sign, that you are woth it.
That Everyone worth who loved and give.
Enought Hippie Talk, now have a nice day and an even better grow, thx for watching by.

Likes
37
Share


@Cheeba_Inu
Follow
December 16: Placed seeds into rapid rooters for germination.
December 21: Seed has germinated and broken through the top of the rapid rooter.
December 22: Planted in seedling pot.
December 23: Start of mild fertigation.
Likes
14
Share


@Rock_n_Roll_Randy
Follow
FOR EVERYTHING MARS HYDRO VISIT:
www.mars-hydro.com
www.marshydroled.ca
PROMO CODE: rocknroll
VISIT THE ALIEXPRESS STORE:
@marshydro_aliexpress
Instagram: @marshydropenny
https://youtube.com/channel/UChU5ZWwNi-DvnO3oWVU3ceA
Thanks for taking the time to read and check out my diary🤜🤛
FC-E6500 LED GROW LIGHT:
FC-E6500 grow light with 3978pcs OSRAM BridgeLux Diodes & Moso Driver, market-leading PPF 2.7 µmol/J, Max 2.5g yield/watt with 30% higher Average PPE, more cost-effective when compared to same style type lights. Only consumes 650W, perfectly cover 5x5ft (personal), 4x4ft (commercial) grow space. Innovative Precise Uniform Lighting-Built-in removable bars interval & dimmability enable the exact & dynamic PPFD control over each of the plant growing stages, FC-E6500 detachable bars deliverSuperior Heat Dissipation: Real Aluminum heatsink together with 6 slim profile passive cooled bars (THINNER & LARGER surface) and detachable Meanwell Driver, create less heat. save 50% hydro than other old grow lights! Driver can be mounted remotely on the side of a grow tent/rack or on an adjacent wall to remove heat from grow space. Full Spectrum UV IR LED: With Yield Max spectrum (660nm Osram enhanced Deep Red,2800k-5000k,730-740nm IR,380-410nm UV LEDs), Average PPFD the FC-E6500 LED grow lamp enables cultivators to produce BIG FAT Dense Buds, perfect for full-cycle hydroponic, soil, grow tent/grow room.
Dimmable Commercial Grow Light: Cost-efficient, easy dimming & daisy chain With a max up to 20 lights, IP65 Waterproof, master light easily controls the rest. Perfect for commercial & home horticulture.
FC4800 LED GROW LIGHT:
GET THE MAX FROM MARS👍: Welcome one of the newest members of the Mars Hydro family🤜🤛🤘. The Mars Hydro FC 4800 480W LED Grow Light can accommodate up to a 4' x 4' area for flowering. It has OVER 2000 LED chips consisting of the best selling Samsung LM301B diodes which has a Luminous Efficacy of: 220 lm/W
0.2 W, 3 V mid power,
Osram 660nm Diodes, Infrared light and UV LIGHT👍. It boasts the incredible efficiency of 2.8 µmol/J, maximum 2.5gram yield per watt with 30% higher Average PPFD. This High-intensity spectrum is beneficial for plants at all stages - from veg to bloom, and creates Big dense Buds👍. achieve 50% higher yields & quality compared with the old lights! Only consumes 480W for 4x4ft personal grows, and 3x3ft for commerical grow. It comes with a dimmer and daisy chain function with a maximum of up to 15 lights, the master light controls the rest👍. Wide 6-bar design offers even & wide canopy coverage and can maximizes your grow space. slim 180° FOLDABLE DESIGN... YES I SAID FOLDABLE🤘🤣 , making it compact and easy to install, it's IP65 WATERPROOF and will give you no worries while growing in a humid environment and makes it a flexible high performance commercial grow light for enormous SUPER FROSTY yields.😛😛😛. MARS GETS EM FROSTY BOYS👍
AWESOME HEAT DISSIPATION: The Low energy consumption FC4800 growing light has 6 passive-cooled bars and an aluminum heat-sink a removable driver you can upgrade later or have it outside your tent. with zero noise you can save up to 50% in your electricity bill compared to HID's or HPS lights!
It also has a removable driver so you can upgrade it in the future or have it outside your grow space for better heat control in your growroom👍
UPGRADED FULL SPECTRUM: Yield Max Spectrum with enhanced red (Top-Bin Samsung 3000k-5000knm, Osram 660nm Deep Red), speed up blooming & fruiting, perfectly suited for full-cycle growing. The FC4800 LED grow lamp was born for Big Buds, perfect for commercial, grow tent, grow room, hydroponics, and all soil grows.👍
THE BEST SAMSUNG DIODES: THE FC4800 has Top Bin genuine Samsung Osram Diodes, combined with remarkable 2.8 µmol/J Efficacy, 30% higher Average PPFD, 50% less energy consumption, to maximize your yields. They give you a TRUSTED 3 years warranty 100% Satisfactory guaranteed!!!
TSW2000 LED GROW LIGHT:
INCREASE YIELD AND CROP QUALITY WITH MARS HYDRO LED GROW LIGHTS: NEWEST SMD LED technology provides the highest PAR/LUMEN output (1122umol@18") and can make you get 30% higher yield compared to OLD blurple led lights. Max 2.5g yield per wattage and achieve maximum quality and quantity, much better than traditional HPS grow systems
LOW ENERGY CONSUMPTION LED GROW LIGHT: Consuming only 300W true output with 684 LEDS! It saves up to 50% energy than other led grow lights. Perfect for 3.5x3.5ft bloom stage, 4x4ft veg stage. Over 90% light energy can be absorbed by plants, it will have higher intensity in a MARS HYDRO grow tent with diamond design mylar, or by crossing over using multiple TSW2000
HIGH EFFICIENCY FULL SPECTRUM INDOOR GROW: 3000K 5000K and IR 660nm 760nm RED, makes it close to natural light, highly engineered to provide improved growing performance for plants at all stages of growing, rapid plant response from seed to flower; Uniform and wide-beam light distribution for your plant's optimal growth
8x8 1680D GROW TENT
The MARS HYDRO 8x8 Grow Tent interior is made of a unique diamond design mylar which is highly reflective. (Other companies mylar and reflective rate is as low as 50%, and it won't provide efficient light. They use thick 1680D oxford canvas, and being double stitched, it is tear proof and perfect for locking in the light. Their grow tent keeps 100% of the light inside the tent and helps your plants absorb more light. EXTRA-THICK material means No light leaks or rips at all.👍
Strong Stable metal corner adapters and poles are the trustful supporters of the tent. It's very sturdy, neither rusting or paint flaking off. quick and easy tool-free setup. They use heavy-duty metal zippers, with double layer black lining, by far the best on the market which creates a light-proof seal.
The Easy observation windows are made by double layers of cloth. Observe the growing conditions of your plants without opening the tent and avoid disturbing your plants. The observation windows also serves to dissipate heat and ventilate the air.
The tent includes 2 removable waterproof floor trays to hold soil and water. The removable tray can be taken out to wash easily.
They guarantee the grow tents are easy to install even if you've never done something like this before. Clear Instructions and no tools needed! They also offer 30-day unconditional refunds for quality problems. Just contact their friendly 24 hours customer service 👍
(NEW) STRIVE NUTRIENTS 💪
Likes
27
Share


@MoneyMorris
Follow
I’ve been flushing the plants for a week now. The colas have definitely gotten fatter from last week. It’s looking like I’ll be harvesting in 1 more week. Pretty much all the trichomes are milky and I’m starting to get amber ones.

Likes
8
Share


@The710Garden
Follow
This time I dont top them to See how she Looks naturally! Without to much Stress,Even if I recommend 1 topping doesent matter if you run it First to See what they do when you let them grow normally
Now they all showin there female Parts,what we all love to See 💚


Likes
141
Share


@Tropicannibis_Todd
Follow
💩Holy Crap Growmies We Are Back💩
Well growmies we are 70 days in and everything is going as good as it can👌 Afraid she's had some major issues but that's just how it goes folks 😉 she's definitely on the mend 👈
👉 Shes a short chunky little plant,😉
Lights being readjusted and chart updated .........👍 Even with early major issues due to the soil/medium she's come a long way 👈
👉I used NutriNPK for nutrients for my grows and welcome anyone to give them a try .👈
👉 www.nutrinpk.com 👈
NutriNPK Cal MAG 14-0-14
NutriNPK Grow 28-14-14
NutriNPK Bloom 8-20-30
NutriNPK Bloom Booster 0-52-34
I GOT MULTIPLE DIARIES ON THE GO 😱 please check them out 😎
👉THANKS FOR TAKING THE TIME TO GO OVER MY DIARIES 👈
Likes
25
Share


@EBxAH
Follow
Well week 7 has started and 1 full week into 12-12. This time of year is perfect for winter time flowering. Basha is 26" Steffa is 36" and Wandzia is 27" so I average the height at 30". I think they look pretty damn good for 50 days old, lol. These ladies are currently taking in a gallon a piece every two days now, different from last grow. Also I've been bottom feeding these girls. That's about it for now.
Happy Growing Everyone
✌️❤️😁🍀🎶👽
EB

Likes
24
Share


@Groweedo
Follow
Hyper content les plantes se portent à merveilles.
J’ai coupé lapex des branches sur le côté, une bonne semaîe et je lance la floraison ( à voir en fonctiin de celle qui à du retard).
Processing
Likes
28
Share


@TrueNorth
Follow
-Strain: Purple Lemonade - Fast Buds
-Tent: 5x5 Gorilla Grow Tent
-Lights: Budget LED Grow Lights 2 x 250 Watt
LED Full Spec/Red Spec mixed boards
-Light Cycle: 18/6
-Soil: Fox Farm
-Air Circulation: AC Infinity Cloudline T6 Inline Duct Fan
WECLOME BACK GROWMIES! Week 10 here with our PURPLE LEMONADE by Fast Buds!
January 29, 2020 (DAY 67) - Hey there growmies we can clearly see the big bud getting to work, they are thickening out well and colour and smell is phenomenal. they are such hungry beast i love seeing the daily change!
Likes
22
Share


@HighRangeFarmacy
Follow
Starting to get orange hairs, smell is fruity and delicious. Can't wait.
Likes
4
Share

@Nocone_Purple
Follow
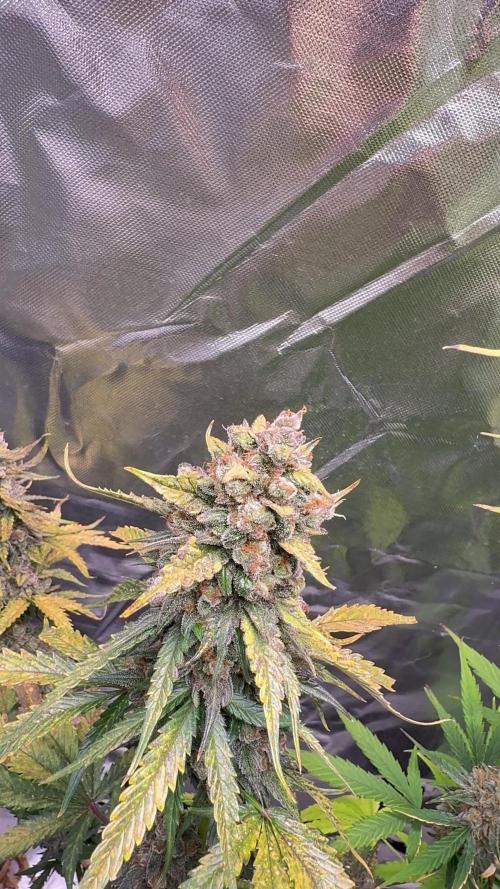
This week marks the final phase for my Blueberry from Zamnesia a truly beautiful plant that has shown its full potential during the last stretch. After completing the last feeding with Overdrive, I officially began the flush with plain water. The response has been perfect: a natural fade across the canopy, with fan leaves turning yellow and purple while the buds stay vibrant, dense, and sticky.
Under the loupe, the trichomes are mostly cloudy with about 15–20% amber, showing that the plant is entering peak maturity. The resin production is absolutely insane the buds are coated in a thick layer of trichomes from top to bottom, giving them that frosted, icy appearance that’s classic for high-quality Blueberry genetics. The calyxes are fully swollen, and the pistils have turned a rich orange-brown, curling inward as the plant finishes ripening.
This week, the aroma reached its peak an incredibly sweet and fruity blueberry scent with earthy undertones and a subtle creamy note. Every time I open the tent, the smell fills the entire room. The terpenes are clearly well-developed, and the overall fragrance feels deep, natural, and powerful.
Structurally, the plant stayed compact but productive, with thick, stacked colas covered in resin. Even the lower buds are tight and solid no airy popcorns, just consistent, frosty flowers. The upper colas are especially impressive, with a perfect balance of purple tones, orange pistils, and silver trichome coverage that makes them look almost unreal under light.
The fade has been very smooth thanks to a well-timed flush. The leaves are now fading evenly without any harsh burns, which should ensure a clean, smooth smoke after drying and curing. Trichomes look at their absolute prime right now, so harvest will likely take place within the next few days for maximum flavor and balanced effects.
Overall, this Blueberry exceeded my expectations strong, aromatic, full of resin, and visually stunning. The final yield looks promising for its size, with buds that feel heavy, sticky, and extremely fragrant. One of the frostiest and most terpene rich autos I’ve grown so far.

Likes
4
Share


@Nofeckingclue79
Follow
A very quiet week just made sure the runoff watering was the same reading as from the tap she is watered from so all that is left to say is good look to everyone else in the Dutch passion competition so until next time ✌️ out my fellow Growmies 🙏👍
