
Likes
Comments
Share


@Gardens_of_Of
Follow
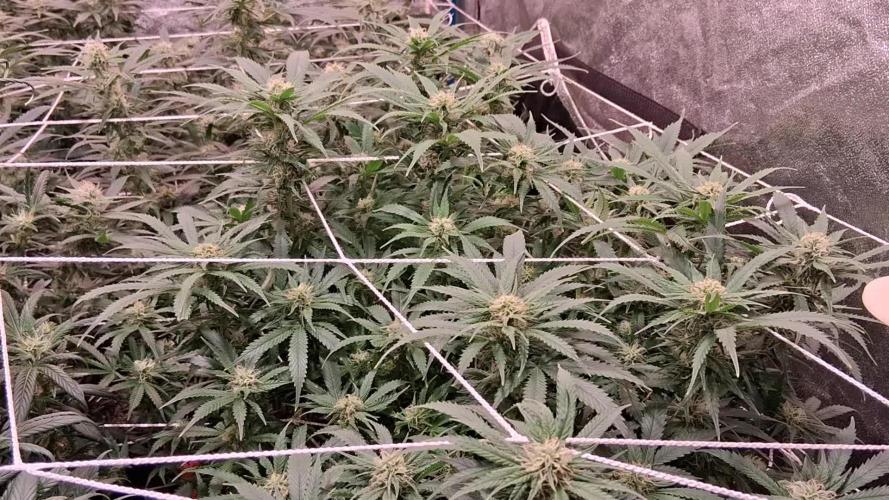
Both ladies finished around 60th day of flowering with 5-10 % Amber Trichome coverage.
Small buds stocking up to make long huge bud sides smelling fruity kush tones. I have also noticed that they are super sticky.
Both phenos grew quite identical even though they received different nutrients line in different pot sizes which tells me that the genetics are very consistent.

Likes
33
Share


@Ksouth1
Follow
Last week went well. She has grown tremendously in the last two weeks. Most growth has taken place in the last week. Over a foot of stretch. Because she was growing so much faster than the other autos, I put her in her own spot with her own Mars Hydro ts600 so I can adjust the light height just for her. I'm hoping she starts stacking on some bud. It seems like she isn't going to be a purple pheno, but oh well. As long as she turns out decent. She responded well to topping, lst and supercropping. She also seems to like the organic diet. I will update as she progresses. Until next time happy growing to everyone!
4/30- She is still stretching some but not as much. Starting to add bud mass. The bud is starting to get a purple coloration to it like I had hoped. Next time she will be grown with a soil mix that has 35% coco coir in no less than a 5 gallon aerated fabric pot to maximize the potential. I am also going to make sure she has the best lighting from the start. Because she wasn't as close as she should have been at first, that is why I think she is as lengthy. Just going to get a feel for her and improve for the next grow of this strain. Will update as she progresses.

Likes
148
Share


@BioBuds
Follow
When we had so many problems with the other two strains. This strain keeps pushing out buds like the little engine that could. Closest to the light, it handles heat and light way better than her counterparts.
It also has some major trichome formation starting covering the entire top leaves.
It is starting to smell and form real compact dense buds, although not very pronounced yet.
We shall see but she promises to deliver some nice danky bud after all.
Nice to see she still pulls together, also nice to see how different this strain behaves from others I have grown.
Time will tell the total tally... We shall see if there is a Silverback in the making, but at least she is not staying behind any more.
Also here, 3 to 4 more weeks... Cant wait!
Thank you for checking in! More budshots follow of this one!
Hug Bud

Likes
49
Share


@masterofsmeagol
Follow
8/29 Knowing I was going to have to yo to the hospital er again this morning with my wife I got up early and watered. We are supposed to get an inch of rain tomorrow but the bags were totally light. If I was going to be around I might've held off watering. Instead I watered everything one gallon and figured the rain will make up for the other 10 percent hopfully that will do it.
8/30 Rained overnight. Plants were soaked. Flowers are swelling. I defoliated a shit ton of yellow leaves the other day. I still don't think I have anything fungal but I'm keeping an eye u e out and am considering doing an application of plant doctor. We are suppised to get an inch of rain tonight and tomorrow I guess. My biddy said i shouod cover my plants because next week is going to be "great growing weather" but with the rain and then the sun it could be a recipe for disaster since I have some large flowers. I got my father's leaf blower running but it was leaking gas. Brought it to the repair shop and a buddy let me borrow his for thus storm. I and hit the plants with it this morning. It is super strong though. I need to be careful not to blow it right out of the bag!!! Or break branches. Of course after u left it started raining lightly. A nice rain that plants like but it's stopped. I'm wondering if I should go over and blast them again to keep them dry but I know it's going to rain off and on and it'd going to rain tonight. I'll check the weather and decide from there. So far things are going good. Still have some yellowing leaves and a few normal pests but that is to be expected.
UPDATE: Stopped raining so I went over
and shook off the plants then put the leaf blower to them. I made sure to get the interiors before I went and had shook things again by hand. Storage us low bur i took a video. Cant upload toll tomorrow. Buds are growing at an insane rate but im losing some fan leaves that just yellow and die. Im sure its senescence but its still wortisome. We are supposed to have a real good week of growing weather coming so I hope that doesn't change. I'll update tomorrow. That leafblower works awesome though.
8/31 Went over to an extremely sunny windy morning. I didn't even need to shake plants or use the leaf blower since I did it after it Rained last night. I'm worried the wind night dry my bags out today so I'll be sure to keep an eye on them. I defoliated a shit ton of leaves but apparently it's just senescence. I need to check the last time I fed. Trich development is going good. The smell was incredible this morning! Each strain has its own unique smell to it. We are supposed to have a real good week for growing so I'm looking forward to it. May do a preventative plant doctor app but I think it will be alright. I'll keep this updated.
UPDATE: Went over around one and plants were bone dry. The wind was RIDICULOUS! I added a few individual stakes and tied a couple loose branches. I got my tarp out and considered covering the cagecto protect from the wind. However I didn't have time to sanitize if and they had already been through it all night and day alwuth no breakages. Plants are strong and supported well. At least I hope. Plus the tarp would block the rest of the direct sun the plants are getting right now. The wind looked like it dud its worst and the trellis and supports held. I did add extra supports higher up the plant to prevent breakages. Found a moth larvae (yellow) and squished him. Also found some aphids but a few lady bugs and three lady bugs larvae so I think I'll be OK. I am really excited for this year. Flowers are really exploding! FORGOT TO PUT THE MOST IMPORTANT THING. WATERED EVERYTHING TWO GALLONS EXCEPT THE 10. WHICH GOT ONE.
9/1 Forgot my phone on the daY I really needed it. It rained last night. The wind was the strongest i've seen in years. I would've tarped the cage but i couldn't find any of the bungee cords or zip ties. Probably good I didn't. No breaks. One plant had dark brown splotches ALL over the leaves! I picked them all off and took pictures and will consult my commercial buddy. I researched and asked a question on here. If it's septoria or something that could ruin my gorgeous garden I'd rather just junk the plant. It's big but it's the furthest behind flowering and I would not be heart broken if I had to get rid of that for the others. This week is supposed to be the best week we've had all summer so I'm expecting major growth. I'll update after conferring with other growers and making a decision. Looking online it seems like it could just be lack of nutes with the co dictionary we've been having. It IS time to feed and I haven't been feeding much. We'll see what he says.
UPDATE: AFTER RESEARCH AND CONSULTING WITH OTHER CONMERCIAL GROWERS I BELIEVE THAT THIS IS A NUTRIENT DEFICIENCY. I READ THAT RAPID TEMP FLUCTUATIONS AND HIGH WINDS CAN EFFECT THINGS LIKE THIS. IT DOES NOT APPEAR TO BE SEPTORIA (WHICH I'M EXPERIENCED WITH). I WAS THINKING ABOUT DOING AN APPLICATION OF PLANT DOCTOR BUT SINCE IT WAS SO FEW DAYS DURING THESE CONDITIONS IM GOING TO WAIT AND MONITOR THE PLANT. I DEFOLIATED ANY LEAF THAT WAS SUSPECT. FOUND AND KILLED A BUD WORM. I THINK THEY ARE STILL DIEING FROM THE BT. IT WAS LIKE STRETCHING UP FROM THE TOG OF A BIG NUG LIKE, "HERE I AM COME OUT ME OUT OF MY AGONY." ALSO FOUND LADY BUGS AND BEETLES AND THEIR LARVAE. IVE SEEN TGE VERY LOWER SECONDARY BRANCHES GET STRIPPED ON A COUPLE PLANTS BUT THATS WHY I LEFT THEM THERE. IF THEIR ARE EARWIGS THEY CAN HAVECTHE SHIT THAT I WAS GOING TO LOLLIPOP ANYWAY BECAUSE THATS WHAT THEY USUALLY GO FOR. THEY ARE DEFINATELY STRAIB DEPENDANT TOO. THEY LOVE ANYTHING BLUEBERRY BUT DONT TOUCH THE REST. MAYBE THERE IS JUST A COUPLE IN "THAT BAG". ILL HAVE TO GO AT NIGHT AND CHECK. IM EXCITED. MY FLOWERS ARE EXPLODING IN SIZE AND TRICHOME PRODUCTION. SEEIMG THAT I THINK THIS IS A NUTRIENT ISSUE AND MY FEEDING DAY WAS TODAY I FED EVERYTHING 1.75 PINTS OF NUTRIENT MIX TO EVERYTHING BUT THE 10 GALLON WHICH GOT LIKE 3/4 OF THE POWERADE BOTTLE. PLANTS SEEM HAPPY AFTER I FEED SO MAYBE I SHOULD UP THE FEEDING SCHEDULE. SINCE THE SOIL WAS ALREADY MOIST AND IT RAINED YESTERDAY I FED WITHOUT WATERING. HOPFULLY THAT WILL BE OKAY. I'VE DONE IT BEFORE.
Went back over at six and WOW! After this nice sunny day buds have swollen. Plants seemed to love the nutes. I think the nutes in my soil are fairly depleted so I just needed to adjust my feeding schedule. I didn't notice anymore calcium deficiency looking spots and I had defoliated a lot of leaves. Super excited moving forward. Pistols are changing color on one 10th p phenome and retracting into buds. This is is the fun time. As long as I can avoid the rot.
9/2 Says it didn't rain last night but my plants are dripping wet. If course the leafblower kept dying so I had to shake everything by hand. Hope that's good enough. Gonna be real sunny. Bags still had some heft to them. I'll check them later. Found a few leaves with what looks like the calcium deficiency on the sane plant and I just removed them. I really don't think it's anything to worry about. I'll update later.
UPDATE: Went back around 10 and everything looked good and was dry. Brought the leaf blower to be fixed. Should have it by the end of the day. Found and killed another pillar and some ants. Took a picture of a lady bug/beetle. This sunshine is making my buds explode!! I was thinking about checking again tonight but I think I can wait and water tomorrow. Bags are still fairly heavy. I did take another couple leaves off the plant that lopks like it might have a deficiency or something. The stalks are bigger than the bottom of a baseball bat. A couple almost like the fat end. Some 9f the best plants I've grown. I also took three short videos of a plant of each strain. Maybe if it's short it will upload quicker. Happy growing! UPDATE: I was back and forth today. I did some pruning and defoliation and then I noticed that my canary was light as hell. I waited until night and went back and had a couple starting to droop so i watered everything 2 gallons except the 10 and tub got 1. Everytime I see them it seems like they are bigger
9/3 Used the leaf blower this morning to get the dew off the buds. I shook them by hand before that. I'm noticing like a little army of lady bug larvae so any aphids I have are not going to be a problem. I have adults as well but is the babies that eat 10x what the adults do. I'm hoping they'll wipe put any bud worms. The weather is great this week all sunny. Making the buds explode in size and increasing terp production. This is the strongest smelling cannabis I've grown. Each strain. Has its own unique "funk" to it. Purple punch is really sweet and floral smelling. 10th planet is more gassy. I need to get some yellow sticky traps. I saw a couple fungus gnats on my canary. A late blooming blueberrycheese. It's the one that dries out the fastest but is more sativa leaning and drinks TONS of water. I have two that are that phenome. Losing yellow leaves but exploding with flowers. Noticed a couple more leaves with that calcium deficiency looking leaf. I just defoliated it. I'm really happy where I'm at right now.
9/4 Plants were covered in water this morning and the leaf blower wouldn't start. I shook everything off by hand. Each strain hasits own STRONG unique scent. One tenth planet phenome smells like bubble gum. I think I've got like two weeks and some of the flowers on ONE plant should be done. I'm planning to take the top half and then letting the bottom mature longer of its not whete I want it to be. The weather has been gorgeous. Sunny today. I'll need to water tonight I'm sure. UPDATE: WENT OVER AT 3PM AND PLANTS WERE DRY. WATERED EVERYTHING 2 GALLONS BIT THE 10 AND THE TUB. THEY GOT ONE. FLOWER DEVELOPMENT IS VISIBLE FROM MORNING TO NIGHT. I HAVE A TENTH PLANET THAT I BELIEVE WILL BE READY FOR HARVEST (AT LEAST THE TOPS) WITHIN A COUPLE WEEKS. PISTOLS ARE RETRACTING AND TURNING ORANGE ON THIS PHENOME AND RED ON THE OTHERS. I AM LOVING HOW THIS STRAIN LOOKS GROWING. I HAVE REAL HIGH HOPES FOR IT. I FAILED TOO MANY TIMES UPLOADING THE VIDEO AND PICTURES I TOOK SO ILL DO THAT TOMORROW. I CANT BELIEVE THE SWELKING GOING ON AND THE AROMA! THIS IS SUCH A WONDETFUL YLTIME OF YEAR. STILL FIND8NY SMALL SPOTS OF WHAT LOOKS LIKE CAL DEFICIENCY IN THAT ONE PLANT. IM STILL UNCERYAIN WHWT TO DO WITH THAT ONE.


Likes
11
Share


@420lor
Follow
Comienza la 4 semana de vegetativo y a todas se les ha aplicado una poda apical, no muestras síntoma de estrés y lo ha asimilado muy bien. Les daré 3 o 4 días y haré la primera poda de bajos antes de entrar en floración! Saludos y buenos humos

Likes
3
Share

@blaze454
Follow
Flowering nicely, starting to stack a little already.
Did a 50% defoliation and removal today. going to remove some more popcorns and climate blockers tommorow.
There are allot of tops. I have to train myself on training plants better to dial in how many cola tops i want and get them at the same height.
Not a strong smell coming off but when you smeel the fingers , Ooohhh its so smooth ans sweet.
This is looking like its going to be a big year for the tent.
I am liking the Canna nutes.
Delay after delay on dripper setup i am now puttin three more valves in for flushing off flush water reservoir, just waiting for parts and assembly.
Home Assistant is fantastic at controlling entire setup!
Lets roll with it.
Likes
37
Share


@MrGreen92
Follow
Has been a good week, back to full nutrients after running out of bloom and top max so should hopefully see alot of growth this week from my lemons and some bud fattening on my pineapple 😁
I think the pineapple has a couple weeks left til I do a flush but gonna try to resist chopping her down too early wanna get this one right 🤞
Hope everyone's having a good week ✌️

Likes
47
Share


@S2340420
Follow
This was a good grow couple of ups and downs weather wise and the moment of devastation when seeing my fattest cola had been affected by bud rot this was a solid happy nug yesterday and today well thenpics tell a tale all other buds were fine and are drying as we speak ye win some ye lose some some are just fkin annoying


Likes
1
Share


@Greenpalace_420
Follow
La 4 semana de crecimiento las niñas están estupendas con un montón de baras y ramas para tofos lados y súper
Robustas ya dentro de 1 semana y media entramos en floración señores


Likes
9
Share

@_dragon_
Follow
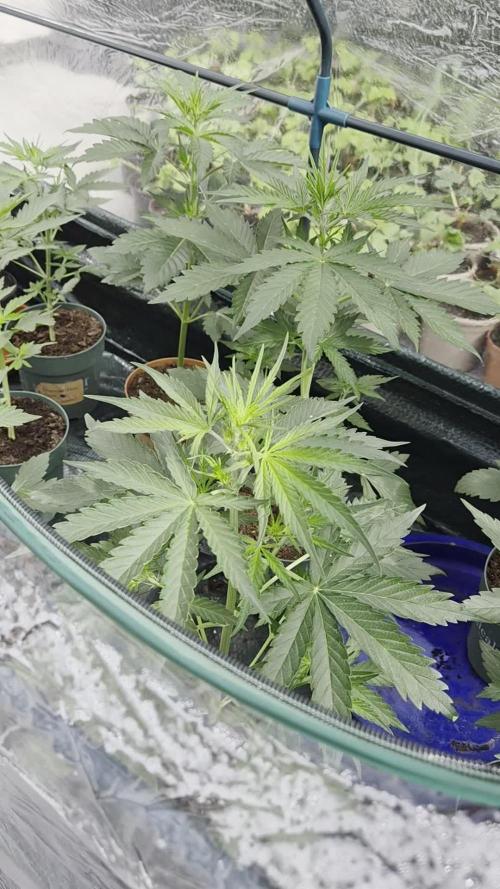
My plants started showing signs of flowering in the fourth week. They're doing well in 1-liter pots so far; I haven't encountered any problems. If the weather remains favorable, I think we'll have a beautiful start to flowering 😊
Processing
Likes
13
Share


@GangbudsGenesgdl
Follow
28/12/20. inicio de semana, 75 cm de altura hoy se aplico un nutriente foliar marca mexicana Rootz kelper son un extracto algas y azucarez y se aplico por riego giga grow. este contiene guano de murcielago
todo organico.
01/01/21. hoy se aplico un nutriente foliar marca mexicana Rootz💪 kelper son un extracto algas y azucarez y se aplico por riego giga grow. este contiene guano de murcielago
03/01/21. cierre de semana con 80 cm de altura

Likes
4
Share


@Jakep721
Follow
topped 3 from seed 1 getting ready to mainline. This is 1st grow so any input would be great. The clones from day 1 were given to me looking unhealthy. The strawnanna is coming along . I'm worried about clone 2 but I'm optimistic !!!
"Let it grow " (~);-}


Likes
48
Share


@Rangaku
Follow
This GSC is a beast of a thing that will love some more room to really spread out once the cherry colas are out . Throwing the K in now , maybe another month to go
Likes
42
Share


@rhodes68
Follow
12/28 Week 7
Wow well looking around there are a lot of plants not sure how we will reconcile space issues with so many of them recovering but glad to have the problem.
More than likely convert the veg tent but still damn
In Flower
Pussy Galore (FF7) is showing their classic stretch to the ceiling, working on it.
Octopussy(LSD) and Plenty (GC) doing very well look great really
In veg - big girl feed 24ml/g grow + occasional Kangaroots
Solitaire (CC) and Chew Mee (FF2) moving towards size to flower couple more inches needed to compete with the big girls.
Bambi (FF6) Right behind them by a few days
Dink(FF2) has now graduated to the big girls - great job #HisHope
In veg - little girl feed 10ml/g grow + kangaroots low dose
Tiffany Case - Gold Leaf
Thumper - FB FFT-8
Holly Goodhead - FB FFT-7
Mary Goodnight - ILGM Gold Leaf
Kissy Suzuki - Fast Buds Wedding Cheese Cake
Seedling - 2ml/L grow
Strawberry Pie will name on transplant should all go well
Typical Bond at the end of the first act everything looks ok but a mess
Issue is in two weeks will have 7 plants in flower another bunch can be ready in 3-4 weeks if I slow things down nuet wise.
Thing is the clones will be coming along in about 6 weeks with planned 8 plants ready for flower with prob a week or two remaining on the first three to flower.
MUHAHAHAHAHA I am happy. But I really hate fungus gnats
12/29
Chew Mee and Solitaire are in the Flowering tent made as nice with the Medicinals as I could, they were getting out of hand.
FF7 is just a stretchy girl, this was expected and did what we could with gentle bend and secure within a cage to keep things manageable.
Octopussy is a perfect lady, growing very well, no cage for her.
Plenty required a little discipline so she got a cage.
Three more plants headed this way within a week or two, FF2 FF6 Gold Leaf
12/30
Three FFT-7 clones have rooted very well.
Transplanted into solo cups to begin the contest for the coveted two F7 slots in the grow.
Other clones still no roots but its way early
12/31
Late night staff meeting on how to proceed.
Clones - ... are on their own in the small tent, will use the small tent and seedling station to bring them along but will veg in the small. Just do the best we can here should be fine.
No more clones will be taken that would only make the space issues worse.
Flowering tent... I can take two more plants but they will have to be flipped small-ish (13") and grow more vertical than wide so no topping on Dink and Bambi which will flower in this tent.
Medicinals... should have been flipped smaller I reckon, hard to get that right but they are large and healthy so keeping them smaller is easier than making them bigger. Not really higher than we wanted just not sure when the stretch will end and the stretch is always out and up. Pussy is the largest so far but Octo is catching up at least in height. Plenty doing great love how she is growing.
Solitaire and Chew Mee outstanding looking plants. Wish I had space for their clones.
Veg tent... Dink and Bambi moving toward departure in a few days
Rest of them flower here, will flip on the smallish side no real choice have to assume they will get larger than planned.
Just have to decide when, will put up the divider for the seedling area so they wont interfere with each other.
Thats it doing well


Likes
4
Share


@The_Doctor_Green
Follow
Hola a todos!!!.. en esta semana solo regue con flora booster de namaste nutrientes, la planta empieza a soltar su aroma cada vez más.
Yo pienso que le debe faltar para el corte unas 4 semanas aproximadamente.
El riego con flora booster lo hice en 5 litros (3ml x litro).
He notado que aun tiene trips asique la próxima semana volveré a realizar un riego foliar con aceite de neem.
Likes
30
Share


@TightNugs
Follow
Ordered a new board from Voost LED (VST 240w)
and it's by far the brightest grow light I have ever used and for the money a no brainer.All the best quality components from samsung and mean well ncluding more IR and UV than any standard board,with the ability to place driver 1.5 meters from board outside of the tent to reduce heat even more.
With my code TightNugs u can get this light delivered free(uk)postage applies intenational for £232.50 with 7.5%discount on Voost.com
Plants only been under the light 18 hours and the response is awesome,plant 1 now into flower plant 2 wont be long behind.
Looking forward to flowering under this light cos I know its gonna be good 😎
Happy growing people and remember
Code-Tightnugs 7.5%off orders over £200 on Voost.com

Likes
17
Share


@Bobo_Zion
Follow
This week we did some more garden maintenance, cleaning up the green house removing any weeds growing under the pallets. We also did some preventative maintenance , spraying Flying Skull's Nuke Em on the ladies.
Likes
13
Share


@DrewbieDoobieNoobie
Follow
This was the best yielder of the 4 but only by 1 gram VS the Tangie-matic Another amazing smelling strain, It is like sweet creamy berries in a candy bar this will be great as desert after a nice meal.
happy with the out come of this auto from MSNL

