
Processing
Likes
Comments
Share


@BIGBUDZ450
Follow
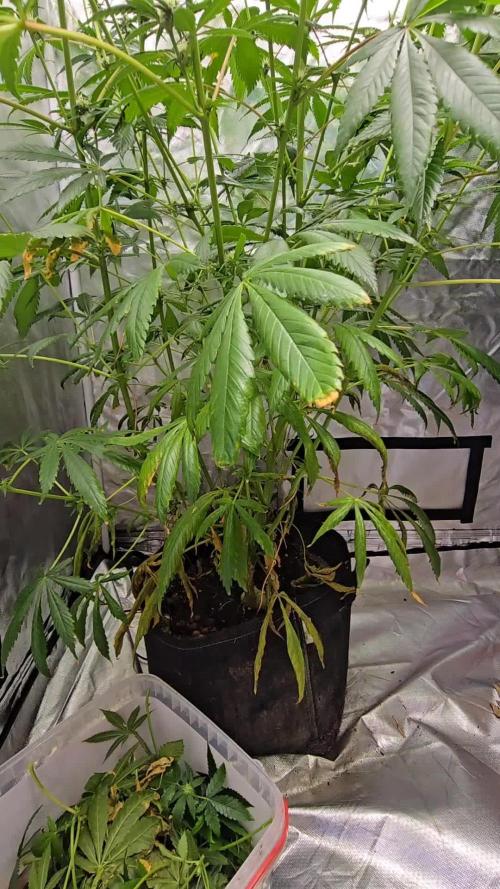
Day 57. Everything looking good, some look like their stretch is done, bud sites everywhere, fed them 1 L - 1.5 L of their solution. Using boost and terpinator.
Day 58. Fed them Full with 20% runoff. They are starting to smell really good.
Removed a lower branch on some of the plants since the light wasn't going to reach.
Removed some fan leaves on some of the plants giving room for bud sites to get some light.
Day 59. Looking real good, some still haven't stretched but have buds growing.
I'm expecting them to stretch this week. I'm always giving them something to drink and they love it! ***********
Day 60. So down to 8 plants. It sucks because one of the barney’s pinneaple chunk that hermied was a real beast with huge branches and buds,
but tips of pistils were brown so probably would of had seeds even if i would of cut the balls as they grew. I saw some pistils on another plant that turned brown,
Going to keep that one since it’s not hermie and just 2 pistils that are brown tipped. Fed them 1.5 L of solution each no runoff.
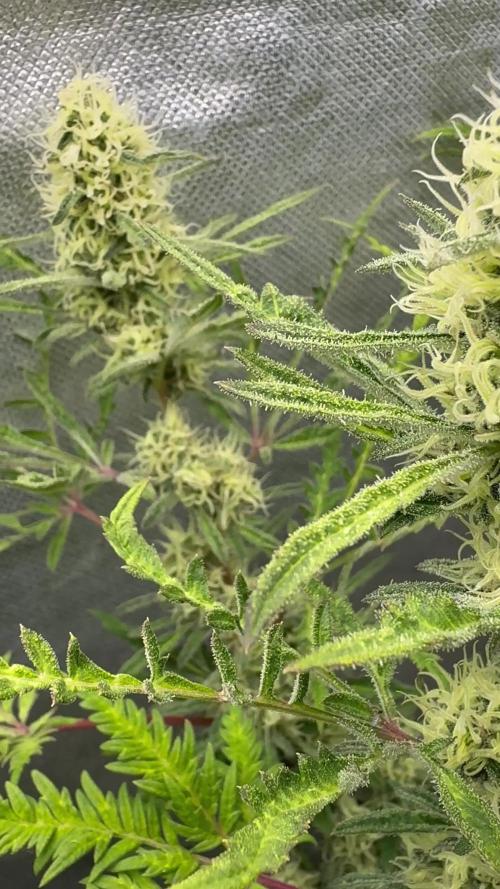
Day 61. Looking good, buds growing nicely, long white hairs so i’m expecting big colas. All of them stretched except the 2 Diesel strain.
Keeping light at 14-22inches from top of colas and humidity at 35-40%. Fed them 1 L -1.5 L solution each no runoff.
Day 62. Defoliation, removed some fan leaves covering bud sites towards the middle of the lights. I make sure to not over do it and place the plants correctly for the bud sites to get direct light. I’m having a hard time with the 2 Diesel plants, they aren’t stretching and are slow on forming buds, they gave me a hard time through whole grow. Fed them All 1.5 - 2.5 L each of their solution with little or no runoff.
Day 63. The 2 Diesel are starting to have their stretch. Everything looking good, buds are getting bigger and bigger. Making sure humidity is always under 45%. Keeping lights at 10-20inches from top of main colas. 40k-70k lux on the lights , updated with pictures.
***** Checked out plants and signs of hermies are showing, i see some male balls
Both Barneys Pinneaple Chunk are showing signs of hermies ( balls growing ), going to remove both from tent and focus on the 8 other ones. What a terrible day ( day 59 )


Likes
19
Share


Likes
Comments
Share


@growmoregas
Follow
LIMETTA MARMALADE by JOLLY POND FARM
(Cotton Candy Kush / Mimosa) x (Koffee Cake / SkyCuddle Kush F3)
Bred by @landrace_bureau
Hunted/Selected/S1 by Jolly Pond Farm
@jollypondfarm
jollypondfarmacy.com
Sativa
Flowering Time: 68-73 Days
~~~~~
1/14/2025
res were all swapped yesterday except for #3 ,
roots barely reaching through, still top watering, as soon as i see its 5 finger leafset, i'll switch to veg nutes.
VPD @ 0.9kpa ish
DLI @ 30 ~
~~~~~
1/21/25
i have noticed that the limetta marmalade are a litttle more sensitive to light at this stage than most of what i am rocking, but that could be because i've gave them a little light to begin , so i can't say for certain.
however everything is looking good.
Follow me on Instagram @growmoregaas & Twitter @growmoregas
Likes
1
Share

@Dendegrow
Follow
📚🌱 Grow Course – Lollipopping (Sweet Mandarine Skittles) 🍬🌈
With Sativa-dominant hybrids like Sweet Mandarine Skittles, you usually don’t need to lollipop too much ✂️.
These plants naturally stretch and create a nice light distribution by themselves 🚀🌞.
👉 I only remove the lower shoots that stretched upwards but still don’t receive enough light. Stretching like that is a sign they’re chasing the light – and those can safely go 🌿.
For bud sites that didn’t stretch, I focus on the very small flowers at the bottom:
⚖️ Rule of thumb → remove about 1/3 up to max 2/3 of the lowest nodes. This keeps the energy flowing into the top, more productive colas 🔥🌸.
Healthy balance = more efficient growth and stronger buds 💚.
👉 Follow along for more grow lessons & weekly updates 🚀🌍.

Likes
2
Share


@Ganjagrandaddy
Follow
Hi all
Well here we are at their stated 11 weeks flowering and I can see how ripe and ready they are looking . They all have a fairly nice trichrome build up now and I had hoped they would pistil flush again but it doesn't look likely now so i am thinking is harvest time any day now. I am now just giving them water to signal theor end coming . I am hoping the plants respond with a panic burst of thc to protect her buds. Not as substantial as I had hoped but as mentioned in previous entries , it has been a simple, lazy grow. Until the next one. Be Happy

Likes
45
Share


@Garreweedlover
Follow
Cepa muy facil de cultivar , tuve un par de problemas en el cultivo , tuve plaga y algunos otros problemas , aun asi supimos sacar adelante y cosechar plantas muy ricas y agradables al fumar .
En lo que consierne a mi gane experiencia y espero poner mas conocimientos en practica para el siguiente cultivo

Likes
1
Share


Likes
18
Share


@Grow4Releaf
Follow
Only fed the bigger plant #2 . The first is getting cloudy just waiting for her to go alil further .
Will update more this week but their getting closer.

Likes
110
Share


@Dennis_Bong
Follow
!!!!!!!!!!!!!!!!!!!!!!!!!!!!!!!!!!!!!!!!!!!!!!guckt euch letzen Report an !!!!!!!!!!!!!!!!!!!!!!!!!!!!!!!!!!!!!!!!!!!!!!!!!!!!!!
Blüte hat begonnen:
Edit:11.05
Die Pflanzen sind innerhalb von 2 Tagen explodiert. Ich habe das Licht nun auf 75 Prozent gestellt und noch einmal Cal-Mag nachgegeben, da die letzte Gabe nur eine halbe war. Die beiden Titan sehen fast identisch aus. Die beiden Epsilon sind circa 3 Tage unterschiedlich, eine ist etwa 5 cm kleiner als die andere und hat noch kaum Blüten. Ich denke, in 3 Tagen wird das der Fall sein. Die Cosmos F1 ist im Umfang circa 50-50 cm, kaum Blüten bisher. Ich hoffe, sie wird nicht noch viel größer, da der Platz langsam eng wird. Ich bin von dem Wachstum dieser Pflanze absolut begeistert. Mal gucken, was die Blüte bringt.
Edit ende
Ich habe alle Blüten entfernt, die nicht im direkten Licht sind, und alle Blätter, die die Blüten bedecken.
Die Pflanzen weisen einen Cal-Mag-Mangel auf, was bei der Blüte normal ist, gerade bei diesem Licht.
Ich habe dem Gießwasser etwas Cal-Mag hinzugefügt.
Die Pflanzen sind drei Tage älter als im letzten Report.
letzte Woche :
Die Pflanzen sind seit der Keimung auf diesen Fotos genau 30 Tage alt.
Ich habe eine Pflanze ausgetauscht, da es sich um eine Epsilon F1 handelte, die vermutlich Mutationen aufwies. Sie hatte verkümmerte Blätter, die nicht wie die ihrer Artgenossen aussahen, und wuchs deutlich langsamer. Daher habe ich sie nach 2,5 Wochen ausgetauscht. Der kleine Mann(die ausgetauschte Pflanze) leidet natürlich jetzt ein bisschen unter Lichtstress, deswegen werde ich wohl nur eine sehr gestauchte Pflanze erhalten. Aber besser, als die Fläche leer zu lassen.
So viel zu dem, was nicht funktioniert hat:
Die Sanlight stand die ersten 2 Wochen auf 20 Prozent.
Dann habe ich sie teilweise mit dem Dimmer höher gestellt: 2 Stunden auf 25 Prozent.
Eine Woche später bin ich auf 30 Prozent und 2 Stunden mit 35 Prozent gegangen.
Für Woche 4 habe ich 40 Prozent und 2 Stunden auf 45 Prozent gewählt.
Ich erhoffe mir, die Pflanzen so schneller an die starken Lampen zu gewöhnen.
Im Nächsten grow soll bei jeder Pflanze die TDS per Infrarot gemessen werden. Da werde ich dann ein Experiment zu machen, wie die Lichtsteigerung am besten umzusetzen ist.
Zu den Lampen kann ich bis jetzt nur Positives sagen. Im Gegensatz zur dazugehörigen App, diese ist wirklich nicht sehr gut umgesetzt. Das Menü und die Einstellungen sind teilweise irreführend und nicht sehr durchdacht. Ich muss mir immer wieder die Tutorials in der App ansehen, da diese immer wieder angezeigt werden.
Noch dazu hätte ich gerne die Möglichkeit, mehr Einstellungen treffen zu können. Das ist aber Meckern auf hohem Niveau, weil auch die App das macht, was sie soll, nur eben meiner Meinung nach nicht sehr gut umgesetzt.
Die Pflanzen wurden von mir mit Klipsen aus dem 3D-Drucker gestützt. Diese Klips kann man Stück für Stück im Winkel verstellen, so dass man die Triebe damit neigen kann. Das habe ich von Tag zu Tag im Winkel verstellt, so dass ich am Ende einen 45-Grad-Winkel habe. Das habe ich insgesamt über 6 Tage gemacht.
Die Pflanzen haben an sich ein sehr gleichmäßiges Wachstum. Die Cosmos F1 wächst so optimal, dass kein LST mit den Klipsen nötig ist. Ich habe an den Pflanzen keine Mängel entdecken können und auch keine Anzeichen von Mutationen.
Die Pflanzen haben im Durchschnitt eine Höhe von 35 cm, wobei eine etwas stärker abweicht mit 22 cm (wieder eine Epsilon F1). Der Umfang mit LST bei der Cosmos F1 liegt ohne LST bei 20 cm im Durchschnitt, wo wir wieder die Epsilon im Negativen haben mit 14 cm.
Die Pflanzen wurden alle entlaubt, das eine Woche vor der Blüte. Morgen werden die Pflanzen erneut entlaubt und ge-lollipoppt.
!!!!!!!!!!!!!!!zusätliche infos werden morgen ergänzt + Fotos !!!!!!!!!!!!!!!!!!!!!!!!!!!!!!!!
*1. Foto Mutation:
Dieses Foto wurde nur 5 Minuten nach dem Umtopfen der Pflanze aufgenommen. Vorher stand sie in einem größeren Topf, in dem sie genauso aussah. Ich habe sie umgetopft, weil ich den Topf brauchte, aber die Pflanze nicht wegwerfen wollte. Der Pflanze geht es gut, aber sie sieht im Moment etwas mitgenommen aus. Bilder folgen

Processing
Likes
7
Share


@SybDarret
Follow
I'm kinda late on the update, week 11 finished on sunday 4, now is feb 9th.
Last time i gave them nutrients was on sunday jan 28th, and i cut them down on feb 6th. almost a week and a half of flush.
Each plant yielded 65g of wet buds (i forgot to take wet weight photography), i will update the harvest when they are done drying and before curing.
Stay alert 😉
Likes
18
Share


@eldruida_lamota
Follow
Kio familia, que ya actualizo. Jaja
Al lío finalizamos la 3 semana de floracion, y esta genética también creció bastante se nota su tamaño xL.
Aumentamos la cantidad de comida por litro, Al ser grandes piden más.
La humedad no aumenta de 50% y la temperatura baja Algo en comparación al principio. 27 grados de media.
En la imágenes y vídeos podemos apreciar bien la evolución esta semana.

Likes
5
Share

@Ninjabuds
Follow
The biggest plant in the tent by far. Definitely gonna have to watch out for this one getting too tall too fast
Likes
23
Share


@Horseluisweed
Follow
Teniendo el sustrato preparado con antelación un par de días antes.. nos animamos a germinar, tengo una tremenda ilusión con esta pequeña, me hace muy feliz verla crecer!🌱 Ojalá todo salga bien y pueda acompañarla hasta el final en este precioso viaje 👽❤️🌱
Nos hemos marcado tres objetivos en este cultivo:
1-hacer un cultivo seguro y no ser detectados👮♂️🥇
2-conseguir una cosecha en menos de 2 meses con éxito 🏇🥈
3-gastar la mínima cantidad de recursos posible con el máximo rendimiento posible🤑🌍⚡🥉


Likes
17
Share


@FatalFarmer
Follow
December 2nd: Week 6 has started, hopefully last week of veg, defoliating, started feeding Sweet Candy, reducing humidity... more to come
Tuesday night and it's end of week 6 or day 42, they are doing well, about 16 inches tall and bushy but I feel like another week of veg wouldn't hurt, hoping to get them all around 18 inches tall before I flip
Comments and likes appreciated, stay high

Likes
17
Share


@Troy_Farms
Follow
Entering the 11th week marks the 5th week of flowering and she is looking great! I decided to make the most of two small side branches and crossbreed her with a Big Bud for an indica hybird and another branch with Durban Poison for a Sativa Hybird. 4 mainlines are looking great.
Likes
Comments
Share

@The_Wanderer
Follow
Balochistan Cannabis historical and cultural aspects of a true medical variety from the ancient world.
Likes
21
Share


@Rollex420
Follow
This week flushing the wedding cake i thought that was the problem was an excess of nutrients, but instead the water was quite clean, around 1100ppm at the first drain, after several flushes water is now on 600ppm..
It seems that the others are starting to have the same deficiency that hit wedding # 2 .. now I'm treating them with 0.5ml of cal-mag adding it to the other nutrients for once a week (except wedding # 2)
I will wait for the soil to dry out, to give her only clean water since the final harvest is not long.
⚠️ UPDATE DAY 45 ⚠️
Yesterday flush for dos si dos and today flush for (wedding cake 1) they are having a nutrient lockout too..😪 The (wedding cake 1) is clearly healthier than her sister (wedding cake 2) by looking at her color, but unfortunately she had excessive PPM / EC too.. So i did the same procedure by using only tap water, but this time added only 0,5ml of cal-mag. Water was at 6.5 ph until I got a better runoff, it went from 5.7 to 6.0 PH and from 1800 to 700-600ppm 😬 I have never thought of overdoing nutrients so much.. I will certainly learn a lot from these mistakes 🙌🏻

Likes
15
Share


@Solarcradle
Follow
Dec 26/Day 16.25 @5pm: LST begins and at 8pm 1 top leaf defoliated for light penetration.
Dec 26 @10pm: Turned bloom lights off (cobs) and left veg lights on. Lowered lighting to 12". Broke her main stalk and taped it. EEEE Giving her a short break from the heat and time to stretch while I LST her. Her humidity levels are up around 54-60% with cobs off and humidifier running.
Dec 27/Day 17 @4:20pm: Both cob and veg lights are on again and the light hangs 12" above.
Dec 27 @9:30pm: Watered her with 2.5L at a PH of 6.56, soaking the whole pot through for the first time. PH runoff was 6.71
This week, I started watering daily with 0.4L and by week end about 0.75L at PH 6.6-6.7

Processing
Likes
14
Share


@CityFarmer
Follow
Hello everyone,
As you can see the White Gold is doing good, only topped her once but she still got nice, buds are growing really close and shes stinking really good, lets see how it she goes...
See you guys next week🤘🤘👊👊👊😉😉