
Likes
Comments
Share


@Master_weeda
Follow
Bonjour à tous les padawans et les maîtres jedis
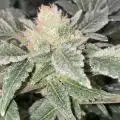
Pour cette semaine 3 au seizième jour ma plante fais 15 centimètres et son sixième noeud apparaît je décide donc de pratiquer un LST sur ma plante.
Pour ce j'utilise du fil de fer galvanisé que je plante directement dans le substrat en faisant attention de ne pas endommagé les racines car n'oublions pas que ce qui pousse dessus pousse aussi dessous.
Jour 17 je pulvérise (dessus et dessous les feuille) une solution composé d'une cuillère à café de savon noir mou dilué dans un litre d'eau en prévention d'éventuels nuisibles. Je répète l'opération une fois par semaine jusqu'à la floraison.
Je corrige mon LST suivant la pousse de ma plante ...
Pour ma par c'est la manière dont je procède mais petit rappel de la technique du LST:
Quand commencer à appliquer la technique LST
De nombreux cultivateurs commencent la manipulation dés que les plantes possèdent entre 3 et 6 nœuds ou une paire de feuilles. Durant cette première étape de la croissance, le tronc encore flexible est pliable sans risque qu’il ne se casse, même si au fur et à mesure du développement de la plante il sera de plus en plus difficile de le plier. Nous pouvons continuer à guider la croissance des branches durant toute la culture, même durant la floraison, ce qui pour cette étape représente un grand avantage face à la taille, qui n’est pas du tout recommandé une fois que la formation des têtes commence, cela stressera en effet la plante, ce qui aura pour effet de retarder la récolte.
Comment appliquer la technique de guidage LST
Si nous sommes prudents, la flexibilité naturelle des fibres du cannabis permet de plier leur tronc et branches avec une relative facilitée, même durant la floraison des plantes.
En utilisant une corde fine, nous pouvons accrocher la pointe de la plante à la base du pot par exemple ou à un tuteur que nous aurons planté dans le substrat. Nous plierons le tronc avec précaution et nous le fixerons avec la corde, à partir de là, nous pouvons augmenter progressivement la tension de la corde, chaque jour un peu plus, jusqu’à obtenir la position souhaitée. Soyez attentif à la réaction de la plante, essayez de ne pas appliquer trop de pression sur la corde et rappelez-vous que la flexibilité des branches peut varier d’une plante à l’autre.
Pour obtenir de meilleurs résultats, il suffit de suivre quelques règles simples. Pour commencer, nous devons choisir une corde fine mais pas trop pour ne pas blesser les troncs au fur et à mesure qu’ils grandissent et qu’ils deviennent plus gros.
Nous pouvons utiliser des crochets en plastique souple ou de n’importe quelle autre matière flexible pour éviter d’endommager les plantes. Spécialement en intérieur, utiliser des cordons en plastique de couleur (voir les diaries de @Silky) est très pratique pour voir facilement les accroches et faciliter le travail au milieu du réseau formés par les cordes, les tuteurs, les mailles ou les supports que nous aurons dans la culture. Bien entendu, en culture extérieure et surtout en guerilla nous ferons juste le contraire et nous utiliserons des matériaux de couleur qui n’attirent pas l’attention pour que notre jardin reste discret.
Pour stresser les plantes au minimum, la mieux est de réaliser ces manipulations le soir ou juste après que les lampes en intérieur s’éteignent, ce qui leur permettra de se remettre durant la nuit. Normalement, le jour suivant nous pourrons observer comme les pointes des branches que nous avons pliées se dressent de nouveau vers le haut à la recherche d’une source de lumière.
Que la force soit avec vous💪
Que la force soit avec vous

Likes
18
Share


Processing
Likes
25
Share


@RastaMouse
Follow
Had some problems this week with my water table ph dropped from 5.8 to 5.1 and the plants showed it. I got the ph balanced back to 5.8 and given some advanced nuts cal mag. Not sure if it’s something to do with the canna. I m new too it so don’t know but after sorting the ph and giving some calmag extra the plants seem happier and are growing fine and leaf damage has frozen were it was.
Likes
2
Share


@C_More_Budz
Follow
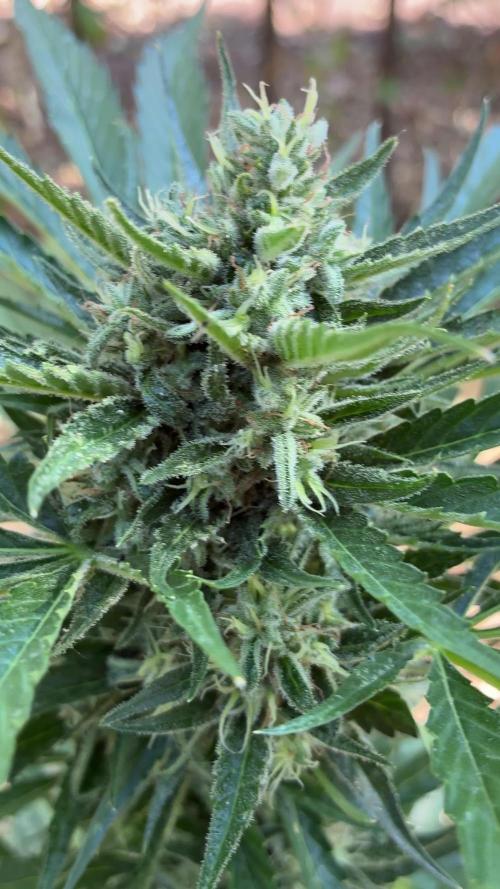
Everything is doing well and fattening up smell is getting more intense which is a good thing. Gonna let them go for another 3-4 weeks. Hopefully chopping down either Christmas Day or New Years. Enjoy the video

Likes
50
Share


@DogDoctorOfficial
Follow
Week 8 Vegetation Report – Eternity Grow Cup
Welcome back, everyone! We’re diving into another exciting update for our Eternity Grow Cup journey. This week marks week 8 of vegetation, and our girls are thriving! Let’s break it down:
Growth & Structure
All five phenos continue to impress, with strong, bushy growth and uniform structure across the board. They’re praying to the ThinGrowLED Model Ones, which have been running on channel one only, and they’re absolutely loving it. The leaf development is lush and vibrant, a sign that they’re thriving under the current conditions.
Environmental Conditions
We’re keeping things dialed in with stable environmental parameters:
Temperature: 20.7°C
Humidity: 57.2%
CO2 Levels: 1569 PPM (a bit high but manageable)
VPD: 1.05 kPa
PPFD: 355 µmol/m²/s
Each of these factors plays a crucial role in maximizing plant efficiency, and we’ll go deeper into why these values are set as they are.
Featured Grow Gear – WCS2 Substrate Sensor
This week, we’re also highlighting part of the grow gear in use—specifically, the WCS2 substrate sensor. This sensor measures:
Soil temperature
EC levels
Water moisture
It's currently placed in the Autopots, which are not yet connected. For now, we’re still top-feeding to encourage root expansion. By allowing the roots to reach the bottom of the pots before activating the Autopot system, we ensure they establish a strong foundation for optimal nutrient uptake. We’ll go deeper into this method and why it’s an essential step in the process.
The Bigger Picture
As always, this journey wouldn’t be possible without the support of some incredible people and brands. Big shoutout to:
Zamnesia, Plagron, and GrowDiaries for making this competition a reality.
Aptus Holland, TrolMaster, CannaKan, Grove Bags, and Ziggi Papers for their continued support.
The entire community—supporters, followers, lovers, and haters alike—because everyone plays a role in making this grow series truly special!
Stay Tuned & Get Involved!
Don’t forget to follow along on YouTube and Instagram for exclusive content, behind-the-scenes insights, and in-depth discussions. Like, comment, and subscribe so you don’t miss the next updates—it’s only getting better from here!
Let’s keep pushing forward, and best of luck to all the competitors—we’re all growing something incredible together. Until next time!
Genetics - Runtz https://www.zamnesia.com/6000-zamnesia-seeds-runtz-feminized.html
Nutrients - Plagron https://plagron.com/en/hobby
- Aptus Holland https://aptus-holland.com/
Controls - Trol MAster https://www.trolmaster.eu/
LED - https://www.futureofgrow.com/en
LED - https://www.thinkgrowled.com
Soil - https://www.promixgardening.com/en
Germination - Cannakan https://cannakan.com/?srsltid=AfmBOopXr-inLXajXu3QFgKXCXXos4F1oEvScjMKIB5MR5dk8-GJ-F49
DOGDOCTOR 15% off
Smoking Papers - https://ziggioriginal.com/
Terpene saver - https://grovebags.com/
As always thank you all for stopping by, for the love and for it all , this journey of mine wold just not be the same without you guys, the love and support is very much appreciloved and i fell honored with you all in my life
With true love comes happiness Always believe in your self and always do things expecting nothing and with an open heart , be a giver and the universe will give back to you in ways you could not even imagine so
As always, this is shared for educational purposes, aiming to spread understanding and appreciation for this plant. The journey with nature is one of discovery, creativity, and respect. Let’s celebrate it responsibly and continue to learn and grow together!
Growers Love To you All 💚
#EternityGrowCup #RuntzHunt #GrowersLove #CannabisCommunity #AptusHolland #ProMixSoil #TrolMaster #Zamnesia #Plagron #ZiggiPapers #Grovebags
Episode 10 week 8 veg UPDATED

Likes
12
Share

@Bunterbiber
Follow
We just pushed through another absolute beast of a week, and the first half of it was pure survival mode. The temperatures peaked at a jaw-dropping 39°C, and even the nights offered zero relief, staying at a sticky 26°C minimum. It’s been an intense endurance test for an outdoor grow!
The Daily Hydration & Feeding Strategy: 💧
To keep them from turning into crisp, dry twigs, I had to switch to a strict every-single-day watering schedule. Missing even one day in that kind of heat wave would have been catastrophic.
Amazingly, the ladies are showing incredible resilience—they haven’t displayed any noticeable signs of distress or major issues so far. Development is moving along beautifully, though I'm keeping my fingers crossed that there won't be any delayed fallout from the extreme heat stress. Nutrient-wise I'm feeding them at about 75% of the recommended dosing plan to keep them happy without overdoing it in this heat.
The Strain Breakdown: 🌿
Lemon Cherry Cookies Auto: This girl is absolutely crushing the game right now. She is already stacking up some seriously decent, chunky buds, and the aroma is getting beautifully pronounced and loud! Every breeze brings a sweet whiff of what's to come. 😉
Amnesia Haze Auto: She has turned into an absolute monster! She’s gotten incredibly big and wide, taking full advantage of her outdoor space. You can definitely see that Sativa heritage shining through—judging by her progress, she’s definitely going to take a bit longer to cross the finish line compared to the quicker, Indica-dominant ladies like the Lemon Cherry Cookies.
Bruce Banner Auto & Banana Purple Punch Auto: These are the two shorter ladies of the group, but what they lack in raw height, they make up for in sheer health. Size aside, they are doing exceptionally well, looking super vibrant, healthy, and stacking their own flowers nicely.
All in all, I’m incredibly proud of how these genetics are handling a brutal summer. Now that the worst of the heatwave seems to be behind us, I can’t wait to watch these buds really start to swell!


Likes
5
Share

@Chrisandweed
Follow
Bueno, van muuuy bien, quizás en alguna variedad me pasé con la tijera y por solo confiar en las cabezas, no voy a sacar mucha producción pero bueno, lo que salga se fuma, y lo que no, se cultiva de nuevo xD.
Las plantas tiran un oloor... Me lo tiene todo apestado! Jajaja para bien!
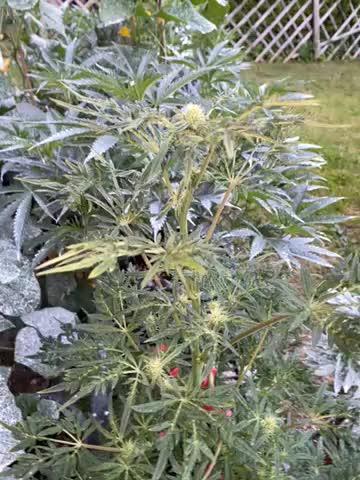
Aclaro que estas fotos son literalmente tras encenderse las luces despues de 6h de un producto de descarga total antifungico que usé en oscuridad. El producto es valido para floración, ademas que pienso que aún quedará un mes pal corte, tiempo de sobra + 2 semanas de secado + otras 2 semanas de curado (no nos engañemos, se fumará desde que esté seca xD pero la teoría es que no, que aguanto hasta que cure). El tiempo este que digo, lo menciono a modo, tiempo mas que de sobra de irse los restos. Debido al producto, que lo coloqué en el centro del armario, las ramas mas cercanas han sufrido de estres químico y han cerrado estomas, por eso estan mas marrones o caídas, incluso como si tuviesen estres hidrico. La semana que viene cuando suba las fotos, veremos los cambios :).
PD: es peluchona esta eeh? Huele muuy cítrica, literalmente a la amnesia original (o la del dispensario al menos xD) y quiza eso hace que pesen mucho sus copas, pero si que es muy resinosa, quiza de las 4 que llevo, la blue zushi le alcance, pero están ahí ahí entre las dos. Pese a esta ser cbd de momento sus propiedades organolepticas se llamas? El olor! Juega en una liga potente.


Likes
1
Share


@chapothegrower
Follow
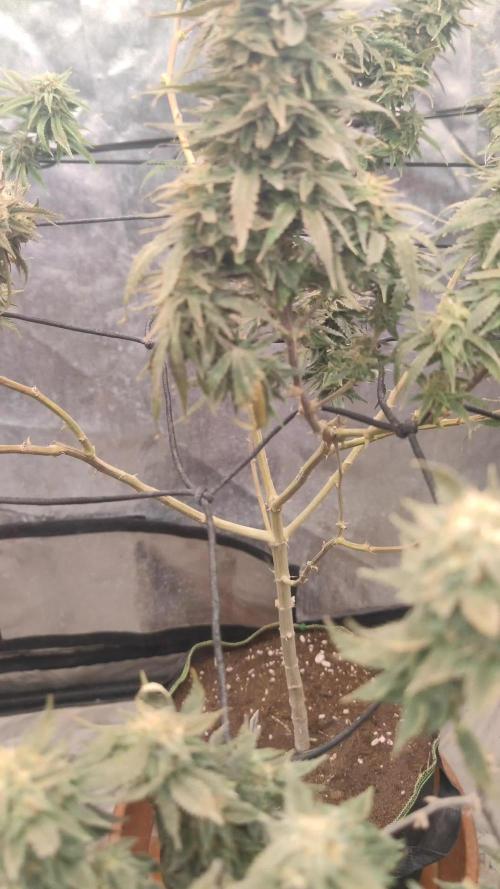
had to cut her very early because of some mold problems, but had about 50-60 grams of amazing, organic weed from this plant!
Likes
10
Share


@Dreadnug
Follow
5/14-
Buds are getting fat - some are starting to droop. The Calcium issue is resolved and feeding pH balanced water and not switching with well seems to have helped. Hopefully we can stay stead to harvest. Noticing some light burn so will have to potentially keep an eye on dialing back the lights a bit.

Processing
Likes
13
Share


@Crazy_zx10r
Follow
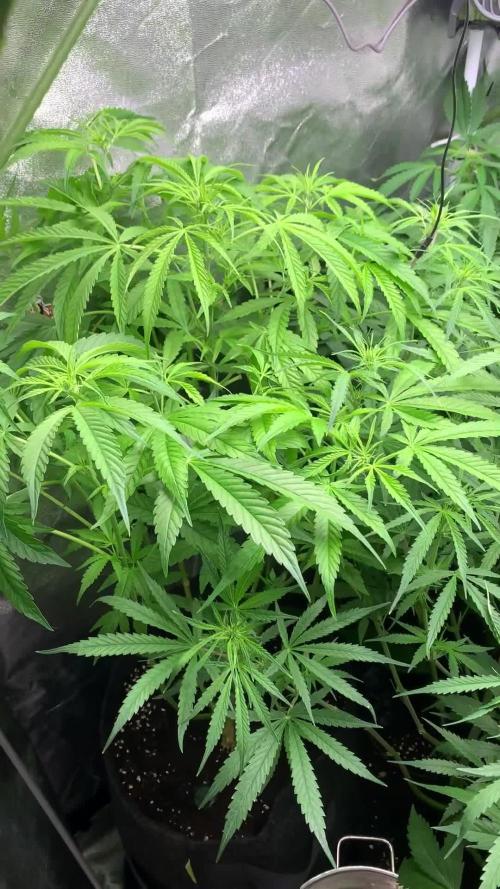
About a day into week 3 . Growing very strong and fast. Transplanted into the 5gal bags at night . Over week 3 they exploded. They wanted the room .. the 5gal bags made that happen. Amazing results with just foxfarm ocean forest soil.

Likes
20
Share

Likes
6
Share


@cwgrows
Follow
The new Apex's are growing much smoother and vigorously than her sister did!


Likes
19
Share


@GoldenWeedGrower
Follow
Legend
Timestamp: 📅
Measures: 🛠️
Water: 🌊
Actions: 💼
Thoughts: 🧠
Events: 🚀
________________________________
📅 D57/F18 - 19/10/23
🛠️ EC 1.2 (stable) pH 6.0 (rising) --> EC 1.1 pH 6.3
🌊 Added water and nutes (B52, Big Bud and Bud Candy, only little bit of Bloom A and B)
💼 Little defolation and some adjustment on the little one. As I saw some light stress symptom I changed the light schedule to 12-12 but with red lights always on.
🧠 I can't wait to see the buds of Little Marlene reaching out Big Marlene
🚀 Little Marlene is now quickly blooming. Some light burn symptoms on little Marlene
________________________________
📅 D58/F19 - 20/10/23
🛠️ EC 1.2 (stable) pH 5.7 (falling)
🌊 No water neighter nutes added
💼 Sprayed Spinosad
🧠
🚀
________________________________
📅 D59/F20 - 21/10/23
🛠️ EC 1.4 (rising) pH 5.4 (falling) --> EC 1.2 pH 5.5
🌊 Added 5L water, nutes Bloom A - B and calmag
💼
🧠
🚀Little Marlene leaves are wilting down
________________________________
📅 D60/F21 - 22/10/23
🛠️ EC 1.3 (rising) pH 5.3 (falling) --> EC 1.2 pH 5.4
🌊 Added 2L water and nutes: Calmag, Bud Candy, Big Buds
💼 Made a big defolation and sprayed Spinosad.
🧠 I really hope Spinosad will solve the situation here.
🚀
_____________________________
📅 D61/F22 - 23/10/23
🛠️ EC 1.3 (rising) pH 5.5 (stable) --> EC 1.2 pH 5.5
🌊 Added 4L water and nutes: Calmag, Rhino Skin, Bloom A, B
💼 Little defolation on the big one.
🧠 Never again two girls germinated in a such big time difference (3 weeks)
🚀
_____________________________
📅 D62/F23 - 24/10/23
🛠️ @17.00 EC 1.3 (rising) pH 5.1 (falling) @23.30 EC 1.4 (rising) pH 5.2 (stable) --> EC 1.2 pH 5.2
🌊 Added 2 L of water, calmag, big bud and B52
💼 Little defolation on the big one.
🧠
🚀
_____________________________
📅 D63/F24 - 25/10/23
🛠️ EC 1.3 (rising) pH 4.7 (falling) --> (by setup) --> EC 1.2 pH 5.5 . Check in the night EC: 1.13 (stable) pH 6.2 (rising)
🌊 RES Changed 💦💦💦 -> Added calmag, Bloom A-B, Bud Candy, Big Bud and B52
💼
🧠 Quite strange, but good, pH goes up in that way
🚀
Likes
Comments
Share


@Billy_Piff
Follow
Amazing plant to grow. By far my favorite out of the sweet seeds f1 fast line. Flower looks feels and smells like indoor. Couldn’t be happier and couldn’t recommend this enough especially to anyone growing with shorter flowering seasons.

Likes
6
Share


@masterofsmeagol
Follow
4/27 I'm fairly certain that I watered everything. If not I only would've held off on a smaller plant that was about 17 grams over dry weight. Pretty sure I did them all though. Having a scale makes watering in these cups SO much easier. Had a rough few days with a lot going on so i uavent been writing as much. Transplant will be happening soon. Most plants have or are close to having there fourth node. I'm not going to top/FIM until after transplant and they've settled in nicely. The Kush plants are getting close to needing that transplant. I'm waiting for the leaves to go beyond the edge of the cup. Despite the fact that some havecthree fingered leaves hanging on their own stem. The transplants will go into 1/2 happy frog half ocean forest. All in all things are going good. Some plants will probably be transplanted this week. Plants in this diary are different ages.
4/28 I watered what needed it by the scale. A few were close but within range so I left them alone. I'll check later in the day and water when they are within range. It sucks sometimes because I need to make that decision over just a few points sometimes. I usually do it based on plant size and response. Oh well, these girls are out of seedling stage thats for sure. Realistically this week is closer to week one of veg then the seedling emerging on day one when i started this. I just wanted to get this diary started. Then I had to get replacement seeds as some didn't germinate. These girls are looking pretty good so ill probably save the other beans i have for next year. I MAY do a lilac/diesel auto from Ethos when it gets warmer but we'll see. I am wicked excited for this season. Planning to clean and sanitize grow area and wash pots today. Everything seems to be doing amazing.
4/29 I watered a few but many weren't in range yet. I'll be there later this afternoon and check again. Boy things are going good. Planning to grab the rest of my soil this morning. Things are popping off. Transplants will be coming soon. I just want that big rootball first before they go in the 1 gals. I picked up my soil but they shorted me 3 bags of haply frog. It was like a war zone there. Construction everywhere and people hollering at each other over the mechanical racket. Only the drive through was open. I did some quick calculations to reach what I needed for soil bit after they told me to go back in because "they didn't have it." I stop and get out and it went back on my card. Apparently they were hassling my legally blind disabled wife to move the car. She offered them the opportunity to do so but they would need to deal with me after. I wasn't in anyone's way. The car behind me went around me just fine. Anyway I remembered the little local store one town over. Ten minute drive and they have a deal where if you buy 5 bags of hf you it's only SLIGHTLY more than 3. I headed out that way but had to come home due to an emergency. They've got a bunch and they aren't in the city. I'll make it over there this afternoon or in the morning and pick up the rest of my happy frog. No roots organic 707 this year. It's the same price as ocean forest and I really like ocean forest. Lots see how they do with just happy frog and ocean.
4/30 Watered the front row of the aerogarden. Others seemed to be within range. Pretty sure I watered everything under the L.E.D. Things are moving forward. I've got a lot of work to do. I'm going to pick up my remaining soil. I need to clean and sterilize grow bags and the 1 gallon pots and I need to clean and sanitize the grow cage itself and do any little repairs that may need it. So far I'm pretty happy. I don't want to make a mistake and transplant to early. I think we may have an early season this year. It's been nice the past few days.
5/1 It's been hot the past few days. It's looking like we are going to have an early season which is totally OK with me. I WATERED TODAY. I think I did the entire aero garden. I watered the majority under the l.e.d as well. I think when it gets that close (weight wise) it doesn't REALLY matter whether they get that shot glass or not. As long as the weight is like 217 or something. Some plants have leaves going over the sides of the cup. I transplanted to early last time with seeds. Not REALLY to early but they could've stayed in the cups longer. And they take up less space that way but within a week I bet these girls will be transplanted and spending some time outside. I'm looking forward to it.
5/2 Plants are looking great. Watered everything I think. Some weights were high (e.g. 216) but I watered them anyway. I'm starting to be able to squeeze the cups and feel the roots. After I run these few errands and bring wife to the soctors I'll get the rest of my soil and I'll clean my 1 gal pots. The past few days they could've gotten some sunlight. It's been really nice out. Raining today.
EDIT: PICKED UP THE REST OF THE SOIL FOR THE SEASON. PLANTS ARE DOING GOOD. SINCE THE FIRST BATCH WAS A LITTLE STUNTED SOME OF THE OTHERS ARE IN SIMILAR STAGES. I "COULD" TRANSPLANT NOW BUT ITS EASIER DEALING WITH THEM IN THE SOLOS. AS SOON AS I TRANSPLANT THEY'LL JUMP IN SIZE. I'LL NEED TO PUT AT LEAST ONE HPS LIGHT UP AS WELL. HOWEVER, IT'S BEEN NICE ENOUGH HERE THAT THEY'LL BE ABLE TO SPEND TIME OUTSIDE DURING PART OF MOST DAYS. LAST TIME I DID SEEDS I WENT WITH 3 GALLONS BUT IM GOING INTO 1'S THIS YEAR WITH FINAL GROW BAGS RANGING FROM 20G-50G. I USIALLY USE A MIX OF FFOF, FFHF, AND ROOTS ORGANIC 707 IN EQUAL PARTS. THIS YEAR I'M USING ONLY THE FOX FARM SOILS. IVE DONE THIS BEFORE WITH GOOD RESULTS.
5/3 WATERED EVERYTHING BUT ONE TENTH PLANET AND THE ONE BEHIND IT WHICH I BELIEVE IS CHEM DOG #4. I'M FAIRLY CERTAIN I WATERED EVERYTHING UNDER THE L.E.D. These girls are ready for a new home. There's a couple that I Gould hold off on but some are at the point where they NEED A transplant. IT would be much easier to light and carry around in these cups but I want to veg indoors and on nice days bring them outside to harden off. There's only a COUPLE slow starters that could wait but only a couple. I have this year's soil. Just need to wash the pots and mis the soil and transplant. Today is busy but tomorrow is open so I'll be playing it by ear.

Likes
17
Share


@Hawkbo
Follow
This is doing good just swelling up. Its gunna have some fat buds it looks like. Some of these never fully recovered from being stunted from the cold. I added some microbe life photosynthesis plus to the mix.

Likes
8
Share


@Bryankush
Follow
Giorno 1 molto bene le ragazze sono in ottima forma e questa sarà l'ultima settimana di veg
Giorno 2 oggi ho fatto HST anche su di lei ma senza spezzare il ramo stavolta😄
Giorno 4 annaffiata con 2L di acqua
Giorno 6 lollipopping di una coppia di nodo soltanto per ogni ramo, da oggi 12/12
Processing
Likes
3
Share


@Fintastic
Follow
Hi all,
My second week posting on here.
Just to confirm that the plants are in London, in a basement. 38 plants in a room approximately 4 meters my 3 meter.
It’s been a busy one! Lots of jobs done, tho not sure if I’m getting things right... if you’d like to comment please feel welcome to make suggestions, or call me and my ideas stupid lol
SATURDAY
At the start of the week I started pruning the plants. I removed all buds, leafs and non-main branches from the bottom 20% of the plants.
MONDAY
After giving the plants a couple of days to recover and so I was sure my pruning didn’t have a negative affect I started removing small buds and all of the older fan leafs from the rest of the plants
I started a different watering routine today after learning that the humidity was too high. It was between 65-85. Cropping a lot of the leafs off the plants helped, so did installing fans to suck air in from outside. Also I stopped leaving buckets of water in the grow rooms.
Yesterday I did not water the plants at all. So this morning they were all very dry, but looks good too. Today they had a lot to drink.
Added more circulation fans too.
Anyway, managed to get the humidity to 40 when lights on, and up to 60 when off. Still working on bring it down to below 50 at night.
WEDNESDAY
Finished pruning today. With half the plants I took off 65% of the leafs, stems and buds, leaving only the bigger bud areas and sugar leafs, plus a few fan leafs.